Come leggere i diagrammi all'uncinetto

Un diagramma all'uncinetto è formato da simboli, 1 simbolo = 1 maglia (o un gruppo di maglie) - la legenda spiega che tipo di punto sia/come viene lavorato. Il diagramma mostra tutte le maglie viste dal diritto del lavoro (se non diversamente indicato).

Un tipico diagramma all'uncinetto appare in questo modo:

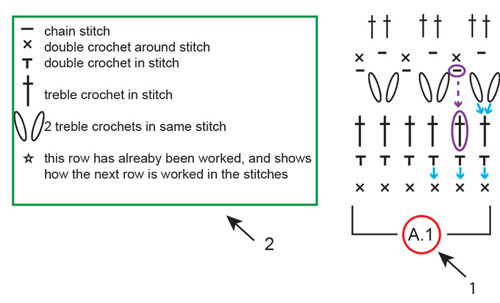
1: 1. A.1 è il nome del diagramma e fa riferimento a tutto il diagramma - all'interno delle parentesi quadrate. Tutto quello che è all'interno delle parentesi quadrate forma 1 ripetizione del diagramma.
2: 2. Questa è la legenda, che spiega come lavorare ogni simbolo.
Frecce blu: il simbolo è lavorato nella maglia o attorno alla maglia direttamente sotto nel diagramma. A volte vengono lavorate maglie multiple nella/attorno alla stessa maglia.
Gli ovali e le frecce viola: Non sempre si lavora in tutte le maglie, ad esempio: a volte su lavora una catenella e si salta la maglia sotto.

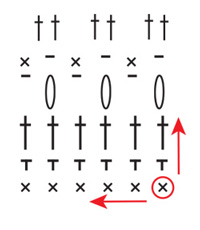
Il diagramma all'uncinetto si legge nel modo opposto al solito metodo di lettura: da destra verso sinistra, dal basso verso l'alto. In altre parole: si inizia con il simbolo nell'angolo in basso a destra, e si lavora verso sinistra e verso l'alto (vedere ROSSO nel diagramma sotto).

Se si devono lavorare diverse ripetizioni del diagramma (cioè: se si deve ripetere molte volte sul ferro/giro), lavorare fino alla fine del ferro del diagramma e iniziare ancora con il 1° simbolo sulla riga.

Avanti e indietro:

Quando si lavora avanti e indietro a ferri alterni si lavora da destra verso sinistra e a ferri alterni si lavora dal rovescio del lavoro. Quando si lavora dal rovescio del lavoro il diagramma deve essere letto nel modo opposto: da sinistra a destra (vedere la freccia rossa dal diritto del lavoro, e la freccia blu dal rovescio del lavoro sotto).

La riga solitamente inizia con un determinato numero di catenelle - il numero corrisponde all'altezza della maglia seguente e sono comprese, per assicurarvi di iniziare dalla cima della maglia seguente (vedere il cerchio verde sotto). Se le catenelle sono incluse nel diagramma (come in questo esempio) lavorare tutte le maglie esattamente come appaiono. A volte il motivo include le INFORMAZIONI PER IL LAVORO all'inizio delle istruzioni, che spiegano quante maglie lavorare all'inizio di ogni riga, e se queste maglie sostituiscono la 1° maglia sulla riga (o sono in aggiunta). Se le catenelle NON sono comprese nel diagramma: seguire le istruzioni sotto il paragrafo INFORMAZIONI PER IL LAVORO.

In tondo:

Durante la lavorazione in tondo, si lavorano tutti i giri dal diritto del lavoro: da destra a sinistra (vedere la freccia rossa sotto). L’inizio e la fine del giro sono spesso spiegati in un diagramma a parte (vedere A.2 sotto – quadrato verde). Allo stesso modo del lavoro in piano, il giro inizia con un numero fisso di catenelle, corrispondente all’altezza della maglia seguente. Alla fine del giro solitamente si unisce l’inizio e la fine del giro con una maglia bassissima nell’ultima delle catenelle all’inizio (vedere il quadrato blu sotto). In alter parole: le catenelle in A.2 = inizio del giro, mentre la maglia bassissima in A.2 = fine del giro.

Se dovete lavorare diverse ripetizioni del diagramma (A.1) (cioè il diagramma è ripetuto diverse volte sul giro) si lavora fino all’ultima maglia, e poi si inizia ancora con la 1° maglia della stessa riga di A.1. NOTA: in questo esempio SOLO A.1 viene ripetuto, A.2 mostra come si lavora l’inizio e la fine del giro.

Diversi diagrammi lavorati in modo consecutivo sulla riga/giro:

Se si lavorano tanti diagrammi uno dopo l’altro sulla stessa/giro, lavorare come segue: lavorare la 1° riga del diagramma 1, continuare con la 1° riga del diagramma 2, poi la 1° riga del diagramma 3 etc. NOTA: Se si lavora avanti e indietro, i diagrammi verranno lavorati nell’ordine opposto sul rovescio del lavoro - cioè: iniziare con il diagramma 3, poi il diagramma 2 e infine il diagramma 1. Si lavorano anche nel modo opposto, come sempre.

Diagrammi circolari:

Quando si lavora in tondo, si inizia al centro e si lavora verso l’esterno, e spesso è disegnato in un diagramma circolare. Il diagramma può anche illustrare il cerchio intero - in questo caso ogni simbolo è lavorato esattamente come appare, o il diagramma può illustrare una parte del cerchio che poi è ripetuto un certo numero di volte per formare il cerchio intero.

Cerchio intero:

In un diagramma a cerchio intero si inizia con il simbolo al centro del cerchio: solitamente un cerchio piccolo che rappresenta un determinato numero di catenelle, unito ad anello con una maglia bassissima (vedere il cerchio rosso sotto). Come per la lavorazione in tondo, il giro inizia con un determinato numero di catenelle (corrispondente all’altezza del simbolo successivo) e finisce con una maglia bassissima nell’ultima di queste catenelle - cioè: equivalenti ad A.2 nel nostro esempio precedente (vedere il quadrato blu) - NOTA: quando vengono illustrate le catenelle nel diagramma, queste NON sostituiscono nessuno degli altri simboli e ogni simbolo è lavorato esattamente come appare. Se le catenelle SOSTITUISCONO qualche maglia, vengono eliminate dal diagramma.

Si lavora in senso anti-orario: da destra a sinistra, 1 simbolo dopo l’altro (vedere la freccia rossa sotto). Le maglie del primo giro solitamente sono lavorate ATTORNO all’anello di catenelle, il che significa che l’uncinetto si inserisce NEL centro dell’anello di catenelle, si prende il filo e di fa ripassare nell’anello (lavorare la maglia come sempre) – Non si lavora la maglia IN una delle catenelle, ma ATTORNO all’anello di catenelle. Alla fine del giro, unire l’inizio e la fine con una maglia bassissima, e iniziare con il secondo giro del diagramma: il secondo più vicino al centro (vedere la freccia verde).

Parte di un cerchio:

Se il diagramma è solo una parte del cerchio, questa parte viene ripetuta un determinato numero di volte sul giro, per fare il cerchio intero. Si inizia con il simbolo in basso (vedere il cerchio rosso) e lavorare nello stesso modo del CERCHI INTERO, ma A.2 sarà ripetuto un determinato numero di volte in tondo. Come per la lavorazione in tondo solitamente c’è un diagramma a parte che mostra l’inizio e la fine del giro (vedere A.1, quadrato blu sotto). Si inizia con la riga del diagramma più vicina all’anello di catenelle in basso, lavorare la/e catenella/e in A.1, poi lavorare il/i simbolo/i in A.2 (nel 1° giro c’è solo 1 simbolo) e ripetere il/i simbolo/i in A.2 il n° di volte indicato nel motivo.

Alla fine del giro unire in tondo con 1 maglia bassissima in A.1. Alla fine del 1° giro, continuare con il giro successivo: il 2° più vicino all’anello di catenelle (vedere la freccia verde sotto).

Quadrati dei diagrammi / Colori dei diagrammi:

Alcuni diagrammi vengono illustrati in un quadrato, in cui 1 quadrato = 1 maglia. Il tipo di maglia che dev’essere lavorato verrà spiegato nella legenda, mentre lo scopo dei diagrammi è quello di mostrare il colore con cui lavorare le maglie (vedere il cerchio rosso sotto = legenda).

Si lavora come spiegato sopra, a seconda se il lavoro è IN PIANO, IN TONDO o con un DIAGRAMMA CIRCOLARE.

Commenti (140)

Joke Sonneveldt wrote:

Ik ben met het haakpatroon bezig maar er zijn 3 maten en het patroon staat alleen voor maat s dat zijn 51 stokjes en ik ben met 'm bezig en heb 68 stokjes hoe verander ik dat in het patroon? Mvg joke

18.06.2023 - 12:38:

DROPS Design answered:

Dag Joke,

Zou je zo vriendelijk willen zijn om je vraag bij het betreffende patroon te plaatsen, dan kunnen we je hopelijk beter helpen.

06.07.2023 - 21:27:

Marie D wrote:

Bonjour existe-t-il des tableaux avec les traductions du nom des mailles ( anglais -français) car j'utilise des traducteurs en ligne mais ce n'est pas toujours fiable. merci beaucoup

15.06.2023 - 11:31:

DROPS Design answered:

Bonjour Marie D, retrouvez notre lexique ici - notez bien que la terminologie anglaise UK et US sont différentes. Bon tricot!

15.06.2023 - 15:33:

Patricia H Ledain wrote:

Do you do regular patterns I can never figure out charts To me they are very confusing, Thank you You have very pretty patterns

30.05.2023 - 16:15:

DROPS Design answered:

Dear Mrs Ledain, we do have some patterns with diagrams and some other patterns with written pattern - and to help you with diagrams, you can read this lesson and look at our videos where we show how to work some diagrams. Happy crocheting!

31.05.2023 - 16:38:

Astrid Smit wrote:

Wat betekent “haak een stokje in elk van de volgende 3-0-0-0-0-3 lossen”?

19.05.2023 - 22:42:

DROPS Design answered:

Dag Astrid,

De reeks getallen slaat op de verschillende maten, dus het eerste getal geldt voor maat S, het tweede getal voor maat M, enzovoorts. Als je bijvoorbeeld maat S breit dan brei je in de volgende 3 lossen elk 1 stokje. Als je bijvoorbeeld maat M breit hoef je niks te doen.

29.05.2023 - 16:03:

Bernadette Richard wrote:

Drop 239-28 Je ne comprends pas A3 et A5 puisqu'il n'y a pas de mailles en l'air avant. Ou s'accroche les 3 brides du haut? Merci. Bernadette

28.04.2023 - 17:58:

DROPS Design answered:

cf réponse précédente, sauf si je n'ai pas compris de quelles "brides du haut" vous parliez, auquel cas, n'hésitez surtout pas à nous préciser de quelles brides vous parliez, merci d'avance pour votre compréhension.

02.05.2023 - 10:19:

Bernadette Richard wrote:

Drop 239-28 Je ne comprends pas A3 et A5 puisqu'il n'y a pas de mailles en l'air avant. Ou s'accroche les 3 brides du haut? Merci. Bernadette

28.04.2023 - 17:57:

DROPS Design answered:

Bonjour Mme Richard, lorsque l'on crochète A.2-A.6, on commence le rang sur l'endroit par A.2 (par 3 ml au début du rang), on crochète ensuite A.3/A.5 (3 brides dans la bride indiquée par A.3 et A.5/ ou entre les groupes de brides au 2ème rang) et on termine le rang par A.6 (pas besoin de 3 ml à la fin du rang), on tourne on commence le rang par A.6 (par 3 ml) et on termine par A.2 et 3 ml, 1 mc dans la 3èm ml du début du rang précédent. Bon crochet!

02.05.2023 - 10:18:

Birgit wrote:

Behöver hjälp med diagrammet/mönstret till Let’s Safari drops 127-45. Kan inte hitta hålmönstret bland instruktionsvideorna.

25.04.2023 - 14:57:

DROPS Design answered:

Hej Birgit, skriv direkte i mønsteret, hvilken størrelse og hvad du vil have hjælp med, så svarer vi så hurtigt som muligt :)

25.04.2023 - 15:04:

Annette wrote:

Hallo, ich versuche mich an der Granny Häkeltasche Drops 175-17. Ich hab den Luftmaschen Ring und die 11 Stäubchen. Jetzt kommt keine Luftmasche für nach oben für die nächste Runde sondern 12 Luftmaschen jeweils oben zwischen 2 Stäbchen? Oder hätte die jeweils eingezeichnete Luftmasche zwischen die 11 Stäbchen gehört? Gerne höre ich von euch

15.04.2023 - 11:48:

DROPS Design answered:

Liebe Annette, am Anfang der 1. Runde häkelt man 2 Luftmaschen (ersetzen das 1. Halbstäbchen) dann häkeln Sie *1 Luftmasche, 1 Halbstäbchen* 11 Mal insgesamt in der Luftmaschen Ring, am Ende der Runde häkeln Sie 1 Luftmasche, 1 Kettmasche in die 2. Luftmasche vom Anfang der Runde - In diesem Video zeigt man, wie das Quadrat gehäkelt wird, es kann Ihnen sicher weiterhelfen. Viel Spaß beim häkeln!

17.04.2023 - 16:08:

Lene Holse Andersen wrote:

Hej igen Det er blusen Blue Annabelle jeg vil lave i største størrelse - jeg kan slet ikke diagrammer - så kan jeg måske få en opskrift med forklaring og ikke diagrammer ? Mange hilsner Lene

14.04.2023 - 11:35:

Lene Holse Andersen wrote:

Hej Jeg har hæklet rigtig meget i mange år - men nu er det første gang jeg skal hækle efter diagram . Mit spørgsmål er - hvorfor diagrammer og ikke bare efter almindelig opskrift? Jeg er gået i gang med at hækle Blue Annabelle - og jeg forstår slet ikke diagrammet . Det er helt sort for mig - også slev om at jeg har læst vejledingen flere gange. Kan i hjælpe mig til at forstå ? På forhånd tak! Mange hilsner Lene

12.04.2023 - 14:23:

DROPS Design answered:

Hei Lene Vi prøver å tilfredstille alle våre kunder, noen ønsker kun tekst forklaring og andre kun diagrammer. Så vi har variasjon i våre oppskrifter. Hekler du Blue Annabelle jakken eller genseren? Hvilken str? Og hvor er det du stopper opp i oppskriften? Om du er litt mer presis hva du har problemer med, så skal vi hjelpe deg så godt vi kan. mvh DROPS Design

14.04.2023 - 08:47:

Nadege wrote:

Bonjour, Merci pour l'explication. Je me demandais si on pouvait dessiner un animal à plat sur une feuille, puis transformer ce dessin en diagramme ? J'essaie de reproduire un petit chien que j'ai, mais je ne trouve aucun tuto correspondant à la forme du chien :(

24.02.2023 - 23:43:

DROPS Design answered:

Bonjour Nadège, désolée pour le retard de la réponse. On peut fort probablement faire ce genre de choses, demandez conseil à votre magasin (même par mail) ou bien sur notre groupe DROPS Workshop. Bon crochet!

08.03.2023 - 13:13:

Juliana Northrop wrote:

I am trying to work the shawl in DROPS 214-7 , but I am stuck on diagram A.3 . The pattern says "Work A.2, A.3 (= 4 times in width), A.4 over the tip, ..." What does "= 4 times in width" mean? Am I supposed to work diagram A.3 4 times? If I did, that would only give me twelve stitches. I need sixteen stitches to get to the tip where I work diagram A.4. What should I do? Please help!

23.02.2023 - 14:29:

DROPS Design answered:

Dear Mrs Northrop, this means you have to repeat the 3 sts in A.3 a total of 4 times = work A.3 over the next 12 stitches. Diagrams should be worked from bottom up, ie start first row with row after the one with a star (reading bottom up). Happy crocheting!

23.02.2023 - 15:25:

Jeanet wrote:

Jeg er ved at hækle det sjal der hedder “Alberte autumn” Jeg er nu ved første udtagning på diagram A.5b. Jeg kan ikke forstå hvordan jeg tager 48 masker ud ved at hækle 1 fm ekstra på hver side af de 12 markeringer, - det bliver da kun 24, - eller ?

16.02.2023 - 11:42:

DROPS Design answered:

Hei Jeanet. Regner med at du mener “Alberta autumn” som du finner i DROPS 197-30 og ikke “Alberte autumn” som du skriver. Ved PIL 1 står det at du skal øke 2 fastmasker på HVER side av merketrådene. Du har 12 merketråder og ved å øke 2 masker på hver side blir det 4 økte masker ved hver merketråd = 4 x 12 = 48 økte masker. mvh DROPS Design

27.02.2023 - 07:18:

Jane wrote:

I am doing the French Market basket . Have finished body of the pattern. Now up to the section prior to straps. No idea how to read patter n A3 4 5 rows back and forth … I.e working 7 stitches of A4 the do A5 …., I am regretting taking this on …

07.02.2023 - 09:52:

DROPS Design answered:

Dear Jane, I feel so sorry I cannot find the pattern you are working on, would you please give us the pattern number? Thanks in advance for your comprehension.

07.02.2023 - 10:54:

Pierrette Ribeiro wrote:

Ich verstehe das Diagramm A1 vom So Charmung Taufkleid nicht. Was bedeuten die Zeichen II? Sie sind nicht im Diagramm erkärt, und was ist mit diesen Bögen? Mfg

30.01.2023 - 16:41:

DROPS Design answered:

Liebe Frau Ribeiro, welche Zeichnung meinen Sie? solche || finde ich in den Diagrammen nicht - können Sie uns bitte mehr sagen? Welche Bögen meinen Sie? Die bei der 2. Reihe A.1 z.B.. so ist jedes - eine Luftmasche. = 3 Lm am Anfang A.1B, 5 Lm zwischen jeder fM und 2 Lm am Ende A.1B - siehe auch dieses Video. Viel Spaß beim häkeln!

30.01.2023 - 16:48:

A H wrote:

Are the chart keys and symbols for US or UK terminology? \r\nFor example the double crochet and treble symbols in your \"how-to\" section do not look like the double crochet and treble symbols I am used to. \r\nAnd does your answer hold true for all your crochet patterns?

30.01.2023 - 02:02:

DROPS Design answered:

Dear A H, all our crochet patterns are both available with UK and with US crochet terminology, just make sure to choose the appropriage terminology by clicking on the scroll down menu below the photo and choose either English UK or English US. Happy crocheting!

30.01.2023 - 10:03:

Erica Black wrote:

Thanks for this explanation! I'm new to this whole crochet thing and the charts baffled me. Just finished a skirt for my daughter and I can't wait to try another one!

27.01.2023 - 14:07:

Phenixx wrote:

For the life of me I can\'t figure out the diagrams for shawl pattern 226-47\r\nOh well, maybe one day ... \r\n.

26.01.2023 - 22:27:

Erika wrote:

Habe angefangen den Rose Shawl Design Nr. 229-14 zu häkeln. Das Muster ( 8 Reihen )ist einmal in der Höhe gearbeitet. Wie muss ich jetzt ab (Wiederholung) Reihe 3 - Muster A.2, A.3 und A. 4 erweitern um in die Breite zu kommen? Was heißt A3 insgesamt 3x mehr in der Breite arbeiten??

24.01.2023 - 17:09:

DROPS Design answered:

Liebe Erika, jetzt häkeln Sie genauso wie zuvor mit A.2 am Anfang der Hinreihen, dann wiederholen Sie A.3 bis die 2 letzten Stäbchen (= über die nächsten 32 Maschen = 4 Rapporter A.3 je 8 M), dann häkeln Sie A.4. Und so wird es immer in der Höhe wiederholt mit jeweils mehr Rapporter A.3 zwischen A.2 und A.4. Viel Spaß beim häkeln!

25.01.2023 - 12:26:

Jane Coombes wrote:

I am trying to crochet the Drops belle bobble bag, which I love, but it's the most confusing pattern I have ever seen! Why can't you just explain in words? It seems many of your customers have the same problem. I have purchased your wool & am now very disappointed & will look for another pattern :-(

12.01.2023 - 22:33:

Lasciare un commento o una domanda inerente a questa lezione

Il tuo indirizzo mail non verrà pubblicato. I campi richiesti sono indicati da *.