DROPS Children 49 · Lots of new kid designs!

How to read crochet diagrams

A crochet diagram consists of symbols, 1 symbol = 1 stitch (or a group of stitches) - the symbol definition explains what kind of stitch it is/how it is worked. The diagram shows all stitches seen from the right side (unless otherwise specified).

A typical crochet diagram looks like this:
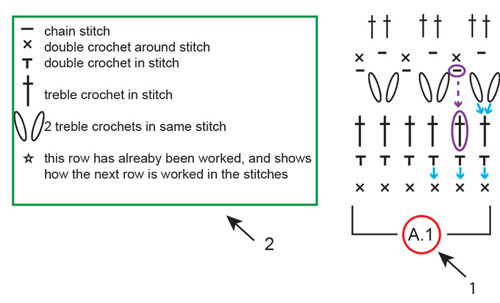
1: 1. A.1 is the name of the diagram and refers to the entire diagram - inside the square brackets. Everything inside the square brackets is 1 repeat of the diagram.
2: 2. This is the symbol definition, which explains how each symbol is worked.
Blue arrows: The symbol is worked in or around the stitch directly below itself in the diagram. Sometimes multiple stitches are worked in/around the same stitch.
Purple ovals and arrows: Not all stitches are worked in, for example: sometimes you work a chain stitch and the stitch below is skipped.

A crochet diagram is read opposite to how you would normally read: from right to left, from bottom to top. In other words: you start with the symbol in the bottom right corner, and work your way leftwards and upwards (see RED in diagram below).

If you are supposed to work several repeats of a diagram (ie: if it is to be repeated several times on the row/round), work until the end of the row of the diagram and begin again with the first symbol on the row.
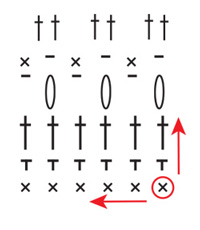
Back and forth:

When you’re working back and forth every other row is worked from the right side and every other row is worked from the wrong side. When working from the wrong side the diagram has to be read the opposite way: from left to right (see red arrow from right side, and blue arrow from wrong side below).

The row typically starts with a given number of chain stitches - the number equals the height of the following stitch, and are included to ensure you are starting from the top of the following stitch (see green circles below). If the chain stitches are included in the diagram (as in this example) all stitches are worked exactly as they appear. Sometimes the pattern includes CROCHET INFORMATION at the top of the instructions, which tells you how many chain stitches to work at the beginning of every row, and whether these chain stitches are replacing the first stitch on row (or in addition). If the chain stitches are NOT included in the diagram: follow instructions under CROCHET INFORMATION.

In the round:

When working in the round, all rounds are worked from the right side: from right to left (see red arrows below). How the round begins and ends are often displayed in a diagram of its own (see A.2 below - green square). Similar to when working back and forth, the round starts with a given number of chain stitches, equal to the height of the following stitch. At the end of the round you typically join the beginning and end of the round with a slip stitch in the last of the chain stitches at the beginning (see blue square below). In other words: the chain stitches in A.2 = the beginning of the round, while the slip stitch in A.2 = the end of the round.

If you are supposed to work several repeats of the diagram (A.1) (ie, it is repeated several times on the round) you work until the last stitch, and then begin again with the first stitch on the same row in A.1. NOTE: in this example it is ONLY A.1 that is repeated, A.2 shows how the beginning and end of the entire round is worked.

Several different diagrams worked consecutively on the row/round:

If you’re working several different diagrams after each other on the same row/round, work as follows: Work 1st row in diagram 1, continue with 1st row in diagram 2, then 1st row in diagram 3 etc. REMEMBER: if you’re working back and forth, the diagrams will have to be worked in the opposite order from the wrong side - ie: start with diagram 3, then diagram 2 and lastly diagram 1. They are also worked the opposite way, as usual.

Circular diagrams:

When working in a circle, ie you start in the middle and work your way outwards, this will often be displayed in a circular diagram. The diagram can either display the entire circle - in this case every symbol is worked exactly as it appears, or the diagram can display a fraction of a circle which is then repeated a given number of times to make a full circle.

Full circle:

In a full circle diagram you begin with the symbol in the middle of the circle: typically a small circle representing a given number of chain stitches, made into a ring with a slip stitch (see red circle below). Similar to when working in the round, the round begins with a given number of chain stitches (equal to the height of the next symbol) and ends with a slip stitch in the last of these chain stitches - ie: equivalent to A.2 in our previous example (see blue square) - NOTE: when the chain stitches are displayed in the diagram these do NOT replace any of the other symbols, and every symbol is worked exactly as they appear. If the chain stitches ARE replacing any stitch, this will have been removed from the diagram.

You work counter-clockwise: from right to left, 1 symbol after the other (see red arrow below). The stitches on the first round are typically worked AROUND the chain stitch ring, meaning you put the crochet hook THROUGH the middle of the chain stitch ring, pick up the strand and pull it back through the ring (working the stitch as usual) - You are not working the stitch IN any of the chain stitches, but rather AROUND the chain stitch ring. At the end of the round, join the beginning and end with a slip stitch, and start with the second round in the diagram: the second closest to the middle (se green arrow).

Fraction of a circle:

If the diagram is only a fraction of a circle, this is because the fraction is repeated a given number of times in the round, to make a full circle. You begin with the symbol at the bottom (see red circle) and work the same way as for FULL CIRCLE, but A.2 will be repeated a given number of times in the round. Similar to when working in the round there is typically a separate diagram illustrating how the round begins and ends (see A.1, blue square below). You begin with the diagram row closest to the chain stitch ring at the bottom, work the chain stitch(es) in A.1, then work the symbol(s) in A.2 (in the first round it is only 1 symbol) and repeat the symbol(s) in A.2 the number of times stated in the pattern.

At the end of the round you join the round with the slip stitch in A.1. When the first round is completed, continue with the next round: second closest to the chain stitch ring (see green arrow below).

Square diagrams / colour diagrams:

Some crochet diagrams are displayed in a square diagram, where 1 square = 1 stitch. What type of stitch is worked will typically be explained in the pattern instructions, while the purpose of the diagram is to display what colours the stitches are worked in (see red circle below = symbol definition).

You work as explained above, depending on whether you work BACK AND FORTH, IN THE ROUND or a CIRCULAR DIAGRAM.

Comments (148)

Country flag Karin wrote:

Is each each row of the diagram a different row ? When only two symbols are showed do i repeat thise two for the whole row? If 4 symbols are shown do i do each symbol then repeat it over and over to end of row ? When they say do A1 then A2 ............do i do the symbols of A1 for the whole row ...then the symbols of A2 for the whole of the next row ? Does 1 row of symbols represent one row ?

27.11.2021 - 08:05

DROPS Design answered:

Dear Karin, it might be a good idea to ask your question in the "question" section of the pattern you are working on, our answer could be more relevant. Thanks for your comprehension.

29.11.2021 - 09:16

Country flag Adiguzel wrote:

Thank you very much :)

21.11.2021 - 23:21

Country flag Mona Sadr wrote:

You're awesome if you had Persian language that would be great

19.11.2021 - 14:56

Country flag Cathy Coffey wrote:

What does it mean to “double crochet around chain stitch”? Does it mean to double crochet in the chain space?

27.10.2021 - 00:45

DROPS Design answered:

Dear Cathy, yes, you need to make a double crochet inside the chain space, and not the chain stitch. Happy crochetting!

31.10.2021 - 18:46

Country flag Paola wrote:

Gracias por estas explicaciones tan utiles y claras Saludos desde Santiago, Chile

17.10.2021 - 14:36

Country flag Ileana Wursten wrote:

Quiero agradecer porque me sirvio para comprender mejor el esquema. Saludos desde Paraná Entre Ríos Argentina.

15.10.2021 - 13:35

Country flag Margo Hulst wrote:

Begrijp niet hoe je 2 voor panden voor vest in de zelfde richting (beneden naar boven) kan haken.

30.08.2021 - 21:40

DROPS Design answered:

Dag Margo,

Je begint onderaan met opzetten, dan haak je heen en weer volgens het telpatroon, gaandeweg haak je dus naar boven. Bij het linker pand zit de bies (als er een bies aan zit) aan de rechter kant, bij het rechter pand zit de bies aan de linker kant. In principe zou in de beschrijving van het patroon duidelijk moeten zijn aangegeven hoe je de panden breit.

Je kan trouwens ook een vraag posten bij het betreffende patroon.

23.10.2021 - 18:15

Country flag Annette Sørensen wrote:

Jeg hækler 152-20 boleo Jeg har problemer med række 9 og 10 kan ikke se hvad jeg skal mellem vifterne

07.08.2021 - 02:51

DROPS Design answered:

Hei Annette. Du hekler som tidligere etter diagrammene ( A.1 + A.2 + A.3 (1-2 eller 3 ganger i bredden) og avslutt med A.4. I rekke 9 hekles det 2 luftmasker og 1 stav i slutten av diagram A.2 og du starter med 1 stav og 2 luftmasker av diagram A.3. Du avslutter A.3 med 2 luftmasker og 1 stav (om du hekler str. L/XL – XXL/XXXL skal A.3 gjenta 1 eller 2 ganger). I rad 10 avslutter du med A.2 med 2 luftmasker og 1 stav og begynner A.3 med 2 luftmasker og avslutter A.3 med 1 stav (om du hekler str. L/XL – XXL/XXXL skal A.3 gjenta 1 eller 2 ganger). mvh DROPS design

16.08.2021 - 08:13

Country flag Petra wrote:

Mijn vraag: Ik ben zojuist gestart met het vierkanten vest in Drops cotton Merino maat S/M Ik moest 163 lossen opzetten, maar de eerste toer heeft 138 steken. Wat doe ik met de overige lossen? Bovendien staat bij de beschrijving A.4a 'over de volgende 19 lossen', terwijl er in het telpatroon slechts 16 stokjes staan vermeld. Dit laatste klopt dan weer wel met de = 138 steken in de beschrijving. Kunt u mij uitleg geven over beide issues?

27.07.2021 - 13:42

DROPS Design answered:

Dag Petra,

Excuses voor het late antwoord. Om je beter te kunnen helpen is het handig om te weten welk patroon je precies maakt en in welke maat. Is het mogelijk om je vraag bij het betreffende patroon te posten?

26.10.2021 - 11:28

Country flag Annika Linde wrote:

Hej ! Jag är nybörjare och skulle väldigt gärna virka denna hatt men förstår verkligen inte den😥. Är det möjligt att få någon hjälp personligen ? Har virkat 2 andra hattar solhattar som blev väldigt bra . Men denna med öglor och diagram . Förstår inte alls tyvärr . Men vill virka denne till min man . Tacksam för hjälp . Med vänlig hälsning, Annika Linde

10.07.2021 - 15:11

DROPS Design answered:

Hej Annika, skriv hvad du vil have hjælp med inde under kommentarer inde på selve mönsteret, så ved vi hvilket mönster og hvad vi skal skrive tydeligere til dig :)

14.07.2021 - 11:24

Country flag MILL LØKKE wrote:

SKAL ALLE DROPSMØNSTER HA DISSE DIAGRAMMENE? JEG ER EN ERFAREN HEKLER,MEN DETTE BLIR FOR DUMT. FORSTÅR DET,MEN DET ER VELDIG TIDKREVENDE. HVORDAN KAN VI VITE HVILKET DIAGRAM VI FÅR FØR VI HAR KJØPT DET? KJØRTE FRA SUNNDALSØRA TIL TRONDHEIM TIL EN BUTIKK MED ERFARNE FOLK,MEN DE VI FORSTOD DET HELLER IKKE. HAR ALLE MØNSTRENE DISSE DIAGRAMMENE?

04.07.2021 - 15:46

DROPS Design answered:

Hei Mill. Dette er en generell forklaring på hvordan hekle etter diagram. Hver enkel oppskrift har forskjellige diagrammer. Alle våre oppskrifter er GRATIS og du ser diagrammene under den aktuelle oppskriften du skal hekle, om det er diagram. Om du finner en oppskrift du ønsker å hekle, men har problemer med å skjønne diagrammet (ene), kan du fint legge et spørsmål under selve oppskriften, så skal vi hjelpe deg så godt vi kan. mvh DROPS design

05.07.2021 - 08:02

Country flag MILL LØKKE wrote:

Skal begynne på SLICE OF SUMMER, men jeg forstår ikke det partiet på sidene av sjalet. Skal det hekles til slutt?

18.06.2021 - 15:10

DROPS Design answered:

Hei Mill. Du starter med å hekle A.1. Om du ser på diagram A.1, A.3, A.5, A.7, A.9, A.11 og A.13 har alle 3 eller 5 luftmasker midt i diagrammet, dette er midten av sjalet. På hver side av disse diagrammene hekles A.2, A.4, A.6, A.8, A.10 eller A.12. Når du er ferdig med A.1 (22 masker + midtbuen) hekler du slik fra vrangen: Hekle A.2a over første stav, A.2b over de neste 10 maskene, hekle A.2c, hekle A.3 over midtbuen, hekle A.2c, hekle A.2b over de neste 10 maskene og avslutt med A.2a over siste stav. Da har du heklet A.2 på hver side av midten (A.1), så fortsetter du med diagrammene i høyden på hver side av midt diagrammene. mvh DROPS design

21.06.2021 - 09:15

Country flag Marian wrote:

Hallo, de mouwen worden van bovenaf(pols?) gehaakt. Er wordt met 21 st opgezet. Dat is in de stekenverhouding ca. 10 cm. Volgens mij moet je dat wel erg dunne polsjes hebben. Klopt het aantal steken wel? Of lees ik het verkeerd?

17.05.2021 - 21:04

DROPS Design answered:

Dag Marian,

Vanaf hier kan ik niet zien met welk patroon je bezig bent, maar als de mouw vanaf boven naar beneden gebreid wordt, worden er wellicht nog steken opgezet aan beide zijkanen om de mouwkop te creëren.

26.05.2021 - 15:16

Country flag Cindy P wrote:

When there is a space without a symbol what transpires? For instance pattern Belladonna Drops/187/5 Chart lines 10, 11 and 12 all have empty spaces between symbols.

10.05.2021 - 20:25

DROPS Design answered:

Dear Cindy P, there are spaces for technical reasons, but you just have to work the symbols as they are drawn, Happy crocheting!

11.05.2021 - 10:14

Country flag BOUDAILLE Annie wrote:

Modèle sac 211-25 A.w montre le début de rang et A.x la fin, mais si je travaille un rang de droite à gauche, je termine donc par A.x. Pourquoi y-a-t-il un début sur chaque rang A.w ... Pouvez-vous m'aider s'il vous plait. Merci

08.05.2021 - 15:57

DROPS Design answered:

Bonjour Mme Boudaille, A.w montre le début de rangs sur l'endroit et la fin des rangs sur l'envers; A.x montre la fin des rangs sur l'endroit et le début des rangs sur l'envers, ainsi, vous savez comment commencer/terminer chaque rang en fonction du rang sur l'endroit ou sur l'envers. Bon crochet!

10.05.2021 - 11:35

Country flag Hilde wrote:

Hei, hva gjør jeg feil når lappen jeg hekler blir mer og mer «krøllete» etter 4. omgang og utover (som om kantene utover på lappen blir for store i forhold til midten)?

02.05.2021 - 09:02

DROPS Design answered:

Hei Hilde. Har du like mange masker som det skal være iflg oppskriften? Arbeidet kan krølle seg litt i begynnelsen, men det er litt avhengig av hvilket diagram/oppskrift du hekler etter. mvh DROPS design

03.05.2021 - 08:40

Country flag Eleanor A Miller wrote:

I DON'T UNDERSTAND HOW TO READ THE DIAGRAM FOR DROPS 165-33

31.03.2021 - 20:32

DROPS Design answered:

Dear Mrs Miller, in this pattern, diagrams are worked in the round. Start from the bottom on the right corner and read towards the left. Start round with A.1, repeat A.2 and finish round with A.3.( Adding markers between diagrams can help). Then work A.4 and repeat A.5 all the round. Happy knitting!

08.04.2021 - 08:26

Country flag Linnea wrote:

Hej! Fråga angående när det står A.1 i mönster. Virkar "waterfall" och står tex " virka A.1 över bakstycke...". A.1 finns ju i tre olika sektioner a, b, c. Men när ddt vara står att man ska virka A.1 hur ska man tänka då?

23.03.2021 - 15:39

DROPS Design answered:

Hei Linnea. Når det bare står hekle A.1, er forklaringen på hvordan rekkefølge til A.1a, A.1b og A.1c forklart tidligere i oppskriften. F.eks A.1a og A.1c hekles gjerne i hver side av et plagg, mens A.1b hekles mellom A.1a og A.1c og gjentas flere ganger. Når det bare står hekle A.1, står det gjerne "hekle A.1 som før". Da blir det å hekle alle 3 som tidligere. mvh DROPS design

07.04.2021 - 08:09

Country flag Jane wrote:

Hallo, ik moet het lijf haken. Ik moet uitkomen op 16 steken. Hoe kan dat? Als ik A3 bekijk lees ik ook niet wanneer ik moet meerderen en als ik de bobbels tel op de foto kom ik op veel meer uit dan 16. Kunt u mij helpen? Alvast bedankt.

07.03.2021 - 18:36

Country flag Irene wrote:

Bij de toeren 5-10 loop ik vast. Ik begrijp niet hoe je op deze toeren moet meerderen en tegelijkertijd het patroon vasthouden. Want als je op deze toeren gaat meerderen krijg je een scheve verhouding van de kleuren. Ik heb nu alleen in toer 10 gemeerderd tot 120 stokjes, en toer 5 tot en met negen niet gemeerderd.(ziet er wel goed uit) Kunt u mij helpen want ik wil graag begrijpen met wat jullie bedoelen met 1 stokje tussen de meerderingen ? Alvast bedankt

01.02.2021 - 16:58

Leave a comment or question to this lesson

Your email address will not be published. Required fields are marked *.