DROPS Super Sale - RISPARMIATE il 30% su 6 filati per tutto giugno!

Indizio #4 - E' ora di aggiungere un pò di colore....

DROPS-Along Magic Summer

In questa tappa lavoreremo 20 nuove righe con diverse tecniche stimolanti, e lavoreremo le nostre strisce con 3 bellissimi colori.

Come sempre, troverete dei video che vi possono aiutare alla fine della tappa. Ma se avete ancora delle domande, potete semprd utilizzare il modulo alla fine della pagina!

Per prima cosa un pò di informazioni

MOTIVO:
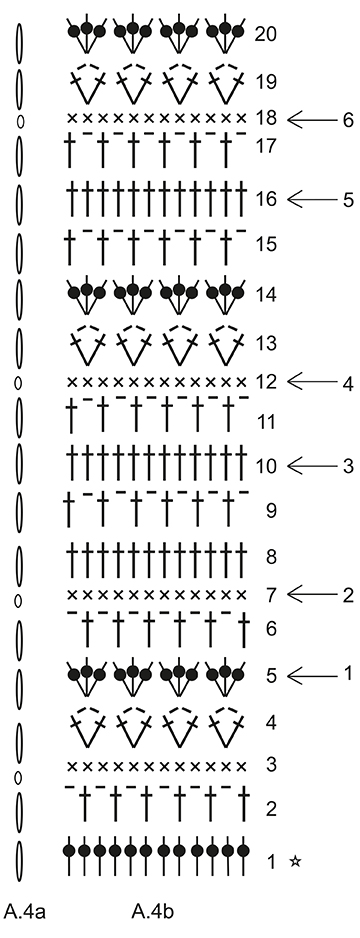
Nella tappa #4 stiamo lavorando con i diagrammi A.4a e A.4b. A.4a mostra come inizia la riga. NOTA: L’inizio delle righe è disegnato sopra ogni riga nello stesso diagramma, anche se vengono lavorate in modo alternato sul lato destro e sinistro dello scialle e non una sull’altra.

STRISCE:
Tagliare il filo dopo ogni riga, a meno che la riga successiva non abbia lo stesso colore. Affrancare i fili a lato alla fine.
RIGHE 1-3: cipria (colore a)
RIGHE 4: giallo senape (colore b)
RIGHE 5-7: beige (colore e)
RIGHE 8-9: cipria (colore a)
RIGHE 10-12: beige (colore e)
RIGA 13: giallo senape (colore b)
RIGHE 14-15: cipria (colore a)
RIGHE 16-18: beige (colore e)
RIGA 19: giallo senape (colore b)
RIGA 20: cipria (colore a)

CAMBIO DI COLORE:
Quando si cambia colore, lavorare come segue: lavorare l’ultima maglia sulla riga con il 1° colore, ma aspettare con l’ultimo gettato e passaggio, passare al colore successivo e lavorare l’ultimo gettato e passaggio attraverso l’ultima maglia con questo colore, poi lavorare la riga successiva.

INFORMAZIONI PER IL LAVORO:
Le informazioni tra due * vengono ripetute ogni vilta che trovate *-* nel modello.

Se siete esperte, seguite la descrizione breve e i diagrammi A.4a+b che troverete più sotto. Se avete bisogno di aiuto per iniziare, continuate a leggere la tappa sotto.

Versione breve

Continuare a lavorare a STRISCE – leggere la spiegazione sopra, e il motivo A.4b (A.4a mostra come inizia la riga ed è lavorato in aggiunta alle maglie in A.4b). Leggere CAMBIO DI COLORE! NOTA: Per avere una visione migliore della riga su cui lavorare con il motivo e a strisce, mettere un segnapunti nel lavoro e la riga successiva viene contata come riga 1. Il che significa che la prima riga di A.4b = Riga 1 nelle strisce.

Diagramma per la Tappa #4

= 1 catenella
= 1 maglia alta attorno alla catenella/arco di catenelle
= Dal diritto del lavoro: 1 maglia alta nel filo dietro della maglia. Dal rovescio del lavoro: 1 maglia alta nel filo davanti della maglia
= Dal diritto del lavoro: 1 maglia bassa nel filo dietro della maglia. Dal rovescio del lavoro: 1 maglia bassa nel filo davanti della maglia
= Aumento (con la stessa maglia indicata nel diagramma) a ogni lato dei segnapunti sulla riga con la freccia.
= Lavorare 3 catenelle all’inizio della riga
= lavorare 1 catenella all’inizio della riga
= iniziare qui

Avete bisogno di aiuto per iniziare?

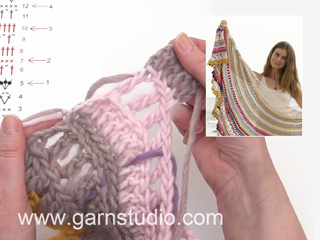
Ecco una descrizione più dettagliata di come iniziare la tappa #4. Abbiamo evidenziato in rosso il punto in cui state lavorando nel diagramma.

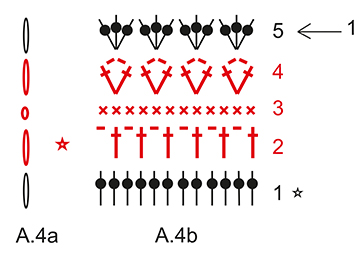
RIGA 1 (= diritto del lavoro): lavorare 3 catenelle (A.4a), poi lavorare A.4b come segue: * 2 maglie alte attorno al 1°/successivo arco di catenelle, 3 maglie alte attorno all’arco di catenelle successivo *, lavorare *-* per tutta la riga = 120 maglie alte.


Senza lavorare, aggiungere 12 segnapunti come segue: aggiungere 1 segnapunti dopo le prime 5 maglie, poi aggiungere i successivi 11 segnapunti a distanza di 10 maglie, ora rimangono 5 maglie alte sulla riga dopo l’ultimo segnapunti. I segnapunti seguono il lavoro e ci sarà quasi sempre lo stesso numero di maglie a ogni lato.


Girare il lavoro e lavorare le righe 2, 3 e 4 seguendo i diagrammi A.4a e A.4b, - leggere CAMBIO DI COLORE.


Girare il lavoro, lavorare la riga 5 (FRECCIA 1) e aumentare come segue: aumentare 1 maglia alta a ogni lato dei segnapunti lavorando 1 maglia alta in più attorno all’arco di catenelle (=24 aumenti) = 144 maglie alte sulla riga.


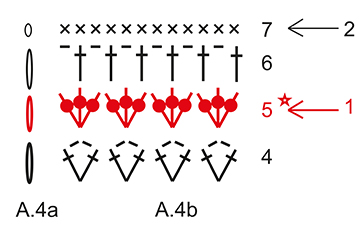
Girare il lavoro e lavorare le righe 6-10. Continuare a seguire le strisce – leggere sopra e aumentare sulla riga 7 (FRECCIA 2, aumentare come segue: aumentare 1 maglia bassa a ogni lato dei segnapunti lavorando 2 maglie basse nella stessa maglia = 24 aumenti) = 168 maglie basse sulla riga e sulla riga 10 (FRECCIA 3, aumentare come segue: aumentare 1 maglia alta a ogni lato dei segnapunti lavorando 2 maglie alte in 1 maglia = 24 aumenti) = 192 maglie alte sulla riga.


Girare il lavoro, e lavorare le righe 11-15. Continuare a seguire le strisce – leggere sopra e aumentare sulla riga 12 (FRECCIA 4 e aumentare come segue: aumentare 1 maglia bassa a ogni lato dei segnapunti lavorando 2 maglie basse in 1 maglia = 24 aumenti) = 216 maglie basse sulla riga.


Girare il lavoro, e lavorare le righe 16-20. Continuare a seguire le strisce – leggere sopra e aumentare sulla riga 16 (FRECCIA 5 e aumentare come segue: aumentare 1 maglia alta a ogni lato dei segnapunti lavorando 2 maglie alte in 1 maglia = 24 aumenti) = 240 maglie alte sulla riga e sulla riga 18 (FRECCIA 6 e aumentare come segue: aumentare 1 maglia bassa lavorando 2 maglie basse in 1 maglia a ogni lato dei segnapunti = 24 aumenti) = 264 maglie basse sulla riga.


Finito!

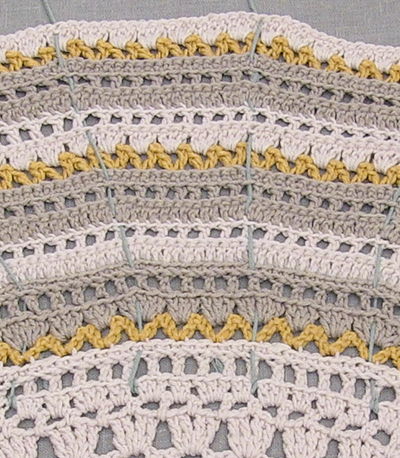
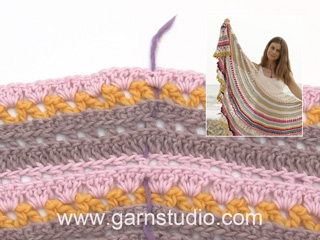
Ora la tappa 4 è finita e il lavoro misura circa 39 cm tra l’anello di catenelle e il centro dell’ultima riga quando sono state lavorate tutte le 20 righe. La foto sotto mostra come appare il lavoro. Ora potete lavorare la tappa successiva! Fate in modo di non dimenticare di mandare le foto dei vostri progressi alla nostra galleria!

Avete finito il colore E? Potete utilizzare il colore G nella riga 18.

Video Tutorial

Commenti (78)

Country flag Sumara Marletta wrote:

Hola, al final de la pista 20 tengo mucho lío con los hilos marcadores, no tengo ni idea donde tienen que estar. Por favor me lo podeis decir exactamente su posición? Me parece complicado trabajar sin el gráfico la verdad. Muchas gracias por la ayuda!

13.05.2018 - 16:51

DROPS Design answered:

Hola Sumara, al terminar la fila 20 tenemos 264 puntos. Es decir, 11 puntos antes del primer marcador, 22 puntos entre cada siguiente marcador y después del última quedan 11 puntos.

20.05.2018 - 20:03

Country flag Gudrun Loger wrote:

Wenn ich in der 5. Reihe jedes mal ein zusätzliches Stäbchen bei der Zunahme in den Bogen häkeln, nehme ich doch nur 12 Maschen zu und keine 24?

13.05.2018 - 13:41

DROPS Design answered:

Liebe Frau Loger, es sind 12 Markierungsfaden und Sie nehmen 1 M vor jedem Markierungsfaden und 1 M nach jedem Markierungsfaden zu = 24 M werden insgesamt zugenommen. Viel Spaß beim häkeln!

14.05.2018 - 13:20

Country flag Cathy wrote:

Is the diagram correct for Row 6? It shows a treble crochet stitch, however, the video for Row 6 demonstrates double crochet.

13.05.2018 - 05:00

DROPS Design answered:

Hi Cathy, Row 6 sould be: From right side: 1 double crochet into back loop of stitch. From wrong side: 1 double crochet into front loop of stitch

14.05.2018 - 09:15

Country flag Cathy wrote:

Is the diagram correct for Row 6? It shows a treble crochet stitch, however, the video for Row 6 demonstrates treble crochet. Also, is it possible to have translation on the comments so that I can read the comments in different languages? Just wondering if translation feature is available for comments

13.05.2018 - 04:58

Country flag Cathy wrote:

Please show how to end each row as well as showing the beginning of each row.

13.05.2018 - 04:22

DROPS Design answered:

Dear Cathy, from RS work first A.4a then read diagram from the right towards the left, from WS work first A.4a and then read diagram from the left towards the right. Happy crocheting!

14.05.2018 - 13:11

Country flag Bente Stylsvig Lyngsøe wrote:

Jeg tror I har fejl beregnet garnforbruget. Jeg er løbet tør for farve E midt i række 17. Jeg bruger Merino Extra fine og min farve E er Natur 01.

12.05.2018 - 21:12

DROPS Design answered:

Hej Bente, Garnforbruget er regnet ud efter hæklefastheden i denne opskrift. Sjalet bliver fint uanset om du hækler lidt løsere eller fastere, men det kan påvirke garnforbruget. Du kan erstatte farve E med G, den bør du have nok af.

15.05.2018 - 13:16

Country flag Dorothe Lucassen wrote:

Is er een fout gemaakt bij de beschrijving van de hoeveelheden garen wat nodig is? Ik had nl bij clue4 rij 17 al mijn kleur E op. Gelukkig had ik voor een ander project deze kleur nog liggen maar vraag me nu wel af of er dalijk niet nog voor nog meer kleuren te weinig garen is.

12.05.2018 - 20:18

DROPS Design answered:

Dag Dorothe, We hebben inderdaad gemerkt dat er meerdere haaksters zijn die te kort komen van kleur e, dus er is een nieuwsbericht gemaakt hierover. Zie hier hoe je dit op kunt lossen.

16.05.2018 - 16:05

Country flag Sophie wrote:

Que proposez vous pour le manque de couleur E, merci

12.05.2018 - 18:42

DROPS Design answered:

Bonjour Sophie, les fournitures sont calculées sur l'échantillon, mais si votre tension n'est pas tout à fait juste, et que vous manquez de la couleur e, vous pouvez utiliser la couleur g dont vous devriez avoir suffisamment. Bon crochet!

14.05.2018 - 13:12

Country flag Sophie wrote:

Idem je n'ai pas assez de couleur E et je trouve regrettable de payer des frais de port pour la commande d'une seule pelote , je me pose des questions sur la suite du projet va t il en manquer encore ?

12.05.2018 - 18:39

Country flag Antonia wrote:

Ik ben blij dat ik niet de enige ben die kleur E te weinig heeft. Maar ik vind het wel heel jammer, ik ga zeker geen bolletje bij bestellen, wordt dan nl. een duur bolletje met de verzendkosten. En heb ik wel genoeg garen voor de volgende clues?

12.05.2018 - 17:52

Country flag Maja wrote:

Hallo, wie viele V (\--/ ) habe ich am Ende von Reihe 4? Und in welchem Abstand wird der Markiererfaden hochgezogen?

12.05.2018 - 13:15

DROPS Design answered:

Liebe Maja, Sie wiederholen A.4b 10 Mal in der Breite über 120 Maschen, am Ende der Reihe 4 haben Sie 40 V (= \--/ ) + 3 Lm am Anfang der Reihe (= A.4a). Viel Spaß beim häkeln!

14.05.2018 - 13:18

Country flag Julia wrote:

Like the others below, I do not have enough yarn in colour e, even though my 18 double crochet (US) make up 10 cm. It's really annoying that I have to buy an extra ball of yarn and pay the shipping, especially since there's no way to be sure that there will be enough of the other colours. Will you be advising us on what to do?

12.05.2018 - 10:46

DROPS Design answered:

Hi Julia, The materials required for the shawl are calculated after the crochet tension used in the pattern/clues. The shawl will look nice whether is crocheted loose or tight, but if for a reason you have too little of a colour E you can replace it with colour G, which you will have enough of.

14.05.2018 - 12:13

Country flag Erica Alexiusson wrote:

Hej! Jag har samma tveksamma åsikt om färg E! Den kommer ta slut under varv 16-18, och jag virkar i regel hårt men har försökt virka lite mer ”normalt” denna gång. Har svårt att förstå hur det är beräknat faktiskt! För visst kommer det att återkomma färg E lite längre fram, en rand till som jag gissar är 1-3 varv. Eller är det bara fram till denna ledtråd som vi har den färgen?

12.05.2018 - 01:44

Country flag Nadi wrote:

Leider habe auch ich von farbe e viel zu wenig, es fehlt noch 2/3 von reihe 17 und die ganze reihe 18...

11.05.2018 - 22:45

Rebecca wrote:

Hi, could you explain how to move the marking threads up please, thank you

11.05.2018 - 20:51

DROPS Design answered:

Dear Rebecca, place the marker alternately in front and in back of piece after each row so that they can move forward. Happy crocheting!

14.05.2018 - 13:13

Country flag Marieke wrote:

Volgens de benodigde materialen heb ik 50gr van kleur e nodig, maar net als Pien hieronder, ben ik bog niet klaar met clue 4 en is mijn kleur E al op! Ik zit halverwege tour 17. Voordat ik kleur ga bij bestellen, zou ik graag willen weten hoevaak kleur E nog terug komt. Ik zou ook graag willen weten of de verwachting van de overige enkele kleuren wellicht bijgesteld moet worden.

11.05.2018 - 20:06

DROPS Design answered:

Hallo Marieke, We hebben inderdaad gemerkt dat er meerdere haaksters zijn die te kort komen van kleur e, dus er is een nieuwsbericht gemaakt hierover. Zie hier hoe je dit op kunt lossen.

16.05.2018 - 16:05

Country flag Claudia Seeland wrote:

Fertig: Hab generell 4a am Anfang UND Ende gearbeitet (zb 3LM= 1STB) u. diese RandMaschen NICHT mitgezählt. Der Symmetrie wegen noch 1 Marker f. exakte Mitte & 1Masche extra seit Reihe 2 da sonst das Ende des Musters oft nicht passt. (RAND Steigemaschen, LM,STB,LM,STB... ... LM,STB,LM,Rand STB). Die Marker verteile ich vor den Zunahmen in den Mustern und nehme VOR der Mitte zb erst über der LM 1zu, dann über d. STB, nach der Mitte umgekehrt… ging gut!

11.05.2018 - 16:46

Country flag Drops Design wrote:

Hi all. Regarding the marking threads. You put marker 1 between stitch 5 and 6, (dont count the 3 chain stitches - A.4), marker 2 between 15 and 16, 3 between 25/26, 4 between 35/36, 5 between 45/46, 6 between 55/56, 7 between 65/66, 8 between 75/76, 9 between 85/86, 10 between 95/95, 11 between 105/106 and 12 between 115/116. Although there is a difference between the photos and the video, the result will be the same. Happy Crocheting!

11.05.2018 - 14:10

Country flag Christina wrote:

Beskrivelsen af hvor man sætter mærketrådene, har skabt lidt forvirring hos mig, og jeg fik kun sat 11 mærketråde. Men så så jeg på billedet, at der ikke er 10 stm mellem mærketrådene men kun 9. Altså sættes mærketråden i den 10. stm. Og så fik jeg sat 12 mærketråde. Hvis andre skulle blive forvirret som mig, kan jeg fortælle at mærketrådene sættes i stm nr. 6, 16, 26, 36, 46, 56, 66, 76, 86, 96, 106 og 116 fra begyndelsen.

11.05.2018 - 13:33

Country flag Marisa wrote:

Could I have clarification on the positioning of the marking threads? It looks different on the photo to the video.

11.05.2018 - 12:18

Lascia un commento o una domanda a questo indizio

Il tuo indirizzo mail non verrà pubblicato. I campi richiesti sono indicati da *.