DROPS Alpaca
DROPS Alpaca
100% Alpaca
from 4.85 $ /50g
Get the yarn to make this pattern from 33.95$.

The yarn cost is calculated from the pattern’s smallest size and the yarn’s cheapest product type. Looking for an even better price? You might find it on the DROPS Deals!

DROPS SS24

Two to Tango

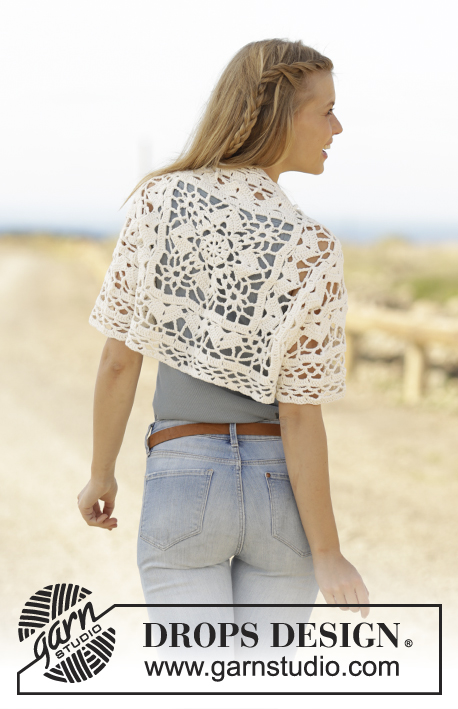
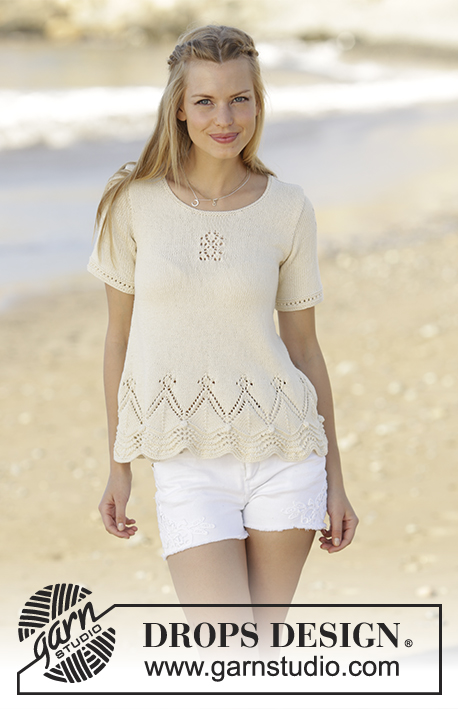
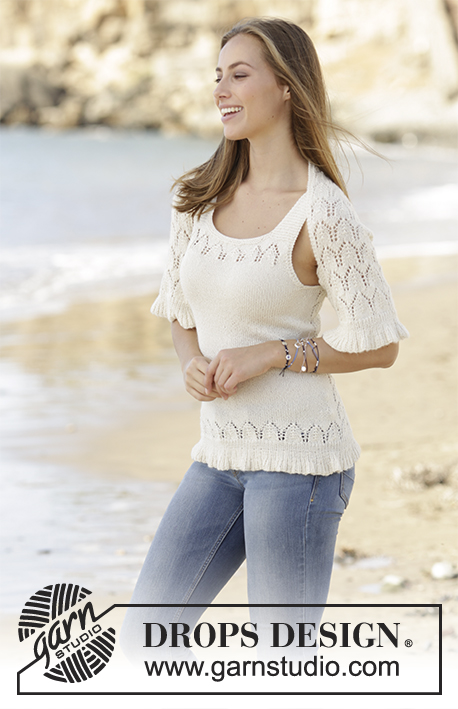
Set consists of: Knitted top with lace pattern in DROPS Alpaca and shoulder piece with lace pattern in DROPS Alpaca. Size: S - XXXL

DROPS 178-59
DROPS design: Pattern no z-782
Yarn group A
----------------------------------------------------------
TOP:
Size: S - M - L - XL - XXL - XXXL
Materials:
DROPS ALPACA from Garnstudio (belongs to yarn group A)
200-250-250-250-300-350 g color no 100, off white

DROPS CIRCULAR NEEDLE (60 or 80 cm / 24" or 32") SIZE 3 mm/US 2.5 – or size needed to get 24 stitches and 32 rows in stockinette stitch = width 10 cm / 4" and 10 cm / 4" vertically.

DROPS CIRCULAR NEEDLE (80 cm / 32") SIZE 2.5 mm/ US 1.5 for rib – or size needed to get 26 stitches and 34 rows in stockinette stitch = width 10 cm / 4" and 10 cm / 4" vertically.

SHOULDER PIECE:
Size: S - M - L - XL - XXL - XXXL
Materials:
DROPS ALPACA from Garnstudio (belongs to yarn group A)
150-150-200-200-250-250 g color no 100, off white

DROPS CIRCULAR NEEDLE (60 or 80 cm / 24" or 32") SIZE 3 mm/US 2.5 – or size needed to get 24 stitches and 32 rows in stockinette stitch = width 10 cm / 4" and 10 cm / 4" vertically.

DROPS CIRCULAR NEEDLE (60 or 80 cm / 24" or 32") SIZE 2.5 mm/ US 1.5 for rib – or size needed to get 26 stitches and 34 rows in stockinette stitch = width 10 cm / 4" and 10 cm / 4" vertically.

-------------------------------------------------------

Alternative Yarn – See how to change yarns here
Yarn Groups A to F – Use the same pattern and change the yarn here
Yarn usage using an alternative yarn – Use our yarn converter here

-------------------------------------------------------

DROPS Alpaca
DROPS Alpaca
100% Alpaca
from 4.85 $ /50g
Get the yarn to make this pattern from 33.95$.

The yarn cost is calculated from the pattern’s smallest size and the yarn’s cheapest product type. Looking for an even better price? You might find it on the DROPS Deals!

Pattern instructions

NOTE: This pattern is written in American English. All measurements in charts are in cm. For conversion from inches to cm - click here. There are different terms for crocheting in American and British English. If this pattern includes crochet, click for "crochet terms" here. For this pattern in British English, please click here.
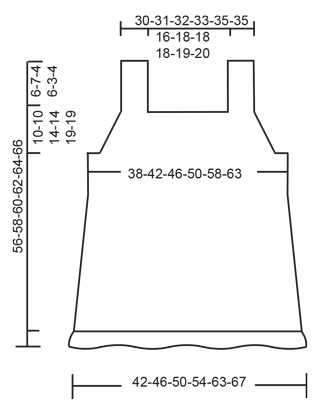
GARTER STITCH (worked in the round):
1 ridge = 2 rounds. Knit 1 round and purl 1 round.

GARTER STITCH (back and forth):
1 ridge = knit 2 rows.

PATTERN:
See diagrams A.1 and A.2. Diagrams show all rows in pattern seen from the right side.

DECREASE TIP BODY:
Begin 3 stitches before marker thread in the side and knit 2 together, knit 2 (marker thread is between these stitches), slip 1 stitch knitwise, knit 1, pass slipped stitch over stitch worked.

DECREASE TIP ARMHOLE:
Decrease inside 3 stitches in garter stitch. All decreases are done from the right side.
Decrease as follows after 3 stitches in garter stitch: Slip 1 stitch knitwise, knit 1, pass slipped stitch over stitch worked
Decrease before 3 stitches as follows: Knit 2 together.
----------------------------------------------------------

TOP:
Worked in the round on circular needle up to armhole, then work front and back piece separately.

Cast on 480-528-576-624-720-768 stitches on circular needle size 2.5 mm / US 1.5 with Alpaca. Knit 1 round, then work as follows: * Knit 1, purl 3 *, repeat from *-*. Continue rib like this. When piece measures 2 cm / ¾", decrease all 3 purl stitches to 2 purl stitches by purling 2 together = 360-396-432-468-540-576 stitches. When piece measures 3 cm / 1", decrease every other 2 purl stitches to 1 purl stitch = 300-330-360-390-450-480 stitches. When piece measures 4 cm / 1½", decrease the remaining 2 purl stitches to 1 purl stitch = 240-264-288-312-360-384 stitches. When rib measures 6 cm / 2⅜", switch to circular needle size 3 mm / US 2.5, knit 1 round then work as follows: Work A.1 over all stitches (= 20-22-24-26-30-32 repetitions of A.1). When A.1 has been worked 1 time vertically, there are 200-220-240-260-300-320 stitches on round. Insert 2 marker threads in piece; 1 at the beginning of round and 1 after 100-110-120-130-150-160 stitches = sides.

Work as follows: Stockinette stitch over the first 110-120-130-140-160-170 stitches, A.2 over the next 80-90-100-110-130-140 stitches (= A.2 is directly above 8-9-10-11-13-14 repetitions of A.1), stockinette stitch over the last 10 stitches. Continue pattern like this. When piece measures 12 cm / 4¾", decrease 1 stitch on each side of markers in the side (= 4 stitches decreased) - READ DECREASE TIP BODY! Decrease every 6-6-7-7-7-7 cm / 2½"-2½"-2¾"-2¾"-2¾"-2¾" 5 times in total = 180-200-220-240-280-300 stitches. When piece measures approx. 39-40-41-42-43-44 cm / 15¼"-15¾"-16⅛"-16½"-17"-17¼" and 3 rounds remain before an entire repetition of A.2 work in GARTER STITCH - see explanation above, over 12-12-14-14-16-18 stitches in each side (= 6-6-7-7-8-9 stitches on each side of each marker), continue the remaining stitches as before. NOTE: Begin with purl 1 round over the 12-12-14-14-16-18 stitches in each side, knit 1 round over the 12-12-14-14-16-18 stitches in each side - 1 round remains in A.2. Work this round as follows: bind off the first 3-3-4-4-5-7 stitches, purl 3, work the next 78-88-96-106-122-130 stitches as before, purl 3, bind off the next 6-6-8-8-10-14 stitches, purl 3, work the next 78-88-96-106-124-130 stitches, purl 3, bind off the last 3-3-4-4-5-7 stitches. NOW FINISH EACH PART SEPARATELY:

BACK PIECE:
Slip the first 84-94-102-112-130-136 stitches on a stitch holder, now work over the last 84-94-102-112-130-136 stitches on needle (= the part where A.2 is) – begin from right side: Continue with GARTER STITCH - see explanation above - over 3 stitches in each side, 9-9-18-18-27-25 stitches in stockinette stitch, pattern A.2 as before over the next 60-70-60-70-70-80 stitches ( = 6-7-6-7-7-8 repetitions), 9-9-18-18-27-25 stitches in stockinette stitch, 3 stitches in garter stitch. AT THE SAME TIME decrease 1 stitch inside 3 stitches in garter stitch in each side - READ DECREASE TIP ARMHOLE. Decrease every 6th row 4-0-0-0-0-0 times, every 4th row 2-5-9-6-6-2 times, then every other row 0-4-4-10-17-23 times = 72-76-76-80-84-86 stitches. When A.2 has been worked 2-2-3-3-4-4 times vertically after division for armholes, work 2 rows in stockinette stitch with 3 stitches in garter stitch in each side, then work 3 ridges over all stitches. Bind off knitting from right side.

FRONT PIECE:
Slip the 84-94-102-112-130-136 stitches from stitch holder back on needle. Continue with stockinette stitch and 3 stitches in garter stitch, decrease the same way as on back piece. AT THE SAME TIME when 14-14-28-28-42-42 rows in stockinette stitch have been worked, work A.2 over the middle 60-70-60-70-70-80 stitches, continue the same remaining stitches as before, continue with decreases in the sides. When A.2 has been worked 1 time vertically, work 2 rows in stockinette stitch with 3 stitches in garter stitch in each side, then work 3 ridges over all stitches (same number of rows has been worked on back piece and front piece). After all decreases are done, 72-76-76-80-84-86 stitches remain on needle.

On next row slip the first 17-17-17-18-19-19 stitches on a stitch holder (work them first), bind off the next 38-42-42-44-46-48 stitches, continue to work over the last 17-17-17-18-19-19 stitches on needle. Work in garter stitch over these stitch until strap measures approx. 12-14-8-12-6-8 cm / 4¾"-5½"-3"-4¾"-2½"-3", try the top on and adjust the length if needed. Bind off. Slip the first 17-17-17-18-19-19 stitches back on needle, work the same way.

ASSEMBLY:
Sew strap from front piece on to back piece.

----------------------------------------------------------

SHOULDER PIECE:
Worked back and forth on circular needle in 2 parts and sewn together mid back.

Cast on 175-199-223-247-271-295 stitches on circular needle size 2.5 mm / US 1.5 with Alpaca. Purl 1 row from wrong side, then work as follows from right side: 3 edge stitches in garter stitch, * knit 1, purl 3 *, repeat from *-* until 4 stitches remain and finish with knit 1 and 3 edge stitches in garter stitch. Continue rib like this. When piece measures 2 cm / ¾", decrease all 3 purl stitches to 2 purl stitches by purling 2 together from right side = 133-151-169-187-205-223 stitches. When piece measures 3 cm / 1", decrease every other 2 purl stitches to 1 purl stitch = 112-127-142-157-172-187 stitches. When piece measures 4 cm / 1½", decrease the remaining 2 purl stitches to 1 purl stitch = 91-103-115-127-139-151 stitches. When rib measures 6 cm / 2⅜", switch to circular needle size 3 mm / US 2.5, purl 1 row from wrong side, then work as follows from right side: 3 stitches in garter stitch, starting on 2 nd row in A.1, work A.1 over the next 84-96-108-120-132-144 stitches (= 7-8-9-10-11-12 repetitions of A.1), knit 1 and finish with 3 stitches in garter stitch. When A.1 is done, there are 77-87-97-107-117-127 stitches on row. Continue as follows: 3 stitches in garter stitch, A.2 over the next 70-80-90-100-110-120 stitches (= 7-8-9-10-11-12 repetitions of A.2), knit 1 and finish with 3 stitches in garter stitch. Continue this pattern until piece measures approx. 45-47-49-51-53-55 cm / 17¾"-18½"-19¼"-20"-21"-21½", finish after one whole repetition of A.2 vertically, work 2 ridges over all stitches and bind off.

Knit another part the same way.

ASSEMBLY:
Sew bind-off edges on the two parts neatly tog with grafting/kitchener stitches. Fold the piece along and then sew the sides tog along the dotted lines shown on chart.

This pattern has been corrected.

Updated online: 14.12.2023
The pattern has been reviewed and updated. Correction under shoulderwarmer when A.1 starts.

Diagram

All measurements in charts are in cm.

symbols = knit from the right side, purl from the wrong side
symbols = 1 yarn over between 2 stitches
symbols = knit 2 together
symbols = slip 1 stitch knitwise, knit 1, pass slipped stitch over stitch worked
symbols = slip 1 stitch knitwise, knit 2 stitches together, pass slipped stitch over stitches worked together
diagram
diagram
diagram

Each of our patterns has specific tutorial videos to help you.

Do you have a question? See a list of frequently asked questions (FAQ)

Knitting tension is what determines the final measurements of your work, and is usually measured per 10 x 10 cm. It is provided like so: number of stitches in width x number of rows in height - eg: 19 stitches x 26 rows = 10 x 10 cm.

The knitting tension is very individual; some people knit/crochet loosely while others work tightly. You adjust the knitting tension with the needle size, which is why the suggested needle size only serve as a guide! You need to adjust this (up or down) to ensure that YOUR knitting tension matches the knitting tension provided in the pattern. If you work with a different knitting tension than provided you will have a different yarn consumption, and your work will have different measurements than what the pattern suggests.

The knitting tension also determines which yarns can replace each other. As long as you achieve the same knitting tension you can replace one yarn with another.

See DROPS lesson: How to measure your tension/gauge

See DROPS video: How to make a gauge tension swatch

The required amount of yarn is provided in grams, eg: 450 g. To calculate how many balls you’ll need you first need to know how many grams are in 1 ball (25g, 50g or 100g). This information is available if you click on the individual yarn quality on our pages. Divide the amount required with the amount of each ball. For example, if each ball is 50g (the most common amount), the calculation will be as follows: 450 / 50 = 9 balls.

The important thing when changing from one yarn to another is that the knitting/crochet tension remains the same. This is so that the measurements of the finished piece will be the same as on the sketch provided. It is easier to achieve the same knitting tension using yarns from the same yarn group. It is also possible to work with multiple strands of a thinner yarn to achieve the knitting tension of a thicker one. Please try our yarn converter. We recommend you to always work a test swatch.

Please NOTE: when changing yarn the garment might have a different look and feel to the garment in the photo, due to individual properties and qualities of each yarn.

See DROPS lesson: Can I use a different yarn than the one mentioned in the pattern?

All our yarns are categorised into yarn groups (from A to F) according to thickness and knitting tension – group A contains the thinnest yarns and group F the thickest. This makes it easier for you to find alternative yarns to our patterns, should you wish to switch yarn. All yarns within the same group have a similar knitting tension and can easily replace each other. However, different yarn qualities have different structures and properties which will give the finished work a unique look and feel.

Click here for an overview of the yarns in each yarn group

At the top of all our patterns you’ll find a link to our yarn converter, which is a helpful tool should you wish to use a different yarn than suggested. By filling in the yarn quality you wish to replace, the amount (in your size) and number of strands, the converter will present good alternative yarns with the same knitting tension. Additionally it will tell you how much you’ll require in the new qualities and whether you’ll need to work with multiple strands. Most skeins are 50g (some are 25g or 100g).

If the pattern is worked with multiple colours, every colour will have to be converted separately. Similarly, if the pattern is worked with several strands of different yarns (for example 1 strand Alpaca and 1 strand Kid-Silk) you will have to find alternatives for each, individually.

Click here to see our yarn converter

Since different yarns have different qualities and textures we have chosen to keep the original yarn in our patterns. However, you can easily find options among our available qualities by using our yarn converter, or simply pick a yarn from the same yarn group.

It is possible that some retailers still have discontinued yarns in stock, or that someone has a few skeins at home that they would like to find patterns for.

The yarn converter will provide both alternative yarn as well as required amount in the new quality.

If you think it's hard to decide what size to make, it can be a good idea to measure a garment you own already and like the size of. Then you can pick the size by comparing those measures with the ones available in the pattern's size chart.

You'll find the size chart at the bottom of the pattern.

See DROPS lesson: How to read size chart

The needle size provided in the pattern serves only as a guide, the important thing is to follow the knitting tension. And since knitting tension is very individual, you will have to adjust the needle size to ensure that YOUR tension is the same as in the pattern – maybe you’ll have to adjust 1, or even 2 needle sizes, up or down to achieve the correct tension. For this, we recommend that you work test swatches.

Should you work with a different knitting tension than the one provided, the measurements of the finished garment might deviate from the measurement sketch.

See DROPS lesson: How to measure your tension/gauge

See DROPS video: How to make a gauge tension swatch

Working a garment top-down provides more flexibility and room for personal adjustment. For example it is easier to try the garment on while working, as well as making adjustments to length of yoke and shoulder caps.

The instructions are carefully explaining every step, in the correct order. Diagrams are adjusted to the knitting direction and are worked as usual.

The diagram depicts all rows/rounds, and every stitch seen from the right side. It is read from bottom to top, from right to left. 1 square = 1 stitch.

When working back and forth, every other row is worked from the right side and every other row is worked from the wrong side. When working from the wrong side, the diagram will have to be worked reversed: from left to right, knit stitches are purled, purl stitches are knit etc.

When working in the round every round is worked from the right side and the diagram are worked from right to left on all rounds.

See DROPS lesson: How to read knitting diagrams

The diagram depicts all rows/rounds, and every stitch seen from the right side. It is worked from bottom to top, from right to left.

When working back and forth every other row is worked from the right side: from right to left and every other row is worked from the wrong side: from left to right.

When working in the round, every row in the diagram are worked from the right side, from right to left.

When working a circular diagram you start in the middle and work your way outwards, counter clockwise, row by row.

The rows usually start with a given number of chain stitches (equivalent to the height of the following stitch), this will either be depicted in the diagram or explained in the pattern.

See DROPS lesson: How to read crochet diagrams

Instructions for working several diagrams after each other on the same row/round, will often be written like so: “work A.1, A.2, A.3 a total of 0-0-2-3-4 times". This means you work A.1 once, then A.2 is worked once, and A.3 is repeated (in width) the number of times provided for your size – in this case like so: S = 0 times, M = 0 times, L=2 times, XL= 3 times and XXL = 4 times.

The diagrams are worked as usual: begin with the first row in A.1, then work the first row in A.2 etc.

See DROPS lesson: How to read knitting diagrams

See DROPS lesson: How to read crochet diagrams

The total width of the garment (from wrist-to-wrist) will be larger in the larger sizes, despite the actual sleeves being shorter. The larger sizes have longer sleeve caps and wider shoulders, so there will be a good fit in all sizes.

The measurement sketch/schematic drawing provides information regarding the full length of the garment. If it’s a jumper or a jacket the length is measured from the highest point on the shoulder (usually closest to the neckline), and straight down to the bottom of the garment. It is NOT measured from the tip of shoulder. Similarly, the length of yoke is measured from the highest point on the shoulder and down to where yoke is split into body and sleeves.

See DROPS lesson: How to read a schematic drawing

Diagrams are often repeated on the round or in height. 1 repeat is the diagram the way it appears in the pattern. If it says to work 5 repeats of A.1 in the round, then you work A.1 a total of 5 times after/next to each other in the round. If it says to work 2 repeats of A.1 vertically/in height you work the entire diagram once, then begin again at the start and work the entire diagram one more time.

Chain stitches are slightly narrower than other stitches and to avoid working the cast-on edge too tight, we simply chain more stitches to begin with. The stitch count will be adjusted on the following row to fit the pattern and measurement sketch.

The rib edge is more elastic and will contract slightly compared to, for example, stocking stitch. By increasing before the rib edge, you avoid a visible difference in width between the rib edge and the rest of the body.

It’s very easy to cast off too tightly, and by making yarn overs while casting off (and simultaneously casting these off) you avoid a too tight cast off edge.

See DROPS video: How to bind off with yarn overs (yo)

To achieve an even increase (or decrease) you can increase on, for example: every 3rd and 4th row alternately, like so: work 2 rows and increase on the 3rd row, work 3 rows and increase on the 4th. Repeat this until the increase is complete.

See DROPS lesson: Increase or decrease 1 st on every 3rd and 4th row alternately

Should you prefer to work in the round instead of back and forth, you may of course adjust the pattern. You’ll need to add steeks mid-front (usually 5 stitches), and follow the instructions. When you would normally turn and work from the wrong side, simply work across the steek and continue in the round. At the end you’ll cut the piece open, pick up stitches to work bands, and cover the cut edges.

See DROPS video: How to knit steeks and cut open

Should you prefer to work back and forth instead of in the round, you may of course adjust the pattern so you work the pieces separately and then assemble them at the end. Divide the stitches for the body in 2, add 1 edge stitch in each side (for sewing) and work the front and back pieces separately.

See DROPS lesson: Can I adapt a pattern for circular needles into straight needles?

Pattern repeats can vary slightly in the different sizes, in order to get the correct proportions. If you’re not working the exact same size as the garment in the photo, yours might deviate slightly. This has been carefully developed and adjusted so that the complete impression of the garment is the same in all sizes.

Make sure to follow instructions and diagrams for your size!

If you have found a pattern you like which is available in women’s size it’s not very difficult to convert it to men’s size. The biggest difference will be the length of sleeves and body. Start working on the women size that you think would fit across the chest. The additional length will be worked right before you cast off for the armhole/sleeve cap. If the pattern is worked top-down you can add the length right after the armhole or before the first decrease on sleeve.

Regarding additional yarn amount, this will depend on how much length you add, but it is better with a skein too many than too few.

All yarns will have excess fibres (from production) that might come off as lint or shedding. Brushed yarns (ie hairier yarns) have more of these loose, excess fibres, causing more shedding.

Shedding also depends on what is worn under or over the garment, and whether this pulls at the yarn fibres. It’s therefore not possible to guarantee that there will be no shedding

Below are some tips on how to get the best result when working with hairier yarns:

1. When the garment is finished (before you wash it) shake it vigorously so the looser hairs come off. NOTE: do NOT use a lint roller, brush or any method that pulls at the yarn.

2. Place the garment in a plastic bag and put it in your freezer - the temperature will cause the fibres to become less attached to each other, and excess fibres will come off easier.

3. Leave in the freezer for a few hours before taking it out and shaking it again.

4. Wash the garment according to the instructions on the yarn label.

Pilling is a natural process that happens to even the most exclusive of fibers. It's a natural sign of wear and tear that is hard to avoid, and that is most visible in high friction areas of your garment like a sweater's arms and cuffs.

You can make your garment look as new by removing the pilling, using a fabric comb or a pill/lint remover.

Still can't find the answer you need? Then scroll down and leave your question so one of our experts can try to help you. This will be done normally within 5 to 10 working days.
In the meantime, you can read the questions and answers that others have left to this pattern or join the DROPS Workshop on Facebook to get help from fellow knitters/crocheters!

You might also like...

Post a comment to pattern DROPS 178-59

We would love to hear what you have to say about this pattern!

If you want to leave a question, please make sure you select the correct category in the form below, to speed up the answering process. Required fields are marked *.

Comments / Questions (32)

country flag Jutta wrote:

Das gern You 6 hat viel weniger Lauflänge und trotzdem Garngruppe A mit der gleichen Maschenprobe. Kann ich mich dann bei dieser Anleitung an die angegebene Maschenzahl halten?

11.05.2018 - 12:01

DROPS Design answered:

Liebe Jutta, Bei jeder Qualität wird gewählt, die Maschenprobe, um das beste Ergebnis zu bekommen. Solange Sie die gleiche Maschenprobe erreichen, können Sie ein anderes Garn gleicher Gruppe benutze. Bitte beachten Sie, dass Garne mit unterschiedlichen Strukturen auch unterschiedlich aussehen. Weitere Ausküfnte und Hilfe bekommen Sie von Ihrem DROPS Laden (auch telefonisch oder per mail). Viel Spaß beim stricken!

11.05.2018 - 13:31

country flag Jutta wrote:

Hallo, leider gibt mir der Garnumrechner nicht an, wieviel Garn ich für dieses Set von You 6-9 benötigen würde. Können Sie es mir bitte für diese 3 Garne sagen?

11.05.2018 - 10:44

DROPS Design answered:

Liebe Jutta, hier finden Sie, wie man die neue Garnmenge kalkulieren. Viel Spaß beim stricken!

11.05.2018 - 11:47

country flag Coopman Vera wrote:

Hallo , voor de boord , na 3 cm iedere ándere 2 steken. Tot 1 steek maken , wat bedoeld u met met \" iedere andere \" ?\r\nBedankt \r\nVera

16.04.2018 - 10:19

country flag Sandra wrote:

What are the bust sizes in inches for each size of the top

02.03.2018 - 04:31

DROPS Design answered:

Dear Sandra, you will find all finished measurements in each size in the measurement chart at the bottom of the pattern. They are taken flat from side to side (in cm). Compare these to a similar garment you have and like the shape to find out the matching size. Happy knitting!

02.03.2018 - 08:40

country flag Karin wrote:

Ik heb in mijn breiwerk het effect van knobbels, volgens de afbeelding zou dit glad moeten zijn. Het is op de plaats waar ik de 2 st samenbrei en 1 steek overhaal. Hoe kan ik dit oplossen aub? Ik zou het wel heel sterk moeten aantrekken bij het opspannen. Ik vrees dat dit niet gaat lukken. Alvast bedankt voor uw antwoord.

03.08.2017 - 13:05

DROPS Design answered:

Hoi Karin, Wat er precies gebeurt waardoor er knobbels ontstaan, kan ik vanaf hier jammer genoeg niet zien. Misschien moet je iets losser breien. Bekijk evt. ook even deze video over hoe je 2 st. samenbreit en 1 overhaalt:

06.08.2017 - 22:55

country flag Marita Kjørsvik wrote:

Jeg ble usikker på om3rett og tre vrang stemmer. strikker toppen. Jeg får heller ikka antall masker etter felling til å stemme?, valgte xl etter målene på bildet, det ble alt for stort. Er vanligvis M, men målene stemmer ikke. Så nå at det en plass står en rett og trevrang på vrangborden, hva er riktig?

21.06.2017 - 21:29

DROPS Design answered:

Hei Marita. For at du skal få målene til å stemme, må du sjekke at du får den strikkefastheten som er oppgitt i oppskriften. Legg opp 624 m (str. xl), strikk 1 omg rett, deretter strikkes det 1 rett, 3 vrang, gjenta dette omg ut. Når arb måler 2 cm felles alle 3 vrang til 2 vrang = 468 m. Når arb måler 3 cm felles annenhver 2 vrang til 1 vrang = 390 m på pinnen. Når arb måler 4 cm felles de resterende 2 vrang til 1 vrang =312 m igjen på pinnen. Nå har du 1 rett, 1 vrang hele omg = 312 m. Nå starter du på A.1 og når A.1 er strikket 1 gang i høyden er det også felt 52 m (2 m felt på hver rapport av A.1) = 312 m – 52 felte m = 260 m på pinnen etter A.1 er strikket 1 gang i høyden. God Fornøyelse!

22.06.2017 - 08:53

country flag Marita Kjørsvik wrote:

Hei. Lurer på om oppskriften stemmer. Antall masker stemmer ikke nårman har felt. Er det riktig med tre rett og tre vrang, dadet ser ut som bølgemønstret på bildet ikke ser så tett ut. Er det bare vrang masker som skal felles? Ingen rette? Snakker im borden nede.

20.06.2017 - 21:32

DROPS Design answered:

Hei Marita. Kan du spesifisere litt mer? Hva strikker du, toppen eller skulderstykket?

21.06.2017 - 07:28

country flag Marita Kjørsvik wrote:

Hei, lurer på om det er feil i oppskriften. Får ikke antall masker til å stemme før og etter inntak. Dessuten syns jeg ikke mønsteret med 3 rett og tre vrang stemmer med bildet? Der syns jeg det ser ut som det er større bølgemønster i nedre kant enn det blir med tre rett og tre vrang. Og stemmer det at det er kun vrang masker som skal felles og ikke noe på rettmaskene? Setter stor pris på raskt svar. Mvh Marita Kjørsvik

16.06.2017 - 12:48

DROPS Design answered:

Hei Marita. Se svaret over :)

22.06.2017 - 08:58

country flag Benedetta wrote:

Buonasera,sto facendo la Tg S .Sono arrivata al punto che bisogna lavorare a legaccio sulle 6 m prima e dopo il segnapunti ,ma a lato del segnaposti ci sono solo 5 m dopo le diminuzioni del corpo.Potete aiutarmi?grazie

09.06.2017 - 22:12

DROPS Design answered:

Buonasera Benedetta. È corretto che rimangano 5 m. Deve iniziare a lavorare le 6 m a legaccio alla terzultima riga del diagramma A2. In questo modo la maglia che manca è una maglia rasata del diagramma A2. Buon lavoro!

09.06.2017 - 22:35

country flag Sonja Demerlier wrote:

Als je de derde keer moet minderen in de boord (van 3 st averechts naar 1st) eerst moet je van 3 st averrecht naar 2st, 2st naar 1st, dan staat er geschreven van 2st averechts naar 1st maar da kan niet je heb mar 1st averrecht over

09.06.2017 - 06:29

DROPS Design answered:

Hoi Sonja, Bij de tweede keer minderen (dus bij een hoogte van 3 cm) minder je iedere andere 2 steken averecht tot 1 steek averecht. Dus je mindert niet alle 2 steken averecht, maar de helft. De derde keer mindere je de andere helft van de 2 steken averecht naar 1 steek. Veel breiplezier!

09.06.2017 - 09:00