Stony Ridge

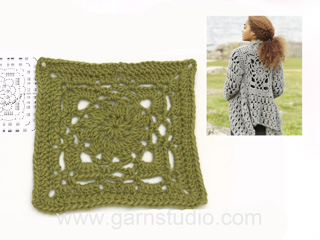
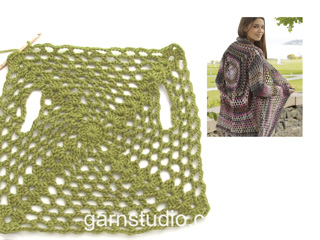
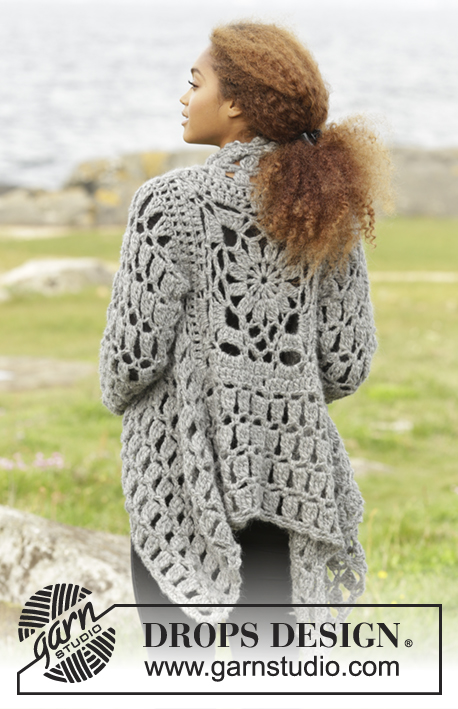
Crochet DROPS jacket worked in a square in 1 thread Cloud or 2 threads Air. Size S-XXXL.

DROPS 173-31
DROPS design: Pattern no co-034
Yarn group E or C + C
----------------------------------------------------------
Size: S/M - L/XL - XXL - XXXL

Materials:
DROPS CLOUD from Garnstudio
500-550-600-650 g, color no 04, medium gray
Or use:
DROPS AIR from Garnstudio
550-600-650-700 g, colour no 04, medium grey

DROPS CROCHET HOOK SIZE 7 mm/KorL – or size needed to get 10 dc x 6 rows 1 thread Cloud or 2 threads Air = 4" x 4" (10 x 10 cm).

-------------------------------------------------------

Alternative Yarn – See how to change yarns here
Yarn Groups A to F – Use the same pattern and change the yarn here
Yarn usage using an alternative yarn – Use our yarn converter here

-------------------------------------------------------

DROPS Cloud
DROPS Cloud
72% Alpaca, 21% Polyamide, 7% Wool
Discontinued
find alternatives

Pattern instructions

NOTE: This pattern is written in American English. All measurements in charts are in cm. For conversion from inches to cm - click here. There are different terms for crocheting in American and British English. If this pattern includes crochet, click for "crochet terms" here. For this pattern in British English, please click here.
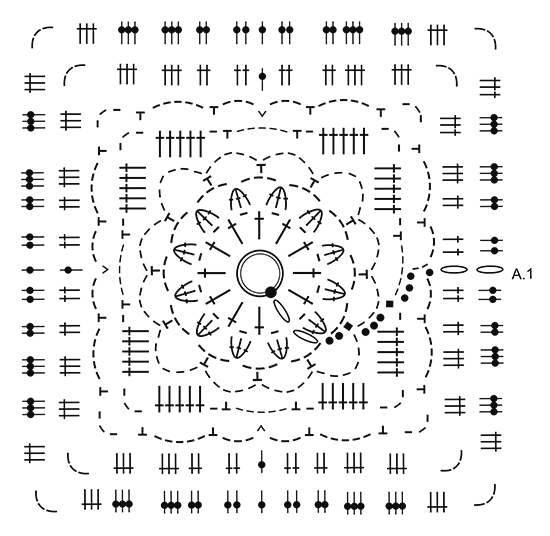
INC DC-GROUP:
Work (3 dc, ch 3, 3 dc) around ch-space in the corner.

PATTERN:
See diagrams A.1 to A.5.
----------------------------------------------------------

JACKET:
Work piece from mid back and outwards as a square.

Beg with 1 thread Cloud or 2 threads Air on hook size 7 mm and work pattern according to diagram A.1. REMEMBER THE CROCHET GAUGE! When entire diagram A.1 has been worked, piece measures 36 x 36 cm / 14¼" x 14¼".
Size S/M is now finished. Continue the remaining sizes in the round as follows:
Size L/XL, XXL and XXXL:
Continue with 1-2-2 rounds in total with 1 dc in every dc and work 1 INC dc-GROUP – see explanation above, in each corner. NOTE: Beg round with ch 3, and finish round with 1 sl st in 3rd ch at beg of round

Now continue in all sizes as follows (work 2nd round in diagram A.2):
Work 1 ch and 1 sl st in first dc on round, work A.2 over the next 12-15-18-18 dc (= 4-5-6-6 repetitions), work (1 sc, ch 3, 1 sc) around ch-space in the corner, work ch 3, skip 3 dc, A.2 over the next 6-9-12-12 dc (= 2-3-4-4 repetitions), 1 sc in space between the next 2 dc, insert a marker in piece and work 18-21-24-24 loose ch for armhole, skip 18-21-24-24 dc, work (1 sc, ch 3, 1 sc) around ch-space in next corner, work ch 3, skip 3 dc, work A.2 over the next 27-33-39-39 dc (= 9-11-13-13 repetitions), work (1 sc, ch 3, 1 sc) around ch-space in the corner, work 18-21-24-24 loose ch for armhole, skip 18-21-24-24 dc, insert a new marker in piece and work A.2 over the next 9-12-15-15 dc (= 3-4-5-5 repetitions), work (1 sc, 3 ch 1 sc) around ch-space in the corner, work ch 3, skip 3 dc, work A.2 over the next 12-15-18-18 dc (= 4-5-6-6 repetitions), and finish with 1 sl st in first sc on round.

Now work pattern in the round as follows (work from 2nd round in diagram A.3a-A.3c): Work A.3a (show how round beg and end), work A.3b around every ch-space until first corner, work A.3c (= 3 tr, ch 3, 3 tr) around ch-space in the corner, continue with A.3b around every ch-space until ch for armhole, work A.3b 6-7-8-8 times around the 18-21-24-24 ch, work A.3c around ch-space in the corner, work A.3b around every ch-space until next corner, work A.3c around ch-space in the corner, work A.3b 6-7-8-8 times around the 18-21-24-24 ch for armhole, work A.3b around every ch-space until next corner, work A.3c around ch-space in the corner, work A.3b around the remaining ch-spaces on round.
When A.3a-A.3c have been worked vertically, repeat the last 2 round in diagram until piece measures approx. 70-76-80-82 cm / 27½"-30"-31½"-32¼"" in total (= 35-38-40-41 cm / 13¾"-15"-15¾"-16⅛" from the middle of A.1 and out in one side) - adjust so that last round worked is a round with ch-spaces and sc. Cut the yarn.

FRONT PIECE:
Work front pieces back and forth without inc. Insert a marker on last round worked. NOW MEASURE THE PIECE FROM HERE.
Beg at star in one corner – see chart, and work from 2nd row in diagram as follows: A.4a, then work A.4b until 1 ch-space remain before the ch-space in the corner, work A.4c.
Continue like this back and forth. When A.4a, A.4b and A.4c have been worked vertically, repeat the last 2 rows until front piece measures approx. 23-25-26-27 cm / 9"-9¾"-10¼"-10½" from marker – adjust so that last row is worked as next to last row in A.4a-A.4c. Fasten off. Repeat in opposite side of piece – see star on chart.

SLEEVES:
Work sleeve back and forth.
Beg at marker mid under sleeve and work from WS 18-21-24-24 dc evenly up to shoulder, then work 18-21-24-24 dc around ch-row = 36-42-48-48 dc. Insert a marker here. NOW MEASURE THE PIECE FROM HERE. Then work pattern back and forth from 2nd row (= RS) in diagram A.4 as follows:
NOTE: On first row work every tr in tr-groups into one dc on previous row. Work A.4a, then work A.4b over the next 30-36-42-42 dc, work A.4c = 12-14-16-16 tr-groups. When entire diagram A.4a-A.4c has been worked vertically, repeat the last 2 rows in pattern, AT THE SAME TIME dec 1 tr-group in each side of sleeve by working as shown on the last 4 rows in diagram A.5a at beg of row and A.5b at the end of row = 10-12-14-14 tr-group. Repeat this dec in each side 0-1-1-1 more time = 10-10-12-12 tr-groups. When piece measures approx. 50 cm / 19¾" in all sizes, the sleeve is done - adjust to finish after a row that is last row in A.4a-A.4c. Fasten off.
Work the other sleeve the same way.


ASSEMBLY:
Sew underarm seams in outer loops of edge sts. Work an edge around the entire jacket as follows: Beg in one corner on one of the front pieces and work * (1 sc, ch 3, 1 sc, ch 3, 1 sc, 3 ch) around ch-space in the corner, work (3 ch, skip approx. 1 cm / ⅜", 1 sc) until next corner, work ch 3, *, repeat from *-* around the entire jacket. Finish with 1 sl st in first sc on round. Fasten off.

Diagram

All measurements in charts are in cm.

symbols = work 4 ch and form a ring with 1 sl st
symbols = 1 ch
symbols = 1 sl st
symbols = 1 sc in st
symbols = 1 sc around ch-space
symbols = 1 sc between 2 sts
symbols = 1 hdc around ch-space
symbols = 1 dc around ch/ch-space
symbols = 1 dc in st
symbols = 1 tr around ch-space
symbols = 1 tr in st
symbols = work 3 tr tog around ch-space as follows: Work 1 tr but wait with last pull through (= 2 sts on hook), then work 2 tr more the same way (= 4 sts on hook) but on last pull through, pull yarn through all sts on hook.
symbols = beg row with 4 ch
symbols = beg round with ch 3, and finish round with 1 sl st in 3rd ch at beg of round
symbols = beg round with 1 ch and finish with 1 sl st in 1st ch at beg of round, then work sl sts until first ch-space
symbols = when working front piece beg here
diagram
diagram
diagram
diagram
Do you have a question? See a list of frequently asked questions (FAQ)

Knitting tension is what determines the final measurements of your work, and is usually measured per 10 x 10 cm. It is provided like so: number of stitches in width x number of rows in height - eg: 19 stitches x 26 rows = 10 x 10 cm.

The knitting tension is very individual; some people knit/crochet loosely while others work tightly. You adjust the knitting tension with the needle size, which is why the suggested needle size only serve as a guide! You need to adjust this (up or down) to ensure that YOUR knitting tension matches the knitting tension provided in the pattern. If you work with a different knitting tension than provided you will have a different yarn consumption, and your work will have different measurements than what the pattern suggests.

The knitting tension also determines which yarns can replace each other. As long as you achieve the same knitting tension you can replace one yarn with another.

See DROPS lesson: How to measure your tension/gauge

See DROPS video: How to make a gauge tension swatch

The required amount of yarn is provided in grams, eg: 450 g. To calculate how many balls you’ll need you first need to know how many grams are in 1 ball (25g, 50g or 100g). This information is available if you click on the individual yarn quality on our pages. Divide the amount required with the amount of each ball. For example, if each ball is 50g (the most common amount), the calculation will be as follows: 450 / 50 = 9 balls.

The important thing when changing from one yarn to another is that the knitting/crochet tension remains the same. This is so that the measurements of the finished piece will be the same as on the sketch provided. It is easier to achieve the same knitting tension using yarns from the same yarn group. It is also possible to work with multiple strands of a thinner yarn to achieve the knitting tension of a thicker one. Please try our yarn converter. We recommend you to always work a test swatch.

Please NOTE: when changing yarn the garment might have a different look and feel to the garment in the photo, due to individual properties and qualities of each yarn.

See DROPS lesson: Can I use a different yarn than the one mentioned in the pattern?

All our yarns are categorised into yarn groups (from A to F) according to thickness and knitting tension – group A contains the thinnest yarns and group F the thickest. This makes it easier for you to find alternative yarns to our patterns, should you wish to switch yarn. All yarns within the same group have a similar knitting tension and can easily replace each other. However, different yarn qualities have different structures and properties which will give the finished work a unique look and feel.

Click here for an overview of the yarns in each yarn group

At the top of all our patterns you’ll find a link to our yarn converter, which is a helpful tool should you wish to use a different yarn than suggested. By filling in the yarn quality you wish to replace, the amount (in your size) and number of strands, the converter will present good alternative yarns with the same knitting tension. Additionally it will tell you how much you’ll require in the new qualities and whether you’ll need to work with multiple strands. Most skeins are 50g (some are 25g or 100g).

If the pattern is worked with multiple colours, every colour will have to be converted separately. Similarly, if the pattern is worked with several strands of different yarns (for example 1 strand Alpaca and 1 strand Kid-Silk) you will have to find alternatives for each, individually.

Click here to see our yarn converter

Since different yarns have different qualities and textures we have chosen to keep the original yarn in our patterns. However, you can easily find options among our available qualities by using our yarn converter, or simply pick a yarn from the same yarn group.

It is possible that some retailers still have discontinued yarns in stock, or that someone has a few skeins at home that they would like to find patterns for.

The yarn converter will provide both alternative yarn as well as required amount in the new quality.

If you think it's hard to decide what size to make, it can be a good idea to measure a garment you own already and like the size of. Then you can pick the size by comparing those measures with the ones available in the pattern's size chart.

You'll find the size chart at the bottom of the pattern.

See DROPS lesson: How to read size chart

The needle size provided in the pattern serves only as a guide, the important thing is to follow the knitting tension. And since knitting tension is very individual, you will have to adjust the needle size to ensure that YOUR tension is the same as in the pattern – maybe you’ll have to adjust 1, or even 2 needle sizes, up or down to achieve the correct tension. For this, we recommend that you work test swatches.

Should you work with a different knitting tension than the one provided, the measurements of the finished garment might deviate from the measurement sketch.

See DROPS lesson: How to measure your tension/gauge

See DROPS video: How to make a gauge tension swatch

Working a garment top-down provides more flexibility and room for personal adjustment. For example it is easier to try the garment on while working, as well as making adjustments to length of yoke and shoulder caps.

The instructions are carefully explaining every step, in the correct order. Diagrams are adjusted to the knitting direction and are worked as usual.

The diagram depicts all rows/rounds, and every stitch seen from the right side. It is read from bottom to top, from right to left. 1 square = 1 stitch.

When working back and forth, every other row is worked from the right side and every other row is worked from the wrong side. When working from the wrong side, the diagram will have to be worked reversed: from left to right, knit stitches are purled, purl stitches are knit etc.

When working in the round every round is worked from the right side and the diagram are worked from right to left on all rounds.

See DROPS lesson: How to read knitting diagrams

The diagram depicts all rows/rounds, and every stitch seen from the right side. It is worked from bottom to top, from right to left.

When working back and forth every other row is worked from the right side: from right to left and every other row is worked from the wrong side: from left to right.

When working in the round, every row in the diagram are worked from the right side, from right to left.

When working a circular diagram you start in the middle and work your way outwards, counter clockwise, row by row.

The rows usually start with a given number of chain stitches (equivalent to the height of the following stitch), this will either be depicted in the diagram or explained in the pattern.

See DROPS lesson: How to read crochet diagrams

Instructions for working several diagrams after each other on the same row/round, will often be written like so: “work A.1, A.2, A.3 a total of 0-0-2-3-4 times". This means you work A.1 once, then A.2 is worked once, and A.3 is repeated (in width) the number of times provided for your size – in this case like so: S = 0 times, M = 0 times, L=2 times, XL= 3 times and XXL = 4 times.

The diagrams are worked as usual: begin with the first row in A.1, then work the first row in A.2 etc.

See DROPS lesson: How to read knitting diagrams

See DROPS lesson: How to read crochet diagrams

The total width of the garment (from wrist-to-wrist) will be larger in the larger sizes, despite the actual sleeves being shorter. The larger sizes have longer sleeve caps and wider shoulders, so there will be a good fit in all sizes.

The measurement sketch/schematic drawing provides information regarding the full length of the garment. If it’s a jumper or a jacket the length is measured from the highest point on the shoulder (usually closest to the neckline), and straight down to the bottom of the garment. It is NOT measured from the tip of shoulder. Similarly, the length of yoke is measured from the highest point on the shoulder and down to where yoke is split into body and sleeves.

See DROPS lesson: How to read a schematic drawing

Diagrams are often repeated on the round or in height. 1 repeat is the diagram the way it appears in the pattern. If it says to work 5 repeats of A.1 in the round, then you work A.1 a total of 5 times after/next to each other in the round. If it says to work 2 repeats of A.1 vertically/in height you work the entire diagram once, then begin again at the start and work the entire diagram one more time.

Chain stitches are slightly narrower than other stitches and to avoid working the cast-on edge too tight, we simply chain more stitches to begin with. The stitch count will be adjusted on the following row to fit the pattern and measurement sketch.

The rib edge is more elastic and will contract slightly compared to, for example, stocking stitch. By increasing before the rib edge, you avoid a visible difference in width between the rib edge and the rest of the body.

It’s very easy to cast off too tightly, and by making yarn overs while casting off (and simultaneously casting these off) you avoid a too tight cast off edge.

See DROPS video: How to bind off with yarn overs (yo)

To achieve an even increase (or decrease) you can increase on, for example: every 3rd and 4th row alternately, like so: work 2 rows and increase on the 3rd row, work 3 rows and increase on the 4th. Repeat this until the increase is complete.

See DROPS lesson: Increase or decrease 1 st on every 3rd and 4th row alternately

Should you prefer to work in the round instead of back and forth, you may of course adjust the pattern. You’ll need to add steeks mid-front (usually 5 stitches), and follow the instructions. When you would normally turn and work from the wrong side, simply work across the steek and continue in the round. At the end you’ll cut the piece open, pick up stitches to work bands, and cover the cut edges.

See DROPS video: How to knit steeks and cut open

Should you prefer to work back and forth instead of in the round, you may of course adjust the pattern so you work the pieces separately and then assemble them at the end. Divide the stitches for the body in 2, add 1 edge stitch in each side (for sewing) and work the front and back pieces separately.

See DROPS lesson: Can I adapt a pattern for circular needles into straight needles?

Pattern repeats can vary slightly in the different sizes, in order to get the correct proportions. If you’re not working the exact same size as the garment in the photo, yours might deviate slightly. This has been carefully developed and adjusted so that the complete impression of the garment is the same in all sizes.

Make sure to follow instructions and diagrams for your size!

If you have found a pattern you like which is available in women’s size it’s not very difficult to convert it to men’s size. The biggest difference will be the length of sleeves and body. Start working on the women size that you think would fit across the chest. The additional length will be worked right before you cast off for the armhole/sleeve cap. If the pattern is worked top-down you can add the length right after the armhole or before the first decrease on sleeve.

Regarding additional yarn amount, this will depend on how much length you add, but it is better with a skein too many than too few.

All yarns will have excess fibres (from production) that might come off as lint or shedding. Brushed yarns (ie hairier yarns) have more of these loose, excess fibres, causing more shedding.

Shedding also depends on what is worn under or over the garment, and whether this pulls at the yarn fibres. It’s therefore not possible to guarantee that there will be no shedding

Below are some tips on how to get the best result when working with hairier yarns:

1. When the garment is finished (before you wash it) shake it vigorously so the looser hairs come off. NOTE: do NOT use a lint roller, brush or any method that pulls at the yarn.

2. Place the garment in a plastic bag and put it in your freezer - the temperature will cause the fibres to become less attached to each other, and excess fibres will come off easier.

3. Leave in the freezer for a few hours before taking it out and shaking it again.

4. Wash the garment according to the instructions on the yarn label.

Pilling is a natural process that happens to even the most exclusive of fibers. It's a natural sign of wear and tear that is hard to avoid, and that is most visible in high friction areas of your garment like a sweater's arms and cuffs.

You can make your garment look as new by removing the pilling, using a fabric comb or a pill/lint remover.

Still can't find the answer you need? Then scroll down and leave your question so one of our experts can try to help you. This will be done normally within 5 to 10 working days.
In the meantime, you can read the questions and answers that others have left to this pattern or join the DROPS Workshop on Facebook to get help from fellow knitters/crocheters!

You might also like...

Post a comment to pattern DROPS 173-31

We would love to hear what you have to say about this pattern!

If you want to leave a question, please make sure you select the correct category in the form below, to speed up the answering process. Required fields are marked *.

Comments / Questions (47)

country flag Christiane Moten wrote:

Hallo, auch mir geht es wie Hanne. Die Maschenprobe war perfekt und auch bei mir ist nach Fertigstellung von A.1 die Größe nur 25x25 cm. Wie kommen Sie auf 36 cm ?

28.10.2016 - 14:30

DROPS Design answered:

Liebe Frau Moten, beachten Sie die Maschenprobe so daß sie dieselbe bleibt, und beachten Sie auch, die richtige Maschen zu häkeln, dh Stäbchen/Doppel-Stb wie under Diagram Text beschrieben.

28.10.2016 - 14:47

country flag Hanne Jakobsen wrote:

Min hækleprøve passede perfekt. 10 masker og 6 rækker på pind 7 var 10 gange 10 cm. Når jeg har lavet diagram A1 er mit arbejde kun 25 cm på hver led - i opskriften står der, at det skal være 36 cm på hver led??? Jeg strikker med Cloud fra Drops - som blev anbefalet i butikken. Jeg ved ikke hvordan jeg skal komme videre???!

27.10.2016 - 15:10

DROPS Design answered:

Hej Hanne, Da er du nødt til at bruge en tykkere hæklenål for at få det rigtige mål. God fornøjelse!

22.12.2016 - 09:50

country flag Diane Mosher wrote:

Need assistance with diagram A.2. I am unable to tell how to complete this stitch or group of stitches. I have looked at the photo but for me it is unclear. Please assist. Thanks. Diane Mosher

19.09.2016 - 22:38

DROPS Design answered:

Dear Mrs Mosher, you will find pictures showing how to work A.2. Happy crocheting!

20.09.2016 - 09:49

country flag Ruth wrote:

Ja, das kann ich sehen, aber mir geht es nicht um die Größe des Armausschnittes, sondern um den Abstand zwischen linkem und rechtem Armausschnitt und der ist 43 cm lt. den Angaben in der Zeichnung.

15.09.2016 - 18:36

country flag Ruth wrote:

Ja, vielen Dank, das sehe ich. Es geht mir aber nicht um die Größe des Armausschnittes, sondern um den Abstand zwischen rechtem und linkem Armausschnitt ... und da sind oben 43 cm eingetragen

15.09.2016 - 18:30

country flag Ruth wrote:

Lieben Dank für Ihre Nachricht. Die 43 cm Abstand sind laut Ihrer Zeichnung angegeben ;-). Ich arbeite zwischenzeitlich nach meinen eigenen Maßen und habe bei Größe M zwischen den Armausschnitten schon einen Abstand von 52 cm. Ich finde trotzdem, es ist so ein tolles Modell!! Herzliche Grüße!

15.09.2016 - 11:32

DROPS Design answered:

Liebe Ruth, die 43 cm in der Zeichnung gilt für 1 Seite von dem Quadrat, aber wenn sie die Armlöcher häkeln, haben Sie dann 24 cm - wie in der Zeichnung (siehe an der rechten Seite).

15.09.2016 - 13:01

country flag Ruth wrote:

Die Armausschnitte werden bei 43 cm (XXL) gesetzt, das scheint mir viel zu eng

12.09.2016 - 19:40

DROPS Design answered:

Liebe Ruth, stimmt Ihre Maschenprobe? Sie müssen 24 Stb überspringen und 24 (lockere) Lm häkeln, dh = 48 Maschen für die Armausschnitte = 48 cm.

13.09.2016 - 10:26

country flag Birte wrote:

In der Anleitung ist beschrieben, das man nach dem man Muster A1 gehäkelt hat die Arbeit ein Maß von 36x36cm hat. Ich komme weder mit Nadelstärke 7 noch mit Nadelstärke 9 auf diese Maße, ist eher 26x26cm, kann das sein?

15.08.2016 - 18:38

DROPS Design answered:

Liebe Birte, ja ich sehe, was Sie meinen. Mit der Maschenprobe kommt das nicht hin. Ich habe eine Anfrage an das Designteam gesendet und bitte Sie noch um etwas Geduld.

17.08.2016 - 14:02

country flag Arma Bakker wrote:

Beste Adeline, ik kwam ook maar aan de 28/28cm, en heb toen de laatste 2 toeren van A1 met dubbele stokjes gehaakt ipv stokjes. En ik snapte eerst ook niet van die 2e toer van A2 .Maar de stokjes die je ziet op de tekening bij A2, zijn de stokjes nog van A1. Je gaat dus verder met de vaste met 3 lossen , die boven de stokjes getekend staan. Snap je het zo beter? Groetjes, Arma

08.08.2016 - 09:55

country flag Adeline wrote:

Beste, Als ik met hknl 7 haak dan geraak ik niet aan de afmetibgen 36×36cm. Ook niet met hknl 10! Ik heel zeer los en niet vast. Ook versta ik niet meer wat ik moet doen als ik eenmaal de vierkant heb gehaakt. Wat bedoelen jullie met 12-15-18-18? Hoe tel ik dit? Want ik kom telkens fout uit. Wat bedoelen jullie met haak 2de toer van telpatroon a2? Met vriendelijke groeten

28.07.2016 - 21:27

DROPS Design answered:

Hoi Adeline. Ten eerste, haak altijd een proeflapje en was deze om de stekenverhouding te controleren. Dan klopt je afmetingen. Je haakt A.2 over 12-15-18 OF 18 stk (afhankelijk van welke maat je haakt). Daarna haak je verder vanaf 2e toer A.3a-A.3c zoals beschreven.

29.07.2016 - 11:39