
Popular categories
Looking for a yarn?


|
|||||||||||||||||||||||||||||||||||||||||||||||||
Stony Ridge |
|||||||||||||||||||||||||||||||||||||||||||||||||
 |
 |
||||||||||||||||||||||||||||||||||||||||||||||||
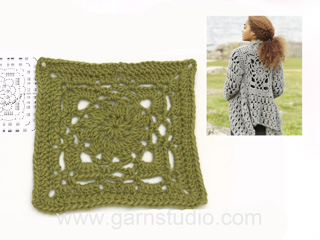
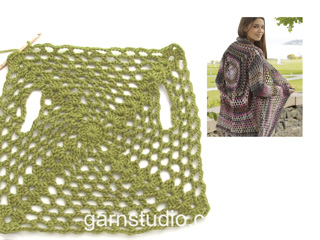
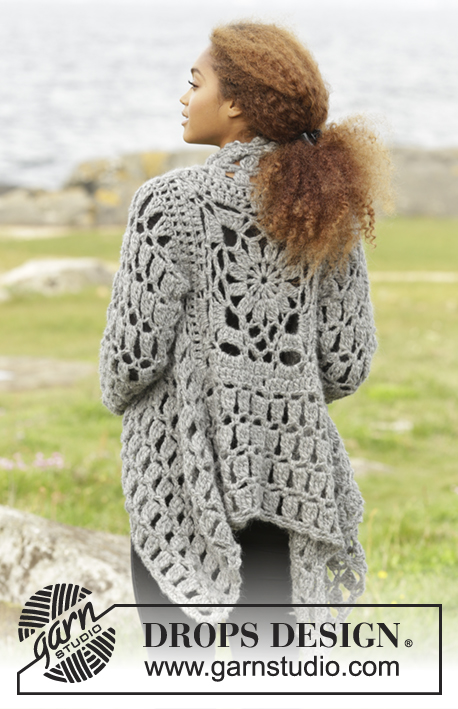
Crochet DROPS jacket worked in a square in 1 thread Cloud or 2 threads Air. Size S-XXXL.
DROPS 173-31 |
|||||||||||||||||||||||||||||||||||||||||||||||||
|
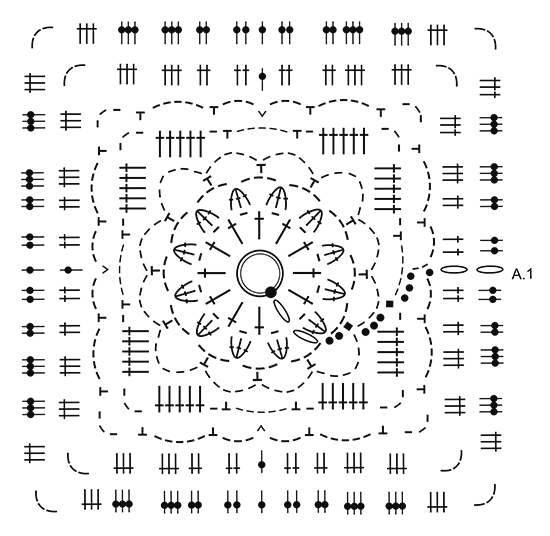
INC DC-GROUP: Work (3 dc, ch 3, 3 dc) around ch-space in the corner. PATTERN: See diagrams A.1 to A.5. ---------------------------------------------------------- JACKET: Work piece from mid back and outwards as a square. Beg with 1 thread Cloud or 2 threads Air on hook size 7 mm and work pattern according to diagram A.1. REMEMBER THE CROCHET GAUGE! When entire diagram A.1 has been worked, piece measures 36 x 36 cm / 14¼" x 14¼". Size S/M is now finished. Continue the remaining sizes in the round as follows: Size L/XL, XXL and XXXL: Continue with 1-2-2 rounds in total with 1 dc in every dc and work 1 INC dc-GROUP – see explanation above, in each corner. NOTE: Beg round with ch 3, and finish round with 1 sl st in 3rd ch at beg of round Now continue in all sizes as follows (work 2nd round in diagram A.2): Work 1 ch and 1 sl st in first dc on round, work A.2 over the next 12-15-18-18 dc (= 4-5-6-6 repetitions), work (1 sc, ch 3, 1 sc) around ch-space in the corner, work ch 3, skip 3 dc, A.2 over the next 6-9-12-12 dc (= 2-3-4-4 repetitions), 1 sc in space between the next 2 dc, insert a marker in piece and work 18-21-24-24 loose ch for armhole, skip 18-21-24-24 dc, work (1 sc, ch 3, 1 sc) around ch-space in next corner, work ch 3, skip 3 dc, work A.2 over the next 27-33-39-39 dc (= 9-11-13-13 repetitions), work (1 sc, ch 3, 1 sc) around ch-space in the corner, work 18-21-24-24 loose ch for armhole, skip 18-21-24-24 dc, insert a new marker in piece and work A.2 over the next 9-12-15-15 dc (= 3-4-5-5 repetitions), work (1 sc, 3 ch 1 sc) around ch-space in the corner, work ch 3, skip 3 dc, work A.2 over the next 12-15-18-18 dc (= 4-5-6-6 repetitions), and finish with 1 sl st in first sc on round. Now work pattern in the round as follows (work from 2nd round in diagram A.3a-A.3c): Work A.3a (show how round beg and end), work A.3b around every ch-space until first corner, work A.3c (= 3 tr, ch 3, 3 tr) around ch-space in the corner, continue with A.3b around every ch-space until ch for armhole, work A.3b 6-7-8-8 times around the 18-21-24-24 ch, work A.3c around ch-space in the corner, work A.3b around every ch-space until next corner, work A.3c around ch-space in the corner, work A.3b 6-7-8-8 times around the 18-21-24-24 ch for armhole, work A.3b around every ch-space until next corner, work A.3c around ch-space in the corner, work A.3b around the remaining ch-spaces on round. When A.3a-A.3c have been worked vertically, repeat the last 2 round in diagram until piece measures approx. 70-76-80-82 cm / 27½"-30"-31½"-32¼"" in total (= 35-38-40-41 cm / 13¾"-15"-15¾"-16⅛" from the middle of A.1 and out in one side) - adjust so that last round worked is a round with ch-spaces and sc. Cut the yarn. FRONT PIECE: Work front pieces back and forth without inc. Insert a marker on last round worked. NOW MEASURE THE PIECE FROM HERE. Beg at star in one corner – see chart, and work from 2nd row in diagram as follows: A.4a, then work A.4b until 1 ch-space remain before the ch-space in the corner, work A.4c. Continue like this back and forth. When A.4a, A.4b and A.4c have been worked vertically, repeat the last 2 rows until front piece measures approx. 23-25-26-27 cm / 9"-9¾"-10¼"-10½" from marker – adjust so that last row is worked as next to last row in A.4a-A.4c. Fasten off. Repeat in opposite side of piece – see star on chart. SLEEVES: Work sleeve back and forth. Beg at marker mid under sleeve and work from WS 18-21-24-24 dc evenly up to shoulder, then work 18-21-24-24 dc around ch-row = 36-42-48-48 dc. Insert a marker here. NOW MEASURE THE PIECE FROM HERE. Then work pattern back and forth from 2nd row (= RS) in diagram A.4 as follows: NOTE: On first row work every tr in tr-groups into one dc on previous row. Work A.4a, then work A.4b over the next 30-36-42-42 dc, work A.4c = 12-14-16-16 tr-groups. When entire diagram A.4a-A.4c has been worked vertically, repeat the last 2 rows in pattern, AT THE SAME TIME dec 1 tr-group in each side of sleeve by working as shown on the last 4 rows in diagram A.5a at beg of row and A.5b at the end of row = 10-12-14-14 tr-group. Repeat this dec in each side 0-1-1-1 more time = 10-10-12-12 tr-groups. When piece measures approx. 50 cm / 19¾" in all sizes, the sleeve is done - adjust to finish after a row that is last row in A.4a-A.4c. Fasten off. Work the other sleeve the same way. ASSEMBLY: Sew underarm seams in outer loops of edge sts. Work an edge around the entire jacket as follows: Beg in one corner on one of the front pieces and work * (1 sc, ch 3, 1 sc, ch 3, 1 sc, 3 ch) around ch-space in the corner, work (3 ch, skip approx. 1 cm / ⅜", 1 sc) until next corner, work ch 3, *, repeat from *-* around the entire jacket. Finish with 1 sl st in first sc on round. Fasten off. |
|||||||||||||||||||||||||||||||||||||||||||||||||
Diagram explanations |
|||||||||||||||||||||||||||||||||||||||||||||||||
|
|||||||||||||||||||||||||||||||||||||||||||||||||
|
|||||||||||||||||||||||||||||||||||||||||||||||||

|
|||||||||||||||||||||||||||||||||||||||||||||||||

|
|||||||||||||||||||||||||||||||||||||||||||||||||

|
|||||||||||||||||||||||||||||||||||||||||||||||||
|
Have you made this or any other of our designs? Tag your pictures in social media with #dropsdesign so we can see them! Do you need help with this pattern?You'll find tutorial videos, a Comments/Questions area and more by visiting the pattern on garnstudio.com. © 1982-2024 DROPS Design A/S. We reserve all rights. This document, including all its sub-sections, has copyrights. Read more about what you can do with our patterns at the bottom of each pattern on our site. |
|||||||||||||||||||||||||||||||||||||||||||||||||


With over 40 years in knitting and crochet design, DROPS Design offers one of the most extensive collections of free patterns on the internet - translated to 17 languages. As of today we count 304 catalogs and 11422 patterns - 11417 of which are translated into English (US/in).
We work hard to bring you the best knitting and crochet have to offer, inspiration and advice as well as great quality yarns at incredible prices! Would you like to use our patterns for other than personal use? You can read what you are allowed to do in the Copyright text at the bottom of all our patterns. Happy crafting!
Comments / Questions (47)
Is there a video tutorial on making this beautiful cardigan? I'm not well with reading patterns and work best watching videos. I want to make this but I'm afraid I won't be able to follow the written pattern. Thanks
22.04.2019 - 05:13DROPS Design answered:
Dear Leah, this video shows how to crochet the square - you will find here some more explanations on how to read crochet diagrams. You will also find here some pictures showing how to crochet all diagrams Happy crocheting!
23.04.2019 - 13:56Could this pattern be made with Drops Eskimo wool and if so what would be the best size crochet hook to be used.
08.03.2019 - 19:29DROPS Design answered:
Dear Susan, yes, you can make this sweater in Eskimo, however the result will be less soft, moe rigid and heavier. As for the hook size you should make a swatch and see what would give you the stitch count given in the pattern. Happy Crafting.
10.03.2019 - 16:52Hallo, In de werkbeschrijving staat dat ik bij het haken van de voorpanden moet eindigen met de een na laatste toer van A.4, wat een toer met dubbele stokjes is. Het grote vierkant en de mouwen moet ik eindigen met l-lussen en vasten. Klopt het dat de laatste toer van de voorpanden anders is? Alvast bedankt voor het antwoord.
07.11.2018 - 21:38DROPS Design answered:
Dag Iris,
Ja, dat klopt inderdaad dat het verschillend is. Aan het eind haak je nog een afwerkingsrand rondom de panden, waardoor het er weer hetzelfde uitziet als bij de mouwen.
08.11.2018 - 09:30Salve, sto eseguendo questo modello ma non mi è molto chiaro quando devo fare la prima riga dello schema A.4a-c (catenelle e maglie basse). Avete a disposizione qualche video per le maniche? Grazie mille, arrivederci.
09.10.2018 - 17:53DROPS Design answered:
Buongiorno Alessia. Quando lavora il diagramma A.4, deve iniziare dalla seconda riga. Buon lavoro!
09.10.2018 - 21:15J\'ai réussie a terminer le premier carré avec les explications vidéos,mais sans explications videos je ne suis pas capable de continuer, existe-t-il d'autres outils qui pourraient m'aider a comprendre et a finir ce tricot?
27.08.2018 - 15:33DROPS Design answered:
Bonjour Mme Tremblay, vous trouverez ici quelques photos illustrant comment crocheter ce modèle. Bon crochet!
05.09.2018 - 12:32Si usará drops you 8, cuántos gramos seria para una talla L? Gracias
10.01.2018 - 17:52DROPS Design answered:
Hola Mónica. Un ovillo de 50 g de Drops You 8 tiene casi los mismos metros ( 80 m) que un ovillo de Cloud (85 m). Es decir, se necesitan aprox 600 g. (12 ovillos). Ten en cuenta que la calidad de los hilos es totalmente diferente.
13.01.2018 - 20:18MARIA ELENA ALASSIA wrote:
A cuantos centimetros de tejido del granny se debe dejar lospuntos para las sisas?
18.12.2017 - 13:51DROPS Design answered:
Hola María, para cada talla, el tamaño del Granny es distinto. Para calcular mejor el número de puntos, mira el diagrama bajo el patrón.
30.12.2017 - 12:49MARIA ELENA ALASSIA wrote:
Es muy confusa la explicación para hacer el resto después del granny, no se como seguirlo
18.12.2017 - 01:53Hej! Under delen KOFTA: och ÄRMAR: står det att man ska avsluta med ett varv som består av 3 lm och 1 fm, men under delen FRAMST: står det att man ska avsluta med 3 dst runt lm-båge och 3 lm. Stämmer det? Eller ska det vara 3 lm och 1 fm runt hela koftan? Och används aldrig mönster A5? Tacksam för svar!
16.10.2017 - 20:49DROPS Design answered:
Hej, Ja det är bara att följa beskrivningen, den stämmer. Jo A.5 följer du på ärmen. Lycka till!
31.10.2017 - 08:29Hallo liebe Jeannette Matzau, verstehe ich das richtig, nach Beendigung der Vorderteile, ist bei ausgebreiteter Arbeit, A.4a links oben nach unten zu sehen, auf der rechten Seite aber A.4c . Die Vorderteile sehen bei mir oben im Muster nicht gleich aus.
20.09.2017 - 17:00DROPS Design answered:
Liebe Frau Abderhalden, bei A.4 lesen Sie das Diagram von unten nach oben, rechts nach links von der Vorderseite und links nach rechts von der Rückseite, so fangen Sie die 1. Reihe mit 4 Lm (in A.4a, bei einer Hinreihe) und enden Sie die 1. Reihe mit 1 Doppel-Stb (in A.4c, bei einer Hinreihe). Viel Spaß beim stricken!
20.09.2017 - 17:53