
Popular categories
Looking for a yarn?


|
||||||||||||||||||||||
Addiena |
||||||||||||||||||||||
|
|
||||||||||||||||||||||
Crochet DROPS shawl with fans and lace pattern in ”Cotton Viscose”.
DROPS 167-27 |
||||||||||||||||||||||
|
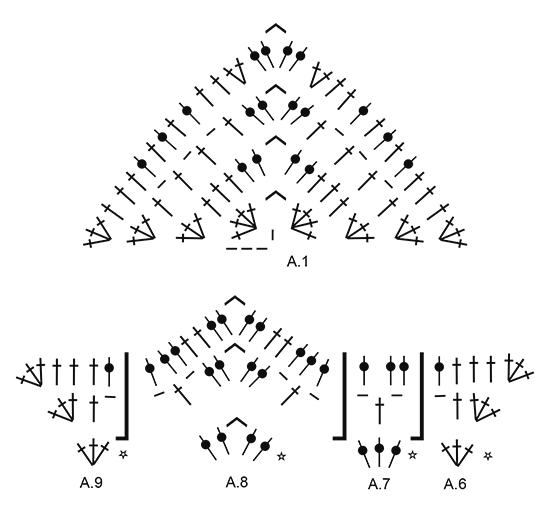
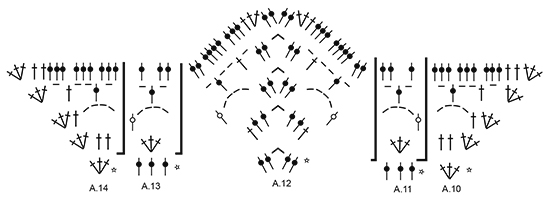
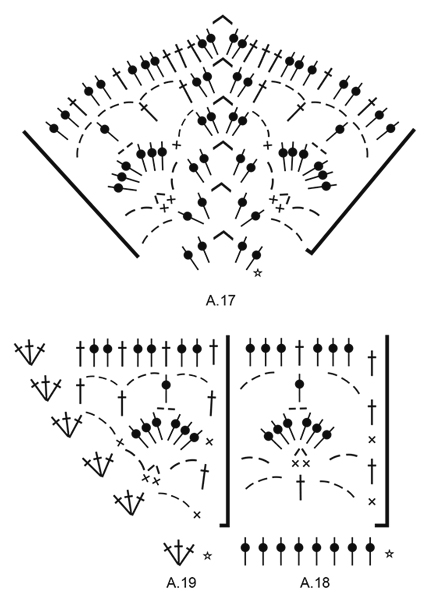
PATTERN: See diagrams A.1 to A.19. CROCHET INFO: At beg of every row with dc work ch 5, ch do not replace first dc. DECREASE TIP: Dec 1 dc by working 2 dc tog as follows: Work 1 dc but wait with last pull through (= 2 loops on hook), then work next dc but on last pull through, pull yarn through all 3 loops on hook. INCREASE TIP: Inc 1 dc by working 2 dc in same st. ---------------------------------------------------------- SHAWL: Worked back and forth from the top and down on hook size 3.5 mm/E/4 with Cotton Viscose - READ CROCHET INFO. Work diagram A.1 as follows: ROW 1 (= from WS): Work with off white. Work ch 4, 4 dc in 4th ch from hook, 4 ch (= tip), finish with 4 dc in same ch = 8 dc with 4 ch between. ROW 2: (= from RS): Work 3 dc in first dc, 1 dc in each of the next 3 dc, (2 dc, ch 4, 2 dc) around tip, 1 dc in each of the next 3 dc, 3 dc in last dc = 16 dc and 4 ch (= tip). ROW 3: Work 3 dc in first dc, 1 dc in next dc, * ch 1, skip 1 dc, 1 dc in next dc *, repeat from *-* 2 more times, (2 dc, ch 4, 2 dc) around tip, 1 dc in next dc, * ch 1, skip 1 dc, 1 dc in next dc *, repeat from *-* 2 more times, 3 dc in last dc = 18 dc, 6 ch and 4 ch (= tip). ROW 4: Work 3 dc in first dc, 1 dc in each of the next 3 dc, * 1 dc around next ch, 1 dc in next dc *, repeat from *-* 2 more times, 1 dc in next dc, 2 dc in next dc, (2 dc, ch 4, 2 dc) around tip, 2 dc in next dc, 1 dc in each of the next 2 dc, * 1 dc around next ch, 1 dc in next dc *, repeat from *-* 2 more times, 1 dc in each of the next 2 dc, 3 dc in last dc = 34 dc and 4 ch (= tip). REMEMBER THE CROCHET GAUGE! Work diagram A.2, A.3 (= 4 times), A.4, A.3 (= 4 times), A.5 as follows: ROW 5 (= from WS): Work 3 dc in first dc, 1 dc in every dc until tip, (2 dc, ch 4, 2 dc) around tip, 1 dc in every dc until 1 dc remains, work 3 dc in last dc. ROW 6 (from RS): Work 3 dc in first dc, ch 1, skip 2 dc, (1 dc, ch 1, 1 dc) in next dc, * skip 2 dc, (1 dc, ch 1, 1 dc) in next dc *, repeat from *-* until 2 dc remain before tip, ch 1, skip 2 dc, (2 dc, ch 4, 2 dc) around tip, ch 1, skip 2 dc, * (1 dc, ch 1, 1 dc) in next dc, skip 2 dc *, repeat from *-* until 1 dc remains, ch 1, 3 dc in last dc. ROW 7: (= from WS): Work 3 dc in first dc, 1 dc in each of the next 2 dc, 1 dc around next ch-space, 3 dc around every ch until (1 ch, 2 dc) remain before tip, 1 dc around ch, 1 dc in each of the next 2 dc, (2 dc, ch 4, 2 dc) around tip, 1 dc in each of the next 2 dc, 1 dc around next ch, 3 dc around every ch until (1 ch, 3 dc) remain, 1 dc around ch, 1 dc in each of the next 2 dc, 3 dc in last dc = 29 dc on each side of tip (first time repetition is worked). Work diagram A.6, A.7 (= 8 times), A.8, A.7 (= 8 times), A.9 as follows: ROW 8 (from RS): Work 3 dc in first dc, 1 dc in next dc, ch 2, skip 2 dc, * 1 dc in next dc, ch 2, skip 2 dc *, repeat from *-* until 1 dc remain before tip, ch 2, 1 dc in next dc, ch 1, (2 dc, ch 4, 2 dc) around tip, ch 1, 1 dc in next dc, * ch 2, skip 2 dc, 1 dc in next dc *, repeat from *-* until 1 dc remains, 3 dc in last dc. ROW 9 (= from WS): Work 3 dc in first dc, 1 dc in each of the next 3 dc, 2 dc around next ch-space, 3 dc around every ch-space until 1 ch and 2 dc remain before tip, 2 dc around ch, 1 dc in each of the next 2 dc, (2 dc, ch 4, 2 dc) around tip, 1 dc in each of the next 2 dc, 2 dc around next ch, 2 dc around next ch-space, 3 dc around every ch-space until 4 dc remain, 1 dc in each of the next 3 dc, 3 dc in last dc = 38 dc on each side of tip (first time repetition is worked). Work diagram A.10, A.11 (= 11 times), A.12, A.13 (= 11 times), A.14 as follows: ROW 10 (from RS): Work 3 dc in first dc, 1 dc in each of the next 2 dc, skip 1 dc, * 3 dc in next dc, skip 2 dc *, repeat from *-* until 1 dc remains before tip, 1 dc in next dc, (2 dc, ch 4, 2 dc) around tip, 1 dc in next dc, * skip 2 dc, 3 dc in next dc *, repeat from *-* until 4 dc remain, skip 1 dc, 1 dc in each of the next 2 dc, 3 dc in last dc. ROW 11 (= from WS): Work 3 dc in first dc, 1 dc in next dc, ch 4, 1 dc before first dc-group (i.e. between 2 sts), * ch 4, 1 dc before next dc-group *, repeat from *-* until 3 dc remain before tip, ch 4, 1 dc before next dc, ch 4, (2 dc, ch 4, 2 dc) around tip, ch 4, skip 3 dc, * 1 dc before next dc-group, 4 ch *, repeat from *-* until (1 dc-group, 5 dc) remain, work 1 dc between dc-group and next dc, ch 4, skip 3 dc, 1 dc in next dc, 3 dc in last dc. ROW 12: Work 3 dc in first dc, ch 1, skip 1 dc, 1 dc in next dc, * ch 2, 1 dc around next ch-space *, repeat from *-* until 2 dc remain before tip, ch 2, 1 dc in next dc, ch 1, skip 1 dc, (2 dc, ch 4, 2 dc) around tip, ch 1, skip 1 dc, 1 dc in next dc, ch 2, * 1 dc around next ch-space, 2 ch *, repeat from *-* until 4 dc remain, skip 1 dc, 1 dc in next dc, ch 1, skip 1 dc, 3 dc in last dc. ROW 13: 3 dc in first dc, 1 dc in each of the next 2 dc, 3 dc around next ch, 3 dc around next ch-space, 4 dc around next ch-space, 3 dc around every ch-space until (1 ch-space, 1 dc, 1 ch-space, 1 dc, ch 1, 2 dc) remain before tip, work 4 dc around each of the 2 ch-spaces, 3 dc around ch, 1 dc in next dc, 2 dc in next dc, (2 dc, ch 4, 2 dc) around tip, 2 dc in next dc, 1 dc in next dc, 3 dc around next ch, 4 dc around each of the next 2 ch-spaces, 3 dc around every ch-space until (2 ch-spaces, ch 1, 4 dc) remain, work 4 dc around next ch-space, 3 dc around next ch-space, 3 dc around next ch, 1 dc in each of the next 2 dc, 3 dc in last dc = 61 dc on each side of tip (first time repetition is worked). Fasten off. Work diagram A.15, A.16 (= 7 times), A.17, A.18 (= 7 times), A.19 as follows: ROW 14 (from RS): Work with light beige. Work 3 dc in first dc, ch 3, skip 1 dc, 1 sc in next dc, * ch 3, skip 3 dc, 1 dc in next dc, ch 3, skip 3 dc, 1 sc in next dc *, repeat from *-* until 2 dc remain before tip, ch 3, skip 2 dc, (2 dc, ch 4, 2 dc) around tip, ch 3, skip 2 dc, * 1 sc in next dc, ch 3, skip 3 dc, 1 dc in next dc, ch 3, skip 3 dc *, repeat from *-* until 3 dc remain, 1 sc in next dc, ch 3, skip 1 dc, 3 dc in last dc. ROW 15 (= from WS): Work 3 dc in first dc, ch 2, skip 1 dc, (1 sc, ch 2, 1 sc) in next dc, ch 2, 1 dc in next sc, * ch 2, (1 sc, ch 2, 1 sc) in next dc, ch 2, 1 dc in next sc *, repeat from *-* until 2 dc remain before tip, ch 2, (2 sc, ch 2, 1 sc) in next dc, ch 2, skip 1 dc, (2 dc, ch 4, 2 dc) around tip, ch 2, skip 1 dc, (1 sc, ch 2, 1 sc) in next dc, ch 2, * 1 dc in next sc, ch 2, (1 sc, ch 2, 1 sc) in next dc, 2 ch *, repeat from *-* until (1 sc, 1 ch-space, 3 dc) remain, 1 dc in next sc, ch 2, (1 sc, ch 2, 1 sc) in next dc, ch 2, skip 1 dc, 3 dc in last dc. ROW 16: Work 3 dc in first dc, ch 3, skip 1 dc, 1 sc in next dc, skip 1 ch-space, (3 dc, ch 2, 3 dc) around next ch-space, skip 1 ch-space, 1 sc in next dc, * skip 1 ch-space, (3 dc, ch 2, 3 dc) around next ch-space, skip 1 ch-space, 1 sc in next dc *, repeat from *-* until 1 dc remains before tip, ch 3, skip 1 dc, (2 dc, ch 4, 2 dc) around tip, ch 3, skip 1 dc, * 1 sc in next dc, skip 1 ch-space, (3 dc, ch 2, 3 dc) around next ch-space, skip 1 ch-space *, repeat from *-* until 3 dc remain, 1 sc in next dc, ch 3, skip 1 dc, 3 dc in last dc. ROW 17: Work 3 dc in first dc, skip 1 dc, 1 dc in next dc, ch 3, 1 dc in next sc, ch 3, 1 dc around next ch-space, ch 3, 1 dc in next sc, * ch 3, 1 dc around next ch-space, ch 3, 1 dc in next sc *, repeat from *-* until (1 ch-space, 2 dc) remain before tip, ch 3, 1 dc in next dc, skip 1 dc, (2 dc, ch 4, 2 dc) around tip, skip 1 dc, 1 dc in next dc, ch 3, * 1 dc in next sc, ch 3, 1 dc around next ch-space, 3 ch *, repeat from *-* until (1 sc, 1 ch-space, 3 dc) remain, 1 dc in next sc, ch 3, 1 dc in next dc, skip 1 dc, 3 dc in last dc. ROW 18: Work 3 dc in first dc, skip 2 dc, 1 dc in next dc, * 2 dc around next ch-space, 1 dc in next dc *, repeat from *-* 2 more times, * 3 dc around next ch-space, 1 dc in next dc, 3 dc around next ch-space, 1 dc in next dc *, repeat from *-* until (3 ch-space, 5 dc) before tip, * 2 dc around next ch-space, 1 dc in next dc *, repeat from *-* 1 more time, 3 dc around next ch-space, 1 dc in each of the next 3 dc, (2 dc, ch 4, 2 dc around tip), 1 dc in each of the next 3 dc, 3 dc around next ch-space, * 1 dc in next dc, 2 dc around next ch-space *, repeat from *-* 1 more time, * 1 dc in next dc, 3 dc around next ch-space, 1 dc in next dc, 3 dc around next ch-space *, repeat from *-* until (3 ch-spaces, 7 dc) remain, * 1 dc in next dc, 2 dc around next ch-space *, repeat from *-* 2 more times, 1 dc in next dc, skip 2 dc, 3 dc in last dc = 83 dc on each side of tip (first time repetition is worked). Fasten off. Piece measures approx. 16 cm / 6¼" in crochet direction. Continue to work as follows with heather: Repeat 5th-7th row = 95 dc on each side of tip on last row. Repeat 8th-9th row = 104 dc on each side of tip on last row. Repeat 10th-13th row - AT THE SAME TIME on last row dec 2 dc evenly over repetitions with A.11 - READ DECREASE TIP - and dec 2 dc evenly over repetitions with A.13 = 125 dc on each side of tip on last row. Cut the yarn, fasten and change to light beige. Repeat 14th-18th row AT THE SAME TIME on last row inc 2 dc evenly before tip - READ INCREASE TIP - and inc 2 dc evenly after tip = 149 dc on each side of tip. Piece measures approx. 28 cm / 11" in crochet direction. Continue to work as follows: Repeat 14th-18th row (NOTE: First row beg from WS) - AT THE SAME TIME on last row inc 2 dc evenly before tip and 2 dc evenly after tip = 173 dc on each side of tip. Cut the yarn, fasten and change to off white. Repeat 14th-18th row AT THE SAME TIME on last row inc 2 dc evenly before tip and inc 2 dc evenly after tip = 197 dc on each side of tip. Cut the yarn, fasten and change to light pink. Continue to work as follows: Repeat 5th-7th row = 209 dc on each side of tip on last row. Repeat 8th-9th row = 218 dc on each side of tip on last row. Repeat 10th-13th row - AT THE SAME TIME on last row dec 4 dc evenly over repetitions with A.11 and dec 4 dc evenly over repetitions with A.13 = 237 dc on each side of tip on last row. Cut the yarn, fasten and change to heather. Repeat 14th-18th row AT THE SAME TIME on last row inc 2 dc evenly before tip and inc 2 dc evenly after tip = 261 dc on each side of tip. Cut the yarn, fasten and change to light beige. Piece measures approx. 48 cm / 19" in crochet direction. Continue to work as follows: Repeat 14th-18th row AT THE SAME TIME on last row inc 2 dc evenly before tip and inc 2 dc evenly after tip = 285 dc on each side of tip on last row. Repeat 14th-18th row (NOTE: First row beg from WS) - AT THE SAME TIME on last row inc 2 dc evenly before tip and 2 dc evenly after tip = 309 dc on each side of tip on last row. Cut the yarn and fasten. Piece measures approx. 56 cm / 22" in crochet direction and approx. 88 cm / 34½" along tip. |
||||||||||||||||||||||
Diagram explanations |
||||||||||||||||||||||
|
||||||||||||||||||||||
|
||||||||||||||||||||||

|
||||||||||||||||||||||
|
||||||||||||||||||||||
|
||||||||||||||||||||||
|
Have you made this or any other of our designs? Tag your pictures in social media with #dropsdesign so we can see them! Do you need help with this pattern?You'll find tutorial videos, a Comments/Questions area and more by visiting the pattern on garnstudio.com. © 1982-2024 DROPS Design A/S. We reserve all rights. This document, including all its sub-sections, has copyrights. Read more about what you can do with our patterns at the bottom of each pattern on our site. |
||||||||||||||||||||||


With over 40 years in knitting and crochet design, DROPS Design offers one of the most extensive collections of free patterns on the internet - translated to 17 languages. As of today we count 304 catalogs and 11422 patterns - 11417 of which are translated into English (US/in).
We work hard to bring you the best knitting and crochet have to offer, inspiration and advice as well as great quality yarns at incredible prices! Would you like to use our patterns for other than personal use? You can read what you are allowed to do in the Copyright text at the bottom of all our patterns. Happy crafting!
Comments / Questions (35)
I found the problem, I think. It is in your instructions for row 9: the beginning of the row has 2 dc in the first chain space but the end of the row tells us to do 3 dc until we get to the last shell. That is where my increase of one stitch took place on one side of row 9 and threw the next rows off. It would be helpful if you would give the dc count at the end of each row, instead of after every several. And it would help if I would actually force myself to stop and count! ;)
07.04.2018 - 13:51Sorry. But I am having trouble. All went well until row 14 as I approached the tip: after the last ch 3, sc I have 5 dc before the tip, not two. Maybe my problem was earlier as I seem to have 64 not 61 dc in row 13. Ugh.
07.04.2018 - 02:36DROPS Design answered:
Dear Mrs Fagel, make sure the previous rows are correct, if your number of sts is not right at the end of row 13, row 14 and next ones will not be right. You can check the previous rows from diagram as well as from written pattern. Happy crocheting!
09.04.2018 - 09:28Oeps zie het nu eindelijk zelf. Heb ten onrechte aangenomen dat het nummer van het TELpatroon gelijk is aan het nummer van de toeren. Probleem opgelost 😃
15.03.2018 - 16:10DROPS Design answered:
Hallo Anna, Fijn dat je eruit gekomen bent en dankjewel voor de terugkoppeling.
19.03.2018 - 08:11Beste, ik heb het patroon gemaakt tot en met de 1e herhaling van toer 9 en heb nu aan beide kanten 104 stokjes. Het is een beetje dom misschien maar ik heb geen idee hoe ik verder moet. Ik moet in de laatste toer (toer 13?) minderen over de patroonbeschrijvingen van A11 en A13. Toer 11 zijn lussen die telkens tussen stekengroepjes van 3 ingestoken worden, dus daar is het lastig stokjes te minderen. Veel dank vast voor het antwoord!
15.03.2018 - 11:58Hallo, ik zit een beetje in de problemen bij toer 9. Ik heb de indruk dat het telpatroon niet overeenkomt met de omschrijving. In de omschrijving staat dat je in elke l-lus 3stk moet haken, maar als ik kijk naar het telpatroon zijn er dat precies maar 2. Wat moet ik nu volgen? De omschrijving of het telpatroon?
03.11.2017 - 07:42DROPS Design answered:
Hallo Hannelot, Als je goed kijkt zie je ook in het telpatroon 3 stokjes staan aan het begin van toer 9 (in het telpatroon de 2e toer van A.6 t/m A.9). Je haakt 3 stokjes in dezelfde steek.
03.11.2017 - 09:53Bij rij 50 staat: "Herhaal 10e-13e toer – minder TEGELIJKERTIJD op de laatste toer 2 stk gelijkmatig over patroonherhalingen van A.11 en minder 4 stk gelijkmatig over patroonherhalingen van A.13 = 237 stk aan elke kant van de punt op de laatste toer. Hecht af en wissel naar heidekruid." Als je goed telt dan moet er aan elke kant 4 steken geminderd worden, anders kom je niet aan 237 stk per kant. Toch een fijn patroon met heel wat uitdagingen.
05.07.2017 - 11:04DROPS Design answered:
Hoi Diane, Dat klopt inderdaad; het moeten 4 steken zijn aan beide zijden. Er is inmiddels een correctie op het patroon gekomen, dus het staat er nu wel goed in.
07.07.2017 - 14:09Merci beaucoup!!! Votre aide est vraiment précieuse! ^_^ J'ai mis des marqueurs à chaque groupe de B pour bien visualiser et c'est nickel! Merci encore!
30.06.2017 - 16:50Bonjour, tout colle à la perfection jusqu'au rang 7. par contre j'ai de gros soucis au rang 8 et avec les diagrammes A6 à A9 : si je suis les explications seulement, j'ai 9 répétitions de A7 ; si je suis les diagrammes et que je fais 8 répétitions de A7 comme demandé, il me reste 4B avant la pointe et non trois comme dessiné. Merci pour votre aide, Marion
30.06.2017 - 15:44DROPS Design answered:
Bonjour Marion, vous répétez A.7 sur les 24 brides (entre le groupe de B du début/de la fin du rang et celui du milieu), soit 8 x A.7, avec A.8 dans le groupe de B du milieu du rang (= sur 2B, 4 ml, 2B). Bon crochet!
30.06.2017 - 15:59Er staat bij toer 50 (herhaling toer 13) dat je moet minderen. Alleen over A11 2 steken en over A13 4 steken. Volgens mij moet dit hetzelfde aantal zijn ? Alleen is het nou 2 of 4 aan elke kant ?
18.05.2017 - 08:53DROPS Design answered:
Hoi Kiruna, Excuses voor het lange wachten op een antwoord. Het patroon is nagekeken en het moet inderdaad hetzelfde aantal zijn, namelijk 4 steken. Inmiddels is dit aangepast in het patroon.
07.07.2017 - 14:07Tm toer 4 snap ik het. Dan wordt er verwezen naar telpatroon A2,A3 (=4keer) dan A4 en weer A3. En dan staat er a5 als volgt: toer 5 (....) Moet ik nu die telpatroon volgen en dan in Totaal 8 keer haken en verder op toer 5? Daarbij snap ik die twee telpatronem ook niet. Haak normaal amigurumi dus dit is wel wat anders.
08.05.2017 - 22:31DROPS Design answered:
Hoi Karina, In wezen kun je gewoon de beschrijving blijven volgen. De telpatronen zijn in dit geval als aanvulling van de beschrijving. Dus als je zeg maar gewoon leest wat er bij toer 5 staat (net zoals de voorgaande toeren) moet je eruit komen.
09.05.2017 - 22:43