
Popular categories
Looking for a yarn?


|
||||||||||||||||||||||
Addiena |
||||||||||||||||||||||
|
|
||||||||||||||||||||||
Crochet DROPS shawl with fans and lace pattern in ”Cotton Viscose”.
DROPS 167-27 |
||||||||||||||||||||||
|
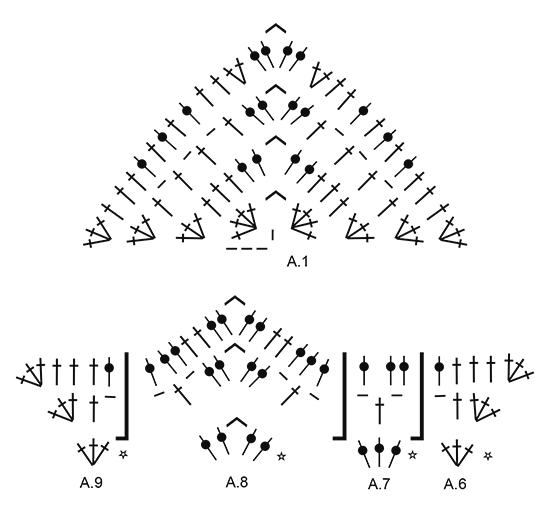
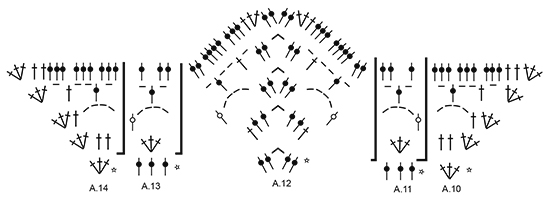
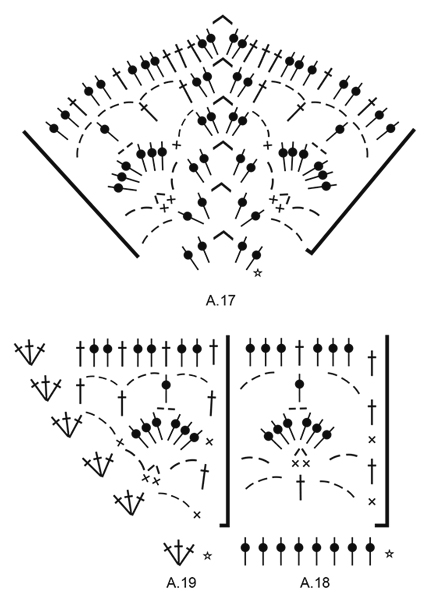
PATTERN: See diagrams A.1 to A.19. CROCHET INFO: At beg of every row with dc work ch 5, ch do not replace first dc. DECREASE TIP: Dec 1 dc by working 2 dc tog as follows: Work 1 dc but wait with last pull through (= 2 loops on hook), then work next dc but on last pull through, pull yarn through all 3 loops on hook. INCREASE TIP: Inc 1 dc by working 2 dc in same st. ---------------------------------------------------------- SHAWL: Worked back and forth from the top and down on hook size 3.5 mm/E/4 with Cotton Viscose - READ CROCHET INFO. Work diagram A.1 as follows: ROW 1 (= from WS): Work with off white. Work ch 4, 4 dc in 4th ch from hook, 4 ch (= tip), finish with 4 dc in same ch = 8 dc with 4 ch between. ROW 2: (= from RS): Work 3 dc in first dc, 1 dc in each of the next 3 dc, (2 dc, ch 4, 2 dc) around tip, 1 dc in each of the next 3 dc, 3 dc in last dc = 16 dc and 4 ch (= tip). ROW 3: Work 3 dc in first dc, 1 dc in next dc, * ch 1, skip 1 dc, 1 dc in next dc *, repeat from *-* 2 more times, (2 dc, ch 4, 2 dc) around tip, 1 dc in next dc, * ch 1, skip 1 dc, 1 dc in next dc *, repeat from *-* 2 more times, 3 dc in last dc = 18 dc, 6 ch and 4 ch (= tip). ROW 4: Work 3 dc in first dc, 1 dc in each of the next 3 dc, * 1 dc around next ch, 1 dc in next dc *, repeat from *-* 2 more times, 1 dc in next dc, 2 dc in next dc, (2 dc, ch 4, 2 dc) around tip, 2 dc in next dc, 1 dc in each of the next 2 dc, * 1 dc around next ch, 1 dc in next dc *, repeat from *-* 2 more times, 1 dc in each of the next 2 dc, 3 dc in last dc = 34 dc and 4 ch (= tip). REMEMBER THE CROCHET GAUGE! Work diagram A.2, A.3 (= 4 times), A.4, A.3 (= 4 times), A.5 as follows: ROW 5 (= from WS): Work 3 dc in first dc, 1 dc in every dc until tip, (2 dc, ch 4, 2 dc) around tip, 1 dc in every dc until 1 dc remains, work 3 dc in last dc. ROW 6 (from RS): Work 3 dc in first dc, ch 1, skip 2 dc, (1 dc, ch 1, 1 dc) in next dc, * skip 2 dc, (1 dc, ch 1, 1 dc) in next dc *, repeat from *-* until 2 dc remain before tip, ch 1, skip 2 dc, (2 dc, ch 4, 2 dc) around tip, ch 1, skip 2 dc, * (1 dc, ch 1, 1 dc) in next dc, skip 2 dc *, repeat from *-* until 1 dc remains, ch 1, 3 dc in last dc. ROW 7: (= from WS): Work 3 dc in first dc, 1 dc in each of the next 2 dc, 1 dc around next ch-space, 3 dc around every ch until (1 ch, 2 dc) remain before tip, 1 dc around ch, 1 dc in each of the next 2 dc, (2 dc, ch 4, 2 dc) around tip, 1 dc in each of the next 2 dc, 1 dc around next ch, 3 dc around every ch until (1 ch, 3 dc) remain, 1 dc around ch, 1 dc in each of the next 2 dc, 3 dc in last dc = 29 dc on each side of tip (first time repetition is worked). Work diagram A.6, A.7 (= 8 times), A.8, A.7 (= 8 times), A.9 as follows: ROW 8 (from RS): Work 3 dc in first dc, 1 dc in next dc, ch 2, skip 2 dc, * 1 dc in next dc, ch 2, skip 2 dc *, repeat from *-* until 1 dc remain before tip, ch 2, 1 dc in next dc, ch 1, (2 dc, ch 4, 2 dc) around tip, ch 1, 1 dc in next dc, * ch 2, skip 2 dc, 1 dc in next dc *, repeat from *-* until 1 dc remains, 3 dc in last dc. ROW 9 (= from WS): Work 3 dc in first dc, 1 dc in each of the next 3 dc, 2 dc around next ch-space, 3 dc around every ch-space until 1 ch and 2 dc remain before tip, 2 dc around ch, 1 dc in each of the next 2 dc, (2 dc, ch 4, 2 dc) around tip, 1 dc in each of the next 2 dc, 2 dc around next ch, 2 dc around next ch-space, 3 dc around every ch-space until 4 dc remain, 1 dc in each of the next 3 dc, 3 dc in last dc = 38 dc on each side of tip (first time repetition is worked). Work diagram A.10, A.11 (= 11 times), A.12, A.13 (= 11 times), A.14 as follows: ROW 10 (from RS): Work 3 dc in first dc, 1 dc in each of the next 2 dc, skip 1 dc, * 3 dc in next dc, skip 2 dc *, repeat from *-* until 1 dc remains before tip, 1 dc in next dc, (2 dc, ch 4, 2 dc) around tip, 1 dc in next dc, * skip 2 dc, 3 dc in next dc *, repeat from *-* until 4 dc remain, skip 1 dc, 1 dc in each of the next 2 dc, 3 dc in last dc. ROW 11 (= from WS): Work 3 dc in first dc, 1 dc in next dc, ch 4, 1 dc before first dc-group (i.e. between 2 sts), * ch 4, 1 dc before next dc-group *, repeat from *-* until 3 dc remain before tip, ch 4, 1 dc before next dc, ch 4, (2 dc, ch 4, 2 dc) around tip, ch 4, skip 3 dc, * 1 dc before next dc-group, 4 ch *, repeat from *-* until (1 dc-group, 5 dc) remain, work 1 dc between dc-group and next dc, ch 4, skip 3 dc, 1 dc in next dc, 3 dc in last dc. ROW 12: Work 3 dc in first dc, ch 1, skip 1 dc, 1 dc in next dc, * ch 2, 1 dc around next ch-space *, repeat from *-* until 2 dc remain before tip, ch 2, 1 dc in next dc, ch 1, skip 1 dc, (2 dc, ch 4, 2 dc) around tip, ch 1, skip 1 dc, 1 dc in next dc, ch 2, * 1 dc around next ch-space, 2 ch *, repeat from *-* until 4 dc remain, skip 1 dc, 1 dc in next dc, ch 1, skip 1 dc, 3 dc in last dc. ROW 13: 3 dc in first dc, 1 dc in each of the next 2 dc, 3 dc around next ch, 3 dc around next ch-space, 4 dc around next ch-space, 3 dc around every ch-space until (1 ch-space, 1 dc, 1 ch-space, 1 dc, ch 1, 2 dc) remain before tip, work 4 dc around each of the 2 ch-spaces, 3 dc around ch, 1 dc in next dc, 2 dc in next dc, (2 dc, ch 4, 2 dc) around tip, 2 dc in next dc, 1 dc in next dc, 3 dc around next ch, 4 dc around each of the next 2 ch-spaces, 3 dc around every ch-space until (2 ch-spaces, ch 1, 4 dc) remain, work 4 dc around next ch-space, 3 dc around next ch-space, 3 dc around next ch, 1 dc in each of the next 2 dc, 3 dc in last dc = 61 dc on each side of tip (first time repetition is worked). Fasten off. Work diagram A.15, A.16 (= 7 times), A.17, A.18 (= 7 times), A.19 as follows: ROW 14 (from RS): Work with light beige. Work 3 dc in first dc, ch 3, skip 1 dc, 1 sc in next dc, * ch 3, skip 3 dc, 1 dc in next dc, ch 3, skip 3 dc, 1 sc in next dc *, repeat from *-* until 2 dc remain before tip, ch 3, skip 2 dc, (2 dc, ch 4, 2 dc) around tip, ch 3, skip 2 dc, * 1 sc in next dc, ch 3, skip 3 dc, 1 dc in next dc, ch 3, skip 3 dc *, repeat from *-* until 3 dc remain, 1 sc in next dc, ch 3, skip 1 dc, 3 dc in last dc. ROW 15 (= from WS): Work 3 dc in first dc, ch 2, skip 1 dc, (1 sc, ch 2, 1 sc) in next dc, ch 2, 1 dc in next sc, * ch 2, (1 sc, ch 2, 1 sc) in next dc, ch 2, 1 dc in next sc *, repeat from *-* until 2 dc remain before tip, ch 2, (2 sc, ch 2, 1 sc) in next dc, ch 2, skip 1 dc, (2 dc, ch 4, 2 dc) around tip, ch 2, skip 1 dc, (1 sc, ch 2, 1 sc) in next dc, ch 2, * 1 dc in next sc, ch 2, (1 sc, ch 2, 1 sc) in next dc, 2 ch *, repeat from *-* until (1 sc, 1 ch-space, 3 dc) remain, 1 dc in next sc, ch 2, (1 sc, ch 2, 1 sc) in next dc, ch 2, skip 1 dc, 3 dc in last dc. ROW 16: Work 3 dc in first dc, ch 3, skip 1 dc, 1 sc in next dc, skip 1 ch-space, (3 dc, ch 2, 3 dc) around next ch-space, skip 1 ch-space, 1 sc in next dc, * skip 1 ch-space, (3 dc, ch 2, 3 dc) around next ch-space, skip 1 ch-space, 1 sc in next dc *, repeat from *-* until 1 dc remains before tip, ch 3, skip 1 dc, (2 dc, ch 4, 2 dc) around tip, ch 3, skip 1 dc, * 1 sc in next dc, skip 1 ch-space, (3 dc, ch 2, 3 dc) around next ch-space, skip 1 ch-space *, repeat from *-* until 3 dc remain, 1 sc in next dc, ch 3, skip 1 dc, 3 dc in last dc. ROW 17: Work 3 dc in first dc, skip 1 dc, 1 dc in next dc, ch 3, 1 dc in next sc, ch 3, 1 dc around next ch-space, ch 3, 1 dc in next sc, * ch 3, 1 dc around next ch-space, ch 3, 1 dc in next sc *, repeat from *-* until (1 ch-space, 2 dc) remain before tip, ch 3, 1 dc in next dc, skip 1 dc, (2 dc, ch 4, 2 dc) around tip, skip 1 dc, 1 dc in next dc, ch 3, * 1 dc in next sc, ch 3, 1 dc around next ch-space, 3 ch *, repeat from *-* until (1 sc, 1 ch-space, 3 dc) remain, 1 dc in next sc, ch 3, 1 dc in next dc, skip 1 dc, 3 dc in last dc. ROW 18: Work 3 dc in first dc, skip 2 dc, 1 dc in next dc, * 2 dc around next ch-space, 1 dc in next dc *, repeat from *-* 2 more times, * 3 dc around next ch-space, 1 dc in next dc, 3 dc around next ch-space, 1 dc in next dc *, repeat from *-* until (3 ch-space, 5 dc) before tip, * 2 dc around next ch-space, 1 dc in next dc *, repeat from *-* 1 more time, 3 dc around next ch-space, 1 dc in each of the next 3 dc, (2 dc, ch 4, 2 dc around tip), 1 dc in each of the next 3 dc, 3 dc around next ch-space, * 1 dc in next dc, 2 dc around next ch-space *, repeat from *-* 1 more time, * 1 dc in next dc, 3 dc around next ch-space, 1 dc in next dc, 3 dc around next ch-space *, repeat from *-* until (3 ch-spaces, 7 dc) remain, * 1 dc in next dc, 2 dc around next ch-space *, repeat from *-* 2 more times, 1 dc in next dc, skip 2 dc, 3 dc in last dc = 83 dc on each side of tip (first time repetition is worked). Fasten off. Piece measures approx. 16 cm / 6¼" in crochet direction. Continue to work as follows with heather: Repeat 5th-7th row = 95 dc on each side of tip on last row. Repeat 8th-9th row = 104 dc on each side of tip on last row. Repeat 10th-13th row - AT THE SAME TIME on last row dec 2 dc evenly over repetitions with A.11 - READ DECREASE TIP - and dec 2 dc evenly over repetitions with A.13 = 125 dc on each side of tip on last row. Cut the yarn, fasten and change to light beige. Repeat 14th-18th row AT THE SAME TIME on last row inc 2 dc evenly before tip - READ INCREASE TIP - and inc 2 dc evenly after tip = 149 dc on each side of tip. Piece measures approx. 28 cm / 11" in crochet direction. Continue to work as follows: Repeat 14th-18th row (NOTE: First row beg from WS) - AT THE SAME TIME on last row inc 2 dc evenly before tip and 2 dc evenly after tip = 173 dc on each side of tip. Cut the yarn, fasten and change to off white. Repeat 14th-18th row AT THE SAME TIME on last row inc 2 dc evenly before tip and inc 2 dc evenly after tip = 197 dc on each side of tip. Cut the yarn, fasten and change to light pink. Continue to work as follows: Repeat 5th-7th row = 209 dc on each side of tip on last row. Repeat 8th-9th row = 218 dc on each side of tip on last row. Repeat 10th-13th row - AT THE SAME TIME on last row dec 4 dc evenly over repetitions with A.11 and dec 4 dc evenly over repetitions with A.13 = 237 dc on each side of tip on last row. Cut the yarn, fasten and change to heather. Repeat 14th-18th row AT THE SAME TIME on last row inc 2 dc evenly before tip and inc 2 dc evenly after tip = 261 dc on each side of tip. Cut the yarn, fasten and change to light beige. Piece measures approx. 48 cm / 19" in crochet direction. Continue to work as follows: Repeat 14th-18th row AT THE SAME TIME on last row inc 2 dc evenly before tip and inc 2 dc evenly after tip = 285 dc on each side of tip on last row. Repeat 14th-18th row (NOTE: First row beg from WS) - AT THE SAME TIME on last row inc 2 dc evenly before tip and 2 dc evenly after tip = 309 dc on each side of tip on last row. Cut the yarn and fasten. Piece measures approx. 56 cm / 22" in crochet direction and approx. 88 cm / 34½" along tip. |
||||||||||||||||||||||
Diagram explanations |
||||||||||||||||||||||
|
||||||||||||||||||||||
|
||||||||||||||||||||||

|
||||||||||||||||||||||
|
||||||||||||||||||||||
|
||||||||||||||||||||||
|
Have you made this or any other of our designs? Tag your pictures in social media with #dropsdesign so we can see them! Do you need help with this pattern?You'll find tutorial videos, a Comments/Questions area and more by visiting the pattern on garnstudio.com. © 1982-2024 DROPS Design A/S. We reserve all rights. This document, including all its sub-sections, has copyrights. Read more about what you can do with our patterns at the bottom of each pattern on our site. |
||||||||||||||||||||||


With over 40 years in knitting and crochet design, DROPS Design offers one of the most extensive collections of free patterns on the internet - translated to 17 languages. As of today we count 304 catalogs and 11422 patterns - 11417 of which are translated into English (US/in).
We work hard to bring you the best knitting and crochet have to offer, inspiration and advice as well as great quality yarns at incredible prices! Would you like to use our patterns for other than personal use? You can read what you are allowed to do in the Copyright text at the bottom of all our patterns. Happy crafting!
Comments / Questions (32)
Hoe kan het dat de tekst niet overeenkomt met de tekeningen? In toer 8 bijvoorbeeld houd ik voor de punt in het midden niet 1 stk over maar 3 of geeneen. We hebben samen ernaar gekeken maar komt niet goed uit. Klopt dit of lees ik verkeerd?
12.03.2017 - 15:56DROPS Design answered:
Hoi Josephina. Ik denk dat je eerder iets verkeerd gehaakt moet hebben. Ik heb een proefje gemaakt en ik kom uit zoals in het patroon. Ik kan helaas niet van afstand zien wat er verkeerd gaat. Maar gaat het hier fout, dan zal het misschien ook verklaren waarom het later ook fout gaat (je tweede vraag).
16.03.2017 - 13:50Anita wrote:
Al inicio de cada vuelta se tejen 5 cadenas las cuales no sustituyen el primer punto alto, es norma que queden unas ondas a lo ancho del chal? cual es el objetivo de hacer esto? gracias,
05.10.2016 - 20:34DROPS Design answered:
Hola Anita. Los 5 p.de cad. al inicio de cada fila son necesarios para que el borde del chal no quede tenso. Las ondas que salen pueden formarse debido a que las cadenetas están trabajadas demasiado flojo.
07.10.2016 - 16:45Anita wrote:
Es normal que en la vuelta 9 en uno de los lados despues de la punta sea diferente del otro lado? es decir de un lado se repiten 2 puntos altos en dos de los arcos que van seguidos y en el otro lado solo son 2 puntos altos en uno de los arcos.
05.10.2016 - 19:22DROPS Design answered:
Hola Anita. El diagrama está correcto. Si te confunde la explicación del texto puedes trabajar según el diagrama debajo el patrón. El diagrama A.7 no es simétrico.
09.10.2016 - 12:01Der skal tages ind med 4 på hver side :-)
23.09.2016 - 09:12Der skal tages ind med 4 på hver side :-)
23.09.2016 - 09:12Jeg er endnu ikke nået dertil, men har bare læst fremad og undrede mig så over, at indtaget ikke er ens på begge sider af spidsen. Nu har jeg regnet lidt på det...For at nå frem til 237 stm på hver side af spidsen efter anden gentagelse af rækkerne 10-13, skal der tages 4 stm ind på hver side af spidsen...Altså både på A11 og A13? De to burde jo være identiske.... Så jeg mener, at det er en fejl at der står 2 ved A11 og 4 ved A13? Ellers dejlig opskrift :-)
13.09.2016 - 19:17DROPS Design answered:
Hej Gertrud. Okay, jeg vil lige regne paa det og se hvad jeg kommer fra. Men hvis du kommer frem til at du skal tage 4 ind paa hver side naar du kommer saa vidt, saa vil jeg göre det.
14.09.2016 - 11:38Gertrud wrote:
Når række 10-13 gentages 2. gang, skal der tages 2 stm ind i A.11 og 4 i A13, så forbliver sjalet ikke symmetrisk. (Første gang række 10-13 gentages tages 2 stm ind i både A11 og A13)
13.09.2016 - 09:45DROPS Design answered:
Hej Gudrun. Stemmer antallet af masker efter anden gentagelse af 8-13 med 237 st paa hver side af spissen, naar du tager 2 & 4 st ind? Jeg har lidt svaert ved at gennemskue om det er fejl eller om det er meningen med mönstret.
13.09.2016 - 14:24Witam, mam problem ze zrozumieniem wyrażenia: " W TYM SAMYM CZASIE w ost. rzędzie równomiernie zamknąć 2 sł ponad schematem A.11". W schemacie A11 powinnam zrobić 3 słupki. Czy za każdym razem gdy powtarzam schemat A 11 w tym rzędzie powinnam zmknąć 2 słupki i 1 pzerobić normalnie? Na zdjęciu wygląda to tak jakby nic się nie zmieniło, nie rozumiem co powinnam zrobić. Bardzo proszę o pomoc.
17.08.2016 - 15:55DROPS Design answered:
Witaj Martyno. Tylko 2 sł będą zamknięte. Należy równomiernie zamknąć 2 sł ponad wszystkimi powtórzeniami schematu A.11 (czyli w 2 miejscach), NIE w każdym schemacie A.11 oddzielnie. I na zdjęciu będzie wyglądać jak wcześniej. POWODZENIA
18.08.2016 - 08:16In info it's said that it has to be 5ch, but isn't that mistake? It shouldn't supposed to be 3ch?
20.07.2016 - 22:25DROPS Design answered:
Please specify where exactly in the pattern is this mistake. We will check it out. Kind regards
20.07.2016 - 22:59I cannot understand why you fasten off at the end of the sections repeating 14-18 rows. The pattern has these rows in light pink. Should they have been in white, as appears in the picture? Thanks for your help. It is a lovely pattern.
23.06.2016 - 14:11DROPS Design answered:
Dear Mrs Martin, pattern will be edited, ie you should change to off-white when you have 173 sts, then work row 14-18 with off-white, and change to light pink where there are 197 sts. Happy crocheting!
23.06.2016 - 16:47