
Popular categories
Looking for a yarn?


|
||||||||||||||||||||||||||||
Boardwalk |
||||||||||||||||||||||||||||
 |
 |
|||||||||||||||||||||||||||
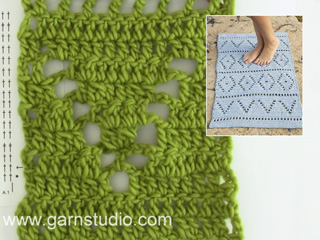
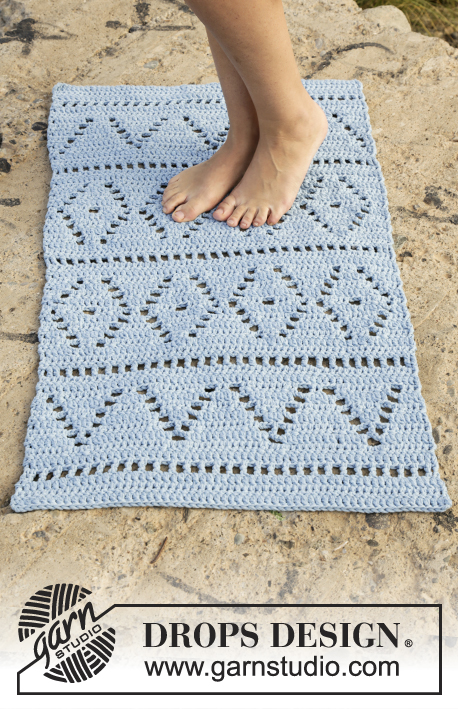
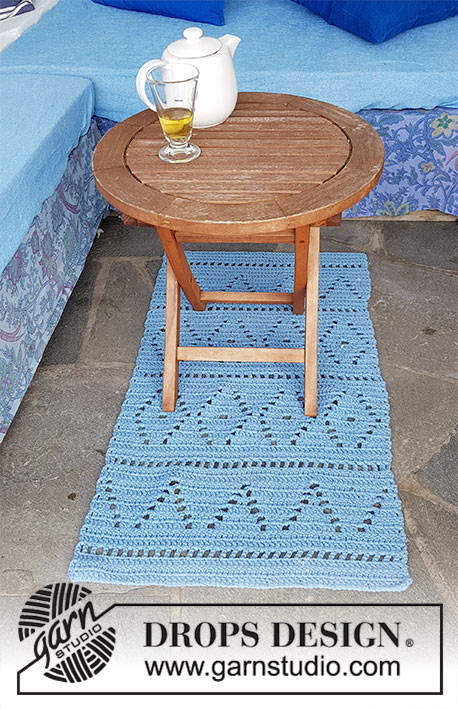
Crochet DROPS rug with lace pattern in 2 strands "Paris".
DROPS 170-41 |
||||||||||||||||||||||||||||
|
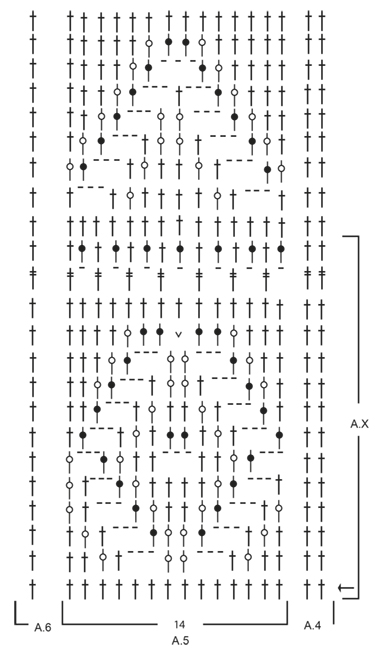
CROCHET INFO: At beg of every row with dc work 3 ch to turn with. These 3 ch do not replace first dc. At beg of every row with tr work 4 ch to turn with. These 4 ch do not replace first tr. PATTERN: See diagrams A.1 to A.6. ---------------------------------------------------------- RUG: Work 87-104 ch (includes 3 ch to turn with) on hook size 6 mm / J/10 with 2 strands Paris. Work first row as follows: Work 1 dc in 4th ch from hook (= 1 dc and 3 ch to turn with), 1 dc in each of the next 6-2 ch, * skip ch 1, work 1 dc in each of the next 6 ch *, repeat from *-* 10-13 more times = 73-87 dc. Now work pattern from 2nd row in diagram as follows - READ CROCHET INFO: Work A.1 (= 2 dc), A.2 (= 14 dc) 5-6 times in width, A.3 (= 1 dc). When entire A.1-A.3 has been worked vertically, continue from 1st row with A.4 over A.1, A.5 over A.2 and A.6 over A.3. REMEMBER THE CROCHET GAUGE! When A.X has been worked 1 time vertically, repeat A.X 1-2 more times vertically. Piece measures approx. 77-101 cm / 30½"-39 3/4". Continue with the remaining 9 rows in A.4-A.6. Now work the last 2 rows in A.X, then work 2 rows with 1 dc in every dc. Piece measures approx. 100-123 cm / 39½"-48½" in length. Fasten off. |
||||||||||||||||||||||||||||
Diagram explanations |
||||||||||||||||||||||||||||
|
||||||||||||||||||||||||||||
|
||||||||||||||||||||||||||||

|
||||||||||||||||||||||||||||
|
Have you made this or any other of our designs? Tag your pictures in social media with #dropsdesign so we can see them! Do you need help with this pattern?You'll find tutorial videos, a Comments/Questions area and more by visiting the pattern on garnstudio.com. © 1982-2024 DROPS Design A/S. We reserve all rights. This document, including all its sub-sections, has copyrights. Read more about what you can do with our patterns at the bottom of each pattern on our site. |
||||||||||||||||||||||||||||


With over 40 years in knitting and crochet design, DROPS Design offers one of the most extensive collections of free patterns on the internet - translated to 17 languages. As of today we count 304 catalogs and 11422 patterns - 11417 of which are translated into English (US/in).
We work hard to bring you the best knitting and crochet have to offer, inspiration and advice as well as great quality yarns at incredible prices! Would you like to use our patterns for other than personal use? You can read what you are allowed to do in the Copyright text at the bottom of all our patterns. Happy crafting!
Comments / Questions (23)
Buongiorno, ho quasi terminato il tappeto e devo ultimare l' ultima riga. il mio dubbio è questo: ho iniziato con 87 catenelle, che sono diventate 73, seguendo le indicazioni. Ora sul lato opposto del tappeto devo ripristinarne 87, per simmetria? Come faccio a fare i 14 aumenti? Grazie!
09.08.2019 - 14:59DROPS Design answered:
Buongiorno Anna Paola, non deve aumentare per tornare ad 87 maglie. A questo link può leggere perchè vengono avviate più catenelle del necessario. Buon lavoro!
09.08.2019 - 18:16Bonjour, Après le rang de DB, on pique dans l'arceau puis dans la B ? Sur la vidéo on dirait que les 2 B sont dans l'arceau.... Merci d'avance.
21.01.2019 - 15:44DROPS Design answered:
Bonjour Claire, après le rang de DB, on crochète 1 B dans chaque maille (= 2ème symbole) et 1 B autour de l'arceau/de la ml (= 3ème symbole), on va donc crocheter ici en piquant dans l'arceau. Bon crochet!
21.01.2019 - 16:33In the photo, and the chart, the points on the top "v" shapes are different than those on the bottom "v" shapes ie the rug does not look symmetrical? Is this correct as when it's finished it gives the appearance that an error has been made, when in fact the pattern has been followed correctly?
01.11.2016 - 04:18DROPS Design answered:
Dear Niamh, there's no error, it has been designed like that, but you are welcome to make your own edit if you like to. Happy crocheting!
01.11.2016 - 14:31I do not understand the instructions or the graph. Do I work the graph right to left, then left to right, or up then down ? The instructions say when entire A1-A3 have been worked vertically.. Also the picture shows a few solid rows, then what looks like a dc, ch1 repeat design then a V design..., but I do not see that on the graph. I have crocheted for 40 years, but I am stumped on this one.
23.06.2016 - 17:15DROPS Design answered:
Dear Mrs Rekeweg, start reading diagram on the bottom corner on the right side towards the left from RS and from the left towards the right from WS. 1st row = row with the arrow (the one with the star has already been worked). Then work 1 time the diagrams A.1, A.2 and A.3 in height (= 15 rows), then work diagrams A.4, A.5 and A.6 in height, repeating first A.X a total of 2 times then finish the 9 last rows in A.4-A.6, then work 2 last rows in A.1 and 2 rows with dc (so that work ends with same pattern it beg). Happy crocheting!
24.06.2016 - 08:34Hei. Miten voisi käydä niin että virkkaamaalla ensimmäistä kerrosta (104) tulee tuplampi vähemmän silmukoita? Miten saadaan just 87 silmukkaa - en tajunnut sitä? Ja jos virkkaa pienempaa kokoa niin tulee liian kireä eikä suora linja jos seuraa täsmälleen ohjeetta? Katsoessani kuvaa niin ei näytä että ensimmäinen kerros virkattu kuin ohjeessa. Selitäkää ystävällisesti. Kiitos.
07.05.2016 - 21:37DROPS Design answered:
Hei! Ensimmäisellä kerroksella virkataan pylväitä ja samalla ketjusilmukoita jätetään tasaisin välein virkkaamatta, jolloin s-luku vähenee. Kunhan virkkaat ohjeen mukaan ja tiheytesi on oikea, työhön tulee 87 pylvästä ja reunasta tulee tasainen. Voit aina pyytää lisää apua paikallisesta DROPS liikkeestäsi.
11.05.2016 - 14:16170-41 .a in ognuna delle 6-2 cat successive, * saltare 1 cat, 1 m.a in ognuna delle 6 cat successive *, ripetere da *-* altre 10-13 volte = 73-87 m.a. per favore potrei avere informazioni sulla spiegazione 6-2 succ saltare 1 cat e tutta la spiegazione grazie molte e poi 73-87 m a si riferiscono alle due misure grazie ancora
20.03.2016 - 16:11DROPS Design answered:
Buon giorno Gian Luigi. Se sta seguendo la taglia più piccola, deve lavorare 6 m.a, una in ognuna delle 6 cat; se sta lavorando la taglia più grande lavora 2 m.a nelle 2 cat successive. Il primo numero fa riferimento alla taglia piccola, il secondo alla grande. Quando trova indicato: saltare una cat, non deve lavorare in quella cat, ma passa a quella successiva. Buon lavoro!
20.03.2016 - 16:281 m.a nella 4a cat dall’uncinetto (= 1 m.a e 3 cat per girare il lavoro), 1 m.a in ognuna delle 6-2 cat successive, * saltare 1 cat, 1 m.a in ognuna delle 6 cat successive *, ripetere da *-* altre 10-13 volte = 73-87 m.a.
20.03.2016 - 13:52DROPS Design answered:
Buongiorno Gian Luigi. Il conteggio delle m.a è corretto. Le prime 3 cat non contano come una m.a; lavora 1 m.a nella quarta cat, 6-2 m.a (in tutto 7-3 m.a). Ripete la sequenza *saltare una cat, una m.a in ognuna delle 6 cat successive*, in tutto 11-14 volte (quindi 66-84 m.a). Quindi in tutto: 73-87 m.a. Ci riscriva se non era questo il problema. Buon lavoro!
20.03.2016 - 14:33Mønster 170-40 på 4 række i mønster A1 mangler der forklaring på hvad man skal gøre der. Er ikke den store hækler så vil gerne have lidt hjælp :) Måske også mig der ikke lige har luret fidusen :) Mvh Benthe
23.01.2016 - 19:21DROPS Design answered:
Hej Benthe, Jeg kan godt se at der mangler en forklaring i diagramteksten til denne symbol. Vi skal få det lagt ud så hurtigt som muligt. Tak for information :)
27.01.2016 - 16:14I love the rug pattern and would like to make it. What does 87-104 chain mean? Do I crochet 87 chains or 104?
14.01.2016 - 15:43DROPS Design answered:
Dear Mrs Perez, you start with 87 ch for the smaller rug and with 104 ch for the larger rug - see size under tab "materials". Happy crocheting!
14.01.2016 - 18:58Très sympa..donne envie de le faire!
29.12.2015 - 18:59