DROPS Nepal
DROPS Nepal
65% vlna, 35% alpaka
od 68.00 Kč /50g
Přízi na tento model můžete mít už za 612.00Kč.

Cenu za klubka počítáme podle spotřeby při výrobě modelu v nejmenší velikosti a nejlevnější variantě příze. Rádi byste ještě lepší cenu? Třeba ji najdete mezi DROPS Deals!

Aline

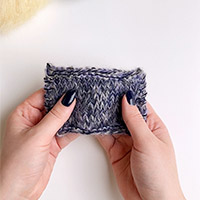
DROPS souprava: čepice - kulich s bambulí, rukavice – palčáky a nákrčník s copánkovým vzorem pletené z příze "Nepal".

DROPS 166-46
DROPS design: model č. ne-183
Skupina přízí: C nebo A + A
-----------------------------------------------------------

ČEPICE:
Velikost: S/M
Obvod hlavy: asi 56-58 cm

Materiál: DROPS NEPAL firmy Garnstudio
150 g, barva č.6314, džínová modrá

DROPS PONOŽKOVÉ JEHLICE a krátká KRUHOVÁ JEHLICE (40 cm) č.5 – nebo velikosti potřebné k upletení zkušebního vzorku o rozměrech 17 ok x 22 řad lícovým žerzejem = 10 x 10 cm.
DROPS krátká KRUHOVÁ JEHLICE (40 cm) č.4 – na lem.
-----------------------------------------------------------

NÁKRČNÍK:
Velikost: jednotná
Obvod: asi 60 cm
Výška: asi 34 cm

Materiál: DROPS NEPAL firmy Garnstudio
200 g, barva č.6314, džínová modrá

DROPS KRUHOVÁ JEHLICE (60 cm) č.5 – nebo velikosti potřebné k upletení zkušebního vzorku o rozměrech 17 ok x 22 řad lícovým žerzejem = 10 x 10 cm.
DROPS KRUHOVÁ JEHLICE (60 cm) č.4 – na lemy.
-----------------------------------------------------------

RUKAVICE:
Velikost: S/M – M/L

Materiál: DROPS NEPAL firmy Garnstudio
100-100 g, barva č.6314, džínová modrá

DROPS PONOŽKOVÉ JEHLICE č.4,5 – nebo velikosti potřebné k upletení zkušebního vzorku o rozměrech 18 ok x 24 řad lícovým žerzejem = 10 x 10 cm.
DROPS PONOŽKOVÉ JEHLICE č.4 – na lemy.

-------------------------------------------------------

Náhradní příze – Podívejte se, jak změnit přízi
Skupina přízí A až F – Neměňte návod, změňte přízi
Spotřeba příze při použití náhradní příze – Využijte náš převodník

-------------------------------------------------------

DROPS Nepal
DROPS Nepal
65% vlna, 35% alpaka
od 68.00 Kč /50g
Přízi na tento model můžete mít už za 612.00Kč.

Cenu za klubka počítáme podle spotřeby při výrobě modelu v nejmenší velikosti a nejlevnější variantě příze. Rádi byste ještě lepší cenu? Třeba ji najdete mezi DROPS Deals!

DROPS Super Sale

SAVE 30% on 6 cotton favourites!
Platí do 12.04.2024

Návod

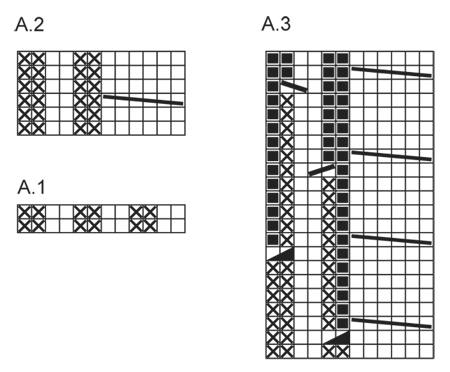
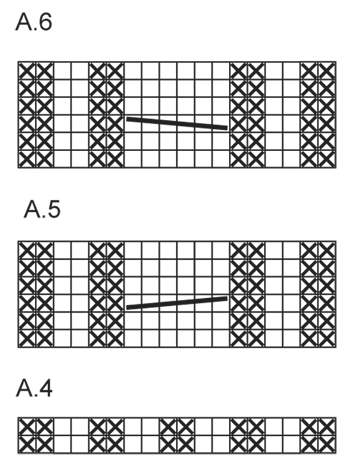
VZOR:
Viz schémata A.1 až A.6.

VROUBKOVÝ VZOR:
Pleteme stále hladce, lícové i rubové řady. 1 vroubek = 2 řady hladce.

TIP - PŘIDÁVÁNÍ:
Přidáváme nahozením; v následující řadě pleteme nahození hladce za zadní nit, aby se v pletenině netvořily dírky.

TIP - UJÍMÁNÍ:
Ujímáme takto – začínáme 3 oka před značkou: 2 oka spleteme hladce, 2 oka upleteme hladce (značka leží mezi těmito 2 oky), 1 oko sejmeme hladce, 1 upleteme hladce a sejmuté přes ně přetáhneme.
----------------------------------------------------------

ČEPICE:
Pleteme v kruhových řadách na kruhové jehlici, v případě potřeby převedeme pleteninu na ponožkové jehlice.
Na kruhovou jehlici č.4 nahodíme přízí Nepal 96 ok a pleteme vzorem A.1 nad všemi oky (= v kruhové řadě máme 8 sekvencí vzoru). Ve výši 4 cm převedeme pleteninu na kruhovou jehlici č.5. Nyní pleteme nad všemi oky vzor A.2 (= v kruhové řadě máme 8 sekvencí vzoru). Ve výši 15 cm, končíme dopletením 1 celé sekvence vzoru A.2, pleteme vzor A.3. Po dokončení 1 celé sekvence vzoru A.3 (na výšku) máme v kruhové řadě 64 ok. V následující kruhové řadě splétáme každá 2 oka hladce = 32 ok. Upleteme 1 kruhovou řadu hladce, pak opět spleteme každá 2 oka hladce = 16 ok. Přízi odstřihneme, protáhneme zbylými oky, stáhneme a zapošijeme.
Čepice je vysoká asi 26 cm.

BAMBULE:
Vyrobíme si bambuli o průměru asi 8 cm a přišijeme ji na vrcholek čepice.
----------------------------------------------------------

NÁKRČNÍK:
Pleteme od dolního okraje nahoru ke stojáčku, nejprve v řadách na kruhové jehlici, pak v kruhových řadách.
Na kruhovou jehlici č.4 nahodíme přízí Nepal 62 ok a upleteme 1 rubovou řadu hladce. Pokračujeme takto – začínáme lícovou řadou: 6 ok vroubkovým vzorem – viz výše, 2 oka hladce, *2 oka obrace, 2 hladce*, *-* opakujeme a končíme 6 oky vroubkovým vzorem. Ve výši 4 cm převedeme pleteninu na kruhovou jehlici č.5 a pokračujeme takto: 6 ok vroubkovým vzorem, následujících 50 ok pleteme lícovým žerzejem a končíme 6 oky vroubkovým vzorem. Ve výši 20 cm uzavřeme na každé straně 6 ok = 50 ok. Přízi odstřihneme a díl odložíme.
Stejným způsobem upleteme druhý díl.

Oba díly převedeme na jednu společnou kruhovou jehlici č.5 = 100 ok a pleteme v kruhových řadách stojáček. Pleteme lícovým žerzejem do výše 34 cm. Pak pleteninu převedeme na kruhovou jehlici č.4 a upleteme 4 cm výšky pružným vzorem 2/2 (tj. střídáme 2 oka hladce, 2 obrace). Poté všechna oka dle vzoru uzavřeme.

DOKONČENÍ:
Uzavřených 6 ok na každé straně dílu sešijeme, nejlépe pletacím stehem.
----------------------------------------------------------

RUKAVICE - PALČÁKY:

PRAVÁ RUKAVICE:
Pleteme v kruhových řadách na ponožkových jehlicích.
Na ponožkové jehlice č.4 nahodíme přízí Nepal 36-36 ok a upleteme 1 kruhovou řadu hladce. Poté pleteme prvních 16 ok pružným vzorem 2/2 (tj. střídáme 2 oka hladce, 2 obrace – začínáme 2 oky obrace), dalších 18 ok vzorem A.4, končíme 2 oky hladce. Takto pleteme lem do výše 6-7 cm. Pak pleteninu převedeme na ponožkové jehlice č. 4,5 a následující kruhovou řadu pleteme takto: 16 ok lícovým žerzejem (= dlaň), vzor A.5 (= 18 ok) a 2 oka lícovým žerzejem. V tomto rozvržení vzorů pokračujeme. Ve výši 13-14 cm přidáme na každé straně prvního oka v kruhové řadě 1 oko (= klín pro palec) – viz TIP - PŘIDÁVÁNÍ. Toto přidávání opakujeme v každé 2. kruhové řadě – přidáváme na obou vnějších stranách vznikajícího klínu, a to ještě 4-5x = 46-48 ok. Nyní odložíme 11-13 ok palce na pomocnou jehlici. Pokračujeme v kruhových řadách jako dosud a SOUČASNĚ nahodíme v následující kruhové řadě za oky palce 1 oko nové = 36-36 ok. Když je rukavice vysoká asi 26-28 cm (rukavici si můžete vyzkoušet – do výsledných rozměrů mají zbývat asi 4 cm), vložíme 1 značku za 14. oko v kruhové řadě a 1 značku za 34. oko. Nyní ujímáme 1 oko na obou stranách každé značky – viz TIP - UJÍMÁNÍ. Toto ujímání opakujeme v každé 2. kruhové řadě ještě 2x, pak 3x v každé kruhové řadě = v kruhové řadě zbývá u obou velikostí 12-12 ok. Přízi odstřihneme, protáhneme zbylými oky, stáhneme a zapošijeme.

PALEC:
Odložených 11-13 ok palce vrátíme zpět na ponožkové jehlice č.4,5 a navíc nabereme 4-3 oka z okraje za nimi = 15-16 ok. Pleteme lícovým žerzejem v kruhových řadách do výše asi 4,5-5 cm (rukavici si vyzkoušejte – do výsledných rozměrů má zbývat asi 0,5 cm); pak upleteme 2 kruhové řady hladce a SOUČASNĚ spleteme v každé z nich každá 2 oka hladce = v kruhové řadě zbývají 4-4 oka. Přízi odstřihneme, protáhneme zbylými 8 oky, stáhneme a zapošijeme.

LEVÁ RUKAVICE:
Pleteme stejně jako pravou rukavici, jen pro klínek pro palec přidáváme na každé straně 14. oka v kruhové řadě. Namísto vzoru A.5 pleteme vzor A.6.

Schéma

symbols = hladce
symbols = obrace
symbols = 2 oka spleteme obrace
symbols = 2 oka spleteme hladce
symbols = 1 oko sejmeme obrace, 1 oko upleteme obrace a sejmuté přes ně přetáhneme
symbols = toto oko jsme ujmuli = čtvereček slouží pouze pro přehlednost
symbols = 3 oka odložíme na pomocnou jehlici PŘED práci, 3 oka hladce, 3 oka z pom.jehlice hladce
symbols = 3 oka odložíme na pomocnou jehlici ZA práci, 3 oka hladce, 3 oka z pom.jehlice hladce
diagram
diagram

Každý náš návod je doprovázen speciálními video-ukázkami, které vás navedou.

Chcete se na něco zeptat? Projděte si seznam nejčastějších otázek (FAQ).

Knitting tension is what determines the final measurements of your work, and is usually measured per 10 x 10 cm. It is provided like so: number of stitches in width x number of rows in height - eg: 19 stitches x 26 rows = 10 x 10 cm.

The knitting tension is very individual; some people knit/crochet loosely while others work tightly. You adjust the knitting tension with the needle size, which is why the suggested needle size is only meant as a guide! You need to adjust this (up or down) to ensure that YOUR knitting tension matches the knitting tension provided in the pattern. If you work with a different knitting tension than provided you will have a different yarn consumption, and your work will have different measurements than what the pattern suggests.

The knitting tension also determines which yarns can replace each other. As long as you achieve the same knitting tension you can replace one yarn with another.

See DROPS lesson: How to measure your tension/gauge

See DROPS video: How to make a gauge tension swatch

The required amount of yarn is provided in grams, eg: 450 g. To calculate how many balls you’ll need you first need to know how many grams are in 1 ball (25g, 50g or 100g). This information is available if you click on the individual yarn quality on our pages. Divide the amount required with the amount of each ball. For example, if each ball is 50g (the most common amount), the calculation will be as follows: 450 / 50 = 9 balls.

The important thing when changing from one yarn to another is that the knitting/crochet tension remains the same. This is so that the measurements of the finished piece will be the same as on the sketch provided. It is easier to achieve the same knitting tension using yarns from the same yarn group. It is also possible to work with multiple strands of a thinner yarn to achieve the knitting tension of a thicker one. Please try our yarn converter. We recommend you to always work a test swatch.

Please NOTE: when changing yarn the garment might have a different look and feel to the garment in the photo, due to individual properties and qualities of each yarn.

See DROPS lesson: Can I use a different yarn than the one mentioned in the pattern?

All our yarns are categorised into yarn groups (from A to F) according to thickness and knitting tension – group A contains the thinnest yarns and group F the thickest. This makes it easier for you to find alternative yarns to our patterns, should you wish to switch yarn. All yarns within the same group have a similar knitting tension and can easily replace each other. However, different yarn qualities have different structures and properties which will give the finished work a unique look and feel.

Click here for an overview of the yarns in each yarn group

At the top of all our patterns you’ll find a link to our yarn calculator, which is a helpful tool should you wish to use a different yarn than suggested. By filling in the yarn quality you wish to replace, the amount (in your size) and number of strands, the calculator will present good alternative yarns with the same knitting tension. Additionally it will tell you how much you’ll require in the new qualities and whether you’ll need to work with multiple strands. Most skeins are 50g (some are 25g or 100g).

If the pattern is worked with multiple colours, every colour will have to be calculated separately. Similarly, if the pattern is worked with several strands of different yarns (for example 1 strand Alpaca and 1 strand Kid-Silk) you will have to find alternatives for each, individually.

Click here to see our yarn calculator

Since different yarns have different qualities and textures we have chosen to keep the original yarn in our patterns. However, you can easily find options among our available qualities by using our yarn calculator, or simply pick a yarn from the same yarn group.

It is possible that some retailers still have discontinued yarns in stock, or that someone has a few skeins at home that they would like to find patterns for.

The yarn calculator will provide both alternative yarn as well as required amount in the new quality.

If you think it's hard to decide what size to make, it can be a good idea to measure a garment you own already and like the size of. Then you can pick the size by comparing those measures with the ones available in the pattern's size chart.

You'll find the size chart at the bottom of the pattern.

See DROPS lesson: How to read size chart

The needle size provided in the pattern serves only as a guide, the important thing is to follow the knitting tension. And since knitting tension is very individual, you will have to adjust the needle size to ensure that YOUR tension is the same as in the pattern – maybe you’ll have to adjust 1, or even 2 needle sizes, up or down to achieve the correct tension. For this, we recommend that you work test swatches.

Should you work with a different knitting tension than the one provided, the measurements of the finished garment might deviate from the measurement sketch.

See DROPS lesson: How to measure your tension/gauge

See DROPS video: How to make a tension/gauge swatch

Working a garment top-down provides more flexibility and room for personal adjustment. For example it is easier to try the garment on while working, as well as making adjustments to length of yoke and shoulder caps.

The instructions are carefully explaining every step, in the correct order. Diagrams are adjusted to the knitting direction and are worked as usual.

The diagram depicts all rows/rounds, and every stitch seen from the right side. It is read from bottom to top, from right to left. 1 square = 1 stitch.

When working back and forth, every other row is worked from the right side and every other row is worked from the wrong side. When working from the wrong side, the diagram will have to be worked reversed: from left to right, knit stitches are purled, purl stitches are knit etc.

When working in the round every round is worked from the right side and the diagram are worked from right to left on all rounds.

See DROPS lesson: How to read knitting diagrams

The diagram depicts all rows/rounds, and every stitch seen from the right side. It is worked from bottom to top, from right to left.

When working back and forth every other row is worked from the right side: from right to left and every other row is worked from the wrong side: from left to right.

When working in the round, every row in the diagram are worked from the right side, from right to left.

When working a circular diagram you start in the middle and work your way outwards, counter clockwise, row by row.

The rows usually start with a given number of chain stitches (equivalent to the height of the following stitch), this will either be depicted in the diagram or explained in the pattern.

See DROPS lesson: How to read crochet diagrams

Instructions for working several diagrams after each other on the same row/round, will often be written like so: “work A.1, A.2, A.3 a total of 0-0-2-3-4 times". This means you work A.1 once, then A.2 is worked once, and A.3 is repeated (in width) the number of times provided for your size – in this case like so: S = 0 times, M = 0 times, L=2 times, XL= 3 times and XXL = 4 times.

The diagrams are worked as usual: begin with the first row in A.1, then work the first row in A.2 etc.

See DROPS lesson: How to read knitting diagrams

See DROPS lesson: How to read crochet diagrams

The total width of the garment (from wrist-to-wrist) will be larger in the larger sizes, despite the actual sleeves being shorter. The larger sizes have longer sleeve caps and wider shoulders, so there will be a good fit in all sizes.

The measurement sketch/schematic drawing provides information regarding the full length of the garment. If it’s a jumper or a jacket the length is measured from the highest point on the shoulder closest to the neckline, and straight down to the bottom of the garment. It is NOT measured from the tip of shoulder. Similarly, the length of yoke is measured from the highest point on the shoulder and down to where yoke is split into body and sleeves.

On a jacket measures are never taken along bands, unless specifically stated. Always measure inside band stitches when measuring the length.

See DROPS lesson: How to read a schematic drawing

Diagrams are often repeated on the round or in height. 1 repeat is the diagram the way it appears in the pattern. If it says to work 5 repeats of A.1 in the round, then you work A.1 a total of 5 times after/next to each other in the round. If it says to work 2 repeats of A.1 vertically/in height you work the entire diagram once, then begin again at the start and work the entire diagram one more time.

Chain stitches are slightly narrower than other stitches and to avoid working the cast-on edge too tight, we simply chain more stitches to begin with. The stitch count will be adjusted on the following row to fit the pattern and measurement sketch.

The rib edge is more elastic and will contract slightly compared to, for example, stocking stitch. By increasing before the rib edge, you avoid a visible difference in width between the rib edge and the rest of the body.

It’s very easy to cast off too tightly, and by making yarn overs while casting off (and simultaneously casting these off) you avoid a too tight cast off edge.

See DROPS video: How to bind off with yarn overs (yo)

To achieve an even increase (or decrease) you can increase on, for example: every 3rd and 4th row alternately, like so: work 2 rows and increase on the 3rd row, work 3 rows and increase on the 4th. Repeat this until the increase is complete.

See DROPS lesson: Increase or decrease 1 st on every 3rd and 4th row alternately

Should you prefer to work in the round instead of back and forth, you may of course adjust the pattern. You’ll need to add steeks mid-front (usually 5 stitches), and follow the instructions. When you would normally turn and work from the wrong side, simply work across the steek and continue in the round. At the end you’ll cut the piece open, pick up stitches to work bands, and cover the cut edges.

See DROPS video: How to knit steeks and cut open

Should you prefer to work back and forth instead of in the round, you may of course adjust the pattern so you work the pieces separately and then assemble them at the end. Divide the stitches for the body in 2, add 1 edge stitch in each side (for sewing) and work the front and back pieces separately.

See DROPS lesson: Can I adapt a pattern for circular needles into straight needles?

Pattern repeats can vary slightly in the different sizes, in order to get the correct proportions. If you’re not working the exact same size as the garment in the photo, yours might deviate slightly. This has been carefully developed and adjusted so that the complete impression of the garment is the same in all sizes.

Make sure to follow instructions and diagrams for your size!

If you have found a pattern you like which is available in women’s size it’s not very difficult to convert it to men’s size. The biggest difference will be the length of sleeves and body. Start working on the women size that you think would fit across the chest. The additional length will be worked right before you cast off for the armhole/sleeve cap. If the pattern is worked top-down you can add the length right after the armhole or before the first decrease on sleeve.

Regarding additional yarn amount, this will depend on how much length you add, but it is better with a skein too many than too few.

All yarns will have excess fibres (from production) that might come off as lint or shedding. Brushed yarns (ie hairier yarns) have more of these loose, excess fibres, causing more shedding.

Shedding also depends on what is worn under or over the garment, and whether this pulls at the yarn fibres. It’s therefore not possible to guarantee that there will be no shedding

Below are some tips on how to get the best result when working with hairier yarns:

1. When the garment is finished (before you wash it) shake it vigorously so the looser hairs come off. NOTE: do NOT use a lint roller, brush or any method that pulls at the yarn.

2. Place the garment in a plastic bag and put it in your freezer - the temperature will cause the fibres to become less attached to each other, and excess fibres will come off easier.

3. Leave in the freezer for a few hours before taking it out and shaking it again.

4. Wash the garment according to the instructions on the yarn label.

Pilling is a natural process that happens to even the most exclusive of fibers. It's a natural sign of wear and tear that is hard to avoid, and that is most visible in high friction areas of your garment like a sweater's arms and cuffs.

You can make your garment look as new by removing the pilling, using a fabric comb or a pill/lint remover.

Pořád se nemůžete dobrat odpovědi, kterou hledáte? Pak posuňte stránku dolů a napište nám svůj dotaz, naši specialisté se vám pokusí poradit. Obvykle to zvládneme během 5 až 10 pracovních dnů..
Mezitím si můžete pročíst otázky a odpovědi, které k tomuto modelu položili ostatní, nebo navštívit skupinu DROPS Workshop na Facebooku, kde vám může poradit některá spřízněná duše!

Mohly by se vám líbit...

Přidejte komentář k návodu DROPS 166-46

Rádi bychom věděli, co si o tomto modelu myslíte!

Pokud se chcete na něco zeptat, dbejte prosím na to, abyste ve formuláři níže vybrali správnou kategorii - díky tomu se dříve dozvíte, co potřebujete vědět. Povinná pole jsou označena *.

Komentáře / Otázky (10)

country flag Isabelle wrote:

Bonjour ! J'ai atteint la hauteur désirée et voudrais diminuer. Si je place un marqueur après la 14e et après la 34e maille, il ne reste que 2 mailles entre les deux. Comment pourrai-je diminuer de chaque côté des marqueurs pendant 6 tours ? N'y a-t-il pas une erreur ? Merci de votre aide !

12.12.2023 - 00:01

DROPS Design answered:

Bonjour Isabelle, comptez les mailles à partir du début du tour, autrement dit, vous devez avoir 20 mailes entre le 1er (14ème maille du tour) et le 2ème marqueur (34ème maille du tour). Bon tricot!

12.12.2023 - 09:40

country flag Marianne Ermesjo wrote:

I oppskriften for votter står det at du skal legge opp 36-36 masker, likt antall masker for begge størrelser. Tror det skal være 36-38 masker. Når du legger ut til tommel stemmer det ikke med antall masker.

05.12.2023 - 09:44

country flag Marianne Ermesjo wrote:

I oppskriften for votter står det at du skal legge opp 36-36 masker, likt antall masker for begge størrelser. Tror det skal være 36-38 masker. Når du legger ut til tommel stemmer det ikke med antall masker.

05.12.2023 - 09:43

country flag Ann-Sofie Lindstein wrote:

Hej! Det står fel i vantbeskrivningen fortfarande...A1 o A2 o A3 står det...vänligen uppdatera .Ska vara A4, A5 o A6. Mvh Anso

05.02.2021 - 14:29

country flag Jeannette Thompson wrote:

Could I knit these flat on ordinary needles as cannot use circular needle with having arthritis

15.11.2020 - 12:30

DROPS Design answered:

Dear Mrs Thompson, you will find how to adapt a pattern into straight needles here. Happy knitting!

16.11.2020 - 08:54

country flag Katarina Andersson wrote:

Det står fel i den svenska översättningen. På vantarna står det A1, A2 och A3, men i den norska versionen står det A4, A5 och A6. Lite förvirrande!

08.12.2019 - 00:11

country flag Katrin K wrote:

Die Fäustlinge beginnen mit 36 M. Dann 16 M Rippe und 18 M A4. Das macht 34 M. Was mache ich mit den verbleibenden 2M? A 4 scheint mir exakt das Rippenmuster zu sein, warum. nicht einfach alle 36 M in Rippenmuster?

30.11.2016 - 18:03

DROPS Design answered:

Liebe Katrin, so stricken Sie die 36 M.: 16 M im Rippenmuster, 18 M im A.4 und 2 M re (16+18+2=36 M.). Nach 6-7 cm stricken Sie glatt über die 16 M im Rippenmuster und A.5 über die 16 M. im A.4. Viel Spaß beim stricken!

01.12.2016 - 08:56

country flag Maria wrote:

Är de inte mönster A4-6 som skall användas till vantarna?

26.10.2016 - 10:50

DROPS Design answered:

Hej Maria. Ja og nej... Du bruger A.4 og A.5 til höjre vante og A.4 og A.6 til venstre vante.

26.10.2016 - 12:36

country flag Anja wrote:

Beim linken Fäustling heißt es: A.3 statt A.2 stricken. Stimmt das? Eigentlich muß er doch gleich gestrickt werden und nur der Daumen wird an anderer Stelle getrickt, oder?

08.09.2015 - 12:56

DROPS Design answered:

Liebe Anja, Sie haben Recht, da wirkt etwas unstimmig. Es müsste sich eher um A.5 und A.6 handeln statt um A.3 und A.2. A.2 und A.3 gehören zur Mütze. Denn sonst passt das auch gar nicht zu der M-Zahl von 18 M für das Muster. Ich leite das an die Designerinnen weiter.

08.09.2015 - 13:46

Hortensia wrote:

Me encanta. Parece un proyecto simple e ideal para el invierno.

19.06.2015 - 23:04