
Popular categories
Looking for a yarn?


|
||||||||||
Otus |
||||||||||
|
|
||||||||||
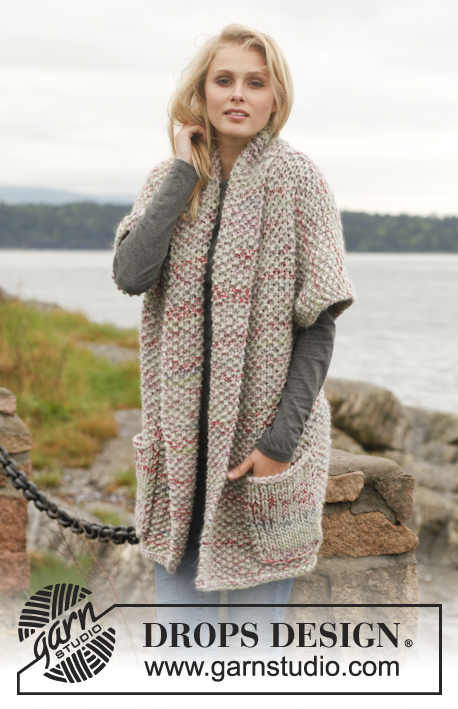
Crochet DROPS jacket with bands in fan pattern in ”Nepal”. Size: S - XXXL.
DROPS 151-26 |
||||||||||
|
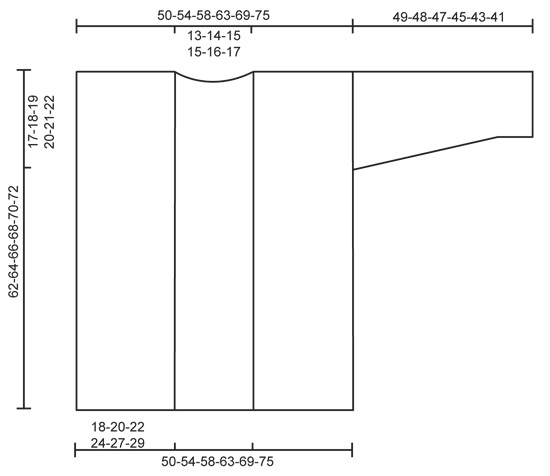
CROCHET INFO: At beg of every sc row beg with ch 1, then work 1 sc in first st before continuing with 1 sc in every st (ch does NOT count as 1 st). Finish row with 1 sc in 4th ch from beg of previous row. At beg of every tr row beg with 4 ch in 1st st, then work 1 tr in every st (4 ch = 1st tr). Finish row with 1 tr in first sc from beg of previous row. TEXTURE ROWS: * 1 row tr, 1 row sc *, repeat from *-* until finished measurements - NOTE: Work in every sc/tr from previous row and not between. PATTERN: See diagram A.1 (applies to sleeve) and A.2 (applies to band). ---------------------------------------------------------- JACKET: Ch 139-151-163-179-196-213 on hook size 5 mm / H with Nepal. Work first row as follows: 1 sc in 2nd ch from hook, * 1 sc in each of the 3 next ch, skip 1 ch *, repeat from *-* until 1-1-1-1-2-3 ch remain and finish with 1 sc in each of the last ch = 104-113-122-134-147-160 sc, turn piece. READ CROCHET INFO and work TEXTURE ROWS upwards – see explanation above. REMEMBER THE CROCHET GAUGE! When piece measures approx. 45-46-47-48-49-50 cm / 17¾"-18"-18½"-19"-19¼"-19¾", divide for armholes and finish each part separately as follows: FRONT PIECE: Continue with texture rows back and forth over the outermost 22-24-26-29-32-35 sts in one side of piece (= front piece). When piece measures approx. 62-64-66-68-70-72 cm / 24⅜"-25¼"-26"-26¾"-27½"-28⅜"– finish after 1 row with sc, cut the yarn. Repeat over the outermost 22-24-26-29-32-35 sts in the other side of piece. BACK PIECE: Continue with texture rows back and forth over the 60-65-70-76-83-90 sts on back piece until piece measures approx. 60-62-64-66-68-70 cm / 23⅝"-24⅜"-25¼"-26"-26¾"-27½" – make sure that last row is 1 row with sc. Now work 1 texture row (i.e. 1 row tr + 1 row sc) back and forth over the outermost 22-24-26-29-32-35 sts on shoulder. Cut the yarn and repeat over the outermost 22-24-26-29-32-35 sts in the other side (i.e. do not work over the middle 16-17-18-18-19-20 sts = neckline in the back of neck). Fasten off. SLEEVE: Work 35-37-37-40-40-43 ch on hook size 5 mm / H with Nepal. Work first row as follows: 1 sc in 2nd ch from hook, * 1 sc in each of the 3 next ch, skip 1 ch *, repeat from *-* until 1-3-3-2-2-1 ch remain and finish with 1 sc in each of the last ch = 26-28-28-30-30-32 sc, turn piece. Then work texture rows back and forth. READ THE REST OF SLEEVE BEFORE CONTINUING! AT THE SAME TIME on 5th row (i.e. on third row with tr), insert 1 marker in the middle of piece. Work tr as before until 2 sts remain before marker, work pattern according to diagram A.1 over the next 4 sts, i.e. work as follows: Skip 1 st, 1 tr in next st, ch 2, 1 tr in next st, skip 1 st and continue the rest of row with tr as before. Continue pattern as shown in A.1 (arrow in the middle of A.1 shows marker). AT THE SAME TIME on 4th-4th-4th-4th-3rd-3rd row with tr (piece measures approx. 9-9-9-9-6-6 cm / 3½"-3½"-3½"-3½"-2½"-2½"), inc 1 tr in each side by working 2 tr in second and next to last tr in each side. Repeat inc every other row with tr 6-4-3-3-2-1 more time (= 7-5-4-4-3-2 inc in total in each side) and then on every row with tr 0-3-5-5-7-8 times in total = 40-44-46-48-50-52 sts. When piece measures 49-48-47-45-43-41 cm / 19¼"-19"-18½"-17¾"-17"-16⅛" (shorter measurements in the larger sizes because of wider shoulders), cut the yarn. Work another sleeve the same way. ASSEMBLY: Sew the shoulder seams. Sew sleeve seams tog edge to edge in outer loops of edge sts. Sew sleeves in armhole with neat, little stitches - make sure to avoid a tight seam. BAND: Beg from RS at the bottom on right front piece and work as shown in diagram A.2, i.e. work as follows: ROW 1: 1 sc in first st, ch 5 (= 1 tr + 1 ch), in first tr work 2 tr + ch 2 + 2 tr + ch 2, * skip 1 tr, in next tr work 2 tr + ch 2 + 2 tr + ch 2 *, repeat from *-* along right front piece, along the neckline at the back of neck and down along left front piece. Turn piece. ROW 2: 5 ch (= 1 tr + 1 ch), then work as follows in every ch-space in the middle of every tr-group: 2 tr + ch 2 + 2 tr, ch 2. Repeat 2nd row until a total of 4-4-5-5-5-5 rows have been worked. Work last row as follows: 5 ch (= 1 tr + 1 ch), then work as follows in every ch-space in the middle of every tr-group: 3 tr + ch 2 + 3 tr + ch 2. When row is done, cut the yarn. Fasten all strands. |
||||||||||
Diagram explanations |
||||||||||
|
||||||||||

|
||||||||||
|
||||||||||
|
Have you made this or any other of our designs? Tag your pictures in social media with #dropsdesign so we can see them! Do you need help with this pattern?You'll find tutorial videos, a Comments/Questions area and more by visiting the pattern on garnstudio.com. © 1982-2024 DROPS Design A/S. We reserve all rights. This document, including all its sub-sections, has copyrights. Read more about what you can do with our patterns at the bottom of each pattern on our site. |
||||||||||


With over 40 years in knitting and crochet design, DROPS Design offers one of the most extensive collections of free patterns on the internet - translated to 17 languages. As of today we count 304 catalogs and 11422 patterns - 11417 of which are translated into English (US/in).
We work hard to bring you the best knitting and crochet have to offer, inspiration and advice as well as great quality yarns at incredible prices! Would you like to use our patterns for other than personal use? You can read what you are allowed to do in the Copyright text at the bottom of all our patterns. Happy crafting!
Comments / Questions (37)
Hi i'm a bit confuse i have finish the piece at 45 cm, i don't understand divide for the armholes, what do you mean divide , fold the piece ?? Please help!
15.05.2015 - 18:43DROPS Design answered:
Dear Aida, body is worked in one piece to armholes. When piece measures 45 cm, you continue each piece separately to shoulders, ie work only over the first 22 sts in one side for first front, then in the other side for 2nd front, and work over the middle 60 sts on back piece. Happy crocheting!
16.05.2015 - 09:47Marya wrote:
I V finished with front and back piece but when i wanted to sew the shoulder i v 2 cm lelt on the top(i think it s the texture row we add a the end )when i sew them edge to edge i v the front piece taller than the back piece pls could u tell me how shall i do thanks
10.03.2015 - 22:57DROPS Design answered:
Dear Marya, both front pieces should have same length as back piece, the last 2 rows worked on each shoulder on back piece are done 2 cm before final measurements, you may require to crochet more rows to reach same height. Happy crocheting!
11.03.2015 - 08:57Marya wrote:
I m working M size i divide for armholes in 46cm but there s no hole ,will the hole be created in the last row over 24 sts and please can u tel me how should i sew the sleeve thanks
06.03.2015 - 13:28DROPS Design answered:
Dear Marya, you will sew the last 24 sts on back piece each side together with the 24 sts on right and left shoulder, this will create a hole (from where you divide work to shoulder) where you can then sew sleeve. Happy crocheting!
06.03.2015 - 14:31Marya wrote:
I m a little confused,the pattern says "Sew the shoulder seams. Sew sleeve seams" dont know where shall i sew the sleeves ,i see no hole please i need some clarification thanks
06.03.2015 - 08:14DROPS Design answered:
Dear Marya, the armholes are created when you divide the bottom of jacket when piece measures 45-50 cm (see size) and finish each piece separately. The shoulders are the last row of each front piece + the 22-35 sts each side of back piece. Happy crocheting!
06.03.2015 - 09:14Klopt de hoeveelheid garen wel? Het vest (L) is af, het past perfect maar ik heb 3 bollen Nepal over!
27.10.2014 - 10:48DROPS Design answered:
We geven het door aan onze designafdeling.
27.10.2014 - 16:07Ben er inmiddels uit. Nog bedankt.
26.10.2014 - 11:29Snap het langs hals nu wel maar 1e toer onderaan linker voorpand nog niet (ben een beginner) Er staat : * sla 1 dstk over, haak in volgende dstk 2 dstk en 2l en 2 dstk en 2 l *, herhaal van *-* langs rechter voorpand, langs de hals op het achterpand en naar beneden langs het linker voorpand. Het is me niet duidelijk wat ik moet doen na de allerlaatste 2 dstk onderaan
25.10.2014 - 20:02Ik kom niet uit het laatste stuk, de voorbies. Ik snap niet hoe je de eerste toer eindigt en evenmin hoe je langs de hals op het achterpand haakt aangezien de dstk daar anders lopen dan langs de rand van het voorpand.
25.10.2014 - 17:54DROPS Design answered:
U kunt gewoon verder gaan op dezelfde manier, als u maar zorgt dat u de steken over ongeveer hetzelfde aantal cm verdeelt zodat het mooi doorloopt, dan is het niet zo belangrijk dat de steken waarin u haakt iets anders zijn. Denk alsof u deze rand al gehaakt heeft en gelijkmatig vastnaait. U eindigt zoals u begint, dus met 1 v.
25.10.2014 - 18:45I for some reason, cannot figure out the last of this pattern. I do not understand the 1-1-1-1-2-3 I normally can read a simple pattern and I cannot figure it out for some reason, Please help!
21.10.2014 - 23:35DROPS Design answered:
Dear Kelly, each number apply to the matching size, ie first 4 "1" applies to first 4 sizes (= S, M, L, XL), the "2" apply to size XXL and "3" to size XXXL. Happy crocheting!
22.10.2014 - 09:38Versuche es hier nochmal, häkel die jacke nach Anleitung nach aber irgendwie verstehe ich nicht wo ich die armlöcher abk soll. Danke schon mal im voraus
27.08.2014 - 20:14DROPS Design answered:
Die Jacke wird für die Armausschnitte einfach nur geteilt, d.h. Sie häkeln zunächst nur über die äußersten 22-24-26-29-32-35 M an der einen Seite, dies ist das eine Vorderteil. Dann setzen Sie den Faden neu an und häkeln über die äußersten 22-24-26-29-32-35 M an der anderen Seite (= anderes Vorderteil). Dann häkeln Sie die mittleren M weiter. Nun haben Sie also zwei "Einschnitte" in der Jacke, dies sind die Armausschnitte.
01.09.2014 - 00:35