
Catégories populaires
Vous cherchez un fil?


Commentaires / Questions (74)
![]() Smolka a écrit:
Smolka a écrit:
Leider stimmt die Anleitung nicht. Schade.
10.01.2026 - 21:39
![]() Lindy a écrit:
Lindy a écrit:
After completion of A1 and A2, do I keep repeating A2? Pattern says "work A.2 over every repetition of A1". That sounds like I should repeat A1 and A2? Thanks.
12.11.2024 - 15:44DROPS Design a répondu:
Dear Lindy, after A.1 has been worked one time in height, work and repeat A.2 to the end; befopre casting off you wil then work A.3 (decreasing the stitches increased in A.1 at the beg of piece). Happy knitting!
12.11.2024 - 16:19
![]() Lindy a écrit:
Lindy a écrit:
I am confused by the 1st row of A1. It looks like a six stitch repeat, but the instructions say "5 stitches on 1st row"? So, is it "K3, YO, K2", repeated 6 times? Also, is there a video for the section where the work is split "18" and "18" in each half and then plaited"? Thank you!
12.11.2024 - 14:30DROPS Design a répondu:
Dear Lindy, the first row in A.1 is worked over 5 stitches only, but you increase 1 stitch so that there are 6 sts in total, so work the first row as follows: P1, K2, YO, K1, P1 (= 5 sts increased to 6 sts). In this video we show (for another pattern) how to split piece in 2 and how to work/cross both sides to make a cable in the middle of headband, hope this could help you. Happy knitting!
12.11.2024 - 16:08
![]() Joanna a écrit:
Joanna a écrit:
Czy trzeci rząd schematu A1 powinien wyjść na stronie prawej czy lewej robótki? Chodzi mi o to czy powinnam przerobić oczko lewe jako prawe czy raczej przerobić dodatkowo jeden rząd lewy i zacząć warkocz na prawej stronie?
09.08.2024 - 01:28DROPS Design a répondu:
Witaj Joanno, rzędy nieparzyste schematu znajdują się zwykle na prawej stronie robótki, a parzyste na lewej. Pozdrawiamy!
12.08.2024 - 09:59
![]() Elsa a écrit:
Elsa a écrit:
Hallo, sind die ersten und letzten Maschen in den Diagrammreihen Randmaschen oder werden sie tatsächlich als rechte, bzw. linke Maschen gestrickt? Danke!
07.01.2023 - 20:54DROPS Design a répondu:
Liebe Elsa, die 30 Maschen werden in A.1 gestrickt, dh die 1. Masche der Reihe wird wie die 1. Masche vom 1. A.1 gestrickt und die letzte Masche wird wie die letze Maschen von letzten A.1 gestrickt, es sind keine extra Randmaschen. Viel Spaß beim stricken!
09.01.2023 - 09:32
![]() Merlene Harris a écrit:
Merlene Harris a écrit:
Ok thank you for your reply, but what I don't understand is the increasing on A1, it says I should end up with 36 stitches, but there is no indication on that first row about increasing??
14.12.2021 - 08:16DROPS Design a répondu:
Dear Mrs Harris, you cast on 30 sts and when working the first row of A.1 you will increase 1 stitch in each A.1 (see yarn over afterP1, k2), so that there will be 6 repeats of A.1 with 6 sts each = 36 sts. Does it help?
14.12.2021 - 16:46
![]() Merlene Harris a écrit:
Merlene Harris a écrit:
I would just like to know why the pattern for the headband shows knit 2 together in A3?
14.12.2021 - 00:35DROPS Design a répondu:
Dear Mrs Harris, you increased at the beginning of the headband when working A.1, you will now decrease at the end of the headband working A.3. You need more stitches to get the same width when working cables as when working garter stitch, that's the reason why you increased in A.1 and have to decrease in A.3. Happy knitting!
14.12.2021 - 07:50
![]() NATHALIE TERRIER a écrit:
NATHALIE TERRIER a écrit:
Bonjour, je suis en train de faire ce superbe bandeau pour en faire un cadeau de Noël. Mais il est impossible de faire la grande torsade, les mailles sont trop serrées et cela devient impossible à tricoter. Je pense faire quelques rangs sur 2 bandes de 18 mailles et les croisées ensuite. Cordialement
08.12.2021 - 17:43DROPS Design a répondu:
Bonjour Mme Terrier, une correction dans ce sens a effectivement été mise en ligne le 24 novembre: on vous propose désormais de tricoter 4 cm sur chaque moitié avant de croiser les mailles. Bon tricot!
09.12.2021 - 07:47
![]() Lena a écrit:
Lena a écrit:
Uselt mönster, stickade och repade upp vridningen otaliga gånger (det funkar bara inte) innan jag läste kommentarerna. Videon som hänvisas till stämmer inte med texten i mönstret. Läste kommentarerna och såg att jag inte var ensam om detta problem, Hittade till slut en kommentar från Gunnar 2018. Följde hans utmärkta tips. Nu har jag stickat tre stycken med lyckat resultat. Tack Gunnar!
23.11.2021 - 09:41
![]() Sigga a écrit:
Sigga a écrit:
Getur verið að það séu mistök í þýðingu á íslensku þar sem snúningurinn kemur framan á - þar segir: Prjónið fyrstu 18 lykkjur á kaðlaprjóni, prjónið hinar 18 lykkjurnar og síðan 18 lykkjur af kaðlaprjóni. En á ensku er það: Slip the first 18 stitches on cable needle, work the remaining 18 stitches and then the 18 stitches on cable needle. - Þ.e. Slip er þýtt sem prjónið í stað færið fyrstu 18 lykkjurnar?
16.11.2021 - 23:19DROPS Design a répondu:
Blessuð Sigga. Takk fyrir ábendinguna, þetta hefur verið leiðrétt.
17.11.2021 - 10:52
|
|||||||||||||||||||
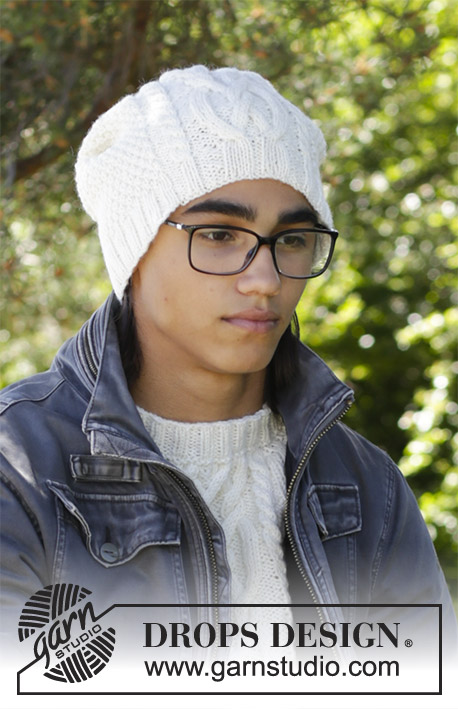
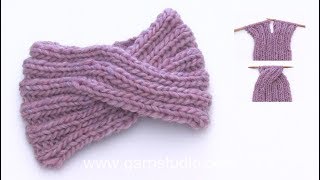
Waiting for Snow Headband#waitingforsnowheadband |
|||||||||||||||||||
|
|
|||||||||||||||||||
Bandeau tricoté avec torsades en DROPS Merino Extra Fine ou DROPS Karisma.
DROPS 195-2 |
|||||||||||||||||||
|
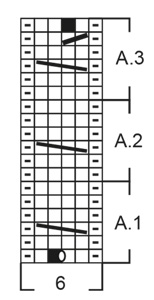
POINT MOUSSE (en allers et retours): 1 côte mousse = tricoter 2 rangs endroit. POINT FANTAISIE: Voir les diagrammes A.1 à A.3. Les diagrammes montrent tous les rangs du motif, vus sur l'endroit. ---------------------------------------------------------- L'OUVRAGE COMMENCE ICI: ---------------------------------------------------------- BANDEAU – PETIT APERÇU DE L'OUVRAGE: Se tricote en allers et retours sur les aiguilles doubles pointes à partir du milieu dos et avec une couture à la fin. BANDEAU: Monter 30 mailles sur les aiguilles 4 en Merino Extra Fine ou Karisma. Tricoter 1 côte au POINT MOUSSE en allers et retours - voir ci-dessus! Tricoter maintenant ainsi: Répéter 6 fois A.1 (= 5 mailles au 1er rang). Au premier rang de A.1, on augmente 6 mailles au total = 36 mailles. Quand A.1 a été tricoté, tricoter A.2 (= 6 mailles) au-dessus de chaque A.1. BIEN CONSERVER LA MÊME TENSION QUE POUR L'ÉCHANTILLON! Quand l'ouvrage mesure 24 cm, diviser l'ouvrage au milieu (= 18 mailles pour chaque moitié). Tricoter A.2 comme avant pendant 4 cm sur la première moitié des mailles. Mettre en attente et tricoter la deuxième moitié des mailles de la même façon. Placer maintenant les mailles de la première moitié sur l'aiguille, mais changer de place avec la deuxième moitié pour former une torsade. Continuer en suivant A.2, en allers et retours jusqu'à ce que l'ouvrage mesure environ 49 cm – ajuster après un motif complet de A.2 en hauteur (il reste encore environ 3 cm avant la fin). Tricoter maintenant A.3 au-dessus de chaque A.2. Après A.3, il reste 30 mailles. Tricoter 1 côte mousse sur toutes les mailles. Rabattre. Assembler le bandeau au milieu dos en cousant les mailles du montage aux mailles rabattues. |
|||||||||||||||||||
Légende diagramme(s) |
|||||||||||||||||||
|
|||||||||||||||||||
 |
|||||||||||||||||||
Vous avez terminé ce modèle?Alors taguez vos photos avec #dropspattern #waitingforsnowheadband ou bien présentez-les dans la galerie #dropsfan Vous avez besoin d'aide pour ce modèle ?Vous trouverez 17 tutoriels vidéo, une rubrique commentaires/questions et plus encore en vous rendant sur la page du modèle sur garnstudio.com © 1982-2026 DROPS Design A/S. Tous droits réservés. Ce document, y compris ces sous-sections, est protégé par les droits d'auteur (copyright). Apprenez-en davantage sur ce que vous pouvez faire avec nos modèles en bas de chacune des pages de notre site. |
|||||||||||||||||||


Avec plus de 40 ans dans la conception de modèles tricot et crochet, DROPS Design offre l'une des plus vastes collections de modèles gratuits sur internet - traduits dans 17 langues. À ce jour, on compte 324 catalogues et 12290 modèles en français.
Nous nous efforçons de vous apporter le meilleur de ce que le tricot et le crochet peuvent vous offrir, inspiration et conseils mais également des fils de haute qualité à des prix incroyables! Vous souhaiteriez utiliser nos modèles autrement que pour un usage personnel? Vous pouvez lire ce que vous êtes autorisés à faire dans le Copyright en bas de page de chacun de nos modèles. Bon tricot!
Poster un commentaire sur le modèle DROPS 195-2
Nous aimerions connaître votre avis sur ce modèle !
Si vous souhaitez poser une question, merci de bien vouloir vérifier que vous avez choisi la bonne catégorie dans le formulaire ci-dessous afin d'accélérer la réponse. Les champs obligatoires sont indiqués par une *.