
Catégories populaires
Vous cherchez un fil?


Commentaires / Questions (11)
![]() Claudine a écrit:
Claudine a écrit:
I have issues with the top right & left front with extra stitches and cannot do the assembly correctly. Reading the comments below I agree the increases should be decreases. I am about to frog both tops of the front pieces.
03.01.2025 - 18:32DROPS Design a répondu:
Dear Claudine, the pattern is correct; these increases are only for the neck which is raised kind of like a lapel, as seen in the picture. If you have a different thread or gauge than that of the pattern the resulting effect may be too loose and it will fall instead of staying straight. Happy knitting!
05.01.2025 - 19:33
![]() DROPS Design a écrit:
DROPS Design a écrit:
Molly, your are right that the shawl collar piece that goes around the neck will have a height measure of approx 5 inch. This drapes up along your neck, and you fold the upper edge only. Depending on which yarn you are using the collar might drape differently. In SilkeTweed which is very drapey and crisp this works beautifully. SilkeTweed used in this design holds it's shape and doesn't "fall" down.
17.04.2009 - 18:10
![]() Molly a écrit:
Molly a écrit:
Correction to my last comment: The gauge for this project is more like 6 sts per inch (which is what I'm getting) so that 32-34 stitch collar is over 5 inches in width (height).
17.04.2009 - 08:31
![]() Molly a écrit:
Molly a écrit:
If 9 stitches is 1 inch in Silke-Tweed (and that is what I'm getting) then the collar, which is 33 stitches, is over 3.5 inches before the 2 thread part. This does seem quite tall-- does it scrunch up behind under the more rigid 2 thread detail? Is it possible there is a detail picture of the back of the collar? Or perhaps a clearer close-up of the collar on the existing picture? I've done the front right panel and, other than my back collar questions, it looks like the picture.
17.04.2009 - 05:56
![]() DROPS Design a écrit:
DROPS Design a écrit:
The inc for collar is also made at the center front edge. Pattern is edited.
14.04.2009 - 19:27
![]() Molly a écrit:
Molly a écrit:
Could you clarify this: "At the same time when the piece measures 32-33-34 cm [12-5/8" - 13" - 13-3/8"] inc 1 st at the center front 8-9-10 times every 7-6-6 rows = 60-61-63 sts." Elsewhere in the pattern it says specifically "center front edge" yet the instruction above says only "center front." Does that mean the increases should no longer be on the edge? That I should put them in the middle, like a bust dart?
14.04.2009 - 18:05
![]() Karen a écrit:
Karen a écrit:
We did post a reply on the 11 November 2006, please check further down this page. As we said in our reply, 66-11 is a 5-year-old pattern and no errors have been found to date. Also we have double checked the translation and this follows the original pattern. It may be that the photo doesn't reflect the true shape/design of the cardigan, and if you want a different look, your suggestions seem a good idea. Again if the instructions
05.01.2007 - 10:16
![]() MKelly a écrit:
MKelly a écrit:
Hi this is the 2nd time that I've written to you regarding 66-11 but noone has emailed me back and I don't see any corrections posted. I have knit this pattern and found numerous errors in it. A novice knitter or even an intermediate knitter would not be able to maneuver this pattern. The front has errors where it says" When piece measures 13" inc.1 st. at the center front 9 times. This should be a decrease not an increas as by the time you get to the collar you have a big lapel shape. It needs to be consistently decreasing at the front to give the v shaping needed. Not increasing and getting larger. The way the collar is described makes absolutely no sense whatso ever if the instructions for the front are not changed. It only will work if the front decreases to end with only the 28 st at the shoulder. As well knitting 2.75 " for the collar is too long and will not stand up as shown in the picture on the website. 35 stitches is not enough for the collar either. I used 95 sts.on a smaller (2.25) needle and double yarn and it then had the length and weith needed to stand up. I also made it 1.5 " instead of 2.75.There is no shaping included in this pattern to allow for the gradual sloping from the front edge to the stand up collar so that it is incorporated smoothly. The sleeves work fine until the underarm decrease of 3 st. either side of marker, but then it says to just knit back and forthe which is not adequate instruction because it doesn't say for how long. also it moves directly to the cap shaping and if I had not knit before I would end up with a 6" arm opening when a 9" arm opening to fit the body is needed. I ended up at the underarm decrease shaping it myself aas for the arm shaping on the body and then added 6 extra rows and then the cap shaping then it worked out a novice would be unable to figure all this out. In the end this is going to be fine but it is a painful pattern and I think there needs to be corrections made.
30.12.2006 - 19:54
![]() karen a écrit:
karen a écrit:
Hi Ya Ya, The Scandinavian version of this pattern is 5 years old and no errors have been found or noted to date. I've checked the translation against the original pattern and Frederikka's translation is word perfect and the instructions in full accordance with the original pattern. The jacket is meant to have a collar/lapel. You increase 9 sts for the collar which in Silketweed amounts to just over 1 inch (the width of the collar on front pieces) and continue over 33 sts for the collar to be sewn tog at the back. Silketweed is a rather rugged quality and the collar will "stand" rather than fall when you have completed the edge in 2 threads and folded it double. I hope this helps. If you don't get the desired look by following the pattern, your alternative sounds a good idea. Kind regards Karen
19.11.2006 - 23:34
![]() Ya Ya a écrit:
Ya Ya a écrit:
I am writing regarding pattern 66-11 the wrap around cardigan in Silke Tweed. There is an error in the pattern for the left and right fronts. Where the pattern reads,"At the same time when the piece measures 13 " inc. 1 st. at the centre front 9 times every 6 rows. This adds far too much material which then actually crosses over at the top instead of angling back towards the shoulder as it shows in the picture and the diagram.As well the next section tells us to leave 33 st on the needle for the collar and knit it an additional 2.75 " When the project is knit in this exact fashion it ends up being huge at the front with a lapel effect. I have since ripped it out and am now doing dec. every 6 rows instead of increases and will continue this until I reach 28 st. and will then put the front and back together and do a 3 needle bind off of the 28sts. to form the shoulder instead of casting off and then sewing it together. I then plan to pick up the cast off 28 sts. on the back for the neck and pick up enough stitches to begin making a collar that looks like the picture using short rows to achieve this. Then I will pick up the stitches all the way around the front and knit in reverse stockinette stitch the last 5 rows. If You have already found the errors and have a correction sheet for this would you please send it to me. I would appreciate hearing back from you either way regarding this pattern. Thanks so much have a good day....Ya Ya
17.11.2006 - 05:42
|
|
Kathmandu |
|
|
|
|
Gilet cache coeur DROPS en Silke Tweed
DROPS 66-11 |
|
|
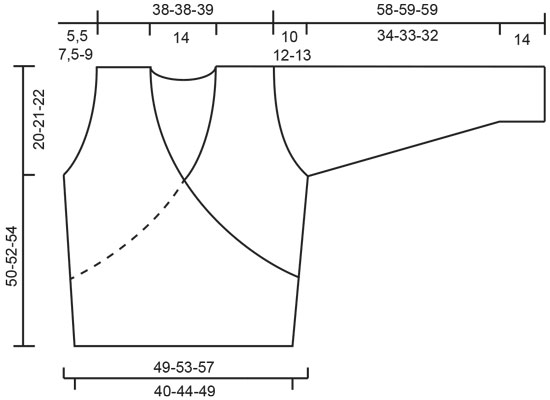
Échantillon : 23 m x 30 rangs = 10 x 10 cm en jersey avec les aiguilles 3,5 Côtes : *1 m end, 1 m env * répéter de * à * Point fantaisie : répéter les 6 rangs suivants : *3 rangs jersey aiguilles 2,5 avec 1 fil vert, 3 rangs jersey envers aiguilles 3,5 avec 1 fil vert + 1 fil vert gazon * répéter de * à * Réalisation Devant droit Avec les aiguilles 2,5 et le fil vert monter 94-104-114 m. Tricoter 7 cm de côtes – voir ci-dessus. Continuer en jersey avec les aiguilles 3,5 en augmentant 1 m sur le côté10 fois tous les 7-7-8 rangs, et 1 m côté milieu devant 2 fois tous les 7-7-8 rangs. À environ 13,5 cm de hauteur totale (on a 98-108-118 m) commencer les diminutions de l'encolure devant (continuer les augmentations sur le côté) : rabattre tous les 2 rangs : 2 fois 8 m, 6-9-12 fois 2 m, 11-10-9 fois 1 m et tous les 4 rangs : 2 fois 1 m = 65-70-75 m. A 30-31-32 cm de hauteur totale, rabattre pour l'emmanchure tous les 2 rangs : 1-2-3 fois 3 m, 3-3-4 fois 2 m et 4-6-5 fois 1 m. EN MÊME TEMPS, à 32-33-34 cm de hauteur totale, augmenter 1 m côté milieu devant 8-9-10 fois 1 m tous les 7-6-6 rangs. À 50-52-54 cm de hauteur totale, rabattre pour l'épaule 28-28-29 m = 32-33-34 m. Continuer en jersey sur ces mailles pour le col pendant encore 7 cm et rabattre. Devant gauche Monter et tricoter comme pour le devant droit, mais en sens inverse. Dos Avec le fil vert et les aiguilles 2,5 monter 94-104-114 m. Tricoter 7 cm de côtes puis continuer en jersey avec les aiguilles 3,5, en augmentant de chaque côté 10 fois 1 m tous les 7-7-8 rangs = 114-124-134 m. A 30-31-32 cm de hauteur totale, rabattre pour les emmanchures de chaque côté comme pour le devant = 88-88-90 m. A 49-51-53 cm de hauteur totale, rabattre pour l'encolure les 28 m centrales, puis 2 m côté encolure au rang suivant = 28-28-29 m pour chaque épaule. À 50-52-54 cm de hauteur totale, rabattre toutes les mailles. Manches Avec les aiguilles doubles pointes 2, 5 et le fil vert monter 58-60-62 m. Joindre et placer un marqueur au début du rang. Tricoter 4 rangs au point mousse puis continuer en point fantaisie – voir ci-dessus- jusqu'à 14 cm de hauteur totale. Continuer avec les aiguilles doubles pointes 3,5 et terminer en jersey. EN MÊME TEMPS, après le point fantaisie, augmenter 1 m de chaque côté du marqueur 13-15-16 fois : Taille S : tous les 8 rangs Taille M : alternativement tous les 6 et 7 rangs Taille L : tous les 6 rangs = 84-90-94 m. A 48-47-46 cm de hauteur totale, rabattre 3 m de chaque côté du marqueur et terminer en allers retours en rabattant de chaque côté tous les 2 rangs : 1 fois 3 m, 2 fois 2 m, 7-10-12 fois 1 m, 2 fois 2 m et 2 fois 3 m. Rabattre les mailles restantes, la manche mesure environ 58-59-59 cm de hauteur totale. Assemblage : coudre les épaules. Sur l'endroit avec le fil vert, relever environ 140-160 m le long du devant droit jusqu'au milieu dos. Changer pour 1 fil vert + 1 fil vert gazon et tricoter 5 rangs jersey envers, rabattre. Répéter le long du devant gauche. Assembler le col au milieu dos. Plier la bande tricotée avec 2 fils sur l'envers et coudre. Coudre les côtés en laissant une ouverture de 4 cm au dessus des côtes sur le côté droit (pour la ceinture), broder l'ouverture au point de boutonnières pour les resserrer. Assembler les manches. Ceinture : avec le fil vert et les aiguilles 2,5 relever 19 m sur le devant droit (ne pas relever le long des côtes). Tricoter en côtes avec 1 m au point mousse de chaque côté. À 3,6 et 9 cm de hauteur totale diminuer 1 m de chaque côté (à 1 m des bords) = 13 m. A environ 70 cm de hauteur totale, rabattre les mailles comme elles se présentent. Faire un lien identique sur le devant gauche. |
|
 |
|
Vous avez terminé ce modèle?Alors taguez vos photos avec #dropspattern ou bien présentez-les dans la galerie #dropsfan Vous avez besoin d'aide pour ce modèle ?Vous trouverez 19 tutoriels vidéo, une rubrique commentaires/questions et plus encore en vous rendant sur la page du modèle sur garnstudio.com © 1982-2026 DROPS Design A/S. Tous droits réservés. Ce document, y compris ces sous-sections, est protégé par les droits d'auteur (copyright). Apprenez-en davantage sur ce que vous pouvez faire avec nos modèles en bas de chacune des pages de notre site. |


Avec plus de 40 ans dans la conception de modèles tricot et crochet, DROPS Design offre l'une des plus vastes collections de modèles gratuits sur internet - traduits dans 17 langues. À ce jour, on compte 324 catalogues et 12290 modèles en français.
Nous nous efforçons de vous apporter le meilleur de ce que le tricot et le crochet peuvent vous offrir, inspiration et conseils mais également des fils de haute qualité à des prix incroyables! Vous souhaiteriez utiliser nos modèles autrement que pour un usage personnel? Vous pouvez lire ce que vous êtes autorisés à faire dans le Copyright en bas de page de chacun de nos modèles. Bon tricot!
Poster un commentaire sur le modèle DROPS 66-11
Nous aimerions connaître votre avis sur ce modèle !
Si vous souhaitez poser une question, merci de bien vouloir vérifier que vous avez choisi la bonne catégorie dans le formulaire ci-dessous afin d'accélérer la réponse. Les champs obligatoires sont indiqués par une *.