
Catégories populaires
Vous cherchez un fil?


Commentaires / Questions (6)
![]() Barbara Kamm a écrit:
Barbara Kamm a écrit:
Thanks you for those latest instructions. So the cable is not really a cable but I. Your last instructions I still don’t see the pattern for the o dented cable like pattern but I guess I can try to figure it out. Are there only 3 stitches in the cable like pattern?
05.09.2023 - 04:41DROPS Design a répondu:
Dear Mrs Kamm, the cable is a real cable but you will either cross the first 6 sts or the last 6 sts - work 3rd row A.1 as follows: slip 3 sts on cable needle behind piece, K 3, K 3 from cable needle, K3, and work 11th row as follows: K3, slip 3 sts on cable needle behind piece, K 3, K 3 from cable needle. Happy knitting!
05.09.2023 - 13:35
![]() Barbara Kamm a écrit:
Barbara Kamm a écrit:
Wow, that I do not understand. I’m going to have to look for an American pattern. I don’t know how to read diagrams. It’s greek to me. So frustrating
03.09.2023 - 22:39
![]() Barbara Kamm a écrit:
Barbara Kamm a écrit:
I have 46 stitches on my needles, 4 stitches in garter, purl 1, 29 stitches in stocking knit, that 34 stitches than plus 3 at the end of the row =37, the other nine must be for the cable pattern. Which is on a diagonal. I don’t see any instructions on how to work the cable and the other stitches ?
02.09.2023 - 04:21DROPS Design a répondu:
Dear Mrs Kamm, on right front piece in larger size, work the 46 sts as follows from right side: 4 front band stitches in garter stitch, work the 9 sts A.1 (= knit on 1st row, cable on 3rd row), then purl 1 and knit to the end of the row. from wrong side, work: K3, P29, K1, P9, K4. In A.1 as well as in A.2 all the stitches will not be crossed for the cable; in A.1 cross the first 6 sts and knit the last 3; then knit the first 3 and cross the last 6. Happy knitting!
04.09.2023 - 09:20
![]() Barbara Kamm a écrit:
Barbara Kamm a écrit:
I am sorry to keep bothering you. But I don’t see in The instructions how to do the cable pattern. I am totally lost
02.09.2023 - 03:57DROPS Design a répondu:
Dear Barbara, the instructions for the cable pattern are in the charts A.1 and A.2, where, on specific rows, you will slip 3 stitches to the cable needle, knit 3 and place the stitches back onto the main needle. So you will have 1 stitch in garter stitch before the cable in A.2 and purl 1 after A.2. On the other front piece you will have A.1 instead of A.2 and 1 purl before the cable and the edge stitch after the cable. Happy knitting!
03.09.2023 - 20:08
![]() Barbara Kamm a écrit:
Barbara Kamm a écrit:
Hi: I am starting the right front and I am confused with the instructions. I am making the 3X size. I have knitted the first 4 stitches that you call Band. Then it states A.2, P1 which I assume is for pearl 1. That confuses me. Then it states 29 stitches in stocking knit. If I am looking at the picture and the right side is on the left, I am not sure what kind of stitch you do before and after the cable? I would think I would do pearl stitches bebore the cable and the cable is zig zag about
29.08.2023 - 05:39DROPS Design a répondu:
Dear Mrs Kamm, on right front piece, work from RS as follows: 4 sts in garter stitch (K them on every row), then work A.2 (see diagram, read from right towards the left from RS and from the left towards the right from WS), purl 1 (this stitch will be knitted from WS), and work the next 29 sts in stocking stitch (= these stitches will be knitted from RS and purled from WS), end with 3 sts in garter stitch (knit them on every row). Happy knitting!
29.08.2023 - 09:27
![]() Barbara Kamm a écrit:
Barbara Kamm a écrit:
It confuses me that on the back piece of this sweater it say to do garter stitch on 3 stitches on each side and I interpret that at the beginning and end of the back ?? Why is that? I understand using it on the front pieces
19.08.2023 - 18:05DROPS Design a répondu:
Dear Barbara, the 3 stitches in garter stitch in each side of the back form a small border for the vent at the lower part of the jacket. After finishing the vent, you will have a single edge stitch in garter stitch, which will be used for the seam. Happy knitting!
20.08.2023 - 17:19
|
||||||||||
Winter Sparkle Cardigan |
||||||||||
|
|
||||||||||
Veste DROPS au tricot, avec torsades, avec 1 fil Cloud ou 2 fils Air. Du S au XXXL.
DROPS Extra 0-1188 |
||||||||||
|
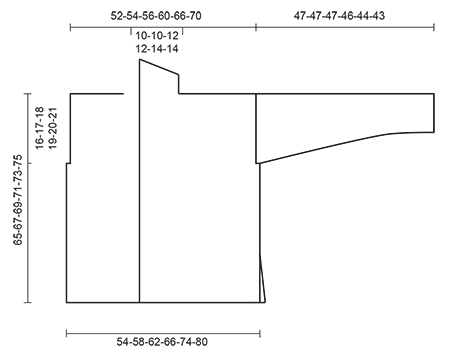
POINT MOUSSE (en allers et retours): Tricoter tous les rangs à l'endroit. 1 côte mousse = 2 rangs end. POINT FANTAISIE: Voir les diagrammes A.1-A.2. Les diagrammes montrent tous les rangs du point fantaisie, vus sur l'endroit. BOUTONNIÈRES: Ouvrir 4 boutonnières sur l'endroit, sur la bordure devant droit. 1 BOUTONNIÈRE = tricoter 2 m à partir du bord, faire 1 jeté, tricoter les 2 m suiv ens à l'end. Au rang suivant, tricoter le jeté à l'end. Emplacement des boutonnières (en cm de hauteur totale) à approx.: TAILLE S: 20, 29, 38 et 47 cm TAILLE M: 20, 29, 38 et 47 cm TAILLE L: 24, 33, 42 et 51 cm TAILLE XL: 24, 33, 42 et 51 cm TAILLE XXL: 25, 35, 45 et 55 cm TAILLE XXXL: 25, 35, 45 et 55 cm ---------------------------------------------------------- DOS: Se tricote en allers et retours sur aiguille circulaire. Monter 54-58-62-66-74-80 m avec l'aiguille circulaire 8 et 1 fil Cloud ou 2 fils Air et tricoter 2 côtes au POINT MOUSSE - voir ci-dessus. Continuer avec l'aiguille circulaire 9 en jersey avec 3 m point mousse de chaque côté. À 14 cm de hauteur totale (= fentes), tricoter les 3 m point mousse de chaque côté en jersey, et, EN MÊME TEMPS, monter 1 m lis de chaque côté à la fin des 2 rangs suivants = 56-60-64-68-76-82 m. Tricoter les m lis au point mousse. PENSER À BIEN CONSERVER LA MÊME TENSION QUE POUR L'ÉCHANTILLON! À 49-50-51-52-53-54 cm de hauteur totale, rabattre pour les emmanchures 2-3-4-4-5-6 m de chaque côté au début des 2 rangs suivants = 52-54-56-60-66-70 m. À 63-65-67-69-71-73 cm de hauteur totale, rabattre les 10-10-12-12-14-14 m centrales pour l'encolure = il reste 21-22-22-24-26-28 m pour l'épaule. Continuer en jersey jusqu'à ce que l'ouvrage mesure 64-66-68-70-72-74 cm. Tricoter 1 côte mousse et rabattre. Tricoter l'autre épaule de la même façon. DEVANT DROIT: Monter 31-33-35-37-41-44 m (y compris 4 m de bordure devant au point mousse) avec l'aiguille circulaire 8 1 fil Cloud ou 2 fils Air . Tricoter 2 côtes mousse - EN MÊME TEMPS, au dernier rang, répartir 2 augmentations = 33-35-37-39-43-46 m. Continuer avec l'aiguille circulaire 9 et tricoter ainsi sur l'endroit: 4 m de bordure devant au point mousse, A.2, 1 m env, 16-18-20-22-26-29 m jersey, 3 m point mousse. À 14 cm de hauteur totale, tricoter en jersey les 3 m point mousse en fin de rang sur l'endroit, EN MÊME TEMPS, monter 1 m lis en fin de rang sur l'endroit = 34-36-38-40-44-47 m. Tricoter la m lis au point mousse. Ne pas oublier les BOUTONNIÈRES - voir ci-dessus. À 49-50-51-52-53-54 cm de hauteur totale, rabattre pour l'emmanchure 2-3-4-4-5-6 m au début du rang suivant sur l'envers =32-33-34-36-39-41 m. À 64-66-68-70-72-74 cm de hauteur totale, ajuster pour que le rang suivant soit sur l'envers, tricoter 1 côte mousse sur toutes les mailles. Rabattre ensuite les 21-22-22-24-26-28 premières m pour l'épaule = il reste 11-11-12-12-13-13 m pour le col châle. Continuer sur ces mailles au point mousse - EN MÊME TEMPS, tricoter des rangs raccourcis, en commençant par le côté col (sur l'endroit) ainsi: *1 côte mousse sur toutes les mailles (= 2 rangs end). Au rang suivant sur l'endroit, tricoter 9 m end, tourner et tricoter le rang retour à l'end*, répéter de *-* jusqu'à ce que l'ouvrage mesure 7-7-8-8-9-9 cm depuis les mailles rabattues pour l'épaule (petit côté). Rabattre souplement toutes les mailles. DEVANT GAUCHE: Se tricote comme le devant droit mais en sens inverse, et tricoter A.1 au lieu de A.2. Monter la m lis en fin de rang sur l'envers. Rabattre pour l'emmanchure en début de rang sur l'endroit. Rabattre pour l'épaule en début de rang sur l'endroit. MANCHES: Se tricotent en allers et retours sur aiguille circulaire. Monter 24-24-24-26-26-26 m avec l'aiguille circulaire 8 1 fil Cloud ou 2 fils Air. Tricoter 2 côtes mousse. Continuer avec l'aiguille circulaire 9 en jersey avec 1 m lis au point mousse de chaque côté. À 9 cm de hauteur totale, augmenter 1 m à 1 m du bord de chaque côté, répéter ces augmentations encore 4-5-6-6-7-8 fois tous les 9-7-6-5½-4½-4 cm = 34-36-38-40-42-44 m. Rabattre quand l'ouvrage mesure 47-47-47-46-44-43 cm. NOTE! plus court dans les grandes tailles, car les épaules sont plus larges. Tricoter l'autre manche. ASSEMBLAGE: Faire la couture des épaules. Monter les manches. Faire la couture des manches et des côtés à 1 m des bords jusqu'aux m lisières (c'est-à-dire environ 14 cm de fentes). Assembler le col au milieu dos. Coudre le col le long de l'encolure dos, bord à bord pour éviter une couture trop épaisse. Coudre les boutons sur le devant gauche. |
||||||||||
Légende diagramme(s) |
||||||||||
|
||||||||||
 |
||||||||||
 |
||||||||||
Vous avez terminé ce modèle?Alors taguez vos photos avec #dropspattern ou bien présentez-les dans la galerie #dropsfan Vous avez besoin d'aide pour ce modèle ?Vous trouverez 26 tutoriels vidéo, une rubrique commentaires/questions et plus encore en vous rendant sur la page du modèle sur garnstudio.com © 1982-2026 DROPS Design A/S. Tous droits réservés. Ce document, y compris ces sous-sections, est protégé par les droits d'auteur (copyright). Apprenez-en davantage sur ce que vous pouvez faire avec nos modèles en bas de chacune des pages de notre site. |
||||||||||


Avec plus de 40 ans dans la conception de modèles tricot et crochet, DROPS Design offre l'une des plus vastes collections de modèles gratuits sur internet - traduits dans 17 langues. À ce jour, on compte 324 catalogues et 12291 modèles en français.
Nous nous efforçons de vous apporter le meilleur de ce que le tricot et le crochet peuvent vous offrir, inspiration et conseils mais également des fils de haute qualité à des prix incroyables! Vous souhaiteriez utiliser nos modèles autrement que pour un usage personnel? Vous pouvez lire ce que vous êtes autorisés à faire dans le Copyright en bas de page de chacun de nos modèles. Bon tricot!
Poster un commentaire sur le modèle DROPS Extra 0-1188
Nous aimerions connaître votre avis sur ce modèle !
Si vous souhaitez poser une question, merci de bien vouloir vérifier que vous avez choisi la bonne catégorie dans le formulaire ci-dessous afin d'accélérer la réponse. Les champs obligatoires sont indiqués par une *.