
Catégories populaires
Vous cherchez un fil?


Commentaires / Questions (14)
![]() Cornelia Wolf a écrit:
Cornelia Wolf a écrit:
Hallo, ich möchte den Schal nicht so breit mit 102 Maschen häkeln. Durch wieviel muss die Maschenzahl teilbar sein? Lg. und vielen Dank!
16.01.2020 - 15:52DROPS Design a répondu:
Liebe Frau Wolf, dann Sollen Sie 12 Luftmaschen weniger für jeden A.2 weniger anschlagen. Viel Spaß beim Häkeln!
16.01.2020 - 16:19
![]() Kathy a écrit:
Kathy a écrit:
So pleased with pattern so far... this is beautiful. I am stumped on the "finish" though. Do I begin with the short side or the long? Please help! Thanks. Kathy
27.02.2016 - 00:47DROPS Design a répondu:
Dear Kathy, The shawl is worked starting from one end (short side) to the other end. When piece measures 168 cm (after a row 4), work a finishing row as stated under "FINISH" + 1 sc row then work 1 sc row on the other short side (along foundation chain). Happy crocheting!
27.02.2016 - 16:05
![]() Joyce Van Der Velden a écrit:
Joyce Van Der Velden a écrit:
Beste mevrouw, meneer. Ik ben begonnen met deze sjaal. Gaandeweg heb ik zitten kijken en naar mijn idee is het resultaat op de foto een ander patroon dan het resultaat van het patroon dat beschreven staat. Ook erg mooi, maar volgens mij dus twee verschillende sjaals. Ik ben benieuwd of het klopt wat ik denk. Alvast dank voor uw reactie. Met vriendelijke groet, Joyce van der Velden
14.05.2015 - 10:04
![]() Charlene a écrit:
Charlene a écrit:
I have an "ICE Yarn" that is 10% Alpaca/ 25% Wool/ 65% Acrylic. The initial yarn strand is fairly thin with a fuzzy feel to it. Was wondering what your thoughts were trying to use this type of yarn for this project. Different hook size, etc?
04.01.2015 - 18:52DROPS Design a répondu:
Dear Charlene, please click click here for all relevant informations about our yarn - please contact the store where you bought your yarn for any individual assistance. Happy crocheting!
05.01.2015 - 09:26
![]() Andien Oostveen a écrit:
Andien Oostveen a écrit:
Een geweldige sjaal om te maken en te dragen.
03.01.2015 - 11:15
![]() Sandy a écrit:
Sandy a écrit:
I haven't crocheted in such a long time but this shawl is gorgeous and I am tearing out the knitted one I just started so that I can attempt this one...wish me luck!
15.07.2014 - 22:56
![]() Laurie a écrit:
Laurie a écrit:
I'm confused as to how much of the Drops yarn I need to purchase for this pattern in a large. Thank you! :)
11.05.2014 - 05:05DROPS Design a répondu:
Dear Laurie, you will need 300 g DROPS Cotton Merino for this shawl - measurements are given while working and after blocking (it will be then somewhat less width but longer). Happy crocheting!
12.05.2014 - 09:51
![]() Deborah David a écrit:
Deborah David a écrit:
Print the pattern function doesn't work. Please HELP!
01.05.2014 - 20:22DROPS Design a répondu:
Dear Mrs David, please first check that your browser allows pop'up windows, then click on "Print:pattern", a new window will open with an add, in this window, click on "Print the pattern" to launch printing. Happy crocheting!
02.05.2014 - 10:01
![]() Maura O'Neill a écrit:
Maura O'Neill a écrit:
I was wondering what the multiples are in the foundation chain to make this shawl wider. Thank you.
26.04.2014 - 16:26DROPS Design a répondu:
Dear Mrs O'Neill, to get 1 extra repeat, add 12 sts (1 time A.2), to get 2 extra repeats, add 24 sts (2 times A.2) and so on. Happy crocheting!
28.04.2014 - 10:07
![]() Ruth a écrit:
Ruth a écrit:
Ein schöner Schal, einfaches Muster und so wirkungsvoll, er verdient wirklich noch einen Kommentar mehr :-)
06.04.2014 - 16:07
|
|||||||||||||
Song For Susan#songforsusanshawl |
|||||||||||||
 |
 |
||||||||||||
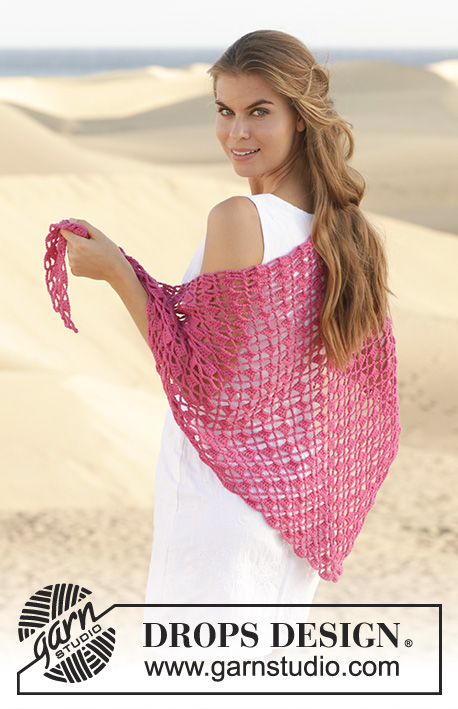
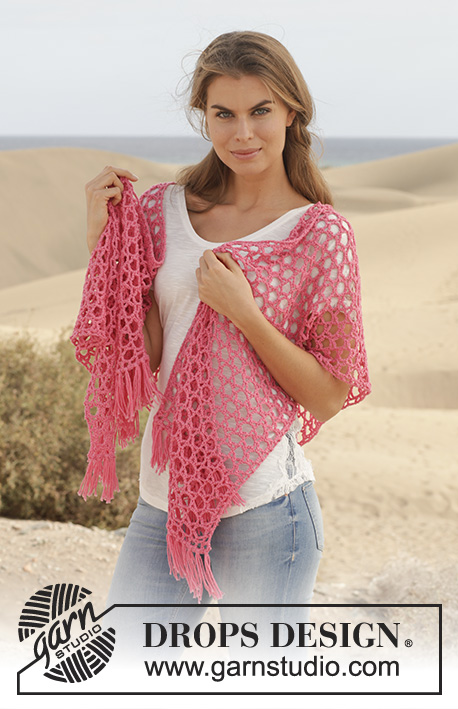
Étole DROPS en point étoilé au crochet, en "Cotton Merino".
DROPS 154-11 |
|||||||||||||
|
POINT FANTAISIE: Voir les diagrammes A.1, A.2 et A.3. Crocheter A.1, 7 fois A.2 au total, A.3. Répéter les rangs 3 et 4 jusqu'à ce que l'ouvrage mesure environ 168 cm. ---------------------------------------------------------- ÉTOLE : Crocheter le POINT FANTAISIE en suivant soit le diagramme ci-dessous, soit les explications suivantes : Monter une chaînette de 102 ml en Cotton Merino avec le crochet 4.5. RANG 1: 1 B dans la 9ème ml à partir du crochet, 2 ml, sauter 2 ml, 1 B dans la ml suiv, 2 ml, sauter 2 ml, *1 B dans la ml suiv, 2 ml, sauter 2 ml, 1 B dans la ml suiv, 2 ml, sauter 2 ml, 1 B dans la ml suiv, 2 ml, sauter 2 ml, 1 B dans la ml suiv, 2 ml, sauter 2 ml*, répéter de *-* encore 6 fois, 1 B dans la ml suiv, 2 ml, sauter 2 ml, 1 B dans la ml suiv = 32 B. Tourner. RANG 2: 5 ml, 1 B dans la B suiv, *3 ml, 1 ms dans la B suiv, 3 ml, 1 B dans la B suiv, 5 ml, sauter 1 B, 1 B dans la B suiv*, répéter de *-* encore 6 fois, 3 ml, 1 ms dans la B suiv, 3 ml, 1 B dans la B suiv, 2 ml, sauter 2 ml, 1 B dans la ml suiv = 17 B. Tourner. RANG 3: 5 ml, 1 B dans la B suiv, 5 ml, *1 B dans la B suiv, 3 ml, 1 ms dans l'arceau, 3 ml, 1 B dans la B suiv, 5 ml*, répéter de *-* encore 6 fois, 1 B dans la B suiv, 2 ml, sauter 2 ml, 1 B dans la ml suiv = 17 B. Tourner. RANG 4: 5 ml, 1 B dans la B suiv, *3 ml, 1 ms dans l'arceau, 3 ml, 1 B dans la B suiv, 5 ml, 1 B dans la B suiv*, répéter de *-* encore 6 fois, 3 ml, 1 ms dans l'arceau, 3 ml, 1 B dans la B suiv, 2 ml, sauter 2 ml, 1 B dans la ml suiv = 17 B. Répéter les rangs 3 et 4 jusqu'à ce que l'ouvrage mesure environ 168 cm (ajuster après le rang 4). FINITIONS: Réaliser ensuite la finition suivante : 5 ml, 1 B dans la B suiv, 2 ml, 1 B dans la 1ère ms, 2 ml, *1 B dans la B suiv, 2 ml, 1 B dans l'arceau, 2 ml, 1 B dans la B suiv, 2 ml, 1 B dans la ms suiv, 2 ml*, répéter de *-* encore 6 fois, 1 B dans la B suiv, 2 ml, sauter 2 ml, 1 B dans la ml suiv = 32 B. Tourner. Crocheter 1 rang de ms ainsi: 1 ml, 1 ms dans chaque ml et B = 96 ms. Arrêter. Crocheter 1 rang de ms le long des 2 petits côtés ainsi: 1 ml, 1 ms dans chaque ml et B = 96 ms. FRANGES: Attacher les franges dans chaque "carré" le long des petits côtés. 1 frange: Couper 3 fils de 20 cm chacun. Les plier en double et passer la boucle dans un des petits carrés. Passer ensuite l'extrémité des fils dans la boucle. MISE EN FORME: Placer l'ouvrage dans l'eau tiède jusqu'à ce qu'il soit complètement trempé. Appuyer délicatement pour extraire l'excès d'eau - ne pas tordre. Rouler ensuite l'ouvrage dans une serviette et appuyer pour extraire l'excédent d'eau - l'ouvrage est maintenant seulement humide. Placer l'ouvrage sur un tapis ou un matelas - étirer délicatement aux dimensions indiquées au début des explications. Laisser sécher. Répéter après chaque lavage. |
|||||||||||||
Légende diagramme(s) |
|||||||||||||
|
|||||||||||||
 |
|||||||||||||
Vous avez terminé ce modèle?Alors taguez vos photos avec #dropspattern #songforsusanshawl ou bien présentez-les dans la galerie #dropsfan Vous avez besoin d'aide pour ce modèle ?Vous trouverez 5 tutoriels vidéo, une rubrique commentaires/questions et plus encore en vous rendant sur la page du modèle sur garnstudio.com © 1982-2026 DROPS Design A/S. Tous droits réservés. Ce document, y compris ces sous-sections, est protégé par les droits d'auteur (copyright). Apprenez-en davantage sur ce que vous pouvez faire avec nos modèles en bas de chacune des pages de notre site. |
|||||||||||||


Avec plus de 40 ans dans la conception de modèles tricot et crochet, DROPS Design offre l'une des plus vastes collections de modèles gratuits sur internet - traduits dans 17 langues. À ce jour, on compte 324 catalogues et 12290 modèles en français.
Nous nous efforçons de vous apporter le meilleur de ce que le tricot et le crochet peuvent vous offrir, inspiration et conseils mais également des fils de haute qualité à des prix incroyables! Vous souhaiteriez utiliser nos modèles autrement que pour un usage personnel? Vous pouvez lire ce que vous êtes autorisés à faire dans le Copyright en bas de page de chacun de nos modèles. Bon tricot!
Poster un commentaire sur le modèle DROPS 154-11
Nous aimerions connaître votre avis sur ce modèle !
Si vous souhaitez poser une question, merci de bien vouloir vérifier que vous avez choisi la bonne catégorie dans le formulaire ci-dessous afin d'accélérer la réponse. Les champs obligatoires sont indiqués par une *.