
Catégories populaires
Vous cherchez un fil?


Commentaires / Questions (25)
![]() Anna a écrit:
Anna a écrit:
In English (UK), the description suggests that you first knit the hat to a length of 26 cm, then knit another 17 cm until the decrease. (You can start decreasing when the piece measures 43 cm) In Hungarian (and some other languages) the description suggests that you knit 32 cm, then knit another 23 cm. (You can start decreasing when the piece measures 55 cm.) Which is correct? What is the recommended length for a size S/M beanie?
16.01.2025 - 12:45DROPS Design a répondu:
Dear Anna, since the pattern was translated and uploaded its English version was reedited. Thank you for bringing to our attention, now the online Hungarian version is also updated. Happy Knitting!
17.01.2025 - 13:42
![]() Manon a écrit:
Manon a écrit:
Dans l'explication en français, il y a une erreur qui m'a fait douter un long moment "Augmenter ainsi 6-7-8 fois au total". 3 propositions pour 2 tailles ... Dans l'explication en anglais c'est "augmenter 6-7..." Le 8 est en trop en français. Maintenant que j'ai compris les explications je vais commencer le bonnet :)
16.01.2025 - 12:33DROPS Design a répondu:
Bonjour Manon et merci pour votre retour, les explications ont été corrigées. Bon tricot!
16.01.2025 - 17:52
![]() Laudia a écrit:
Laudia a écrit:
Ho un giro testa di 50 cm come faccio per gli aumenti e le diminuzioni e l‘avvio? grazie
28.11.2024 - 15:32DROPS Design a répondu:
Buonasera Laudia, deve adattare le spiegazioni alle sue misure: per un aiuto più personalizzato può rivolgersi al suo rivenditore DROPS di fiducia. Buon lavoro!
26.12.2024 - 22:55
![]() Anna a écrit:
Anna a écrit:
Hej! Jeg er/var godt i gang med seks udtagninger i hver runde (i 7 runder) efterfulgt af udtagninger i hver anden runde i 11 runder. Men når jeg nu måler mit arbejde måler det ikke 10 cm jf. jeres opskrift, men i stedet 16 cm.. Hvad kan jeg have gjort forkert?
27.11.2024 - 11:11DROPS Design a répondu:
Hej Anna, strikker du i DROPS Baby Merino og har du 24 m i bredden og 32 varv i højden på 10x10 cm får du 10 cm. Hvis du strikker løsere eller med tykkere garn, fylder pindene mere og da vil arbejdet blive større.
28.11.2024 - 14:44
![]() Debra De Witt a écrit:
Debra De Witt a écrit:
How do you insert a marker in the middle of three stitches?
18.11.2024 - 15:08DROPS Design a répondu:
Dear Mrs De Witt, our stitch markers can be locked around a stitch and then follow piece/stitch by and by, round after round; but you can also use a marker thread around a stitch as shown in this video. Happy knitting!
19.11.2024 - 07:37
![]() Cynthia a écrit:
Cynthia a écrit:
Hi. Like other knitters I’m confused by this pattern. If I repeat from *~* then the last part of round 1 is a make yarn over. How is this (the last YO) knitted on the following round for round 2? Thanks!
17.11.2024 - 18:16DROPS Design a répondu:
Dear Cynthia, all yarn overs are knitted twisted in the next round, including the last one. Happy knitting!
17.11.2024 - 23:28
![]() Debra a écrit:
Debra a écrit:
I’m confused with “Knit 3 and insert a marker in the middle of these three stitches.” How do you insert a marker in the middle 3, attach it to the second (middle) stitch? If there were 4, I’d put it between the second and third. Thank you.
14.11.2024 - 17:43
![]() Carey a écrit:
Carey a écrit:
Hi, I cannot get 18 stitches in the first round of increasing, I get 17! I don’t know where I am going wrong. Knit 3, make 1, knit 1, make 1, knit 3, make 1, knit 1, make 1 etc! I go from 12 stitches to 17! Please help, sorry for my ignorance.
28.10.2024 - 07:16DROPS Design a répondu:
Dear Carey, there are 12 sts and 3 markers and you increase on each side of each marker (K3, YO, K1, YO) x 3 = 6 x3=18 sts (worked over (K3,K1)x3=12 sts). Happy knitting!
28.10.2024 - 10:08
![]() Carol Maitland a écrit:
Carol Maitland a écrit:
Hi thank you so much for your responses concerning this pattern. Have another question where does round 2 come into play,the yarn overs at the beginning and at the end only.thks so much,I aplogize for all these question with this pattern.Carol Maitland
22.10.2024 - 18:35DROPS Design a répondu:
Dear Mrs Maitland, sorry I might misunderstand your question, the round 2 is worked after first round with increases, then you increase on every round and afterwards on every other round. The yarn overs worked to increase will always be knitted twisted (into back of loop) to avoid holes. Happy knitting!
23.10.2024 - 08:06
![]() Carol Maitland a écrit:
Carol Maitland a écrit:
Hi I have another question concerning this pattern. I understand the instructions for round 1 and round 2,but having trouble understanding the increase tip starting where it says increase like this every round 6 or 7 times.So I knit stocking stitch and increase 1 stitch on each side of marker then what do i do.Also dont understand when they say then every 2nd round 11 times,are they ref to round 2 with the yarn overs.Thks so much Carol.
21.10.2024 - 18:12DROPS Design a répondu:
Dear Mrs Maitland, you are right you continue working stocking stich and increase on each side of each marker (you increase 6 sts on each increase round), you increase like this a total of 6, 7 or 8 times on every round, then increase on every other round (1 round with increases as before, 1 round without increases) a total of 11 times. Happy knitting!
22.10.2024 - 08:58
|
|
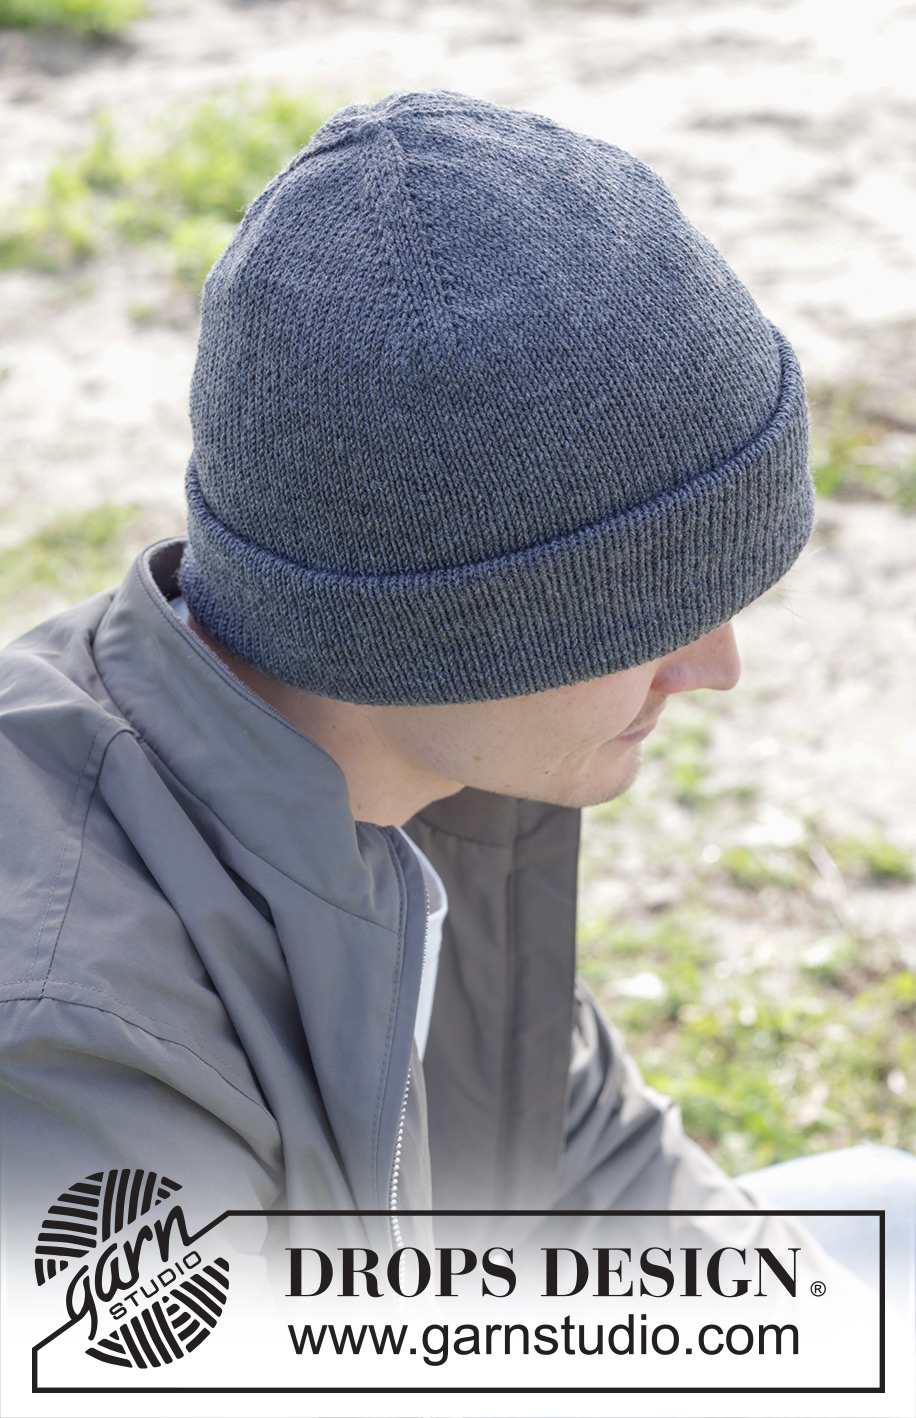
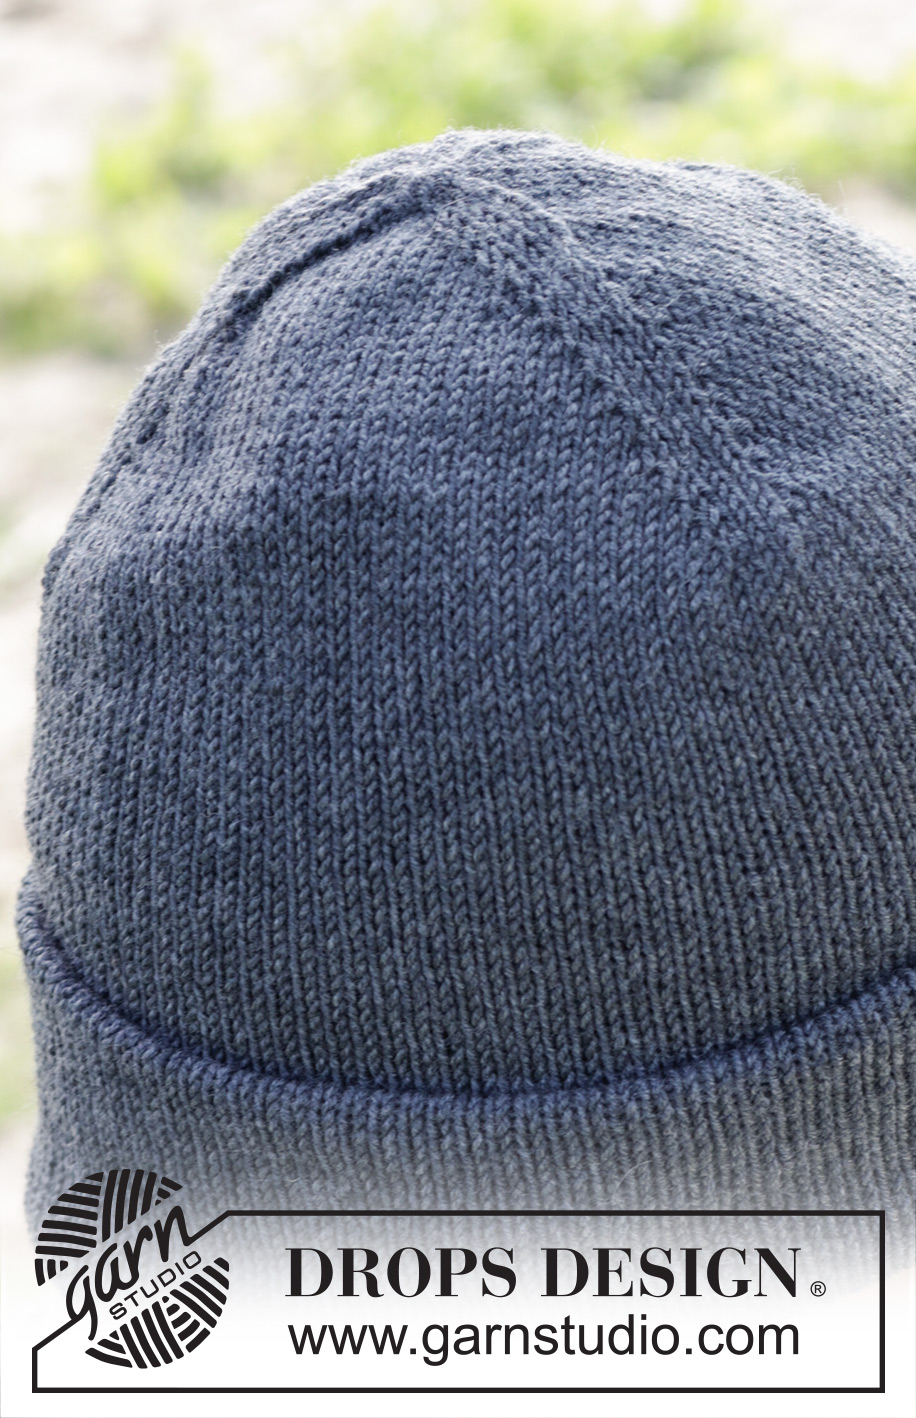
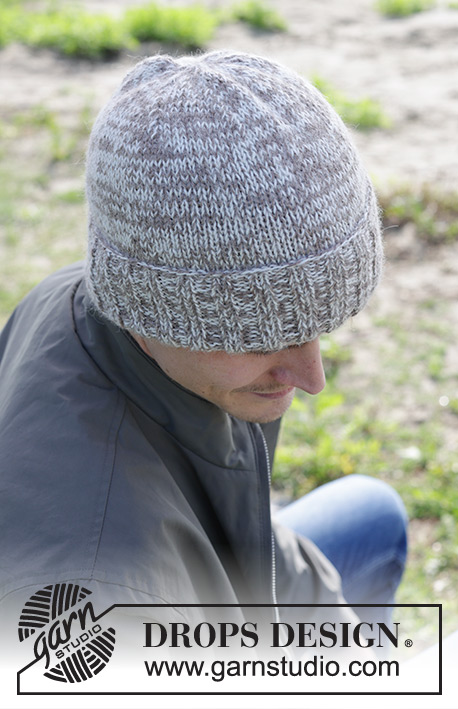
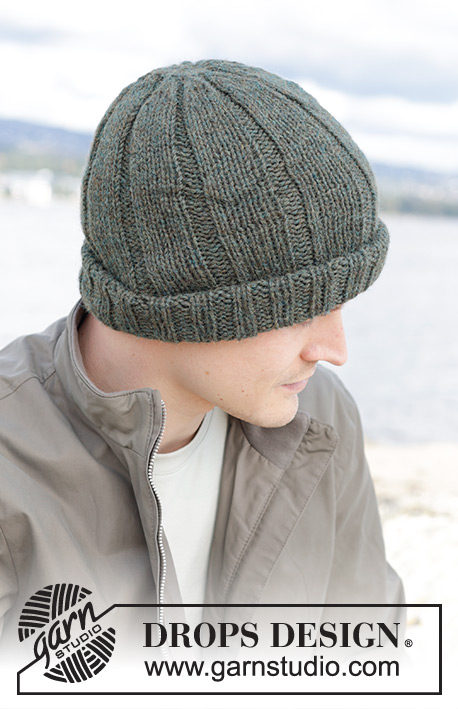
Blank Slate Hat#blankslatehat |
|
 |
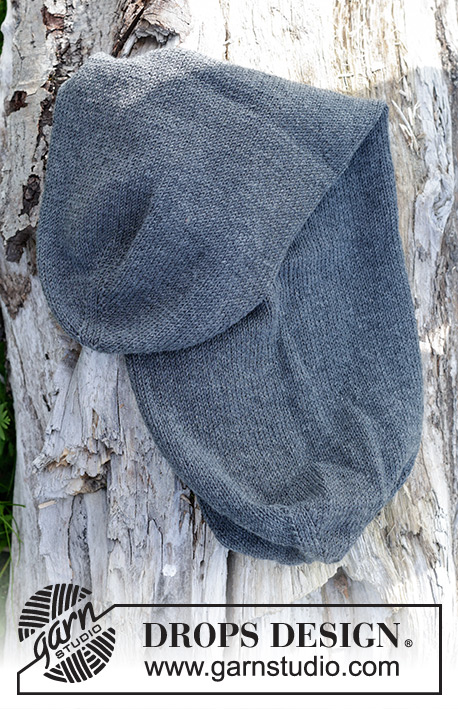 |
Bonnet réversible tricoté pour homme en DROPS BabyMerino. Du M au XL.
DROPS 246-27 |
|
|
------------------------------------------------------- TECHNIQUES EMPLOYÉES: ------------------------------------------------------- AUGMENTATIONS: Augmenter de chaque côté de chacune des mailles avec un marqueur ainsi: tricoter jusqu’à ce qu’il reste 1 maille avant la maille avec le marqueur, faire 1 jeté, tricoter 3 mailles endroit (la maille avec le marqueur est celle du milieu), faire 1 jeté (= on a augmenté 2 mailles). Au tour suivant, tricoter les jetés torse à l’endroit pour éviter des trous. DIMINUTIONS: Diminuer de chaque côté de chacune des mailles avec un marqueur ainsi: Tricoter jusqu’à ce qu’il reste 2 mailles avant la maille avec le marqueur, tricoter 2 mailles ensemble à l’endroit, tricoter 1 maille endroit (la maille avec le marqueur), glisser 1 maille comme pour la tricoter à l’endroit, tricoter 1 maille endroit et passer la maille glissée par-dessus la maille tricotée (on a diminué 2 mailles). ------------------------------------------------------- L’OUVRAGE COMMENCE ICI: ------------------------------------------------------- BONNET - PETIT APERÇU DE L’OUVRAGE: Se tricote en rond avec les aiguilles doubles pointes, continuer avec l’aiguille circulaire quand nécessaire. On tricote le bonnet d’une extrémité à l’autre, en augmentant d’abord puis en diminuant pour l’autre moitié. Le bonnet va ressembler à un tube, fermé aux deux extrémités. On pousse une des extrémités dans l’autre pour former une double épaisseur en jersey. BONNET: Monter 12 mailles avec les aiguilles doubles pointes 3,5 en DROPS Baby Merino. TOUR 1: Tricoter * 3 mailles endroit et mettre un marqueur dans la maille au milieu de ces mailles, faire 1 jeté, tricoter 1 maille endroit, faire 1 jeté *, tricoter de *-* jusqu’à la fin du tour = 3 marqueurs. TOUR 2: Tricoter à l’endroit, tricoter les jetés torse à l’endroit = 18 mailles dans toutes les tailles. Continuer en jersey et augmenter 1 maille de chaque côté de chacune des mailles avec un marqueur - voir AUGMENTATIONS (= on augmente 6 mailles). Augmenter ainsi 6-7 fois au total tous les tours, puis 11 fois tous les 2 tours. Quand toutes les augmentations sont terminées, on a 120-126 mailles et l’ouvrage mesure environ 9-10 cm à partir du rang de montage. BIEN CONSERVER LA MÊME TENSION QUE POUR L’ÉCHANTILLON! Faire suivre les marqueurs au fur et à mesure – ils vont aussi servir de repères pour les diminutions. NOTE! Il est important de fermer le trou en haut du bonnet maintenant. À l’aide d’une aiguille à laine, passer le fil dans les mailles, serrer et sécuriser sur l’envers. Continuer en rond, en jersey, jusqu’à ce que l’ouvrage mesure 26-27 cm; la moitié du bonnet est faite. Placer un marqueur (on va désormais mesurer l’ouvrage à partir d’ici). Continuer en rond, en jersey jusqu’à ce que l’ouvrage mesure 17-17 cm à partir du marqueur. Diminuer maintenant 1 maille de chaque côté de chacune des mailles avec un marqueur - voir DIMINUTIONS (= on diminue 6 mailles). Diminuer ainsi 11 fois au total tous les 2 tours, puis 6-7 fois tous les tours. Quand toutes les diminutions sont faites, il reste 18 mailles. Tricoter le tour suivant ainsi: * 2 mailles ensemble à l’endroit, 1 maille endroit*, tricoter de *-* jusqu’à la fin du tour = 12 mailles. Couper le fil. Le passer dans les mailles restantes et serrer. Sécuriser le fil pour qu’il soit invisible sur l’endroit. Pousser une des moitiés du bonnet à l’intérieur de l’autre, à partir du marqueur pour former une double épaisseur en jersey, à la fois à l’intérieur et à l’extérieur. On peut ensuite le porter des deux côtés. Replier les 6 cm du bas sur l’endroit. |
|
Vous avez terminé ce modèle?Alors taguez vos photos avec #dropspattern #blankslatehat ou bien présentez-les dans la galerie #dropsfan Vous avez besoin d'aide pour ce modèle ?Vous trouverez 12 tutoriels vidéo, une rubrique commentaires/questions et plus encore en vous rendant sur la page du modèle sur garnstudio.com © 1982-2026 DROPS Design A/S. Tous droits réservés. Ce document, y compris ces sous-sections, est protégé par les droits d'auteur (copyright). Apprenez-en davantage sur ce que vous pouvez faire avec nos modèles en bas de chacune des pages de notre site. |
|


Avec plus de 40 ans dans la conception de modèles tricot et crochet, DROPS Design offre l'une des plus vastes collections de modèles gratuits sur internet - traduits dans 17 langues. À ce jour, on compte 324 catalogues et 12290 modèles en français.
Nous nous efforçons de vous apporter le meilleur de ce que le tricot et le crochet peuvent vous offrir, inspiration et conseils mais également des fils de haute qualité à des prix incroyables! Vous souhaiteriez utiliser nos modèles autrement que pour un usage personnel? Vous pouvez lire ce que vous êtes autorisés à faire dans le Copyright en bas de page de chacun de nos modèles. Bon tricot!
Poster un commentaire sur le modèle DROPS 246-27
Nous aimerions connaître votre avis sur ce modèle !
Si vous souhaitez poser une question, merci de bien vouloir vérifier que vous avez choisi la bonne catégorie dans le formulaire ci-dessous afin d'accélérer la réponse. Les champs obligatoires sont indiqués par une *.