
Catégories populaires
Vous cherchez un fil?


Commentaires / Questions (36)
![]() Eva-Lena a écrit:
Eva-Lena a écrit:
Gäller bröstkupan, jag får fram sammanlagt 26 stolpar trots det står ska vara 28 stolpar. stl s - ena 10 stolpar plus 1 stolpe i 4 e luftmaska och 2 st o 1 lm 2 st andra sida 11 stolpar ....?? repade och gjorde om men blir samma resultat.något jag missat ???
10.06.2024 - 21:20DROPS Design a répondu:
Hei Eva-Lena. I str. S starter du med 15 luftmasker, hekle 1 stav i den 4. luftmasken fra nålen (du har nå 2 staver på 1. rad. De 3 siste luftmaskene av de 15 og 1 stav i 4. luftmasken fra nålen). Deretter hekles det 1 stav i hver av de 10 neste luftmasken = 2 staver + 10 staver. I siste luftmaske hekles det 2 staver + 1 luftmaske +2 staver). 2+10+2+2=16 staver. Så hekles det 1 stav på undersiden av de 12 stavene (i de sammen luftmaskene) = 2+10+2+2+12 = 28 staver. Den siste staven hekles i undersiden av de 3 luftmaskene (av de 15 start luftmaskene) som erstatter 1.stav. mvh DROPS Design
17.06.2024 - 11:04
![]() Hannah a écrit:
Hannah a écrit:
När jag gör bröstkuporna, står det att det ska bli 4 stolpar ökning varje varv, men när jag gör 1 A1 på varje varv i toppen så får jag bara två stolpar ökning. Vad har jag missat?
16.05.2024 - 10:42DROPS Design a répondu:
Hei Hannah. Se på diagram A.1, der er det 2 ovale sirkler. I diagramforklaringen leser man at 1 oval sirkel = 2 staver. Når du skal hekle A.1 i den siste masken hekler du 1 oval sirkel (= 2 staver) + 1 luftmaske + 1 oval sirkel (= 2 staver) = det er økt 4 staver. mvh DROPS Design
21.05.2024 - 13:25
![]() Christelle R a écrit:
Christelle R a écrit:
Bonjour. Je crois que la question a déjà été posée mais je ne trouve pas de réponse. Je travaille la taille S. Au 1er rang du bas du top, j'obtiens bien 109m. Au 2eme rang A10 passe d'1 à 3m n'est ce pas ? (Sur le diagramme Rg1=14m/Rg2 et 3 =15m) Donc si je répète les rangs 2 et 3, je ne peux plus avoir 109m ? Où est l'erreur ? Merci pour votre réponse. Cdlt
28.04.2024 - 17:28DROPS Design a répondu:
Bonjour Christelle, c'est exact, continuez simplement à crocheter les diagrammes comme indiqué, je transfère l'info à qui de droit. Bon crochet!
29.04.2024 - 09:52
![]() Ina Bremer a écrit:
Ina Bremer a écrit:
Problem gelöst! Mit der nötigen Ruhe klappt's dann auch mit der Häkelnanleitung : )
05.04.2024 - 22:14
![]() Ina Bremer a écrit:
Ina Bremer a écrit:
Hallo ihr Lieben, ich häkle die Größe XL und komme ganz zu Beginn nur auf 37 Stäbchen anstatt auf 40... Was übersehe ich, bzw. was mache ich verkehrt? Ganz liebe Grüße Ina
05.04.2024 - 18:42DROPS Design a répondu:
Liebe Ina, auf der 1. Seite haben Sie (3 Lm + 1 Stb in die 4. Lm = 2 Stäbchen + 1 Stäbchen in je die nächsten 16 Lm = 18 Stäbchen + A.1 in die letzte Luftmasche = 2 Stäbchen = 20 Stäbchen auf der 1. Seite, dann auf die 2. Seite: A.1 = 2 Stäbchen (mit 1 Lm davor) + 1 Stäbchen in die nächsten 18 Lm = 20 Stäbchen = 40 Stäbchen insgesamt. Viel Spaß beim Häkeln!
08.04.2024 - 07:33
![]() Dawn a écrit:
Dawn a écrit:
What measurements are your sizes please for women XS -S -M -L -XL -XXL I’m not sure what size to make ? Thank you
22.03.2024 - 11:58DROPS Design a répondu:
Dear Dawn, you will find the measurement chart for finished piece at the bottom of the written pattern, compare to a similar garment you have and like the shape to choose the best appropriate size. Read more here. Happy knitting!
22.03.2024 - 15:13
![]() Alcina Carvalho a écrit:
Alcina Carvalho a écrit:
Hello, Thanks for your answer. But you still didn't answer my question: at the end of Row 2 and Row 3, how many stitches do I have? Thanks.
23.06.2023 - 13:30DROPS Design a répondu:
Dear Mrs Carvalho , you will have 149 sts after you have worked first row with A.8 and A.9 and then continue with A.9 only between A.10 and A.7 over all 149 sts. Happy crocheting!
23.06.2023 - 15:57
![]() Alcina Carvalho a écrit:
Alcina Carvalho a écrit:
Hello, I'm doing the part of the body (size L) of this pattern and I have doughts in how many stitches the row 2 and 3 have at the end. Is it supposed to finish with 168 stitches, as the beginning, or it has to finish with 149? Also, I think that at 2nd row, the A7 and A10 has to have only two stiches, and not three as indicated, otherwise we will increase 2 stitches for row. Could you please clarify? Thanks for your help!
22.06.2023 - 17:43DROPS Design a répondu:
Dear Mrs Carvalho, when working diagram A.8 you will skip 1 stitch in each A.8 (4 sts over 5 chains), that's how you will decrease the number of stitches on first row to 149 sts.. Read 1st row from the right towards the left (starting with A.7 and finishing with A.10), then work row 2 starting with A.1, repeat A.9 and end with A.7 (don't work A.8 anymore). And repeat these 2 rows with A.7 over 4 sts on row 2 and3 sts on row 3; A.9 over 4 sts and A.10 over 3sts. Happy crocheting!
23.06.2023 - 07:32
![]() Alexandra a écrit:
Alexandra a écrit:
Row 3 , the treble cluster Rrow comes out with 135 stitches. It would be helpful if you could crochet the 1st 3 rows giving the correct amount of stitches after each row and do the same on the next 3 repeat rows stating amount of stitches after each row. This should have been written in the pattern.
05.06.2023 - 21:00DROPS Design a répondu:
Dear Alexandra, which size are you working on? Remember that you don't work the same diagrams on 1st than on 2nd and 3rd row; on the first row you will crochet alternately A.8 and A.9 but on the 2nd and 3rd row you will then crochet only A.9 (A.8 was worked over 5 stitches and you skip 1 stitch so that A.8 ends with only 4 sts. Happy crocheting!
06.06.2023 - 09:04
![]() Alexandra a écrit:
Alexandra a écrit:
Sorry that should read 135 sts not 145. Still a lot more than 109!
05.06.2023 - 01:46
|
|||||||||||||||||||||||||||||||
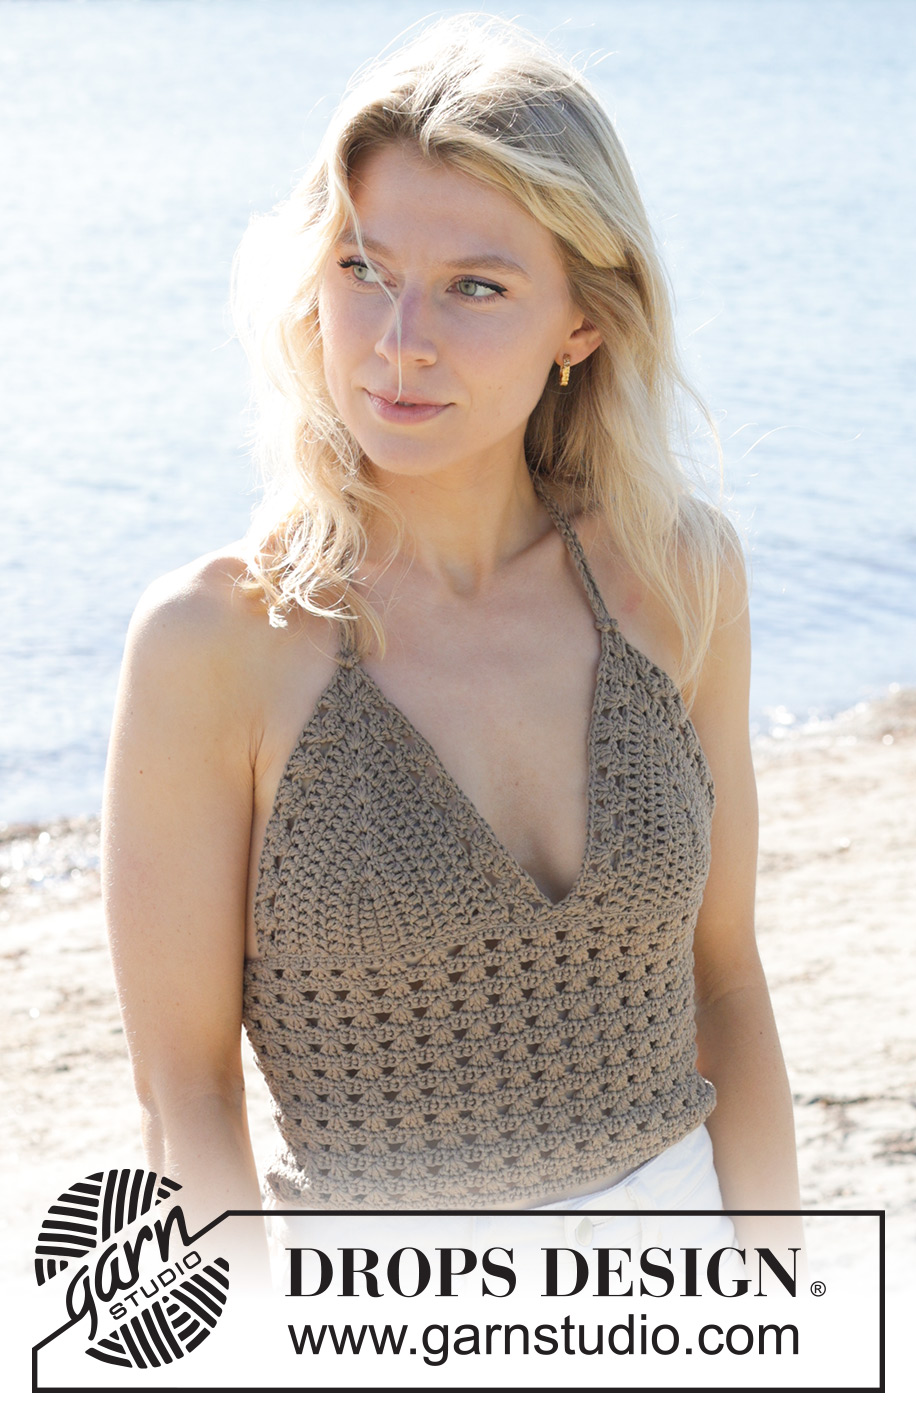
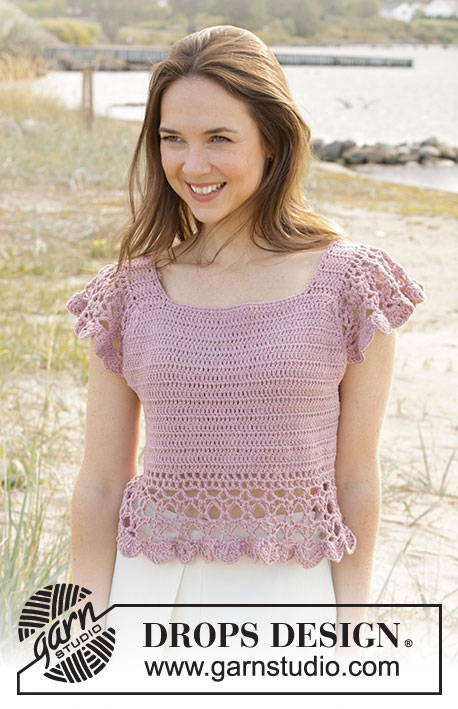
Charming Clover Top#charmingclovertop |
|||||||||||||||||||||||||||||||
 |
 |
||||||||||||||||||||||||||||||
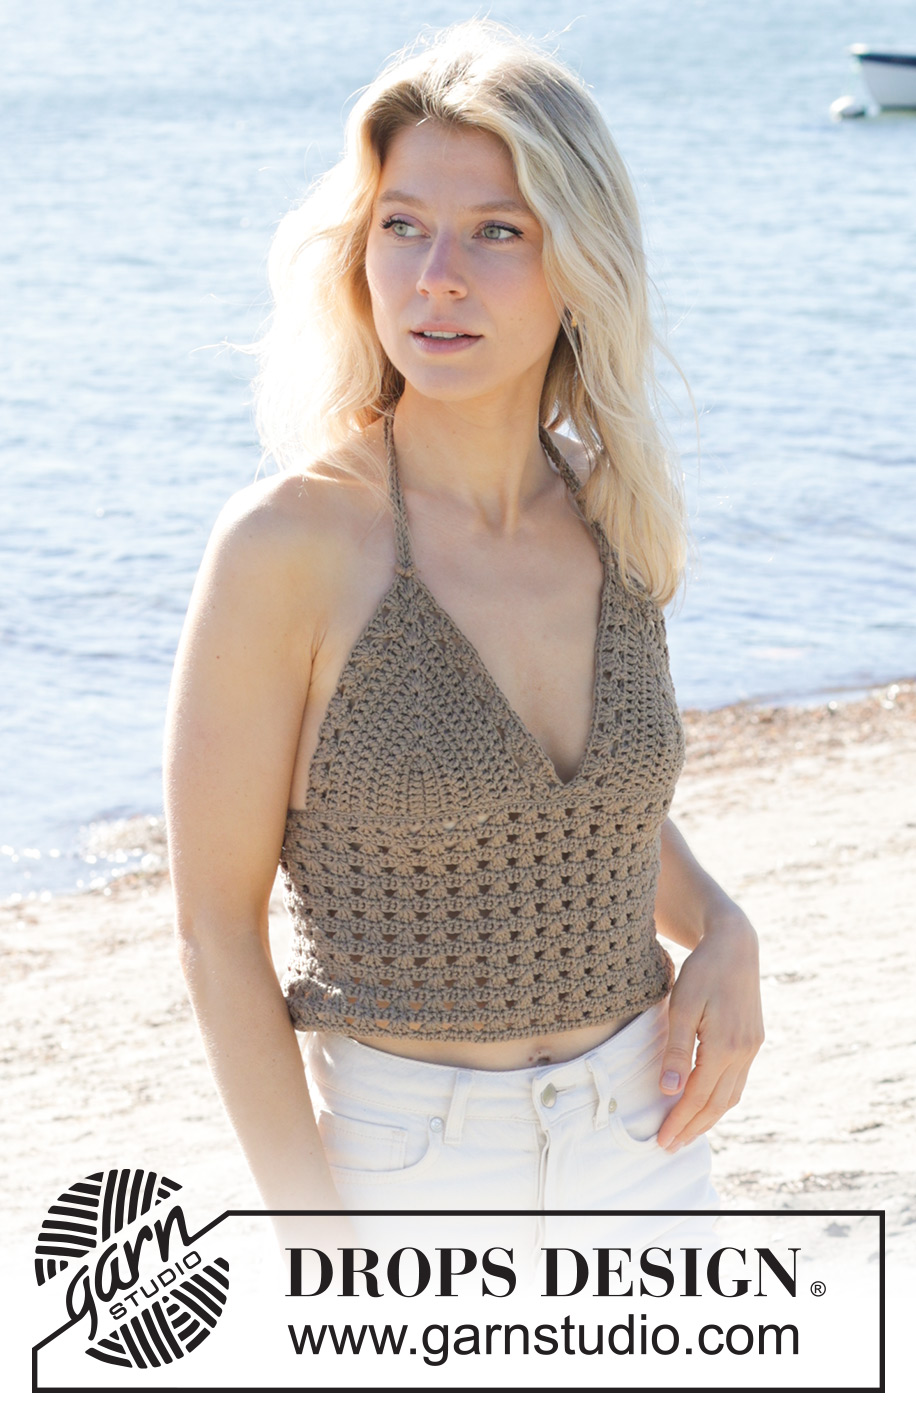
Top crocheté avec point ajouré et bretelles, en DROPS Cotton Light. Du XS au XXL.
DROPS 239-28 |
|||||||||||||||||||||||||||||||
|
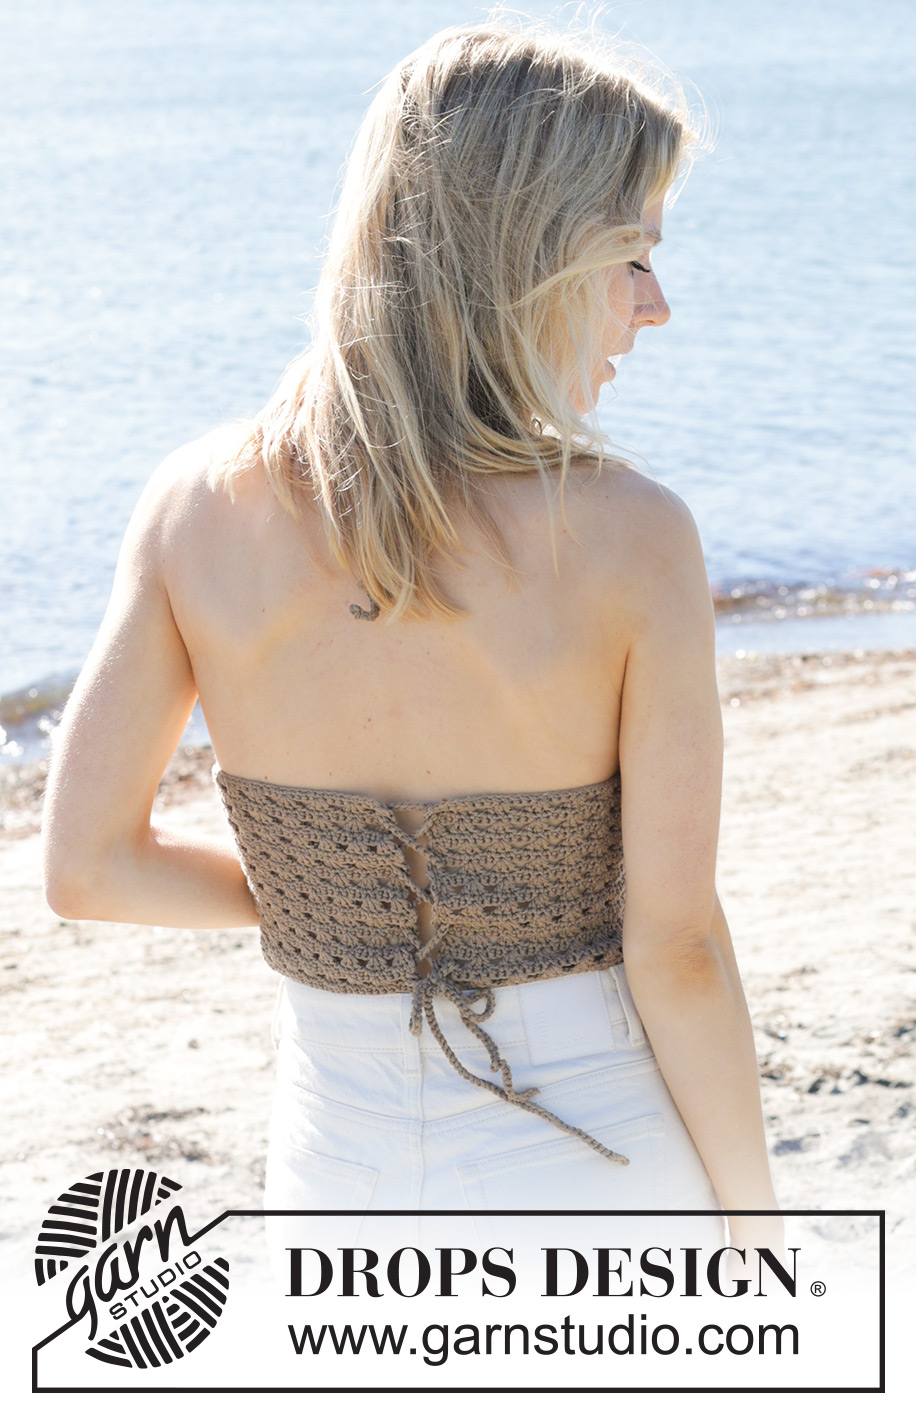
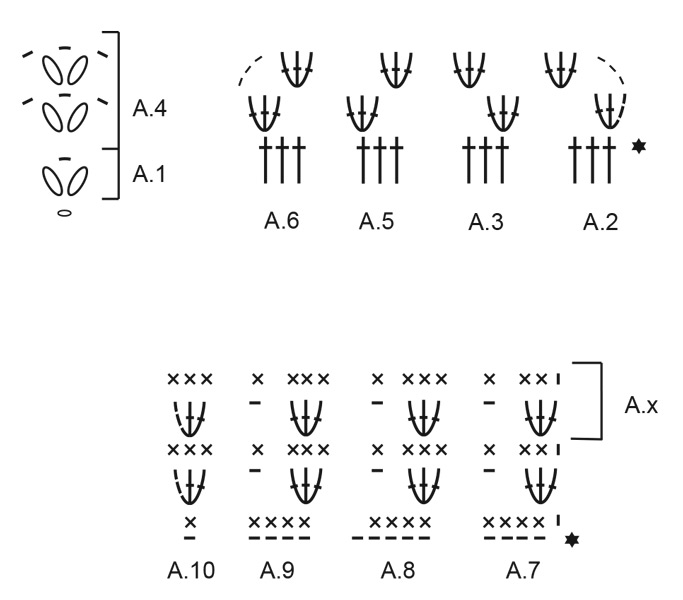
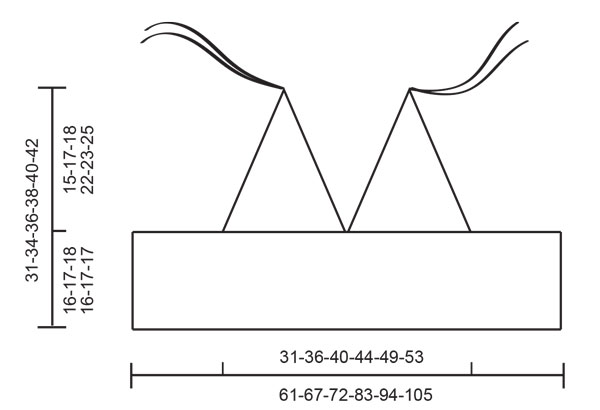
------------------------------------------------------- TECHNIQUES EMPLOYÉES: ------------------------------------------------------- INFO CROCHET: MAILLES EN L'AIR: Si on crochète sur le bout du crochet, les mailles en l'air seront souvent trop serrées; 1 maille en l'air doit être aussi longue qu'1 maille serrée/bride est large. BRIDES: Au début de chaque rang de brides, crocheter 3 mailles en l'air – elles remplacent la première bride, autrement dit, on va sauter la première maille du rang précédent. MAILLE SERRÉES: Au début de chaque rang de mailles serrées, crocheter 1 maille en l'air – elle remplace la première maille serrée, autrement dit, on va sauter la première maille du rang précédent. POINT FANTAISIE: Voir diagrammes A.1 à A.10. ASTUCE CROCHET: Si on veut que le top couvre davantage le décolleté, on peut crocheter les bonnets ensemble en les faisant se chevaucher un peu au milieu. Placer les bonnets avec le chevauchement souhaité et crocheter les mailles serrées dessous en ajustant le nombre de mailles serrées en fonction du chevauchement. ------------------------------------------------------- L'OUVRAGE COMMENCE ICI: ------------------------------------------------------- TOP – PETIT APERÇU DE L'OUVRAGE: On crochète les bonnets séparément, en allers et retours, puis on les crochète ensemble. On crochète ensuite le bas du top en allers et retours et on peut ensuite coudre ou crocheter les bonnets au bas du top. On crochète une bretelle pour chaque bonnet et une autre pour attacher le top au milieu dos. BONNETS: Crocheter 14-15-16-20-21-22 mailles en l'air avec le crochet 3,5 en DROPS Cotton Light. Voir INFO CROCHET ci-dessus. Crocheter 1 bride dans la 4ème maille en l'air à partir du crochet, puis 1 bride dans chacune des 9-10-11-15-16-17 mailles en l'air suivantes (il reste 1 maille en l'air), crocheter le diagramme A.1 dans cette dernière maille en l'air (haut du bonnet). Pivoter l'ouvrage pour crocheter le long du côté opposé de la chaînette: 1 bride dans la même maille en l'air que chacune des 11-12-13-17-18-19 brides crochetées le long du premier côté de la chaînette (la dernière bride est crochetée en bas des 3 mailles en l'air qui remplacent la première bride). On a 26-28-30-38-40-42 brides et 1 maille en l'air. Tourner. Crocheter en allers et retours, en brides (= 1 bride dans chaque maille) mais autour des mailles en l'air au milieu de A.1, crocheter le diagramme A.1 (on augmente 4 brides). BIEN CONSERVER LA MÊME TENSION QUE POUR L'ÉCHANTILLON! Crocheter ainsi jusqu'à ce qu'il y ait 5-6-7-8-9-10 rangs de brides. On a 42-48-54-66-72-78 brides et 1 maille en l'air. Crocheter en suivant les diagrammes A.2 à A.6 ainsi: RANG 1: Crocheter A.2 au-dessus des 3 premières brides, répéter A.3 jusqu'à la maille en l'air au milieu de A.1 (6-7-8-10-11-12 fois), crocheter A.4 dans cette maille en l'air, répéter A.5 jusqu'à ce qu'il reste 3 brides (6-7-8-10-11-12 fois) (le motif est ainsi symétrique de chaque côté de A.4), crocheter A.6 au-dessus des 3 dernières brides. Tourner. RANG 2: Crocheter A.6 au-dessus de A.6, A.5 entre chaque groupe de brides jusqu'à la première maille en l'air de A.4 (5-6-7-9-10-11 fois), crocheter A.5 autour de la première maille en l'air de A.4, A.4 autour de la maille en l'air au milieu de A.4, A.3 autour de la dernière maille en l'air de A.4, A.3 entre chaque groupe de brides (5-6-7-9-10-11 fois), A.2 au-dessus de A.2. Terminer par 1 maille coulée dans la 3ème maille en l'air du 1er rang = 52-58-64-76-82-85 mailles. Couper et rentrer le fil. Crocheter 1 autre bonnet identique. ASSEMBLAGE DES BONNETS: Voir ASTUCE CROCHET ci-dessus. Avec le crochet 3.5 en DROPS Cotton Light, crocheter environ 29-32-36-39-43-47 mailles serrées le long du bas du premier bonnet, puis environ 29-32-36-39-43-47 mailles serrées le long du bas du 2ème bonnet. Couper et rentrer le fil. BAS DU TOP: Crocheter 123-136-145-168-190-213 mailles en l'air avec le crochet 3,5 en DROPS Cotton Light. Voir INFO CROCHET ci-dessus. Tourner. En commençant dans la 2ème maille en l'air à partir du crochet, crocheter les diagrammes A.7 à A.10 ainsi: RANG 1 (sur l'envers): Crocheter A.7, puis répéter alternativement A.8 et A.9 jusqu'à ce qu'il reste 1-5-5-1-5-1 mailles en l'air, crocheter 0-1-1-0-1-0 fois A.9 et terminer par A.10. On a 109-121-129-149-169-189 mailles serrées. RANG 2 (sur l'endroit): Crocheter A.10, répéter A.9 jusqu'à ce qu'il reste 4 mailles et terminer par A.7 = 111-123-131-151-171-191 mailles. RANG 3 (sur l'envers): Crocheter A.7, répéter A.9 jusqu'à ce qu'il reste 3 mailles et terminer par A.10. Répéter comme indiqué dans A.x jusqu'à ce que l'ouvrage mesure 16-17-18-16-17-17 cm ou jusqu'à la longueur souhaitée. Couper et rentrer le fil. ASSEMBLAGE: Poser les bonnets au milieu du bas du top, les placer contre les mailles en l'air du début du bas du top et les coudre ou les crocheter ensemble. Coudre dans le brin le plus à l'extérieur des mailles ou crocheter des mailles coulées pour que la couture soit plate et nette. BRETELLES: Avec le crochet 3.5 et 2 fils DROPS Cotton Light, crocheter une chaînette de 110-115 cm de long ou de la longueur souhaitée. Crocheter 3 chaînettes, une pour chaque bonnet et une autre pour fermer le bas du top dans le dos. Plier une chaînette au milieu, insérer la boucle obtenue dans le haut de l'un des bonnets, passer les extrémités dans la boucle et serrer. Attacher l'autre bretelle de la même façon en haut de l'autre bonnet. Plier le bas du top, les petits côtés face à face. Enfiler la dernière chaînette en haut de chacun des côtés du dos, puis croiser les extrémités en les enfilant dans les côtés et continuer ainsi jusqu'en bas du top. Nouer les extrémités ensemble. |
|||||||||||||||||||||||||||||||
Légende diagramme(s) |
|||||||||||||||||||||||||||||||
|
|||||||||||||||||||||||||||||||
 |
|||||||||||||||||||||||||||||||
 |
|||||||||||||||||||||||||||||||
Vous avez terminé ce modèle?Alors taguez vos photos avec #dropspattern #charmingclovertop ou bien présentez-les dans la galerie #dropsfan Vous avez besoin d'aide pour ce modèle ?Vous trouverez 11 tutoriels vidéo, une rubrique commentaires/questions et plus encore en vous rendant sur la page du modèle sur garnstudio.com © 1982-2026 DROPS Design A/S. Tous droits réservés. Ce document, y compris ces sous-sections, est protégé par les droits d'auteur (copyright). Apprenez-en davantage sur ce que vous pouvez faire avec nos modèles en bas de chacune des pages de notre site. |
|||||||||||||||||||||||||||||||


Avec plus de 40 ans dans la conception de modèles tricot et crochet, DROPS Design offre l'une des plus vastes collections de modèles gratuits sur internet - traduits dans 17 langues. À ce jour, on compte 325 catalogues et 12298 modèles en français.
Nous nous efforçons de vous apporter le meilleur de ce que le tricot et le crochet peuvent vous offrir, inspiration et conseils mais également des fils de haute qualité à des prix incroyables! Vous souhaiteriez utiliser nos modèles autrement que pour un usage personnel? Vous pouvez lire ce que vous êtes autorisés à faire dans le Copyright en bas de page de chacun de nos modèles. Bon tricot!
Poster un commentaire sur le modèle DROPS 239-28
Nous aimerions connaître votre avis sur ce modèle !
Si vous souhaitez poser une question, merci de bien vouloir vérifier que vous avez choisi la bonne catégorie dans le formulaire ci-dessous afin d'accélérer la réponse. Les champs obligatoires sont indiqués par une *.