
Oblíbené kategorie
Hledáte přízi?


Komentáře / Otázky (38)
![]() Uta Wolf napsala:
Uta Wolf napsala:
Ich hatte anfangs auch Probleme, das Muster richtig zu stricken, es wurden entweder immer mehr Maschen auf der oder weniger. Die Aussage, dass die Rückreihe "verkehrt herum" gesehen werden muss, macht es nicht einfacher. Wenn man es aber erst mal kapiert hat, ist es ein sehr schönes, schnell zu strickendes Muster, das auch mal für einen Sommerpulli oder eine Weste geeignet ist.
10.11.2015 - 12:42Sue napsala:
Sorry I am posting twice. I put my question under the wrong section. I tried to make this, but it doesn't look right. Mine looks very tight and small. How do you count the 13 stitches of the lace to get it to measure 4 inches? I am thinking this may be where I messed up. I have a picture, but I don't see how I can post it to show. I am new to knitting and I love how this pattern looks and want to really get it to work out.
27.03.2015 - 01:16Odpověď DROPS Design :
Dear Sue, for your gauge you can cast on 13 sts + 2 edge sts each side (worked in garter st), then measure your sts in width and in height and adjust needle size if necessary. Happy knitting!
30.03.2015 - 14:17Sue napsala:
I tried to make this, but it doesn't look right. Mine looks very tight and small. How do you count the 13 stitches of the lace to get it to measure 4 inches? I am thinking this may be where I messed up. I have a picture, but I don't see how I can post it to show. I am new to knitting and I love how this pattern looks and want to really get it to work out.
27.03.2015 - 01:14
![]() Monique napsala:
Monique napsala:
Reactie op uitleg van drops 22.01.2014: naald 3: 2 recht samenbreien, 2 omslagen, 2 recht samenbreien..... toch?
22.01.2014 - 22:01Odpověď DROPS Design :
Hoi Monique, Ja, twee omslagen.
23.01.2014 - 10:52
![]() Lenie napsala:
Lenie napsala:
Heb het al gevonden misschien voortaan een tekening over meerdere steken laten zien
17.01.2014 - 08:26
![]() Lenie napsala:
Lenie napsala:
Hoe moet de 3e naald gebreid worden hetzelfde als de 1e nld? als ik brei volgens tekening krijg ik meer steken.doe ik iets verkeerd
16.01.2014 - 15:31Odpověď DROPS Design :
Hoi Lenie. Nee, die brei je als volgt: *2 r samen, 1 omslag, 2 r samen* Herhaal *-* (zie ook de teltekening). Het is dezelfde werkwijze als nld 1 alleen is het motief (de omslag) 2 st verschoven. Door zo te breien onstaat het "zigzag" motief je ook ziet op de foto.
22.01.2014 - 17:29
![]() Michelle napsala:
Michelle napsala:
Does anyone have any suggestions... I an new to needle knitting and I can not seem to get a row to come out with 42 stitches when I get past the ribbing. I have spent 6 hours trying this and at first I wasn't counting the stitches each row, and I was dropping stitches and was down to 30 stitches on the needle. I tried again and I ended up with 43 stitches on the needle multiple times. Then again last night, I ended up with only 38 stitches multiple times.
07.01.2013 - 14:44Odpověď DROPS Design :
Dear Michelle, M.1 is worked this way : R1 : K2 tog, K2 tog, 2 yo (= 2 sts, 2 yos). R2 : K the first yo into front loop and K the 2nd yo into back loop, K3 (= 4 sts). R3 : K2 tog, 2 yos, K2 tog (2 sts, 2yos). R4 : K1, K the first yo into front loop, and K the 2nd yo into back loopl, K1 (= 4 sts). Repeat each row these 4 sts all the row as stated. You should then have always same number of sts. Happy Knitting !
07.01.2013 - 16:59
![]() MARTINA napsala:
MARTINA napsala:
Help.. non capisco come si interpreta il diagramma.. ovvero dopo le 2 maglie a legaggio..con quale punti devo proseguire....grazie mille Martina
27.11.2012 - 09:34Odpověď DROPS Design :
I diagrammi si lavorano da destra verso sinistra, quindi devi fare 2 m legaccio, 2 m insieme a dir, 2 m insieme a dir, 2 gettati, poi si inizia da 2 m insieme a dir, 2 m insieme a dir, 2 gettati ancora per 28 m e terminare con 2 m leg. Si lavora avanti e indietro, quindi al f successivo, inizia da sinistra e lavora verso destra sul rovescio del lavoro.
28.11.2012 - 14:41Rut napsala:
Du ska inte börja raden med "kast" utan sluta med detta. Man stickar diagrammet från höger till vänster som vanligt
24.11.2012 - 14:05
![]() Liv napsala:
Liv napsala:
Ok, da syns jeg oppskriften er litt dårlig forklart. Diagrammet sier ingenting om jeg skal begynne med kast. Jeg får prøve å strikke på skjønn. Takk for hjelpen.
24.11.2012 - 01:45
|
|||||||||||||
Petula#petulashawl |
|||||||||||||
 |
 |
||||||||||||
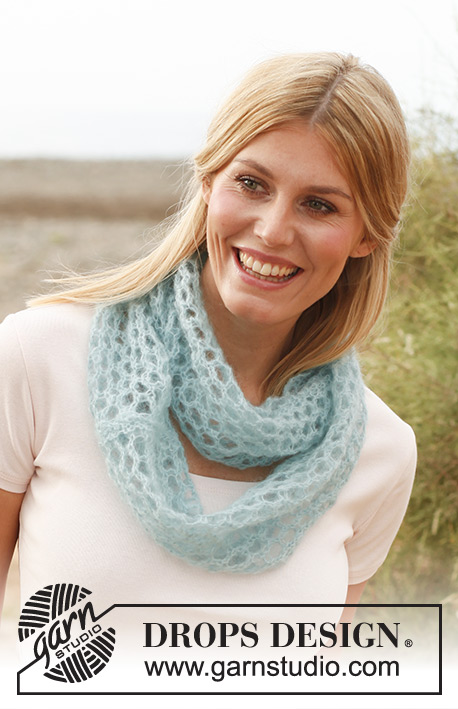
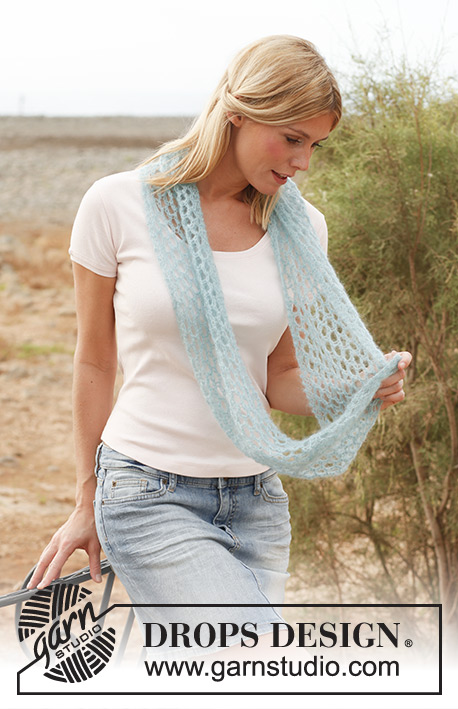
DROPS pletený nákrčník z příze „Vivaldi“.
DROPS 137-11 |
|||||||||||||
|
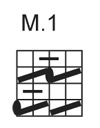
VROUBKOVÝ VZOR (lícové a rubové řady): stále hladce VZOR: viz schéma M. 1. Schéma zobrazuje lícové i rubové řady. ---------------------------------------------------------------------- NÁKRČNÍK: Pleteme lícové a rubové řady. Na jehlici č. 5 nahodíme přízí Vivaldi 32 ok. Pleteme 4. řady hladce. V další lícové řadě pleteme: 2 oka vroubkovým vzorem, 28 ok vzorem M. 1 a 2 oka vroubkovým vzorem. PAMATUJTE NA SPRÁVNÉ NAPĚTÍ PŘÍZE! Takto pokračujeme do výšky asi 138 cm, následují 4. řady hladce. Oka VOLNĚ uzavřeme. Díl sešijeme do kruhu. Sešíváme nahozený a uzavřený okraj, sešíváme za vnější části ok. |
|||||||||||||
Vysvětlivky ke schématu |
|||||||||||||
|
|||||||||||||
 |
|||||||||||||
Dokončili jste tento model?Pak označte své fotky tagem #dropspattern #petulashawl nebo je pošlete do galerie #dropsfan. Potřebujete s tímto návodem poradit?Otevřete-li si návod na stránce garnstudio.com, najdete tam 6 výukových video-ukázek, Komentáře/Dotazy a další užitečné informace. © 1982-2026 DROPS Design A/S. Vyhrazujeme si veškerá práva. Tento dokument, včetně všech jeho dílčích částí, podléhá autorským právům. Podrobnější komentář k možnostem užití našich návodů najdete dole pod každým návodem na našich stránkách. |
|||||||||||||


V oblasti pletené a háčkované módy působí DROPS Design více než 40 let. Díky tomu vám můžeme nabídnout jednu z nejrozsáhlejších kolekcí modelů s bezplatnými návody dostupnými na internetu - navíc v 17 jazycích. K dnešnímu dni máme na 324 katalogů a 12290 návodů celkem - z nich je už 7606 dostupných v [češtině].
We work hard to bring you the best knitting and crochet have to offer, inspiration and advice as well as great quality yarns at incredible prices! Would you like to use our patterns for other than personal use? You can read what you are allowed to do in the Copyright text at the bottom of all our patterns. Happy crafting!
Přidejte komentář k návodu DROPS 137-11
Rádi bychom věděli, co si o tomto modelu myslíte!
Pokud se chcete na něco zeptat, dbejte prosím na to, abyste ve formuláři níže vybrali správnou kategorii - díky tomu se dříve dozvíte, co potřebujete vědět. Povinná pole jsou označena *.