
Categorias populares
Procura um fio?


Comentários / Perguntas (73)
![]() Montagne escreveu:
Montagne escreveu:
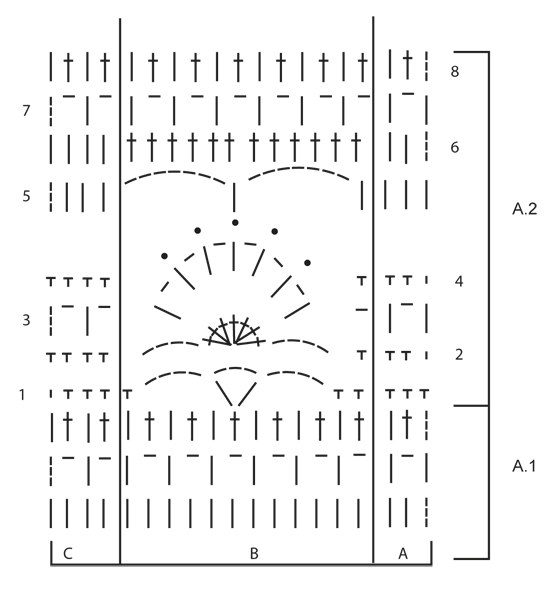
Comment comprendre:Crocheter ensuite en suivant le diagramme A.1 ainsi: A.1 A, 7-8-9 fois A.1 B au total, terminer par A.1C. ? ainsi que ainsi: A.2 A, 9-10-11 fois A.2 B au total, terminer par A.2 C. MERCI
09.05.2015 - 08:29DROPS Design respondeu:
Bonjour Mme Montagne, les diagrammes se décomposent en 3 parties: A (= début de rang sur l'end, fin de rang sur l'env), B (= à répéter sur les mailles suivantes le nombre de fois requis pour chaque taille) et C (= fin de rang sur l'end, début de rang sur l'env). Crochetez ainsi: les 3 m de la partie A de A.1 ou A.2 sur les 3 m suivantes, puis répétez les 12 m de la partie B de A.1 ou A.2 et terminez par les 4 m de la partie C de A.1 ou A.2. Bon crochet!
11.05.2015 - 09:59
![]() Lydia Dam-Prins escreveu:
Lydia Dam-Prins escreveu:
Welke maat moet ik nemen als ik confectiemaat 46 heb.
16.04.2015 - 10:33DROPS Design respondeu:
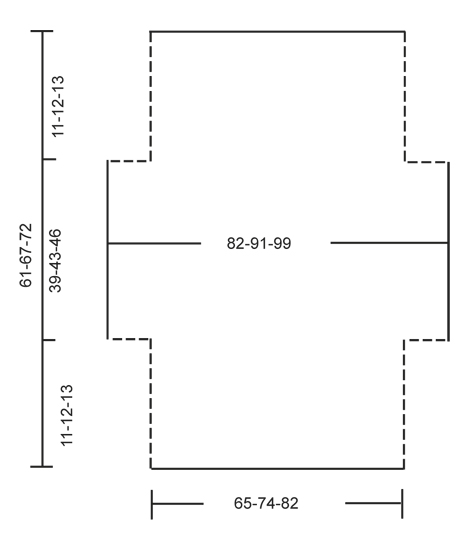
Hoi Lydia. Onderaan het patroon vind je de maattekening met alle afmetingen in cm. Vergelijk deze met je eigen afmetingen om de maat te kiezen.
16.04.2015 - 13:10
![]() Confused escreveu:
Confused escreveu:
Hi. I am confused on the instructions when it starts to follow the diagram. This is vague for me. I don't understand what is meant by working A1 vertically, because it is a horizontal row. Does it refer to A1 being composed of 3 rows? Why must A1 b be worked 7 8 9 times? Shouldn't it be done once horizontally? IMO this pattern is not well written
09.04.2015 - 03:15DROPS Design respondeu:
Dear Confused, working A1 vertically means working the 3 rows in A.1, starting from RS with the 3 sts in A.1-A, then repeating the 12 sts in A.1-B over the next sts until 4 sts remain before the end of row and finish with the 4 sts in A.1C - from WS, work A.1-C, repeat A.1B and finish with A.1-A. Happy crocheting!
09.04.2015 - 10:08
![]() Aria escreveu:
Aria escreveu:
Ik wil graag van drop s bolero 162-34 maken voor mijn dochter maar de eerste toer staat onderlijk schrijven wil u voor mijn wat beter en makkelijk op schrijven het gaat om maat s twee toer ook graag als die twee toer goed dan kom ik er wel uit ik hoor graag van u
08.04.2015 - 16:17DROPS Design respondeu:
Beste Aria, wij herschrijven geen patronen, maar als je het lastig vindt om haakpatronen te lezen, kunnen we je wel op weg helpen. Zo staat stk voor stokje, l voor losse en v voor vaste. De sterretjes geven het begin en einde aan van een stukje dat je steeds herhaalt en erachter staat hoe vaak je dat moet doen. Veel succes!
08.04.2015 - 17:12
![]() Deborah York escreveu:
Deborah York escreveu:
YOU MIGHT WANT TO LOOK AT THIS PATTERN A LITTLE CLOSER, AS THE FIRST ERROR IS THAT CH 4 DOES NOT MAKE A DOUBLE CROCHET CHAIN!!! Blue Wonder by DROPS Design Crochet DROPS shoulder piece in "Paris". Size. S-XXXL MATERIALSYARN ALTERNATIVESVIDEOS DROPS 162-34 DROPS design: Pattern no w-546 Yarn group C or A + A
22.03.2015 - 22:31DROPS Design respondeu:
Dear Mrs York, the fundation chain includes the first ch3 for turning, ie you will crochet the first dc in 4th ch from hook (the first 3 ch = the last 3 ch worked on fundation row = first dc) + the dc you just worked in 4th ch from hook = 2 first dc in row. Happy crocheting!
23.03.2015 - 10:46
![]() Sandra escreveu:
Sandra escreveu:
Ja, bedankt , het gaat prima, wordt super!!
19.02.2015 - 21:02
![]() Sandra escreveu:
Sandra escreveu:
Sorry, was te snel, snap t al, 1x A, 8xB, 1xC= 103 st.
18.02.2015 - 19:40DROPS Design respondeu:
Hoi Sandra. Dus je bent eruit?
19.02.2015 - 16:14
![]() Sandra escreveu:
Sandra escreveu:
Vraagje, ik ben bij toer 2, ga ik uit van de maat l/xl, dan moet ik 8x A.1A, A.1,B haken en dan 1x A.1,C, kom ik op een totaal van 125 st., terwijl ik van de vorige toer 103 st. over heb. Mis ik iets? Groetjes Sandra.
18.02.2015 - 19:35
![]() Pia escreveu:
Pia escreveu:
Super fin, Men! Jag påbörjade detta mönster (mitt första virkprojekt förövrigt) Men när jag gjort allt enl mönster och när jag kommer till att börja om med A.2 så får jag inte till mönstret. Det blir förskjutet trots att jag sett till att jag hade rätt antal stolpar. Nu har jag repat upp hela och nu lutar det åt att jag ger upp det mönstret helt. Så frågan e om det ska vara förskjutet, om jag gjort nå fel eller om det kan finnas nå fel i mönstret. :(
16.02.2015 - 16:36DROPS Design respondeu:
Hej Pia, Svårt att säga var det blir fel. När du skall börja på A.2 så fråga gärna hos din lokala DROPS återförsäljare. Virka evt först bara själva diagram-rapporten så du ser hur det skall se ut. Lycka till!
18.02.2015 - 15:26
![]() Rita Boucher escreveu:
Rita Boucher escreveu:
J'adore ce modele mais je le trouve difficile a confectionner j'aimerais pls dexplications merci
02.02.2015 - 21:27
|
||||||||||||||||
Blue Wonder#bluewondershoulderpiece |
||||||||||||||||
 |
 |
|||||||||||||||
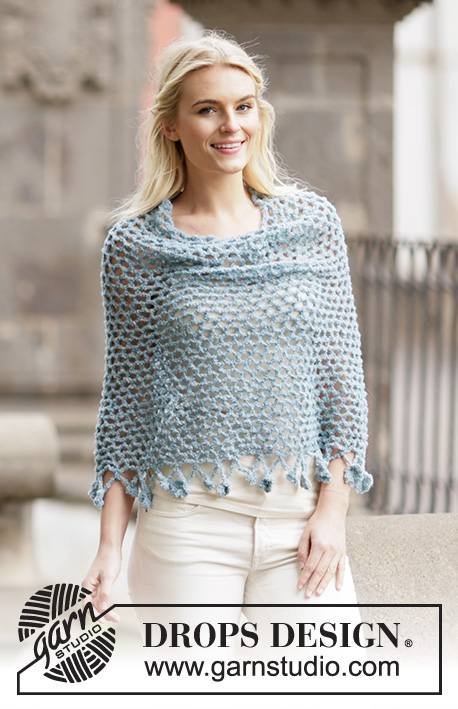
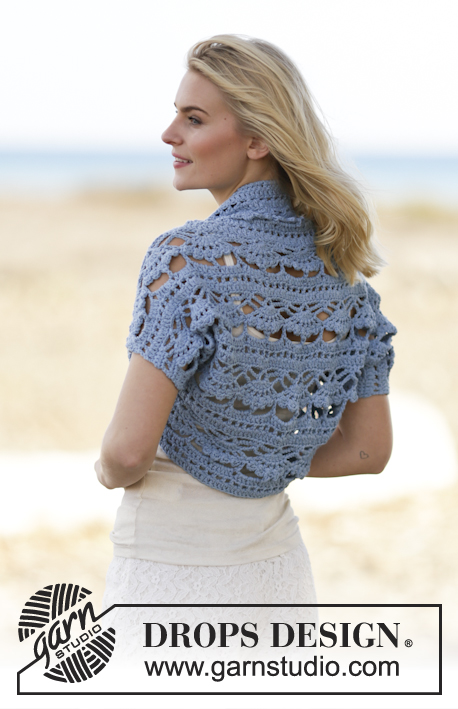
Capa para ombros DROPS em croché, em "Paris". Do S ao XXXL
DROPS 162-34 |
||||||||||||||||
|
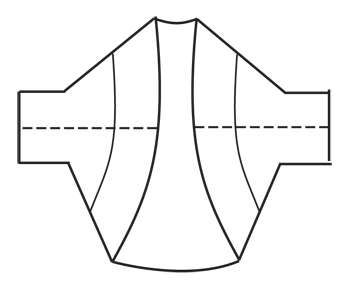
---------------------------------------------------------- NOTA: Existem termos diferentes de tricô e croché em português de Portugal e do Brasil. Malha = Ponto Canelado = Barra Ponto Jarreteira = Cordões de Tricô Ponto Liga = Ponto Tricô Croché : mpa – meio ponto alto pa – ponto alto pad – ponto alto duplo pat – ponto alto triplo pb – ponto baixo pbx – ponto baixíssimo pc – ponto corrente ---------------------------------------------------------- PONTO FANTASIA: Ver diagramas A.1-A2. CAPA PARA OMBROS: Montar uma corrente de 110-125-139 pc com a agulha de croché 5 mm em Paris. CARREIRA 1: Virar e crochetar 1 pa no 4.º pc a partir da agulha de croché (= 2 pa), 1 pa em cada um dos 4-1-3 pc seguintes, *saltar 1 pc, 1 pa em cada um dos 5 pc seguintes*, repetir de * a * = 91-103-115 pa. CARREIRA 2: Crochetar então seguindo o diagrama A.1 da seguinte maneira: A.1 A, 7-8-9 vezes A.1 pa ao todo, terminar com A.1 C. Quando A.1 a tiver sido crochetado 1 vez em altura, repetir A.2. AO MESMO TEMPO, quando a peça medir cerca de 11-12-13 cm (ajustar a altura para que a carreira seguinte seja a carreira 6 de A.2), crochetar 14 pc no fim da carreira (= carreira 5). Virar e crochetar 1 pa no 4.º pc a partir da agulha de croché, 1 pa em cada um dos 10 novos pc seguintes. Continuar com a carreira 6 de A.2, e, no fim da carreira, crochetar 15 pc. Virar e crochetar 1 pa no 6.º pc a partir da agulha de croché, *1 pc, saltar 1 pc, 1 pa no pc seguinte*, repetir de * a * acima dos 9 novos pc seguintes, terminar com 1 pc. Crochetar o resto da carreira seguindo A.2. Na carreira seguinte, crochetar como antes até aos novos pontos no fim da carreira, crochetar 1 pa em cada aro de pc e 1 paem cada pa. Aumentou-se 12 pa de cada lado da peça = 115-127-139 pa. Continuar então na carreira 8 da seguinte maneira: A.2 A, 9-10-11 vezes A.2 pa ao todo, terminar com A.2 C. A cerca de 50-55-59 cm de altura total (ajustar a altura para que a carreira seguinte seja a carreira 7), não crochetar acima dos 12 pa de cada lado da peça = 91-103-115 pa. Continuar da seguinte maneira: A.2 A, 7-8-9 vezes A.2 pa ao todo, terminar com A.2 C. Continuar até a peça medir cerca de 61-67-72 cm – ajustar a altura para depois de um motivo completo de A.2. Arrematar. MONTAGEM: Fazer a costura dos lados e sob as mangas a 1 m/p ourela dos rebordos. |
||||||||||||||||
Explicações do diagrama |
||||||||||||||||
|
||||||||||||||||
 |
||||||||||||||||
 |
||||||||||||||||
 |
||||||||||||||||
Terminou este projecto?Então, identifique as suas fotos com as tags #dropspattern #bluewondershoulderpiece ou mostre-as na galeria #dropsfan. Precisa de ajuda para este modelo?Encontrará 7 turotiais em vídeo, uma rubrica Comentários/Perguntas e muito mais ao visitar a página do modelo em www.garnstudio.com © 1982-2026 DROPS Design A/S. Todos os direitos reservados. Este documento, incluuindo as suas su-secções, tem copyrights. Saia mais o que pode fazer com os nossos modelos no fim de cada uma das páginas do nosso site. |
||||||||||||||||


Com mais de 40 anos no design de modelos de tricô e de croché, a DROPS Design oferece uma das mais vastas colecções demodelos gratuitos na Internet - traduzidos em 17 línguas. Neste dia de hoje, temos 324 catálogos e 12290 modelos - dos quais 12271 estão traduzidos em português.
Trabalhamos com muito empenho para lhe proporcionar o melhor que o tricô e o croché têm para oferecer, para lhe fornecer inspiração e conselhos bem como fios da mais elevada qualidade a preços incríveis! Gostaria de usar os nossos modelos para outros fins que não uso pessoal? Pode ler o que lhe é permitido fazer no Copyright texto que se encontra na parte de baixo de todos os nossos modelos. Bom tricô! Bom croché!
Deixe um comentário acerca do modelo DROPS 162-34
Gostaríamos muito de saber o que tem a dizer-nos acerca deste modelo!
Se deixar uma pergunta acerca do modelo, certifique-se de que escolhe a categoria adequada no formulário abaixo para acelerar o processo relativo à resposta. Os campos obrigatórios estão assinalados com um *.