
Categorias populares
Procura um fio?


Comentários / Perguntas (73)
![]() SandraB escreveu:
SandraB escreveu:
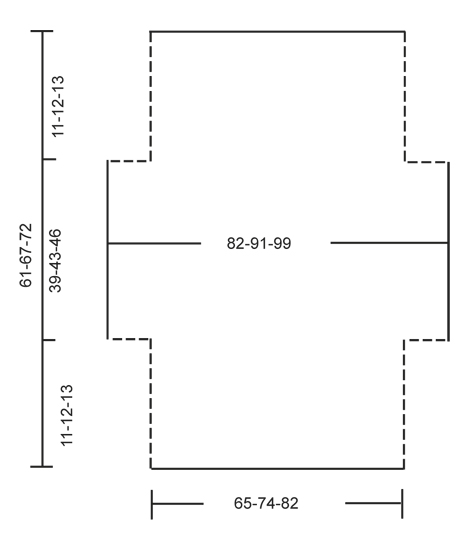
Hallo! Ik wil graag dit patroon maken. Heb nog niet zovaak kleren gehaakt. Daarom begrijp ik de tweede tekening met de maten niet zo goed. Hoe moet ik die zien?
01.07.2017 - 08:37DROPS Design respondeu:
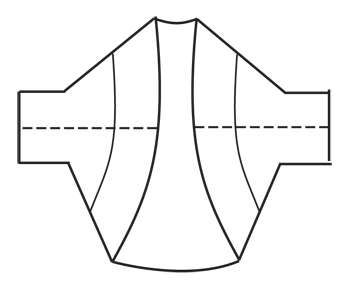
Hoi Sandra, In de tweede tekening zie je het werk wanneer je klaar bent met haken, maar nog niet in elkaar genaaid hebt. Het kledingstuk wordt op de horizontale lijn dubbel gevouwen en op op de stippellijnen aan elkaar gehaakt.
01.07.2017 - 12:01
![]() Elizabeth Baker escreveu:
Elizabeth Baker escreveu:
I have finished my 21 1/2 inches and pattern says to not work 12 stitches on either side how then do I start my next row
21.05.2017 - 19:07DROPS Design respondeu:
Dear Mrs Baker, work next row until 12 sts remain, turn and work next row until 12 sts remain, turn and work next row. You will have now 12 sts unworked on each side. Happy crocheting!
22.05.2017 - 09:54
![]() Elizabeth Baker escreveu:
Elizabeth Baker escreveu:
I have finished my 21 1/2 inches and pattern says to not work 12 stitches on either side, how do I start next row?
20.05.2017 - 19:02
![]() Elizabeth Baker escreveu:
Elizabeth Baker escreveu:
After I have finished row 8 to continue do I start with A1 or A2 to repeat
01.05.2017 - 16:43DROPS Design respondeu:
Dear Mrs Baker, after you have worked A.2 1 time in height, repeat A.2 from row 1. Happy croccheting!
02.05.2017 - 11:48
![]() Elizabeth Baker escreveu:
Elizabeth Baker escreveu:
After I have finished row 8 do I start with row A1 or A2
01.05.2017 - 16:20DROPS Design respondeu:
Dear Elizabeth, after row 8, you should continue and repeat pattern A.2. I hope this helps. Happy crocheting!
06.05.2017 - 11:06
![]() GB escreveu:
GB escreveu:
Hi, in the pattern directions it says the picot has a DC in the first of the chain 3s, but the video shows a sc instead. Could you clarify please? Thanks!
15.04.2017 - 17:14DROPS Design respondeu:
Dear GB, you should work 1 dc in 1st of the 3 ch as explained in the pattern and not 1 sc as worked in the video, thanks for noticing. Happy crocheting!
19.04.2017 - 15:24
![]() Mary Ancira escreveu:
Mary Ancira escreveu:
The letter sizes, (example- S, M, L,) are not showing what size the bust is like it normally does. Should I assume the sizes are the same on all the patterns?
03.04.2017 - 10:24DROPS Design respondeu:
Dear Mrs Ancira, you will find at the bottom of the pattern a measurement chart with measurements for each size in cm, taken flat from side to side. Compare these to a similar garment you have and like the shape to find out the matching size. Read more about sizing and convert into inches here. Happy crocheting!
03.04.2017 - 11:25
![]() Stephanie escreveu:
Stephanie escreveu:
Bonjour je ne comprends pas l'augmentation, au rang 6 avec l'ajout de maille en l'air que l'on crochete apres avec une bride un ml une bride et ensuite crochete le reste comment ? c'est la que je saisis pas , parce que logiquement on serait sur le rang 7 mais ensuite encore au rang 7 ,pouvez vous m'expliquer merci
14.02.2017 - 00:10DROPS Design respondeu:
Bonjour Stéphanie, la 1ère augmentation sur le côté se fait à la fin du rang 5 (= le rang suivant sera le rang 6), on crochète 14 ml à la fin de ce rang, on tourne, on crochète 11B, puis le rang 6 de A.2 et on crochète 15 ml à la fin du rang 6, on tourne, on crochète 1B, 1 ml sur les nouvelles ml et on continue le rang 7 comme A.2. Puis on continue A.2 sur toutes les mailles. Bon crochet!
14.02.2017 - 09:32
![]() Jasmine escreveu:
Jasmine escreveu:
Dear Jasmine, "on row 1 in A.1 work 1 dc in each st," So since I have 92 stitches in A.1 I need to do 92 DC stitches all the way across?
21.01.2017 - 03:45DROPS Design respondeu:
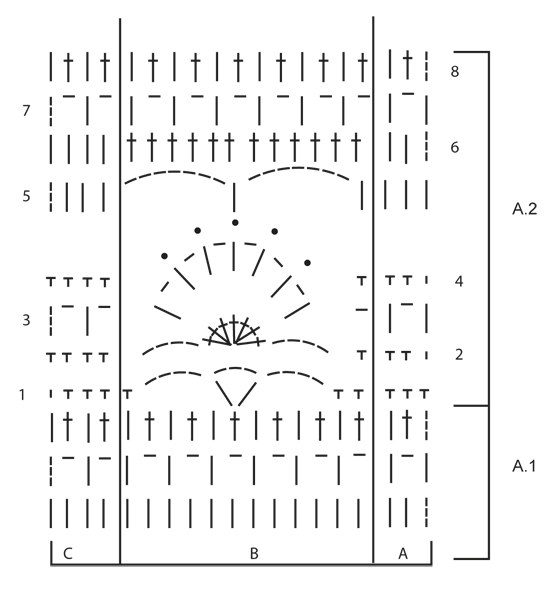
Dear Jasmine, you should have 92 dc on first row, then work: A.1A (= 4 sts), repeat A.1B a total of 7 times (= 7 x 12 sts), and finish with A.1C (= 4 sts), ie: 3 + (x12=84) + 4= 91 sts. Happy crocheting!
23.01.2017 - 09:29Leonore escreveu:
This pattern doesnt make any sence. Row one is clear to work. From there on i dont understand anything! Please write out the pattern. I dont work with diagrams or whatever this confusuon is called. Please help!
17.12.2016 - 18:45DROPS Design respondeu:
Dear Leonore, there is only diagram to this pattern, start reading diagram from the bottom corner on the right side and read towards the left from RS and from left to right from WS. Each symbol represents 1 st/group of sts. work A.1A (= 3 sts), then repeat A.1B (= 12 sts) and finish with A.1C (= 4 sts). You are welcome to contact your DROPS store for any further individual assistance. Happy crocheting!
19.12.2016 - 09:17
|
||||||||||||||||
Blue Wonder#bluewondershoulderpiece |
||||||||||||||||
 |
 |
|||||||||||||||
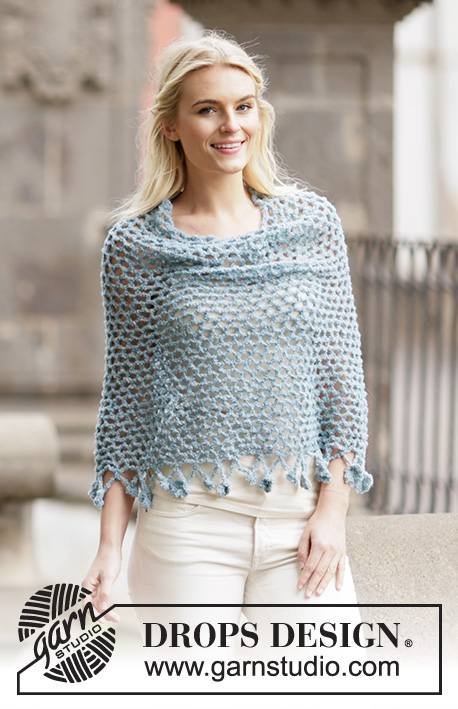
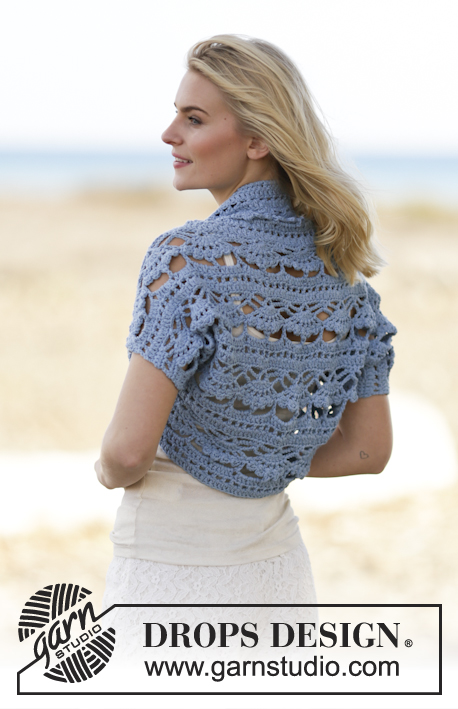
Capa para ombros DROPS em croché, em "Paris". Do S ao XXXL
DROPS 162-34 |
||||||||||||||||
|
---------------------------------------------------------- NOTA: Existem termos diferentes de tricô e croché em português de Portugal e do Brasil. Malha = Ponto Canelado = Barra Ponto Jarreteira = Cordões de Tricô Ponto Liga = Ponto Tricô Croché : mpa – meio ponto alto pa – ponto alto pad – ponto alto duplo pat – ponto alto triplo pb – ponto baixo pbx – ponto baixíssimo pc – ponto corrente ---------------------------------------------------------- PONTO FANTASIA: Ver diagramas A.1-A2. CAPA PARA OMBROS: Montar uma corrente de 110-125-139 pc com a agulha de croché 5 mm em Paris. CARREIRA 1: Virar e crochetar 1 pa no 4.º pc a partir da agulha de croché (= 2 pa), 1 pa em cada um dos 4-1-3 pc seguintes, *saltar 1 pc, 1 pa em cada um dos 5 pc seguintes*, repetir de * a * = 91-103-115 pa. CARREIRA 2: Crochetar então seguindo o diagrama A.1 da seguinte maneira: A.1 A, 7-8-9 vezes A.1 pa ao todo, terminar com A.1 C. Quando A.1 a tiver sido crochetado 1 vez em altura, repetir A.2. AO MESMO TEMPO, quando a peça medir cerca de 11-12-13 cm (ajustar a altura para que a carreira seguinte seja a carreira 6 de A.2), crochetar 14 pc no fim da carreira (= carreira 5). Virar e crochetar 1 pa no 4.º pc a partir da agulha de croché, 1 pa em cada um dos 10 novos pc seguintes. Continuar com a carreira 6 de A.2, e, no fim da carreira, crochetar 15 pc. Virar e crochetar 1 pa no 6.º pc a partir da agulha de croché, *1 pc, saltar 1 pc, 1 pa no pc seguinte*, repetir de * a * acima dos 9 novos pc seguintes, terminar com 1 pc. Crochetar o resto da carreira seguindo A.2. Na carreira seguinte, crochetar como antes até aos novos pontos no fim da carreira, crochetar 1 pa em cada aro de pc e 1 paem cada pa. Aumentou-se 12 pa de cada lado da peça = 115-127-139 pa. Continuar então na carreira 8 da seguinte maneira: A.2 A, 9-10-11 vezes A.2 pa ao todo, terminar com A.2 C. A cerca de 50-55-59 cm de altura total (ajustar a altura para que a carreira seguinte seja a carreira 7), não crochetar acima dos 12 pa de cada lado da peça = 91-103-115 pa. Continuar da seguinte maneira: A.2 A, 7-8-9 vezes A.2 pa ao todo, terminar com A.2 C. Continuar até a peça medir cerca de 61-67-72 cm – ajustar a altura para depois de um motivo completo de A.2. Arrematar. MONTAGEM: Fazer a costura dos lados e sob as mangas a 1 m/p ourela dos rebordos. |
||||||||||||||||
Explicações do diagrama |
||||||||||||||||
|
||||||||||||||||
 |
||||||||||||||||
 |
||||||||||||||||
 |
||||||||||||||||
Terminou este projecto?Então, identifique as suas fotos com as tags #dropspattern #bluewondershoulderpiece ou mostre-as na galeria #dropsfan. Precisa de ajuda para este modelo?Encontrará 7 turotiais em vídeo, uma rubrica Comentários/Perguntas e muito mais ao visitar a página do modelo em www.garnstudio.com © 1982-2026 DROPS Design A/S. Todos os direitos reservados. Este documento, incluuindo as suas su-secções, tem copyrights. Saia mais o que pode fazer com os nossos modelos no fim de cada uma das páginas do nosso site. |
||||||||||||||||


Com mais de 40 anos no design de modelos de tricô e de croché, a DROPS Design oferece uma das mais vastas colecções demodelos gratuitos na Internet - traduzidos em 17 línguas. Neste dia de hoje, temos 324 catálogos e 12290 modelos - dos quais 12271 estão traduzidos em português.
Trabalhamos com muito empenho para lhe proporcionar o melhor que o tricô e o croché têm para oferecer, para lhe fornecer inspiração e conselhos bem como fios da mais elevada qualidade a preços incríveis! Gostaria de usar os nossos modelos para outros fins que não uso pessoal? Pode ler o que lhe é permitido fazer no Copyright texto que se encontra na parte de baixo de todos os nossos modelos. Bom tricô! Bom croché!
Deixe um comentário acerca do modelo DROPS 162-34
Gostaríamos muito de saber o que tem a dizer-nos acerca deste modelo!
Se deixar uma pergunta acerca do modelo, certifique-se de que escolhe a categoria adequada no formulário abaixo para acelerar o processo relativo à resposta. Os campos obrigatórios estão assinalados com um *.