
Suositut kategoriat
Etsitkö tiettyä lankaa?


Kommentit / Kysymykset (57)
![]() Michelle kirjoitti:
Michelle kirjoitti:
Bonjour. Ce modèle m interesse... j aimerais savoir si dans le dos vu qu il n y a pas de photo du dos. il y a de la dentelle ou est ce du jersey? merci 😁😁
25.09.2020 - 13:13DROPS Design vastasi:
Bonjour Michelle, le point fantaisie ajouré est le même dans le dos que devant. Bon tricot!
25.09.2020 - 14:38
![]() Richard kirjoitti:
Richard kirjoitti:
HELP! I am in need of 3 x 50g balls of 'Drops Cotton Merino' - Colour 17- Dye Lot 52848. Any help or suggestions, gratefully received. Also, If I make a hat using Cotton Merino, but the pattern calls for 'Fingering Merino' will it make much difference?? Thank you. Richard.
27.01.2020 - 13:12DROPS Design vastasi:
Dear Richard, please contact your DROPS store (and more stores if necessary) or even our DROPS Workshop - CottonMerino is a 8 ply/Dk/Worsted yarn - see shadecard - see here all patterns you can use for Cotton Merino. Happy knitting!
27.01.2020 - 14:24
![]() Richard kirjoitti:
Richard kirjoitti:
Sorry, the last comment should read with "I placed the marker to the side (on my RIGHT)!" Thanks.
24.01.2020 - 15:28
![]() Richard kirjoitti:
Richard kirjoitti:
Hi, Thanks for your replies & I've mastered the difficult start - as you say, with double-pointed needles. The raglan decreasing is another matter. As I look at the sleeve (to my left), I have placed a marker on the stitch nearest to the side. I have then placed another marker on the 1st stitch of the side (which is to my left). Now, you say to start 3 stitches before this marker- yes? Where to I start on the sleeve decrease, please.
24.01.2020 - 15:25DROPS Design vastasi:
Dear Richard, you should have 1 marker between each piece; so if you look at the sleeve, there is 1 marker at the end of body (either back or front piece) = before the first stitch on sleeve and 1 marker at the end of sleeve, after the last stitch on sleeve = before the first stitch on front/back piece. Start 3 sts before the first of these 2 markers, K2 tog, = 1 stitch remain before marker, work this stitch + the next st (= first after marker) and dec = there are 2 sts decreased at the marker and K2 between the dec (with marker in the middle of these K2). Repeat at each marker. Happy knitting!
24.01.2020 - 16:04
![]() Richard kirjoitti:
Richard kirjoitti:
Hi, once more. I've placed markers at the sleeves & sides & now trying to knit the raglan decreases! I understand the pattern for instructions for the sides, but starting 3 stitches before the marker (does this include the marker), I end up, after the decrease, taking the first stitch of the sleeve. Your assistance once again would be very much appreciated. Thank you. Richard.
24.01.2020 - 12:29DROPS Design vastasi:
Dear Richard, there should be 1 stitch on each side of marker on each piece between the raglan decreases, ie you will work at each transition: K2 tog (1 dec), K2 (= Knit the stitch before marker + the stitch after marker), slip 1 as if to K, K1, psso. So starting at the transition between back and one sleeve, you will start (and end) round with K1, Hope it helps, Happy knitting!
24.01.2020 - 14:23
![]() Richard kirjoitti:
Richard kirjoitti:
Good morning. I have completed the body & both sleeves. But now that I have joined them on one needle, I find that when trying to knit the sleeves, the stitches are stretched (almost impossible to do)! I've had to use double-pointed needles to help me out! I don't remember having this trouble when I made the first one of this pattern (in size medium). Please can you help. Thanks. Richard.
24.01.2020 - 10:15DROPS Design vastasi:
Dear Richard, that's right, the first few rounds at the beginning of yoke can be somewhat tricky, you can use the double pointed needles or circular needles if you like to, after few rounds, all stitches will have enough place on the circular needle to work them on the round. Happy knitting!
24.01.2020 - 14:08
![]() Richard kirjoitti:
Richard kirjoitti:
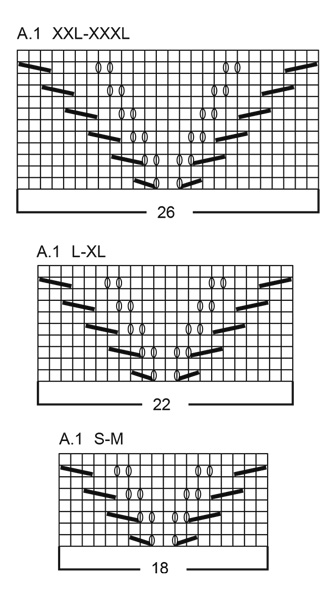
Thank you for the reply to my question. I sent a sketch via email, showing how I was knitting the round. So, from what you are saying, I have to knit A1 (1st row), (only for the complete round)! Then for the next round, I have to knit A1 (2nd row), for the complete round! Then 3rd row, 4th row & so on.... This makes sense. Please can you confirm this for me.. Thanks a million. Richard.
13.01.2020 - 20:17DROPS Design vastasi:
Dear Richard, that's how you should work the diagrams (row 1 in A.1 on all diagrams, then row 2 in A.1 on all diagrams and so on). Happy knitting!
14.01.2020 - 07:50
![]() Richard kirjoitti:
Richard kirjoitti:
Good morning, again. Continuing from the two Ridge rows, I began the round, as per your instructions. But, I find that the *A1* pattern, repeats 3 times (2 with odd row numbers, 1 even row number. in the first half, up to 124 stitches. But for the continuing *A1* pattern, there is only 1 odd number row! But, there are 2 even row numbers! Is this so? Please. Richard. I have made a drawing which explains better. If I may upload it.
13.01.2020 - 11:03DROPS Design vastasi:
Dear Richard, not sure I'm getting this properly, when working A.1 in the round, you should work same round in each diagram all the round = round 1 A.1 when working round 1 on yoke, then work round 2 in A.1 and so on. What do I misunderstand?
13.01.2020 - 11:34
![]() Richard kirjoitti:
Richard kirjoitti:
Sadly, (Hi again). I'm still struggling after completing the two ridges! It is written that I knit 20, purl 3 (23 stitches), then *A1 (22 stitches, purl 6! (A1 = 10 rows @22 stitches) = 220 stitches. But adding the first 23 stitches to the 220 stitches = 243 stitches? Yet it is written, that I then purl 6! Doing this gives a total of 249 stitches! What am I doing wrong please? Forgive me, I am nearly 78 years old. Have a good day.
09.01.2020 - 12:22DROPS Design vastasi:
Dear Richard, you should work the 248 sts in size L as follows: knit 20, purl 3, *A.1 (= 22 sts), purl 6*, repeat from *-* a total of 2 times (= 28 sts x 2= 56 sts), A.1 (= 22 sts), purl 3, knit 40 , purl 3, repeat from *-* (= 56 sts), A.1 (= 22 sts), purl 3, knit 20 = 20+3 + 56+22 + 3+40+3 + 56+22 +3+20=248 sts. Try to add markers between each section, it can help you to check the number of stitches. Happy knitting!
09.01.2020 - 14:07
![]() Richard kirjoitti:
Richard kirjoitti:
Hi (once again). This should be the last for awhile. I understand the A1 block now, working from the bottom up! But, please tell me: Do I follow the pattern from left to right or right to left?? I ask this, because, I am reading the block from right to left! I don't believe it makes much difference (but, there again, you are the Expert). Thank you. Richard.
07.01.2020 - 22:07DROPS Design vastasi:
Dear Richard, diagrams are read bottom up starting from the right corner to the left, ie you will read every row in diagrams from the right towards the left (since you are working in the round) - read more about diagrams here (link is now working). Happy knitting!
08.01.2020 - 09:04
|
|||||||||||||||||||
Lemon Parfait#lemonparfaitsweater |
|||||||||||||||||||
 |
 |
||||||||||||||||||
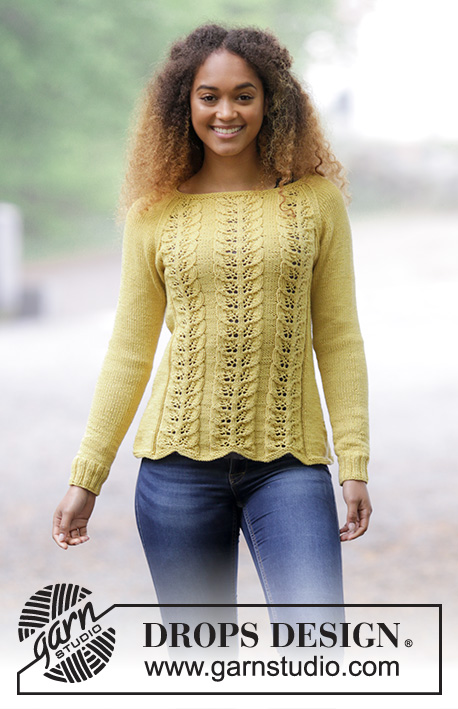
Lehtikuvioinen raglanpusero. Koot S-XXXL. Työ neulotaan DROPS Cotton Merino -langasta.
DROPS 180-1 |
|||||||||||||||||||
|
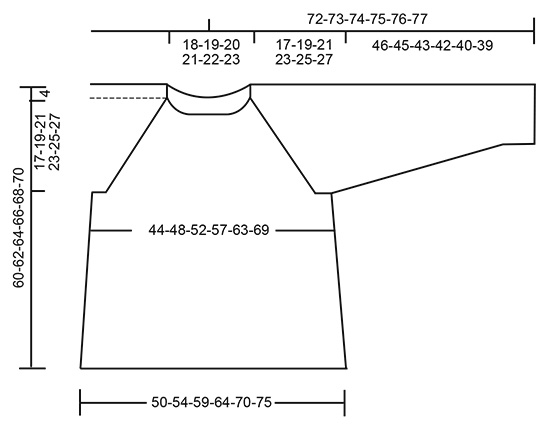
OHJEESEEN LIITTYVÄT TIEDOT: AINAOIKEINNEULE suljettuna neuleena: Neulo vuorotellen 1 kerros oikein ja 1 kerros nurin. MALLINEULE: Katso ruutupiirros A.1. Katso halutun koon piirros. KAVENNUSVINKKI (sivu): Aloita 3 silmukan päässä sivun merkkilangasta: Neulo 2 silmukkaa oikein yhteen, neulo 2 silmukkaa oikein (merkkilanka on näiden silmukoiden keskellä), nosta 1 silmukka neulomatta, neulo 1 silmukka oikein, vedä nostettu silmukka neulotun silmukan yli. LISÄYSVINKKI: Tee lisäykset keskellä hihan alla seuraavasti: Aloita 1 silmukan päässä merkkilangasta ja tee 1 langankierto puikolle, neulo 2 silmukkaa oikein (merkkilanka on näiden 2 silmukan keskellä), 1 langankierto. Seuraavalla kerroksella langankierrot neulotaan kiertäen oikein, jottei muodostuisi reikää. RAGLANKAVENNUKSET: Kavenna jokaisessa kappaleiden rajakohdassa 2 silmukkaa. Aloita 3 silmukan päässä merkkilangasta: Neulo 2 silmukkaa oikein yhteen, 2 silmukkaa oikein (merkkilanka on näiden silmukoiden keskellä), nosta 1 silmukka oikein neulomatta, 1 silmukka oikein, vedä nostettu silmukka neulotun silmukan yli. NEULOMISVINKKI: Mikäli neuletiheys ei täsmää korkeudeltaan ja jos neulotaan liian kireästi, raglankavennuksesta tulee liian lyhyt ja kädentiestä liian pieni. Korjaa tämä neulomalla tasavälein 1 ylimääräinen kerros kavennusten väliin kaventamatta ollenkaan. ---------------------------------------------------------- ETU- JA TAKAKAPPALE: Neulotaan suljettuna neuleena pyöröpuikolla, alhaalta ylös. Luo 212-228-248-268-292-316 silmukkaa pyöröpuikolle nro 4 Cotton Merino -langalla. Neulo 4 kerrosta AINAOIKEAA (katso selitys yllä). Jatka neulomalla seuraavasti: 17-21-20-25-25-31 silmukkaa oikein, 3 silmukkaa nurin, *A.1 (= 18-18-22-22-26-26 silmukkaa), 6 silmukkaa nurin*, toista *-* yhteensä 2 kertaa, A.1, 3 silmukkaa nurin, 34-42-40-50-50-62 silmukkaa oikein, 3 silmukkaa nurin, *A.1, 6 silmukkaa nurin*, toista *-* yhteensä 2 kertaa, A.1, 3 silmukkaa nurin, 17-21-20-25-25-31 silmukkaa oikein. Kiinnitä 1 merkkilanka kerroksen alkuun ja 1 merkkilanka 106-114-124-134-146-158 silmukan jälkeen = sivuissa. Jatka mallineuletta tähän tapaan. TARKISTA NEULETIHEYS! Kun työn pituus on 8 cm, kavenna kummankin sivun merkkilangan molemmin puolin 1 silmukka (= työstä kapeni 4 silmukkaa) (LUE KAVENNUSVINKKI). Toista tällaiset kavennukset 4½ cm välein yhteensä 7 kertaa kaikissa koissa = 184-200-220-240-264-288 silmukkaa. Kun työn pituus on 39-39-39-39-39-39 cm, päätä kummankin sivun keskimmäiset 8-8-10-10-12-14 silmukkaa (= päätä kummankin merkkilangan molemmin puolin 4-4-5-5-6-7 silmukkaa). Takakappaleessa ja etukappaleessa on nyt 84-92-100-110-120-130 silmukkaa. Jätä työ odottamaan ja neulo hihat. HIHA: Neulotaan suljettuna neuleena sukkapuikoilla. Vaihda työhön lyhyt pyöröpuikko, kun silmukoita on lisätty tarpeeksi. Luo 48-52-56-56-60-64 silmukkaa sukkapuikoille nro 3,5 Cotton Merino -langalla. Neulo 1 kerros oikein, jatka neulomalla joustinneuletta (2 silmukkaa oikein/ 2 silmukkaa nurin). Kun työn pituus on 6 cm, vaihda sukkapuikkoihin nro 4. Neulo 1 kerros oikein ja kavenna SAMALLA tasavälein 4-6-8-6-8-10 silmukkaa = 44-46-48-50-52-54 silmukkaa. Kiinnitä 1 merkkilanka kerroksen alkuun (= keskellä hihan alla). Jatka neulomalla sileää neuletta. Kun työn pituus on 10-7-7-10-7-7 cm, lisää keskelle hihan alle 2 silmukkaa (LUE LISÄYSVINKKI). Toista tällaiset lisäykset 3-2½-2-1½-1½-1½ cm välein yhteensä 12-15-18-19-20-21 kertaa = 68-76-84-88-92-96 silmukkaa. Kun työn pituus on 46-45-43-42-40-39 cm (suurimmissa koissa on lyhyemmät mitat, koska niissä on korkeammat kaarrokkeet), päätä keskeltä hihan alta 8-8-10-10-12-14 silmukkaa = 60-68-74-78-80-82 silmukkaa. Jätä työ odottamaan ja neulo toinen hiha samoin. KAARROKE: Ota kaikki silmukat samalle pyöröpuikolle, hihat kädenteitä varten päätettyjen silmukoiden tilalle = 288-320-348-376-400-424 silmukkaa. Kiinnitä 1 merkkilanka jokaiseen kappaleiden rajakohtaan (= 4 merkkilankaa). Jatka mallineuletta kuten aiemmin ja tee nyt RAGLANKAVENNUKSET (katso selitys yllä). Toista kavennukset joka 4.kerros 5-5-6-6-6-7 kertaa, sitten joka 2.kerros 14-16-18-21-23-24 kertaa = yhteensä 19-21-24-27-29-31 kertaa (niillä piirroksen A.1 silmukoilla, joilla ei voida neuloa kokonaista mallikertaa kavennusten aikana, neulotaan sileää neuletta). Kun kaikki kavennukset on tehty, työssä on jäljellä 136-152-156-160-168-176 silmukkaa. Neulo kaikilla silmukoilla 4 kerrosta ainaoikeaa ja neulo ensimmäisellä kerroksella kummankin hihan 22-26-26-24-22-20 silmukkaa pareittain oikein yhteen, kavenna lisäksi tasavälein kerroksella 18-28-26-28-34-40 silmukkaa = 96-98-104-108-112-116 silmukkaa. Päätä silmukat oikein silmukoin. VIIMEISTELY: Ompele kainalosaumat. |
|||||||||||||||||||
Ruutupiirroksen selitykset |
|||||||||||||||||||
|
|||||||||||||||||||
 |
|||||||||||||||||||
 |
|||||||||||||||||||
Oletko tehnyt tämän mallin?Tägää tällöin kuviasi #dropspattern #lemonparfaitsweater tai lähetä kuvat #dropsfan galleriaan. Tarvitsetko apua tämän ohjeen kanssa?Löydät 27 ohjevideota, kommentteja/kysymyksiä ja muuta osoitteessa www.garnstudio.com © 1982-2026 DROPS Design A/S. Pidätämme kaikki oikeudet. Tämä tiedosto ja kaikki sen alatiedostot on suojattu tekijänoikeuslailla. Lue lisää siitä, mitä voit tehdä ohjeillamme, verkkosivujemme jokaisen ohjeen alaosasta. |
|||||||||||||||||||


DROPS Design on toiminut neule- ja virkkausalalla yli 40 vuotta ja meillä on yksi kaikkein laajin valikoima ilmaisia ohjeita verkossa - käännettynä 17 kielelle. Tänään meiltä löytyy 324 lehteä ja 12290 ohjetta - joista 11706 ohjetta on käännetty suomeksi.
Työskentelemme ahkerasti, jotta voisimme antaa teille kaikkein parhaimpia neule- ja virkkausohjeita, inspiraatiota ja neuvoja sekä korkealaatuisia lankoja todella edulliseen hintaan! Haluaisitko käyttää ohjeitamme muuhun kuin henkilökohtaiseen käyttöön? Voit lukea säännöistä ohjeiden Tekijänoikeus -tekstissä, joka löytyy kaikkien ohjeidemme alapuolelta. Hauskoja hetkiä käsitöiden parissa!
Lisää kommentti ohjeeseen DROPS 180-1
Haluamme mielellämme kuulla mielipiteesi tästä ohjeesta!
Mikäli haluat esittää kysymyksen, valitse oikea kategoria alla olevasta valikosta - tällä tavoin saat vastauksen nopeammin. Pakolliset kentät on merkitty tähdellä *.