
Suositut kategoriat
Etsitkö tiettyä lankaa?


Kommentit / Kysymykset (23)
![]() Leeanne kirjoitti:
Leeanne kirjoitti:
Addtnl. info for my last comments: I was confused by the first sentence in the short rows instructions stating to do 6 rows over all stitches. I thought that was part of the directions and the piece started with 6 rows before starting the short row repeat cycle but that is incorrect. This sentence is just telling you that there are 6 rows included in the short row instruction cycle that are not, in fact, short rows – 6 full rows and 2 short rows (not in that order) are listed in the row cycle.
06.09.2025 - 15:15
![]() Leeanne kirjoitti:
Leeanne kirjoitti:
(Cont. from previous two comments) next row starts with R3 and finishes with L3 and last row starts with L4 and finishes with R4. Then you start the cycle again with the first short row. So yes, the short row cycle is short row, full row, short row, full row, full row, full row, full row, full row as the pattern states (1 SR followed by 1 full row followed by 1 SR followed by 5 full rows). There are no edges in which you are not doing a picot edge instruction which allows for an even 8 row cycle
06.09.2025 - 15:08
![]() Leeanne kirjoitti:
Leeanne kirjoitti:
(continued from my previous comment) work the L2 row to the first marker and turn to work back to the “beginning” of the left side row, ending with L3, turn and start a new row with L4, working all the way across, ending with R4, (all the remaining rows in the cycle go all the way across – no more short rows) next row begins with R1 and goes all the way across to the last 4 stitches, ending in L1, turn and start with L2 and go all the way across to finish with R2, (cont. in next comment)
06.09.2025 - 15:03
![]() Leeanne kirjoitti:
Leeanne kirjoitti:
For anyone that needs it, here is the cycle of rows, combining picot edge with short rows instructions (it helps to draw this out on paper): start with right side 1 (R1) and work a short row (to first marker only, not all the way across), turn and work back to the beginning and knit the last four with R2, turn to start next row beginning with R3 and knit all the way across, ending this row with L1, then start the second short row with L2, (continued in next comment)
06.09.2025 - 14:58
![]() Leeanne kirjoitti:
Leeanne kirjoitti:
I figured it out! It is definitely not too complicated but they could have written this pattern differently so it wouldn’t take weeks or trial and error to figure out how to work the short rows in with the picot edge. Maybe we were just making it too complicated. I don’t have enough room to write the pattern in this comment so I’ll start a new one. It is easier to draw your lines and mark each end with the picot line number but I’ll try to write it here in my next comment.
06.09.2025 - 14:55
![]() Leeanne kirjoitti:
Leeanne kirjoitti:
I think I get it! I will test it in the morning and comment again trying to explain it for others if I have it right. My last two comments are wrong for sure. It helps to draw the rows as a picture on paper and mark the ends with the line number.
06.09.2025 - 05:10
![]() Leeanne kirjoitti:
Leeanne kirjoitti:
Revising my last comment: I now have it written as: short row, R1 &L1 on the same row, short row, R2 & L2, short row, R3 & L3, short row, R4 & L4. But this adds up to 8 rows on the sides and only 4 rows in the middle, not 6. Also not sure why the short rows directions refers to the middle stitches as being 70 (for the second size) when it’s only 30 (if excluding 25 on each end) or 72 (if excluding only the outermost 4 on each end).
06.09.2025 - 04:26
![]() Leanne kirjoitti:
Leanne kirjoitti:
The directions for the short rows are difficult to figure out. I’ve been working at this for a few weeks with my MIL, have restarted my project 7 times and we still don’t have it right. So we are alternating between right and left rows 1, 2, etc. when doing full rows? We are not doing any picot edge instructions when doing short rows, correct? To incoorporate the short rows, does it go: left row 1, right row 1, short row, left row 2, right row 2, short row, etc. through all four edge rows?
06.09.2025 - 02:40
![]() Leeanne kirjoitti:
Leeanne kirjoitti:
In addition to my last comment, I’m also confused because it says for garter stitch to knit two rows. The main directions says start with the right Picot edge, then knit the directions for garter stitch for the rest of the row, except for the last four and then knit the directions for the left edge on the last four. How do you knit two rows for the garter stitch directions in between doing the right and left edges?
14.07.2025 - 19:22DROPS Design vastasi:
Dear Leeanne, the garter stitch structure is 2 knit rows. So whenever most of the stitches in the row are knitted, both from the right side and the wrong side, the resulting texture will be garter stitch. In the picot edges we are already using garter stitch, since all other stitches except for the 4 stitches on each side for the picot are knitted from the right side and the wrong side. So you just need to work as indicated; the edges will have the picot texture while the remaining stitches are knitted. Happy knitting!
19.07.2025 - 17:47
![]() Leeanne kirjoitti:
Leeanne kirjoitti:
A video of the actual pattern, please! This is so confusing. I’ve now learned how to do picot edges and short rows, but I can’t understand how to do both at the same time. How do you know which row of the picot edge you’re on if you’ve turned around and gone the other direction halfway through a row? And then when you start the next row do you count as if half the row is row 5 and half is row 6 or just continue with the next direction for that edge in sequence, ignoring row numbers?
14.07.2025 - 19:18DROPS Design vastasi:
Dear Leeanne, please remember to mark your comments as questions so that we can see them and answer sooner. When you are combining the short rows and the picot edges, count only the rows where you reach the edges; those rows where you turn before reaching the edges are not taken into account for the picot edges on that side. Happy knitting!
19.07.2025 - 17:48
|
|
Berry Kiss#berrykissvest |
|
 |
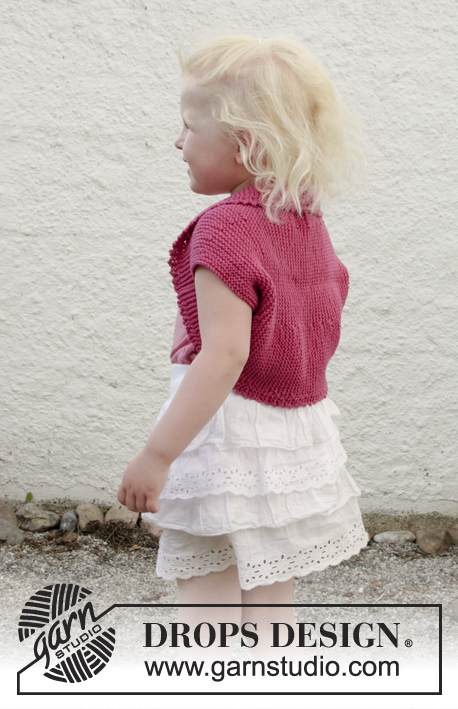 |
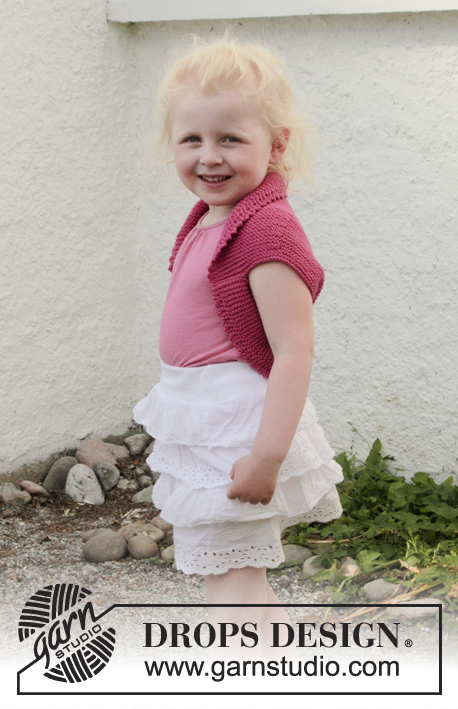
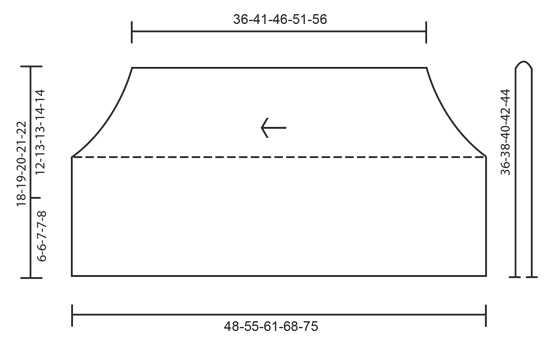
Lapsen neulottu bolero DROPS Cotton Merino -langasta. Työssä on lyhennettyjä kerroksia, nirkkoreunus ja ainaoikeinneuletta. Koot 3 - 12 vuotta.
DROPS Children 28-7 |
|
|
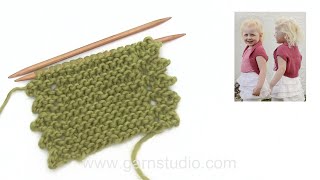
AINAOIKEINNEULE tasona: Neulo kaikki kerrokset oikein. NIRKKOREUNUS (tasoneuleena): OIKEA SIVU: 1.KERROS (= oikea puoli): Neulo oikeaa. 2.KERROS (= nurja puoli): Neulo oikeaa kunnes jäljellä on 4 silmukkaa, nämä silmukat neulotaan seuraavasti: 2 silmukkaa oikein yhteen, 1 langankierto, neulo kumpaankin 2 viimeiseen silmukkaan 2 silmukkaa = työhön lisättiin 2 silmukkaa. 3.KERROS (= oikea puoli): Nosta 1.silmukka oikein neulomatta, 1 silmukka oikein, vedä nostettu silmukka neulotun yli, 1 silmukka oikein, vedä oikean käden puikon takimmainen silmukka etummaisen silmukan yli, työstä kapeni nyt 2 silmukkaa, neulo kerroksen loput silmukat oikein. 4.KERROS (= nurja puoli): Neulo oikeaa. Toista kerroksia 1.-4. VASEN SIVU: 1.KERROS (= oikea puoli): Neulo oikeaa kunnes jäljellä on 4 silmukkaa, nämä silmukat neulotaan seuraavasti: 2 silmukkaa oikein yhteen, 1 langankierto, neulo kumpaankin 2 viimeiseen silmukkaan 2 silmukkaa = työhön lisättiin 2 silmukkaa. 2.KERROS (= nurja puoli): Nosta 1.silmukka oikein neulomatta, 1 silmukka oikein, vedä nostettu silmukka neulotun yli, 1 silmukka oikein, vedä oikean käden puikon takimmainen silmukka etummaisen silmukan yli, työstä kapeni nyt 2 silmukkaa, neulo kerroksen loput silmukat oikein. 3.KERROS (= oikea puoli): Neulo oikeaa. 4.KERROS (= nurja puoli): Neulo oikeaa. Toista kerroksia 1.-4. LYHENNETYT KERROKSET: Neulo 6 kerrosta kaikilla silmukoilla, *neulo 24-25-26-27-28 silmukkaa (ensimmäiseen merkkiin asti), käännä työ, kiristä lanka ja neulo kerros loppuun. Neulo 1 kerros kaikilla silmukoilla, käännä työ, neulo 24-25-26-27-28 silmukkaa (toiseen merkkiin asti), käännä työ, kiristä lanka ja neulo kerros loppuun. Neulo 5 kerrosta kaikilla silmukoilla*, toista *-*. Eli neulo jokaisessa mallikerrassa keskimmäisillä 66-70-72-80-86 silmukalla 6 kerrosta ainaoikeaa ja neulo jokaisessa mallikerrassa kummassakin reunassa 8 kerrosta ainaoikeaa. -------------------------------------------------------- BOLERO: Neulotaan poikittain tasona pyöröpuikolla, kädentiestä toiseen kädentiehen. Taita lopuksi bolero kaksinkerroin ja ompele sivusaumat. Luo 76-80-84-88-92 silmukkaa Cotton Merino -langalla pyöröpuikolle nro 4. Kiinnitä 1 merkki 24-25-26-27-28 silmukan päähän kummastakin reunasta (= 28-30-32-34-36 silmukkaa merkkien välissä). Neulo seuraavasti (1.kerros = oikea puoli): Neulo OIKEAN SIVUN NIRKKOREUNUS, neulo seuraavilla 68-72-76-80-84 silmukalla AINAOIKEAA (katso selitys yllä), neulo viimeisillä 4 silmukalla VASEMMAN SIVUN NIRKKOREUNUS. TARKISTA NEULETIHEYS! Jatka ainaoikein -neuletta ja neulo kummankin reunan reunimmaisilla 4 silmukalla nirkkoreunus kuten aiemmin. Neulo SAMALLA LYHENNETTYJÄ KERROKSIA (katso selitys yllä). Kun työn lyhyimmän kohdan pituus on n. 36-41-46-51-56 cm, päätä silmukat löyhästi. VIIMEISTELY: Taita bolero kaksinkerroin (mittapiirros näyttää työtä taitettuna). Ompele kummankin sivun alimmat 6-6-7-7-8 cm yhteen reunat vastakkain (kädentie = 12-13-13-14-14 cm). |
|
 |
|
Oletko tehnyt tämän mallin?Tägää tällöin kuviasi #dropspattern #berrykissvest tai lähetä kuvat #dropsfan galleriaan. Tarvitsetko apua tämän ohjeen kanssa?Löydät 18 ohjevideota, kommentteja/kysymyksiä ja muuta osoitteessa www.garnstudio.com © 1982-2026 DROPS Design A/S. Pidätämme kaikki oikeudet. Tämä tiedosto ja kaikki sen alatiedostot on suojattu tekijänoikeuslailla. Lue lisää siitä, mitä voit tehdä ohjeillamme, verkkosivujemme jokaisen ohjeen alaosasta. |
|


DROPS Design on toiminut neule- ja virkkausalalla yli 40 vuotta ja meillä on yksi kaikkein laajin valikoima ilmaisia ohjeita verkossa - käännettynä 17 kielelle. Tänään meiltä löytyy 324 lehteä ja 12290 ohjetta - joista 11712 ohjetta on käännetty suomeksi.
Työskentelemme ahkerasti, jotta voisimme antaa teille kaikkein parhaimpia neule- ja virkkausohjeita, inspiraatiota ja neuvoja sekä korkealaatuisia lankoja todella edulliseen hintaan! Haluaisitko käyttää ohjeitamme muuhun kuin henkilökohtaiseen käyttöön? Voit lukea säännöistä ohjeiden Tekijänoikeus -tekstissä, joka löytyy kaikkien ohjeidemme alapuolelta. Hauskoja hetkiä käsitöiden parissa!
Lisää kommentti ohjeeseen DROPS Children 28-7
Haluamme mielellämme kuulla mielipiteesi tästä ohjeesta!
Mikäli haluat esittää kysymyksen, valitse oikea kategoria alla olevasta valikosta - tällä tavoin saat vastauksen nopeammin. Pakolliset kentät on merkitty tähdellä *.