
Suositut kategoriat
Etsitkö tiettyä lankaa?


Kommentit / Kysymykset (48)
![]() María Fernanda Yáñez kirjoitti:
María Fernanda Yáñez kirjoitti:
Hola! Para la talla M, los 95 puntos de A2 no encajan con el sentido de los 7 puntos centrales de A3 (para que encajen tendría que tener 43 puntos a un lado y 45 en el otro). Hago el comentario para saber si es que hay un error en el patrón. Gracias por la respuesta.
15.03.2022 - 05:30
![]() Irene Simeone kirjoitti:
Irene Simeone kirjoitti:
Buongiorno, un'altra domanda. Quando si deve iniziare il diagramma A.3, le istruzioni dicono di iniziare dalla riga indicata dalla freccia su un ferro sul rovescio del lavoro. Questo significa che le 7 maglie centrali devono essere lavorati così: 1 dir, 5 rov, 1 dir? Grazie ancora. Irene
03.03.2022 - 15:43DROPS Design vastasi:
Buonasera Irene, dal rovescio del lavoro deve lavorare come indicato nella legenda e cioè 1 maglia rovescio, 5 maglie diritto e 1 maglia rovescio. Buon lavoro!
05.03.2022 - 22:09
![]() Irene Simeone kirjoitti:
Irene Simeone kirjoitti:
Buongiorno, sto seguendo le istruzioni ma sono un po' confusa :( il davanti del lavoro è quello in cui si vedono le coste oppure quello in cui ci sono una specie di nodini? spero riusciate a capire cosa intendo. Grazie mille! Irene
03.03.2022 - 15:24DROPS Design vastasi:
Buonasera Irene, il davanti del lavoro è quello in cui inizia a lavorare a coste sul dietro. Buon lavoro!
04.03.2022 - 17:46
![]() Stella kirjoitti:
Stella kirjoitti:
When it says to work 4 rows over 10 garter stitches, does is mean 4 rows with the 10 garter stitches or the 10 garter stitches with 4 rows of A2 over it?
03.01.2022 - 21:52DROPS Design vastasi:
Dear Stella, this means you work the next 4 rows with the 10 sts in garter stitch instead of pattern and the remaining stitches as before. Happy knitting!
04.01.2022 - 07:26
![]() Angela Beaty kirjoitti:
Angela Beaty kirjoitti:
In the Back Piece section, work from arrow in A.3 over the middle 7 stitches on row, Is this actually in the middle of the 96 stitches? So you skip the first 4 rows and just do the arrow row? Then work A.3 over the first 48 stitches do you start from the bottom of the diagram or from the arrow?
19.08.2021 - 10:21DROPS Design vastasi:
Dear Angela, when you work from the arrow, yes, you're working over the middle 7 stitches of the 96 stitches and you skip the first 4 rows and start from the arrow row. In the rest of the stitches, you work A.2. After finishing A.3, in the next row, there is a split for the opening. The rows under the arrow are actually from A.2 and are there just to give a context or to make it continuous visually.
30.08.2021 - 19:26
![]() Katzilicious kirjoitti:
Katzilicious kirjoitti:
I'm still confused, can you explain "work from arrow in A.3 over the middle 7 stitches on row - adjust so that this row marked with arrow is worked from wrong side. On first row from right side after A.3 work over the first 44-48-52-57-63-70 stitches on row and slip the remaining 44-48-52-57-63-70 stitches on 1 stitch holder"? So how do I read the chart? From the right bottom? And when i work from arrow A.3 do i start with RS or WS? Thank you
18.05.2021 - 12:06DROPS Design vastasi:
Dear Katzilicious, you read the diagram from right to left and from bottom up, from the right side. Here you have a lesson on how to read a diagram: https://www.garnstudio.com/lesson.php?id=68&cid=19 A.3 begins from the wrong side. Work 5 rows of A.3, which is in the center of the front or the back. The next step is to separate this part into two. You work one part with the V-neck and then you work the second part from the stitch holder. Happy knitting!
07.08.2021 - 11:30
![]() Jessica kirjoitti:
Jessica kirjoitti:
Hi again! Thanks for the help, it clears things up, but I’m still not sure what I should be doing when I switch to the A.3 chart. It says the row marked by the arrow should be worked from the WS, but to do that, I’d have to work the row below from the RS, meaning I’d be doing a row of knitting. But the A.2 pattern states that for RS rows I should P1 K1. I’m not sure how these two charts fit together. Any help would be great.
07.05.2021 - 13:32
![]() Jessica kirjoitti:
Jessica kirjoitti:
Hi! I’m a little confused about what to do once I’ve done the first 8 rows in A.1. I’m finishing on the WS so starting A.2 on the RS with a P1 K1 and 3 garter stitches at each end, then on the WS purling all stitches, but from previous comments that doesn’t seem to be the correct pattern, and after I got to switching to A.3, doing the row indicated by the arrow on the WS indicates that the previous RS row should be all knitted, not P1 K1 as I have done. Any help would be appreciated.
07.05.2021 - 11:22DROPS Design vastasi:
Dear Jessica, the garter stitches in A.2 (= P from RS, P from WS) should be worked over the P stitches in A.1, so that you will work A.2 from RS: 3 sts in garter st, K1, (P1, K1) repeat from (to) and finish with 3 sts in garter stitch and from WS: K3, P to the last 3 sts, P3. Happy knitting!
07.05.2021 - 13:00
![]() Katzilicious kirjoitti:
Katzilicious kirjoitti:
I'm confuse about worked A.1 until it had been vertically worked and work A.2 over A.1 can you please explain? Thank you
06.05.2021 - 07:39DROPS Design vastasi:
Dear Katzilicious, work first the 8 rows in A.1 as explained: (from RS = 3 sts in garter stitch, knit 1, repeat A.1 (read from the right towards the left= P1, K1), 3 sts in garter st / from WS: 3 sts in garter st, A.1 (read from the left towards the right = P1, K1), P1, 3 sts in garter st). Then work: 3 sts in garter st, knit 1, repeat A.2 (= 1 st in garter st, 1 st in stocking st), and finish with 3 sts in garter st, from WS: 3 sts in garter st, repeat A.1 (=1 st in stocking st = P, 1 st in garter st = K), P1, 3 sts in garter st. Hope this help. Happy knitting!
06.05.2021 - 07:45
![]() Diana kirjoitti:
Diana kirjoitti:
I prefer written instructions as opposed to charts. Is there anyone who has written out the instructions? Also, there are no instructions on how many inches or rows we need to knit for each diagram. I am a long time knitter but find almost all of the patterns here quite confusing with no written instructions or actual row/inches for each size. I understand the patterns are translated from Norwegian and it is not an easy task to ensure everything is explained in detail.
29.03.2021 - 22:35DROPS Design vastasi:
Dear Diana, we use charts insted of written out instructions not only because they are available in many languages, but also because we believe that with charts one can see not only the very next step, but one can see teh larger picture, as how stitches and rows relate to each other en large. We also have a lesson about how to read diagrams here, and one can always ask for help in the store where they bought their DROPS yarn from (over the phone or in person). We have many knitters who actually prefer diagrams to written instructions. Happy Knitting!
30.03.2021 - 11:50
|
|||||||||||||
Mazo#mazotop |
|||||||||||||
 |
 |
||||||||||||
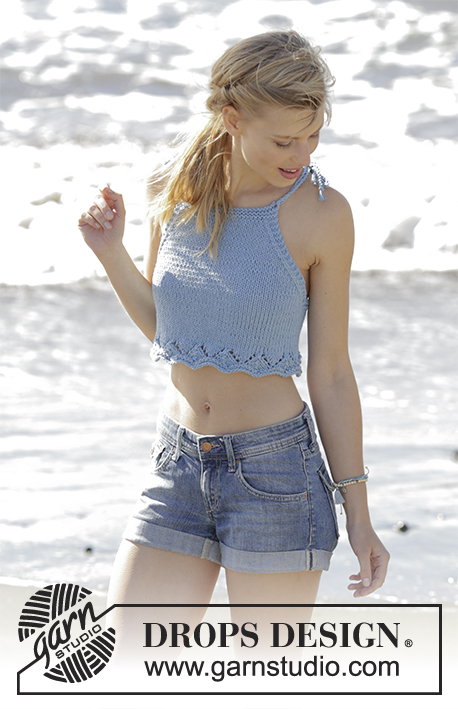
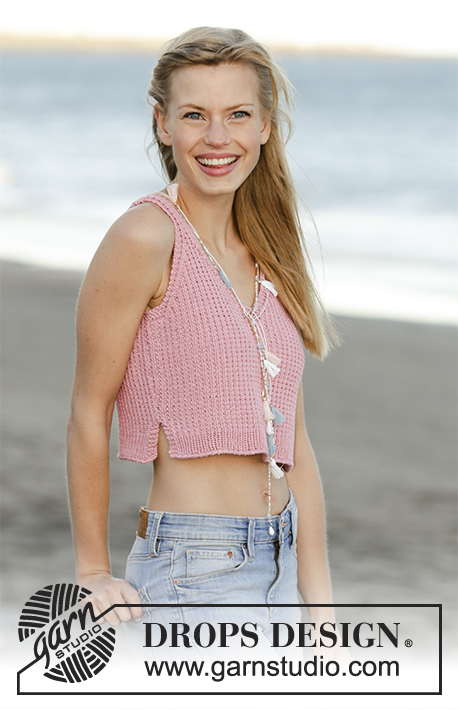
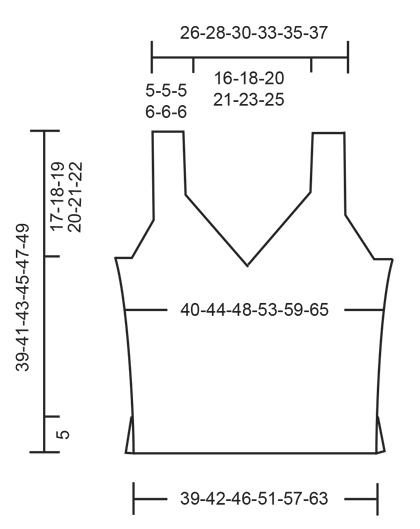
Alhaalta ylös neulottu V-aukollinen kohoneuletoppi sivuhalkioilla DROPS Muskat-langasta. Koot S-XXXL.
DROPS 178-66 |
|||||||||||||
|
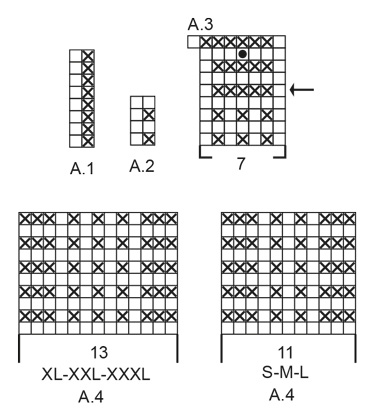
AINAOIKEINNEULE tasona: Neulo kaikki kerrokset oikein. MALLINEULE: Katso ruutupiirrokset A.1-A.4. Piirrokset näyttävät mallineuleen kaikkia kerroksia oikealta puolelta katsottuna. Katso halutun koon piirros. LISÄYSVINKKI: Lisää 1 silmukka tekemällä 1 langankierto puikolle. Seuraavalla kerroksella langankierto neulotaan kiertäen oikein, jottei muodostuisi reikää. HUOM: Lisätyillä silmukoilla neulotaan piirroksen A.2 mallineuletta. KAVENNUSVINKKI: Kavenna 3 ainaoikeinneulotun reunasilmukan sisäpuolella 1 silmukka. Kaikki kavennukset tehdään oikealla puolella! Tee kavennukset seuraavasti: Kerroksen alussa 3 ainaoikeinneulotun reunasilmukan jälkeen: Nosta 1 silmukka oikein neulomatta, 1 silmukka oikein, vedä nostettu silmukka neulotun yli. Kerroksen lopussa ennen 3 ainaoikeinneulottua reunasilmukkaa: Aloita 2 silmukan päässä 3 ainaoikeinneulotusta reunasilmukasta ja neulo 2 silmukkaa oikein yhteen. ---------------------------------------------------------- TOPPI: Neulotaan tasona 2 osana ja ommellaan lopuksi yhteen. TAKAKAPPALE: Luo 81-89-97-107-119-133 silmukkaa Muskat-langalla pyöröpuikolle nro 4. Neulo 1 kerros nurin nurjalta puolelta. Neulo joustinneuletta seuraavasti (1.kerros = oikea puoli): Neulo 3 silmukkaa AINAOIKEAA (katso selitys yllä), neulo 1 silmukka oikein, toista piirroksen A.1 mallikertaa (= 2 silmukkaa), kunnes jäljellä on 3 silmukkaa, neulo 3 silmukkaa ainaoikeaa. Neulo tasona mallineuletta tähän tapaan, kunnes olet neulonut piirroksen A.1 loppuun. Neulo sitten piirroksen A.1 mallineuleen kohdalla mallineuletta piirroksen A.2 (= 2 silmukkaa) mukaisesti. TARKISTA NEULETIHEYS! Kun työn pituus on 5 cm, luo 2 seuraavan kerroksen loppuun 1 silmukka (halkio loppuu tähän) = 83-91-99-109-121-135 silmukkaa. Neulo mallineuletta seuraavasti: 1 reunasilmukka ainaoikeaa, 1 silmukka oikein, neulo mallineuletta piirroksen A.2 mukaisesti, kunnes jäljellä on 1 silmukka, 1 reunasilmukka ainaoikeaa. Jatka mallineuletta tähän tapaan. Kun työn pituus on 7 cm, lisää kummankin reunan ainaoikeinneulotun silmukan sisäpuolelle 1 silmukka (LUE LISÄYSVINKKI). Toista tällaiset lisäykset, kun työn pituus on 10 cm = 87-95-103-113-125-139 silmukkaa. Kun työn pituus on 19-20-21-22-23-24 cm, neulo keskimmäisillä 7 silmukalla mallineuletta piirroksen A.3 nuolelta merkityltä kerrokselta alkaen (tämä nuolella merkitty kerros neulotaan nurjalta puolelta). Kun olet neulonut piirroksen A.3 loppuun, jatka neulomista ensimmäisillä 44-48-52-57-63-70 silmukalla (1.kerros = oikea puoli) ja siirrä loput 44-48-52-57-63-70 silmukkaa apulangalle. TAKAKAPPALEEN OIKEA SIVU: = 44-48-52-57-63-70 silmukkaa. LUE KOKO SEURAAVA KATKELMA. Kavenna pääntietä varten ja päätä SAMALLA kädentietä varten seuraavasti: Neulo piirroksen A.2 mallineuletta kuten aiemmin, lukuun ottamatta 3 ainaoikeinneulottua reunasilmukkaa pääntien reunassa ja 1 ainaoikeinneulottua reunasilmukkaa sivussa. PÄÄNTIE: Aloita esimmäisellä oikean puolen kerroksella pääntien kavennukset. Kavenna 3 ainaoikeinneulotun reunasilmukan sisäpuolella 1 silmukka (LUE KAVENNUSVINKKI). Toista tällaiset kavennukset joka 2.kerros (eli jokaisella oikean puolen kerroksella) yhteensä 16-18-20-22-24-26 kertaa. KÄDENTIE: Kun työn pituus on 21-22-23-24-25-26 cm, neulo sivun reunimmaisilla 10-10-12-11-11-14 silmukalla (sis. 1 ainaoikeinneulottua reunasilmukkaa) ainaoikeaa. Kun olet neulonut näillä silmukoilla 4 kerrosta ainaoikeaa, päätä kerroksen ensimmäiset 7-7-9-8-8-11 silmukkaa kädentietä varten. Neulo seuraavilla 3 silmukalla ainaoikeaa (= kädentien reunus). Kavenna kädentien reunan 3 ainaoikeinneulotun reunasilmukan sisäpuolella 1 silmukka. Toista tällaiset kavennukset joka 2.kerros (eli jokaisella oikean puolen kerroksella) yhteensä 10-12-12-14-18-20 kertaa. Kun kaikki kädentien ja pääntien kavennukset on tehty, työssä on jäljellä 11-11-11-13-13-13 silmukkaa olkainta varten. Jatka mallineuletta kuten aiemmin, ja neulo kummassakin reunassa 3 ainaoikeinneulottua reunasilmukkaa. Neulo olkain piirroksen A.4 mukaisesti (katso halutun koon piirros). Kun työn pituus on 39-41-43-45-47-49 cm, päätä silmukat. TAKAKAPPALEEN VASEN SIVU: Ota toisen sivun apulangalla odottavat 44-48-52-57-63-70 silmukkaa takaisin pyöröpuikolle nro 4 ja neulo takakappaleen oikean sivun peilikuvaksi. HUOM: Päätä nyt kädentien silmukat nurjan puolen kerroksen alusta. Muut kädentien ja pääntien kavennukset tehdään työn oikealta puolelta! ETUKAPPALE: Neulo kuten takakappale. VIIMEISTELY: Ompele olkaimet yhteen uloimmista silmukanreunoista, jottei saumasta tulisi paksu. Ompele sivusauma yhden ainaoikeinneulotun reunasilmukan päästä, kädentieltä alas halkioon. Toista työn toisessa sivussa. Katkaise lanka ja päättele langanpäät. |
|||||||||||||
Ruutupiirroksen selitykset |
|||||||||||||
|
|||||||||||||
 |
|||||||||||||
 |
|||||||||||||
Oletko tehnyt tämän mallin?Tägää tällöin kuviasi #dropspattern #mazotop tai lähetä kuvat #dropsfan galleriaan. Tarvitsetko apua tämän ohjeen kanssa?Löydät 23 ohjevideota, kommentteja/kysymyksiä ja muuta osoitteessa www.garnstudio.com © 1982-2026 DROPS Design A/S. Pidätämme kaikki oikeudet. Tämä tiedosto ja kaikki sen alatiedostot on suojattu tekijänoikeuslailla. Lue lisää siitä, mitä voit tehdä ohjeillamme, verkkosivujemme jokaisen ohjeen alaosasta. |
|||||||||||||


DROPS Design on toiminut neule- ja virkkausalalla yli 40 vuotta ja meillä on yksi kaikkein laajin valikoima ilmaisia ohjeita verkossa - käännettynä 17 kielelle. Tänään meiltä löytyy 324 lehteä ja 12239 ohjetta - joista 11636 ohjetta on käännetty suomeksi.
Työskentelemme ahkerasti, jotta voisimme antaa teille kaikkein parhaimpia neule- ja virkkausohjeita, inspiraatiota ja neuvoja sekä korkealaatuisia lankoja todella edulliseen hintaan! Haluaisitko käyttää ohjeitamme muuhun kuin henkilökohtaiseen käyttöön? Voit lukea säännöistä ohjeiden Tekijänoikeus -tekstissä, joka löytyy kaikkien ohjeidemme alapuolelta. Hauskoja hetkiä käsitöiden parissa!
Lisää kommentti ohjeeseen DROPS 178-66
Haluamme mielellämme kuulla mielipiteesi tästä ohjeesta!
Mikäli haluat esittää kysymyksen, valitse oikea kategoria alla olevasta valikosta - tällä tavoin saat vastauksen nopeammin. Pakolliset kentät on merkitty tähdellä *.