
Suositut kategoriat
Etsitkö tiettyä lankaa?


Kommentit / Kysymykset (114)
![]() Alma kirjoitti:
Alma kirjoitti:
I'm new to knitting. This will be my first project. I did rows 1 and 2, but I'm lost for other. rows. Do I continue with rows 1 and 2 until I reach 3"? Also what does "start at center back" mean? Thank you
11.01.2014 - 01:21DROPS Design vastasi:
Dear Alma, you are correct, repeat rows 1 and 2 until you reach 3" then inc as stated. Start at center back means first row from RS start on the left side of head when worn, ie end of rows from RS = towards face. Happy knitting!
11.01.2014 - 10:10
![]() Nicole kirjoitti:
Nicole kirjoitti:
Very pretty headband!
06.01.2014 - 02:18
![]() Patricia Hill kirjoitti:
Patricia Hill kirjoitti:
DROPS 86-10 headband - pattern for flower with button center (Toumaya). Where can I get pattern?
04.01.2014 - 21:23DROPS Design vastasi:
Dear Mrs Hill, The flower you are talking about is an extra added by a customer, please contact her directly on Ravelry to get more informations. Happy knitting!
06.01.2014 - 09:25
![]() Heidi kirjoitti:
Heidi kirjoitti:
I fi ished this headband recently and LOVE it. I am a very new knitter and found the directions easy to follow. I experimented with making this slightly longer and added buttons and buttonholes (a first for me). I can't wait to make more.
13.12.2013 - 17:13
![]() Tara Buffington kirjoitti:
Tara Buffington kirjoitti:
I got the increases/decreases, but am confused about how many rows of garter/stockinette stitch are between the increases, there's no information on that...does anyone know the answer?!!!
25.10.2013 - 14:51DROPS Design vastasi:
Dear Mrs Buffington, inc are done when piece measures 3", 51/2", 7" and 8 1/4". When work measures 9 1/2", place a marker and measure then from this marker for the dec. Happy knitting!
29.10.2013 - 10:14
![]() Malin kirjoitti:
Malin kirjoitti:
Hej! I mönstret på svenska, står inget om hur fjärde varvet ska stickas. Fortsatte som i beskrivningen men det ger ju inga ränder. Men jag antar att man ska sticka "bakvänt", dvs det som var avig maska på förra varvet, blir nu rät maska, osv, för att bilda ränder. Det vore hjälpsamt om detta skrevs tydligt. För den som är hyfsat nybörjare är det inte så lätt att räkna ut. :)
25.04.2013 - 22:18DROPS Design vastasi:
Om du stickar enligt beskrivningen så här: "1 rätst m, * 2 rm, 1 am * upprepa totalt 5 ggr – avsluta v med 2 rm och 1 rätst m" och fortsätter enligt beskrivningen får du ränderna som på bilden.
03.05.2013 - 10:16
![]() Veniesta kirjoitti:
Veniesta kirjoitti:
I Crochet but know how to knit and purl , so I am going to take a shot at this head band and let you know how I did.
22.04.2013 - 18:21
![]() Ann kirjoitti:
Ann kirjoitti:
Once I start the increase purl stitches... do I continue to follow the knit/purl sequence based on the stitches that I see. ie. after the purl increase row, turn and working back do I then do a "knit 1,purl 2,knit 1, purl 3 - or follow the pattern and do the purl 2, knit 1 repeat, as indicated for the WS. Hope this makes sense.
23.03.2013 - 17:43DROPS Design vastasi:
Dear Ann, you will inc P1 in all P sections seen from RS, so that after 1st inc sequence, youll have K2, P2 with 1 edge st in garter st each side. Happy knitting!
25.03.2013 - 11:30
![]() Paola Rigon kirjoitti:
Paola Rigon kirjoitti:
Cara Marica, riesci sempre a stupirmi! Questo modello lo farò per mia figlia super critica,ma stavolta sarà contentissima! Grazie
13.02.2013 - 14:03
![]() Kordula kirjoitti:
Kordula kirjoitti:
Habe das Stirnband gestrickt mit Alaska Wolle und Nadelstärke 4. Laut Anleitung hat alles prima geklappt und passt sehr gut. Werde noch ein Weiteres stricken und verschenken!
12.12.2012 - 19:32
|
|
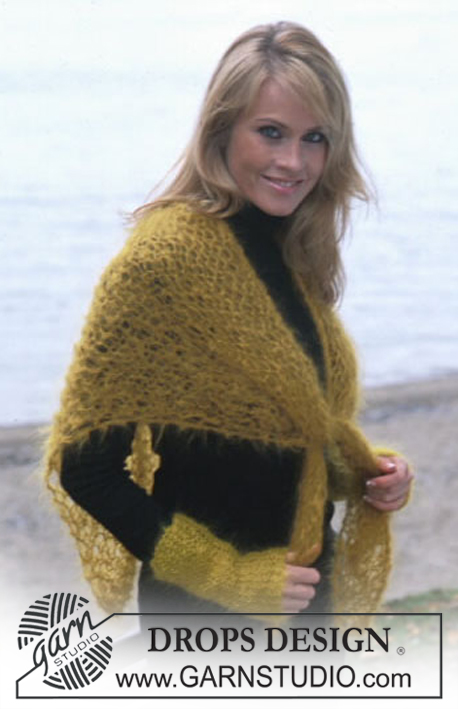
Saturn Rings |
|
|
|
|
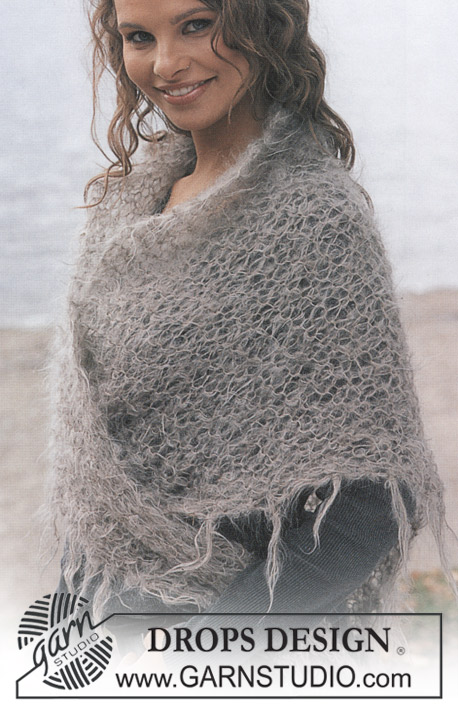
PANTA Alaska langasta
DROPS 86-10 |
|
|
Neuletiheys: 18 s ja 23 krs sileää puikoilla nro 4,5 = 10 x 10 cm. Ainaoikeinneule: Neulo kaikki krs:t oikein. Työohje: Aloita keskeltä takaa. Luo 19 s ja neulo: 1 s ainaoikeinneuletta, 5 x *2 o, 1 n*, 2 o, 1 s ainaoikeinneuletta. Kun työ on 8 cm, lisää 1 s jokaisessa nurjassa raidassa = *2 o, 2 n* = 24 s. Kun työ on 14 cm, lisää 1 s jokaisessa nurjassa raidassa = *2 o, 3 n* = 29 s. Kun työ on 18 cm, lisää 1 s jokaisessa nurjassa raidassa = *2 o, 4 n* = 34 s. Kun työ on 21 cm, lisää 1 s jokaisessa nurjassa raidassa = *2 o, 5 n* = 39 s. Kun työ on 24 cm, kiinnitä merkkilanka työhön = keskikohta. Neulo toinen puolikas peilikuvana, ts. kavenna nurjissa raidoissa aina 1 s samoissa kohdissa missä lisättiin kunnes puikolla on taas 19 s. Kun työ on 48 cm, ompele s silmukkapistoin aloitusreunaan. |
|
Oletko tehnyt tämän mallin?Tägää tällöin kuviasi #dropspattern tai lähetä kuvat #dropsfan galleriaan. Tarvitsetko apua tämän ohjeen kanssa?Löydät 16 ohjevideota, kommentteja/kysymyksiä ja muuta osoitteessa www.garnstudio.com © 1982-2026 DROPS Design A/S. Pidätämme kaikki oikeudet. Tämä tiedosto ja kaikki sen alatiedostot on suojattu tekijänoikeuslailla. Lue lisää siitä, mitä voit tehdä ohjeillamme, verkkosivujemme jokaisen ohjeen alaosasta. |


DROPS Design on toiminut neule- ja virkkausalalla yli 40 vuotta ja meillä on yksi kaikkein laajin valikoima ilmaisia ohjeita verkossa - käännettynä 17 kielelle. Tänään meiltä löytyy 325 lehteä ja 12298 ohjetta - joista 11792 ohjetta on käännetty suomeksi.
Työskentelemme ahkerasti, jotta voisimme antaa teille kaikkein parhaimpia neule- ja virkkausohjeita, inspiraatiota ja neuvoja sekä korkealaatuisia lankoja todella edulliseen hintaan! Haluaisitko käyttää ohjeitamme muuhun kuin henkilökohtaiseen käyttöön? Voit lukea säännöistä ohjeiden Tekijänoikeus -tekstissä, joka löytyy kaikkien ohjeidemme alapuolelta. Hauskoja hetkiä käsitöiden parissa!
Lisää kommentti ohjeeseen DROPS 86-10
Haluamme mielellämme kuulla mielipiteesi tästä ohjeesta!
Mikäli haluat esittää kysymyksen, valitse oikea kategoria alla olevasta valikosta - tällä tavoin saat vastauksen nopeammin. Pakolliset kentät on merkitty tähdellä *.