
Suositut kategoriat
Etsitkö tiettyä lankaa?


Kommentit / Kysymykset (114)
Amanda kirjoitti:
"bind off an sew"
21.12.2015 - 17:40
![]() Amanda kirjoitti:
Amanda kirjoitti:
Once finished, do you use a button and buttonhole or sew the ends together? How do you finish? I don't see this included in the directions. Thanks.
21.12.2015 - 14:16DROPS Design vastasi:
Dear Amanda, after you have cast off sts, sew cast-off edge to cast-on edge. Happy knitting!
22.12.2015 - 10:10Heather kirjoitti:
Can you tell me the width of this headband, thanks
25.11.2015 - 16:51DROPS Design vastasi:
Dear Heather, you can estimate the width from picture - and adjust when working the headband increasing more or less sts as you rather like. Happy knitting!
26.11.2015 - 09:25
![]() Anna Rita kirjoitti:
Anna Rita kirjoitti:
Buona sera, se gli aumenti vanno fatti sul dritto del lavoro e si fa un aumento a rovescio in tutti i gruppi di m lavorate a rov. ,dove trovo i gruppi di 2 maglie lavorate a rovescio per esempio quando sono a 8 cm. , visto che i ferri diritti dopo il vivagno si lavorano 2 diritti e 1 rovescio?
07.02.2015 - 22:54DROPS Design vastasi:
Buongiorno Anna Rita. Quando ha ancora le coste 2 m dir, 1 m rov, aumenta prima o dopo la m rov; così avrà coste 2 m dir, 2 m rov. Continuando gli aumenti, le coste diventeranno: 2 m dir, 3 m rov; 2 m dir, 4 m rov e infine, dopo l'ultimo aumento 2 m dir, 5 m rov. Buon lavoro!
08.02.2015 - 08:36
![]() Lisa kirjoitti:
Lisa kirjoitti:
Hello! I know how to increase, but I'm confused about what to do at the 14cm increase. The previous row has 24 sts, and the next increase only has the row going to 29. So, 4 stitches. I just don't get this "inc all p2 to p3". Help! WHAT p2? This is probably easy, but I'm just not seeing it, thanks!
19.01.2015 - 04:48DROPS Design vastasi:
Dear Lisa, the inc will be done in the purl sections, ie you have now P2 in each P section, you inc 1 st by P2 sts into 1 P st in each P section => you get P3 in each section. Happy knitting!
19.01.2015 - 14:13
![]() Delphine kirjoitti:
Delphine kirjoitti:
Bonjour, serait il possible de connaitre la taille du tour de tête en centimètre (circonférence). Car je souhaiterais le faire pour une personne qui a un tour de tête plus grand que la normale (sup à 56-58 cm). Merci
29.12.2014 - 09:43DROPS Design vastasi:
Bonjour Delphine, vous pouvez ajuster la hauteur totale, en tricotant quelques cm de moins que le tour de tête pour que le bandeau reste bien en place (il doit être plus serré que la dimension "finale"). Bon tricot!
30.12.2014 - 14:06
![]() Birgit kirjoitti:
Birgit kirjoitti:
Ein ganz tolles Stirnband, sieht gut aus uns passt perfekt. Werde es nochmal Stricken:-)
14.11.2014 - 06:32
![]() Iris kirjoitti:
Iris kirjoitti:
Gibt es eine Videoanleitung dazu, wie man die Maschen auf eine Hilfsnadel legt und von dort mit dem Anschlagrand zusammennäht? Ich kann mir das leider gar nicht vorstellen :-(
12.09.2014 - 19:40DROPS Design vastasi:
Liebe Iris, genau dazu gibt es kein Video, aber vielleicht hilft Ihnen das Video unter "Tipps & Hilfe" => "Technikvideos" => "fertigstellen" und dort "Fertigstellen: Maschenstich" weiter. Damit können Sie sehen, wie die stillgelegten M in die Naht eingearbeitet werden.
20.09.2014 - 10:24
![]() Riseon kirjoitti:
Riseon kirjoitti:
Hello...
30.06.2014 - 19:01
![]() Sipkjepost kirjoitti:
Sipkjepost kirjoitti:
Ik kom bij de telling met 19 st zoals beschreven alleen uit als ik brei: 1r *1 av en 2 r* 5 maal (ipv *2r 1 av*)en eindig dan wel met 2 r, en 6 ribbels gebreid.
17.03.2014 - 10:04DROPS Design vastasi:
Hoi Sikjepost. Als je breit zoals in het patroon staat, dan heb je met de 19 st 1 ribbel + 2 r aan beide kanten en 4 x 2 r steken met av tussen in het midden. En dat is ook het correcte volgens de foto.
17.03.2014 - 14:35
|
|
Saturn Rings |
|
|
|
|
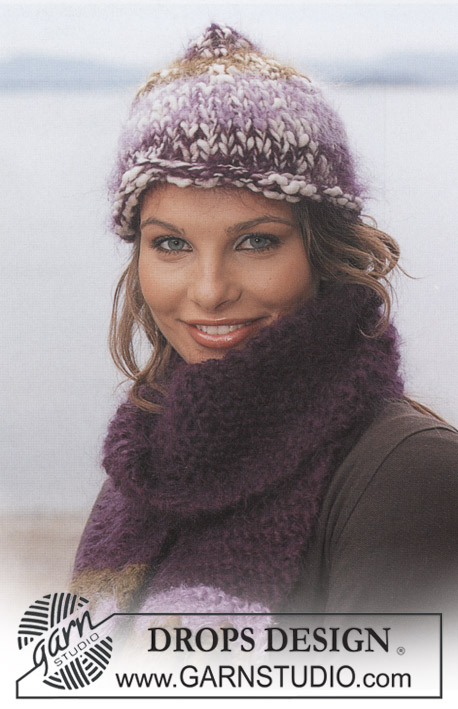
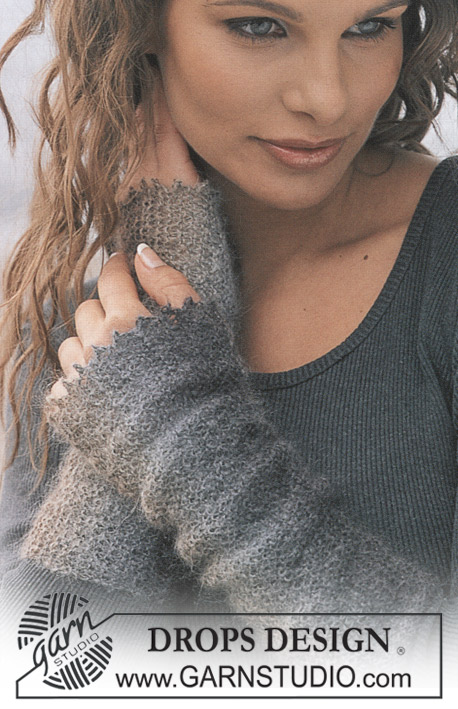
PANTA Alaska langasta
DROPS 86-10 |
|
|
Neuletiheys: 18 s ja 23 krs sileää puikoilla nro 4,5 = 10 x 10 cm. Ainaoikeinneule: Neulo kaikki krs:t oikein. Työohje: Aloita keskeltä takaa. Luo 19 s ja neulo: 1 s ainaoikeinneuletta, 5 x *2 o, 1 n*, 2 o, 1 s ainaoikeinneuletta. Kun työ on 8 cm, lisää 1 s jokaisessa nurjassa raidassa = *2 o, 2 n* = 24 s. Kun työ on 14 cm, lisää 1 s jokaisessa nurjassa raidassa = *2 o, 3 n* = 29 s. Kun työ on 18 cm, lisää 1 s jokaisessa nurjassa raidassa = *2 o, 4 n* = 34 s. Kun työ on 21 cm, lisää 1 s jokaisessa nurjassa raidassa = *2 o, 5 n* = 39 s. Kun työ on 24 cm, kiinnitä merkkilanka työhön = keskikohta. Neulo toinen puolikas peilikuvana, ts. kavenna nurjissa raidoissa aina 1 s samoissa kohdissa missä lisättiin kunnes puikolla on taas 19 s. Kun työ on 48 cm, ompele s silmukkapistoin aloitusreunaan. |
|
Oletko tehnyt tämän mallin?Tägää tällöin kuviasi #dropspattern tai lähetä kuvat #dropsfan galleriaan. Tarvitsetko apua tämän ohjeen kanssa?Löydät 16 ohjevideota, kommentteja/kysymyksiä ja muuta osoitteessa www.garnstudio.com © 1982-2026 DROPS Design A/S. Pidätämme kaikki oikeudet. Tämä tiedosto ja kaikki sen alatiedostot on suojattu tekijänoikeuslailla. Lue lisää siitä, mitä voit tehdä ohjeillamme, verkkosivujemme jokaisen ohjeen alaosasta. |


DROPS Design on toiminut neule- ja virkkausalalla yli 40 vuotta ja meillä on yksi kaikkein laajin valikoima ilmaisia ohjeita verkossa - käännettynä 17 kielelle. Tänään meiltä löytyy 325 lehteä ja 12298 ohjetta - joista 11792 ohjetta on käännetty suomeksi.
Työskentelemme ahkerasti, jotta voisimme antaa teille kaikkein parhaimpia neule- ja virkkausohjeita, inspiraatiota ja neuvoja sekä korkealaatuisia lankoja todella edulliseen hintaan! Haluaisitko käyttää ohjeitamme muuhun kuin henkilökohtaiseen käyttöön? Voit lukea säännöistä ohjeiden Tekijänoikeus -tekstissä, joka löytyy kaikkien ohjeidemme alapuolelta. Hauskoja hetkiä käsitöiden parissa!
Lisää kommentti ohjeeseen DROPS 86-10
Haluamme mielellämme kuulla mielipiteesi tästä ohjeesta!
Mikäli haluat esittää kysymyksen, valitse oikea kategoria alla olevasta valikosta - tällä tavoin saat vastauksen nopeammin. Pakolliset kentät on merkitty tähdellä *.