
Suositut kategoriat
Etsitkö tiettyä lankaa?


Kommentit / Kysymykset (114)
![]() Filiz kirjoitti:
Filiz kirjoitti:
Die anleitung stimmt was nicht..... zb 2Mli,3 Mli....
29.05.2026 - 18:27DROPS Design vastasi:
Liebe Filiz, man wird in Rippenmuster stricken und zuerst die linken Maschen im Rippenmuster zunehmen dann abnehmen. Wenn Sie etwas nicht verstehen, können Sie uns gerne hier schreiben, so können wir Ihen weiterhelfen. Viel Spaß beim Stricken!
01.06.2026 - 07:32
![]() Lisette kirjoitti:
Lisette kirjoitti:
Wat een leuk patroon! Het is al best oud, dus bedankt dat het nog beschikbaar is. Hier ga ik veel mensen blij mee maken en het is zo prettig om te breien. Super!
18.10.2025 - 01:26
![]() Anneli Kokkola kirjoitti:
Anneli Kokkola kirjoitti:
This is very nice, and there are my daughters and their friends hoping me to make this for them❣️
30.03.2025 - 12:30
![]() Silvia kirjoitti:
Silvia kirjoitti:
Seit Jahren stricke ich dieses Stirnband für mich und Freundinnen in allen möglichen Farben. Gut verständliche Anleitung und das Ergebnis sitzt perfek. Vielen Dank für dieses zeitlose und doch pfiffige Accessoire für kalte Tage.
24.02.2025 - 18:08
![]() Annika kirjoitti:
Annika kirjoitti:
Det fattas ju en del av mönstret på svenska! Inte konstigt att det blir fel är jag försöker sticka. Hade varit tacksam om ni rättade till det!
07.02.2025 - 17:14
![]() Janine Luisier kirjoitti:
Janine Luisier kirjoitti:
Bonjour votre site est excellent belles laines, beaux modèles, et le 86-10 super comme tant d'autres. Les explications à portée de tous. Mille MERCIS ż
05.12.2024 - 15:08
![]() Stéphanie P kirjoitti:
Stéphanie P kirjoitti:
Bonjour, Comment joindre les deux extrémités du tricot sans rabattre les mailles? Je ne trouve aucun tutos ... Merci d'avance Stéphanie
01.11.2024 - 00:33
![]() Lorraine kirjoitti:
Lorraine kirjoitti:
Bonjour, pourquoi ne pas rabattre les mailles avant de coudre le bandeau.
11.09.2024 - 17:20DROPS Design vastasi:
Bonjour Lorraine, pour éviter que la couture ne soit trop épaisse, mais vous pouvez tout à fait rabattre avant si vous le préférez. Bon tricot!
12.09.2024 - 09:26
![]() June kirjoitti:
June kirjoitti:
Do I do the first two rows actually like they are written after doing the first increase row?
23.03.2024 - 00:43DROPS Design vastasi:
Dear June, in this pattern you have a rib pattern, where you will repeat the rib explained in rows 1 and 2. However, as you increase, the rib will slightly change. For example, in the first increase at 3", you increase from P1 in the rib to P2 from the RS (by purling 2 stitches in 1 purl stitch). Then, on the WS knit over the new purl stitches (so the new rib will look like K2, P2 from the RS and P2, K2 from the WS). As you continue increasing you will add P stitches from the RS, which are knitted from the WS (so K2, P3 from the RS and P2, K3 from the WS; then K2, P4 from the RS and P2, K4 from the WS). Continue increasing like this. Happy knitting!
25.03.2024 - 00:00
![]() June kirjoitti:
June kirjoitti:
When the piece messages 3 ins what do I do now?
23.03.2024 - 00:30DROPS Design vastasi:
Dear June, in the first increase at 3", you will work as follows from the RS: K 1 (edge st knit in garter st), * K 2, P 2 (that is, purl 2 stitches in the P1 to increase 1 purl stitch) * repeat a total of 5 times – finish row with K 2 and K 1 (edge st knit in garter st). Due to these increases, in the WS the rib also changes: from P2, K1 to P2, K2 (you don't increase in this row, just work over the increased stitches in the previous row). Happy knitting!
25.03.2024 - 00:00
|
|
Saturn Rings |
|
|
|
|
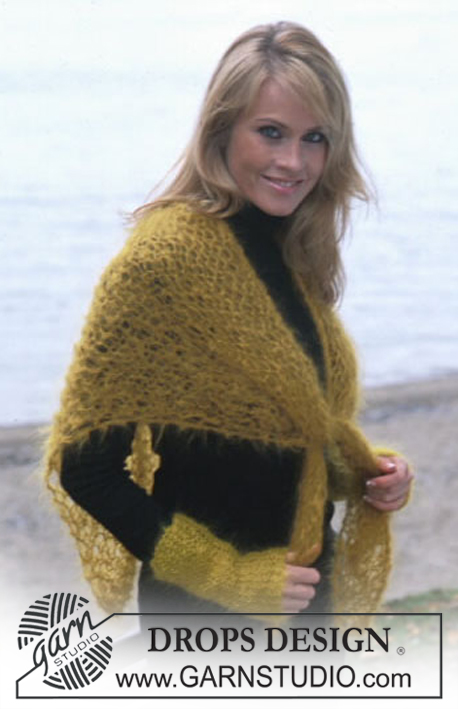
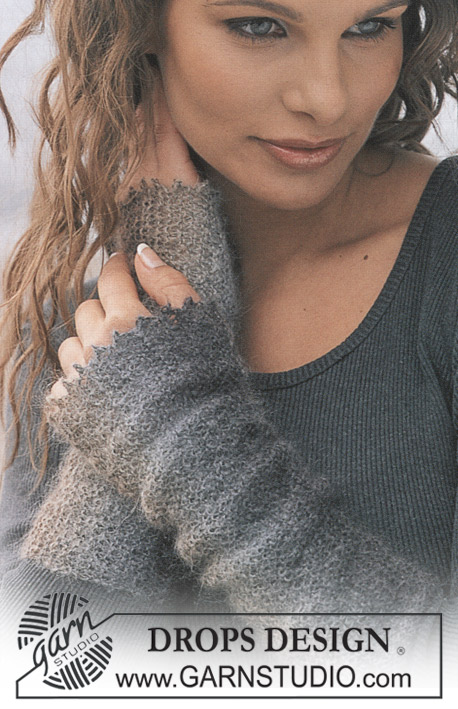
PANTA Alaska langasta
DROPS 86-10 |
|
|
Neuletiheys: 18 s ja 23 krs sileää puikoilla nro 4,5 = 10 x 10 cm. Ainaoikeinneule: Neulo kaikki krs:t oikein. Työohje: Aloita keskeltä takaa. Luo 19 s ja neulo: 1 s ainaoikeinneuletta, 5 x *2 o, 1 n*, 2 o, 1 s ainaoikeinneuletta. Kun työ on 8 cm, lisää 1 s jokaisessa nurjassa raidassa = *2 o, 2 n* = 24 s. Kun työ on 14 cm, lisää 1 s jokaisessa nurjassa raidassa = *2 o, 3 n* = 29 s. Kun työ on 18 cm, lisää 1 s jokaisessa nurjassa raidassa = *2 o, 4 n* = 34 s. Kun työ on 21 cm, lisää 1 s jokaisessa nurjassa raidassa = *2 o, 5 n* = 39 s. Kun työ on 24 cm, kiinnitä merkkilanka työhön = keskikohta. Neulo toinen puolikas peilikuvana, ts. kavenna nurjissa raidoissa aina 1 s samoissa kohdissa missä lisättiin kunnes puikolla on taas 19 s. Kun työ on 48 cm, ompele s silmukkapistoin aloitusreunaan. |
|
Oletko tehnyt tämän mallin?Tägää tällöin kuviasi #dropspattern tai lähetä kuvat #dropsfan galleriaan. Tarvitsetko apua tämän ohjeen kanssa?Löydät 16 ohjevideota, kommentteja/kysymyksiä ja muuta osoitteessa www.garnstudio.com © 1982-2026 DROPS Design A/S. Pidätämme kaikki oikeudet. Tämä tiedosto ja kaikki sen alatiedostot on suojattu tekijänoikeuslailla. Lue lisää siitä, mitä voit tehdä ohjeillamme, verkkosivujemme jokaisen ohjeen alaosasta. |


DROPS Design on toiminut neule- ja virkkausalalla yli 40 vuotta ja meillä on yksi kaikkein laajin valikoima ilmaisia ohjeita verkossa - käännettynä 17 kielelle. Tänään meiltä löytyy 325 lehteä ja 12298 ohjetta - joista 11792 ohjetta on käännetty suomeksi.
Työskentelemme ahkerasti, jotta voisimme antaa teille kaikkein parhaimpia neule- ja virkkausohjeita, inspiraatiota ja neuvoja sekä korkealaatuisia lankoja todella edulliseen hintaan! Haluaisitko käyttää ohjeitamme muuhun kuin henkilökohtaiseen käyttöön? Voit lukea säännöistä ohjeiden Tekijänoikeus -tekstissä, joka löytyy kaikkien ohjeidemme alapuolelta. Hauskoja hetkiä käsitöiden parissa!
Lisää kommentti ohjeeseen DROPS 86-10
Haluamme mielellämme kuulla mielipiteesi tästä ohjeesta!
Mikäli haluat esittää kysymyksen, valitse oikea kategoria alla olevasta valikosta - tällä tavoin saat vastauksen nopeammin. Pakolliset kentät on merkitty tähdellä *.