
Suositut kategoriat
Etsitkö tiettyä lankaa?


Kommentit / Kysymykset (28)
![]() R N kirjoitti:
R N kirjoitti:
Hei! Teen XL kokoa. Ohjeissa on virhe kun kainaloista lähdetään jatkamaan alaspäin. Kuviot eivät täsmää. Voitteko auttaa?
05.07.2024 - 10:56DROPS Design vastasi:
Hei, etu-/takakappaleessa neulotaan mallineuletta piirroksen A.4 mukaisesti ja mallineule jatkuu siitä, mihin se kaarrokkeessa jäi. Mikäli neuletiheys täsmää, kaarroke on valmis, kun olet neulonut ylös piirrokseen kokosi nuolella merkittyyn kerrokseen.
05.07.2024 - 17:08
![]() Mary kirjoitti:
Mary kirjoitti:
But that’s precisely the problem! If I start the third line A4 from the underarm (the first stitch of the new round is basically the third stitch from the underarm) I get the mismatch because the triangle will be stitched earlier: I can’t understand where I am going wrong
09.04.2023 - 14:12DROPS Design vastasi:
Dear Mary, you need to adjust the stitches before starting the triangle. In this case, you need to simply knit stitches (not just the amount indicated in the pattern) so that the triangle won't be mismatched. The pattern under the arm may get slightly mismatched initially but that isn't important, since it will later on match correctly. Happy knitting!
10.04.2023 - 13:34
![]() Mary kirjoitti:
Mary kirjoitti:
Yes, I can see that the pattern is the same. But if I follow the instructions from A4 third line, I should start the "triangle" after 3 stitches of the body, while according to the stitches I have after the line with the arrow, A1, I should start the triangle after 5 stitches but this means that it will be "anticipated" hence the mismatch. Does it mean that I have not divided the garment accordingly? Many thanks and Happy Easter!
09.04.2023 - 11:09DROPS Design vastasi:
Dear Mary, take into account that you should have adjusted the start of the round in the body; you adjust so that the beginning of the round is in the middle stitch cast on under the sleeve. This should help adjust the pattern so that the triangle in A.4 won't get mismatched with the pattern in the yoke in A.1. Happy knitting!
09.04.2023 - 13:30
![]() Mary kirjoitti:
Mary kirjoitti:
Thanks! But I am still confused: the instructions say that the yoke is finished when I have 168 stitches (S size). If I had not knit the last row (the one with the arrow), I would not have got 168 stitches. In any case, once I have knit the row with the arrow, if I then start A4 from the third line I still get a mismatch in the pattern and I do not know where I get it wrong. Well, I know that I do something wrong while shifting from the yoke to the body but I can't figure out what.
07.04.2023 - 10:25DROPS Design vastasi:
Dear Mary, after having worked the row with the arrow, you should have knitted round, where you separated the stitches for each part of the garment. Then, you should start the body with the third row of A.4. There shouldn't be a mismatch there. You can check that the third row of A.4 is exactly like the third row in A.1 after the row with the arrow, so they should be matching. Hope this helps!
08.04.2023 - 20:58
![]() Mary kirjoitti:
Mary kirjoitti:
Thanks! But I am still confused: the instructions say that the yoke is finished when I have 168 stitches (S size). If I had not knit the last row (the one with the arrow), I would not have got 168 stitches. In any case, once I have knit the row with the arrow, if I then start A4 from the third line I still get a mismatch in the pattern and I do not know where I get it wrong. Well, I know that I do something wrong while shifting from the yoke to the body but I can't figure out what.
07.04.2023 - 10:20DROPS Design vastasi:
Dear Mary, after having worked the row with the arrow, you should have knitted round, where you separated the stitches for each part of the garment. Then, you should start the body with the third row of A.4. There shouldn't be a mismatch there. You can check that the third row of A.4 is exactly like the third row in A.1 after the row with the arrow, so they should be matching. Hope this helps!
08.04.2023 - 20:59
![]() Mary kirjoitti:
Mary kirjoitti:
Sorry, I am still unclear: I have finished the yoke knitting the A1-A3-A5 line with the arrow. Then I divided the work and I went for a knitted round. Now which line should I knit first and from which diagram?
05.04.2023 - 09:04DROPS Design vastasi:
Dear Mary, the arrows in the chart mean that, if the gauge is correct, you should finish the raglan/yoke when you reach the arrow for your size (before working it). If you have worked this row, then you will need to start the new part by working the third row of the new chart (A.4). Happy knitting!
06.04.2023 - 23:29
![]() Mary kirjoitti:
Mary kirjoitti:
Hi! "Continue the pattern from yoke on body – making sure to continue with the correct row in the diagram after the yoke. " Does this mean that if I finish A1 (S size) with the line with the arrow, the next line for the body in A4 is in fact the thirs one of the diagram?
04.04.2023 - 08:59DROPS Design vastasi:
Hi Mary, Yes, if you finished the diagram before separating for the body and sleeves, you continue with the first row in the diagram. Happy Easter!
05.04.2023 - 07:01
![]() Mary kirjoitti:
Mary kirjoitti:
"Knit as far as the middle stitch cast on under the sleeve. The round now starts here." Does it mean that the round starts after the second or after the third stitch under the sleeve? Many thanks!
08.03.2023 - 16:03DROPS Design vastasi:
Dear Mary, yes correct: work the first 2 of the 5 stitches cast on under 1st sleeve, the rounds will now start here, before the middle of the new stitches. Happy knitting!
08.03.2023 - 16:08
![]() Mary kirjoitti:
Mary kirjoitti:
Following from your last answer: "...you will start the next round 1 stitch eariler. So, you need to not work the last stitch of the previous round". I interpret this as moving the stitch marker one stitch behind and working that stitch as the first one of the next round rather than the last one of the previous round. Is this correct? So it is basically just a matter of moving the stitch marker?
07.03.2023 - 12:16DROPS Design vastasi:
Dear Mary, you will now work the dividing round, this means you don't need the markers anymore, you start working the dividing round when the last stitch on previous round remain on left needle, slip the next 39 sts (starting with the last stitch previous round + the first 38 sts next round). Happy knitting!
07.03.2023 - 14:37
![]() Mary kirjoitti:
Mary kirjoitti:
Hi, I have just finished all the increases on the raglan and I have 168 stitches (S size). I'll go now go for a knitted round but what does it mean " adjust so the round now starts 1 stitch earlier"? Plus, the 39 stitches I habe to put aside, correspond to the stiches that are within the first and the second marker?
04.03.2023 - 10:25DROPS Design vastasi:
Dear Mary, after finishing the increases and reaching the indicated length (21cm from the marker), you will start the next round 1 stitch eariler. So, you need to not work the last stitch of the previous round. On the other hand, the first marker was inserted in the transition between the back and the sleeve and the second marker between the sleeve and the front. Since you have to put aside the stitches which correspond to the sleeve, these stitches are all in between the first and 2nd marker. Happy knitting!
05.03.2023 - 20:45
|
|||||||||||||||||||
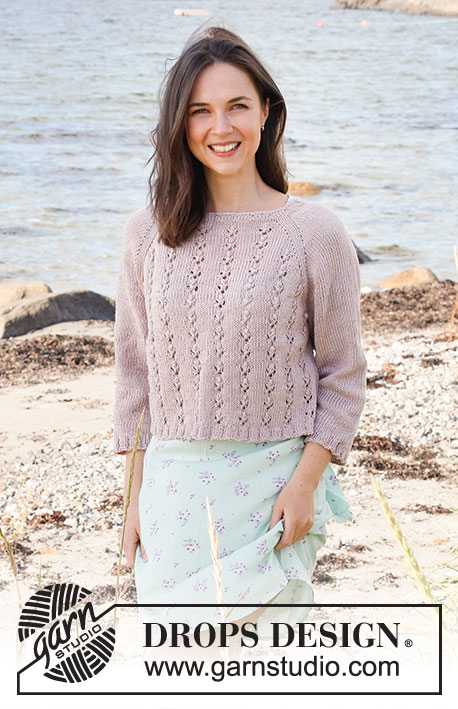
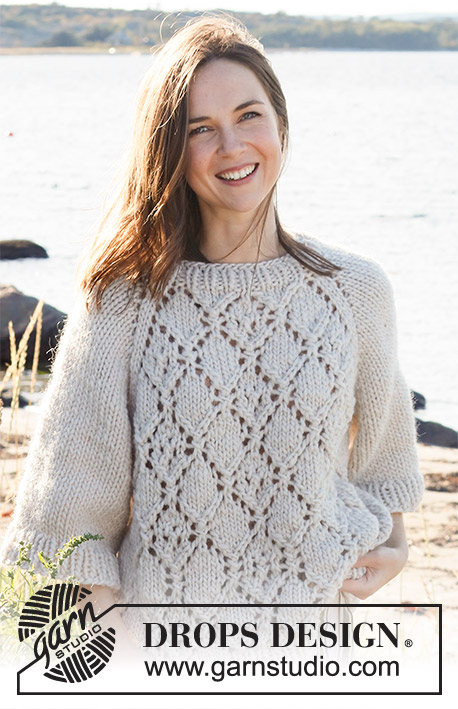
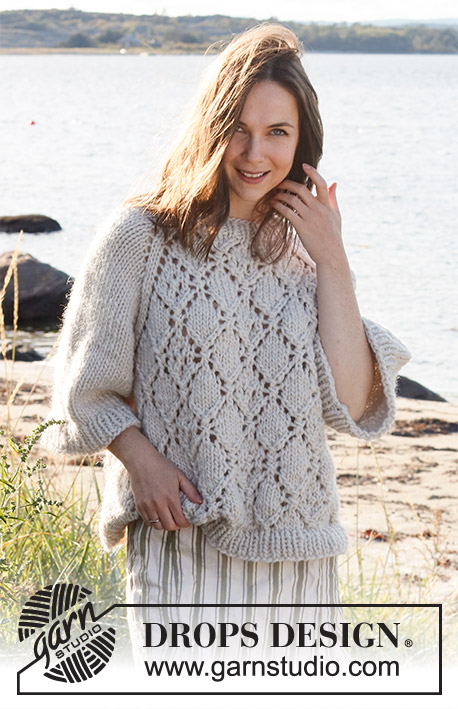
Diamonds in the Sky#diamondsintheskysweater |
|||||||||||||||||||
 |
 |
||||||||||||||||||
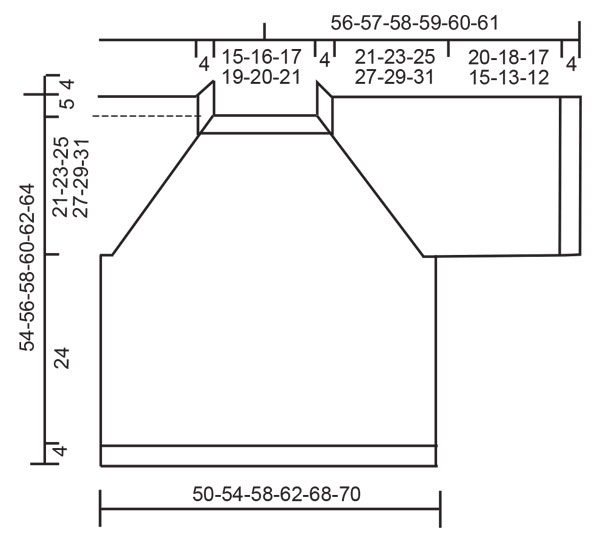
Ylhäältä alas neulottu pusero DROPS Snow- tai DROPS Wish -langasta. Työssä on raglanlinjat, pitsineuletta ja ¾-pituiset, leveät hihat. Koot S-XXXL.
DROPS 221-29 |
|||||||||||||||||||
|
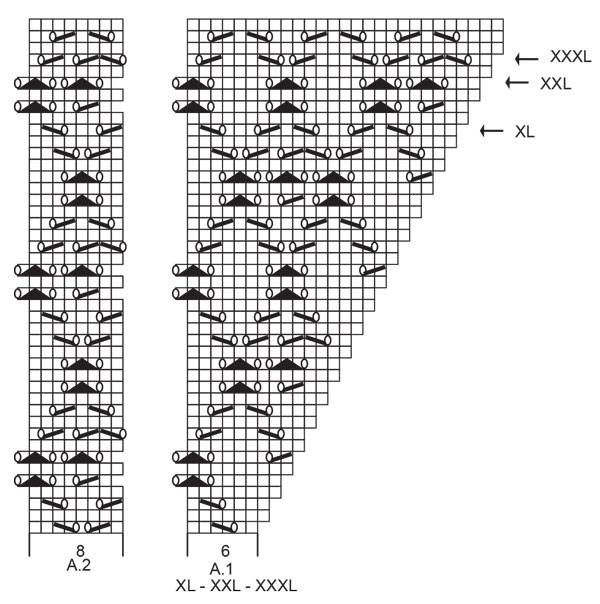
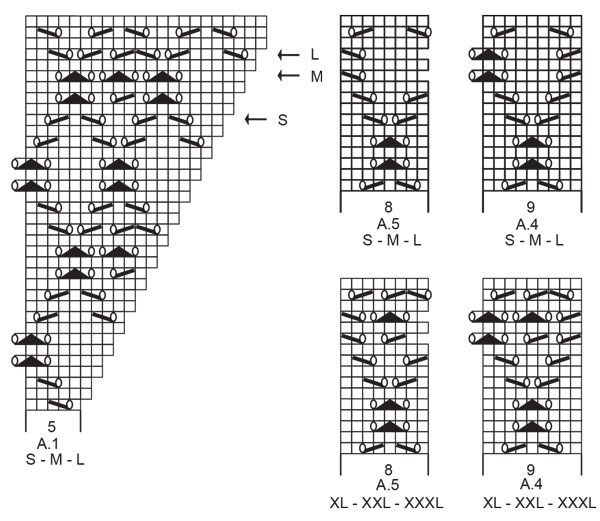
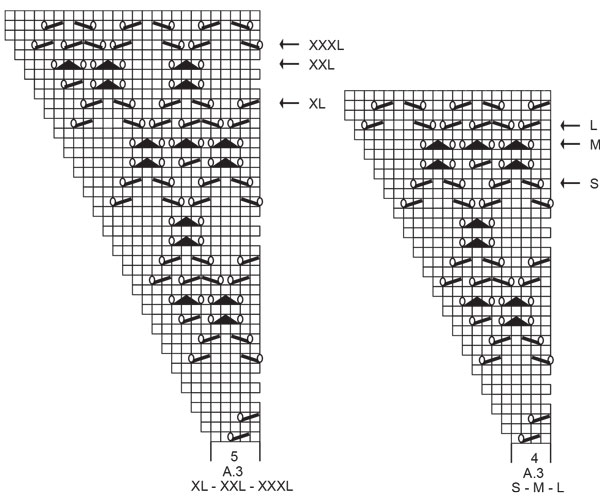
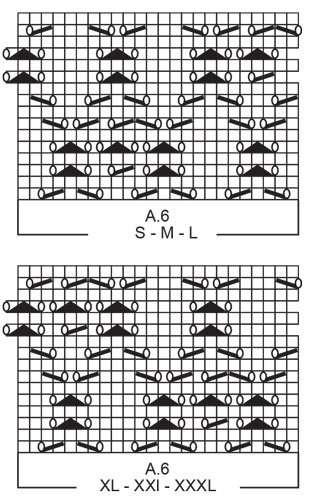
OHJE: ------------------------------------------------------- MALLINEULE: Katso ruutupiirrokset A.1-A.6. Katso halutun koon piirrokset. LISÄYSVINKKI (lisääminen tasavälein): Laske kuinka usein kerroksella lisätään seuraavasti: Laske kerroksen silmukkaluku (esim. 46 silmukkaa), ja jaa silmukat lisäysten määrän kanssa (esim. 10) = 4,6. Tässä esimerkissä lisätään tekemällä 1 langankierto vuorotellen n. joka 4. ja joka 5. silmukan jälkeen. Seuraavalla kerroksella langankierrot neulotaan kiertäen, jottei muodostuisi reikiä. RAGLANLISÄYKSET: Lisää jokaisen kappaleiden rajakohdan 2 silmukan (merkki on näiden 2 silmukan keskellä) molemmin puolin 1 silmukka (= työhön lisätään 8 silmukkaa). Lisää 1 silmukka tekemällä 1 langankierto puikolle. Seuraavalla kerroksella langankierrot neulotaan oikein, jolloin työhön muodostuu reikiä. Jatkossa etukappaleen ja takakappaleen lisätyillä silmukoilla neulotaan mallineuletta, ja hihojen lisätyillä silmukoilla neulotaan sileää neuletta. SILMUKOIDEN PÄÄTTÄMINEN: Päätä tarvittaessa silmukat paksummalla puikolla, jotta päätösreunasta tulisi tarpeeksi joustava. Mikäli päätösreunasta tulee kuitenkin liian kireä, tee 1 langankierto n. joka 4.silmukan jälkeen samalla kun päätät silmukat (langankierrot päätetään kuten muut silmukat). ------------------------------------------------------- ALOITA TYÖ TÄSTÄ: ------------------------------------------------------- PUSERO: LYHYT YLEISKATSAUS TYÖSTÄ: Pääntien reunus ja kaarroke neulotaan suljettuna neuleena pyöröpuikolla, ylhäältä alas. Kaarroke jaetaan etu-/takakappaletta ja hihoja varten. Osat neulotaan erikseen suljettuna neuleena pyöröpuikolla, ylhäältä alas. PÄÄNTIEN REUNUS: Luo 46-48-50-54-56-58 silmukkaa lyhyelle pyöröpuikolle nro 8 Snow- tai Wish-langalla. Neulo 1 kerros oikein. Neulo sitten 4 cm joustinneuletta suljettuna neuleena (= 1 silmukka oikein / 1 silmukka nurin). Neulo 1 kerros oikein ja lisää tasavälein 10-8-6-6-4-2 silmukkaa (lue LISÄYSVINKKI) = 56-56-56-60-60-60 silmukkaa. Neulo 1 kerros oikein. Vaihda pyöröpuikkoon nro 9. Kiinnitä 1 merkki 20-20-20-21-21-21 silmukan jälkeen (= n. keskellä edessä), kaarrokkeen mitat otetaan tästä merkistä! KAARROKE: Neulo mallineuletta ja kiinnitä 4 merkkiä työhön näin: Kiinnitä 1 merkki kerroksen alkuun (= takakappaleen ja oikean hihan rajakohta), 1 silmukka oikein, tee 1 langankierto puikolle, neulo seuraavat 7 silmukkaa oikein, tee 1 langankierto puikolle, 1 silmukka oikein, kiinnitä 1 merkki tähän (= oikean hihan ja etukappaleen rajakohta), 1 silmukka oikein, tee 1 langankierto puikolle, neulo ensimmäisillä 5-5-5-6-6-6 silmukalla mallineuletta piirroksen A.1 mukaisesti, neulo seuraavilla 8 silmukalla mallineuletta piirroksen A.2 mukaisesti, neulo seuraavilla 4-4-4-5-5-5 silmukalla mallineuletta piirroksen A.3 mukaisesti, tee 1 langankierto puikolle, 1 silmukka oikein, kiinnitä 1 merkki tähän (= etukappaleen ja vasemman hihan rajakohta), 1 silmukka oikein, tee 1 langankierto puikolle, 7 silmukkaa oikein, tee 1 langankierto puikolle, 1 silmukka oikein, kiinnitä 1 merkki tähän (= vasemman hihan ja takakappaleen rajakohta), 1 silmukka oikein, tee 1 langankierto puikolle, neulo ensimmäisillä 5-5-5-6-6-6 silmukalla mallineuletta piirroksen A.1 mukaisesti, neulo seuraavilla 8 silmukalla mallineuletta piirroksen A.2 mukaisesti, neulo seuraavilla 4-4-4-5-5-5 silmukalla mallineuletta piirroksen A.3 mukaisesti, tee 1 langankierto puikolle, 1 silmukka oikein. TARKISTA NEULETIHEYS! RAGLANLISÄYSTEN (lue selitys yllä) ensimmäinen lisäyskerros on nyt valmis. Jatka mallineuletta suljettuna neuleena tähän tapaan ja toista raglanlisäykset joka 2.kerros yhteensä 14-16-17-18-20-21 kertaa = 168-184-192-204-220-228 silmukkaa. Kun olet tehnyt viimeisen lisäyskerroksen, työn pituus joustinneuleen jälkeisestä merkkilangasta mitattuna on n. 20-23-24-26-29-30 cm. Jatka neulomista (ilman lisäyksiä), kunnes työn pituus joustinneuleen jälkeisestä merkkilangasta mitattuna on 21-23-25-27-29-31 cm (neulo raglanlinjoissa niin monta silmukkaa mallineuletta kuin pystyt, ole kuitenkin tarkkana mallineuleen langankiertojen ja kavennusten kanssa, jotta ne aina vastaavat toisiaan ja silmukkaluku pysyy samana. Niillä silmukoilla, joilla ei voida neuloa mallineuletta, neulotaan sileää neuletta). Jaa työ seuraavalla kerroksella (eli oikein silmukoin neulottavalla kerroksella) näin (aloita neulominen 1 silmukan päässä kerroksen vaihtumiskohdasta): Siirrä ensimmäiset 39-43-45-47-51-53 silmukkaa apulangalle hihaa varten, luo apulangan silmukoiden tilalle 5-5-7-7-9-9 silmukkaa (= sivussa hihan alla), neulo seuraavat 45-49-51-55-59-61 silmukkaa kuten aiemmin (= etukappale), siirrä seuraavat 39-43-45-47-51-53 silmukkaa apulangalle hihaa varten, luo apulangan silmukoiden tilalle 5-5-7-7-9-9 silmukkaa (= sivussa hihan alla), neulo seuraavat 45-49-51-55-59-61 silmukkaa kuten aiemmin (= takakappale). Neulo sitten etu-/takakappale ja hihat erikseen. KAIKKI MITAT OTETAAN JATKOSSA TÄSTÄ. ETU- JA TAKAKAPPALE: = 100-108-116-124-136-140 silmukkaa. Neulo oikeaa keskelle hihan alle luotujen silmukoiden keskimmäiseen silmukkaan asti. Kerroksen vaihtumiskohta on jatkossa tässä. Neulo nyt mallineuletta (jatka mallineuletta siitä kerroksesta mihin se kaarrokkeessa jäi) ja sileää neuletta näin: *Neulo 1-3-5-3-6-7 silmukkaa oikein, neulo seuraavilla 9 silmukalla mallineuletta piirroksen A.4 mukaisesti (katso halutun koon piirros), neulo seuraavilla 24 silmukalla mallineuletta piirroksen A.6 mukaisesti (katso halutun koon piirros), neulo piirroksen A.6 ensimmäiset 8-8-8-16-16-16 silmukkaa, neulo seuraavilla 8 silmukalla mallineuletta piirroksen A.5 mukaisesti (katso halutun koon piirros), 0-2-4-2-5-6 silmukkaa oikein*, toista *-* vielä kerran kerroksella. Jatka mallineuletta tähän tapaan. Kun työn pituus on 24 cm, neulo 1 kerros oikein ja lisää tasavälein 10-10-12-12-14-14 silmukkaa = 110-118-128-136-150-154 silmukkaa. Vaihda pyöröpuikkoon nro 8. Neulo 4 cm joustinneuletta suljettuna neuleena (= 1 silmukka oikein / 1 silmukka nurin). Päätä silmukat joustinneuletta neuloen. Puseron pituus olalta alaspäin mitattuna on n. 54-56-58-60-52-64 cm. HIHAT: Ota toisen sivun apulangalla odottavat 39-43-45-47-51-53 silmukkaa takaisin lyhyelle pyöröpuikolle nro 9 ja poimi lisäksi jokaisesta hihan alapuolelle luodusta 5-5-7-7-9-9 silmukasta 1 silmukka = 44-48-52-54-60-62 silmukkaa. Neulo sileää neuletta suljettuna neuleena. Kun hihan pituus on 20-18-17-15-13-12 cm, lisää tasavälein 4-4-4-4-6-6 silmukkaa = 48-52-56-58-70-68 silmukkaa. Vaihda pyöröpuikkoon nro 8. Neulo 4 cm joustinneuletta suljettuna neuleena (= 1 silmukka oikein / 1 silmukka nurin). Päätä silmukat joustinneuletta neuloen. Hihan pituus jakokohdasta mitattuna on n. 24-22-21-19-17-16 cm. Neulo toinen hiha samoin. |
|||||||||||||||||||
Ruutupiirroksen selitykset |
|||||||||||||||||||
|
|||||||||||||||||||
 |
|||||||||||||||||||
 |
|||||||||||||||||||
 |
|||||||||||||||||||
 |
|||||||||||||||||||
 |
|||||||||||||||||||
Oletko tehnyt tämän mallin?Tägää tällöin kuviasi #dropspattern #diamondsintheskysweater tai lähetä kuvat #dropsfan galleriaan. Tarvitsetko apua tämän ohjeen kanssa?Löydät 24 ohjevideota, kommentteja/kysymyksiä ja muuta osoitteessa www.garnstudio.com © 1982-2026 DROPS Design A/S. Pidätämme kaikki oikeudet. Tämä tiedosto ja kaikki sen alatiedostot on suojattu tekijänoikeuslailla. Lue lisää siitä, mitä voit tehdä ohjeillamme, verkkosivujemme jokaisen ohjeen alaosasta. |
|||||||||||||||||||


DROPS Design on toiminut neule- ja virkkausalalla yli 40 vuotta ja meillä on yksi kaikkein laajin valikoima ilmaisia ohjeita verkossa - käännettynä 17 kielelle. Tänään meiltä löytyy 324 lehteä ja 12284 ohjetta - joista 11681 ohjetta on käännetty suomeksi.
Työskentelemme ahkerasti, jotta voisimme antaa teille kaikkein parhaimpia neule- ja virkkausohjeita, inspiraatiota ja neuvoja sekä korkealaatuisia lankoja todella edulliseen hintaan! Haluaisitko käyttää ohjeitamme muuhun kuin henkilökohtaiseen käyttöön? Voit lukea säännöistä ohjeiden Tekijänoikeus -tekstissä, joka löytyy kaikkien ohjeidemme alapuolelta. Hauskoja hetkiä käsitöiden parissa!
Lisää kommentti ohjeeseen DROPS 221-29
Haluamme mielellämme kuulla mielipiteesi tästä ohjeesta!
Mikäli haluat esittää kysymyksen, valitse oikea kategoria alla olevasta valikosta - tällä tavoin saat vastauksen nopeammin. Pakolliset kentät on merkitty tähdellä *.