DROPS Children 49 · ¡Muchos nuevos modelos para niños!

Cómo leer los diagramas de punto

Un diagrama de punto consiste de cuadrados. 1 cuadrado = 1 punto – la definición del símbolo proporciona información acerca de cómo tejer el punto. El diagrama muestra todos los puntos vistos por el lado derecho (a menos que se especifique de otra manera).

Un diagrama se ve así:
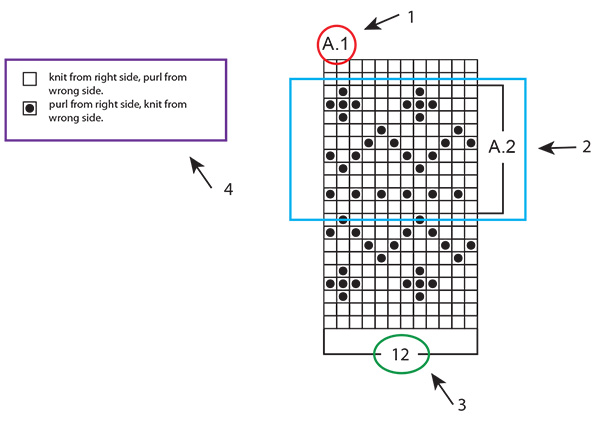
  1. A.1 es el nombre del diagrama, y se refiere al diagrama entero.
  2. A.2 es solo la parte del diagrama que está dentro de los cuadrados separados por líneas más oscuras.
  3. Este número se refiere al número de puntos en la 1ᵃ hilera del diagrama.
  4. Esta es la definición de los símbolos: explica cómo tejer cada punto, o en qué color (en patrones multicolores).

Un diagrama se lee completamente en sentido contrario a cómo leemos normalmente: de derecha a izquierda, de abajo para arriba. Es decir, se comienza con el símbolo en la esquina inferior derecha, y se va tejiendo hacia la izquierda y en dirección hacia arriba (ver lo señalado en ROJO en el diagrama abajo). Si tienes que comenzar en un cuadrado diferente/con un punto diferente, esto será especificado – por ejemplo: las diferentes tallas pueden comenzar en diferentes lugares en el mismo diagrama (ver el rectángulo azul abajo).

Si tienes que tejer varias repeticiones de un diagrama (es decir: tejer el mismo diagrama varias veces a lo ancho) vas a tejer hasta el fin de la hilera del diagrama, y comenzarás nuevamente con el primer punto para la repetición siguiente.

De ida y vuelta:

Cuando se teje de ida y vuelta, se teje una hilera por el lado derecho de la labor y una hilera por el lado revés de la labor. Como los diagramas muestran todos los puntos vistos por el lado derecho, tendrás que tejer en el sentido contrario cuando se teje por el lado revés (ver las flechas AZULES en el diagrama abajo): lees la hilera de izquierda a derecha, los puntos derechos se tejen de revés, y los puntos reveses se tejen de derecho, etc (esto frecuentemente va a estar especificado en la definición de los símbolos: “derecho por el lado derecho, revés por el lado revés”).

En redondo:

Cuando se teje en redondo, todas las vueltas son tejidas por el lado derecho, y el diagrama es leído completamente de derecha a izquierda. Cuando se comienza una nueva vuelta, simplemente comenzar tejiendo el primer símbolo de la hilera siguiente del diagrama.

Varios diagramas diferentes tejidos consecutivamente en la hilera/vuelta:

Si estás tejiendo varios diagramas diferentes, uno después del otro en la misma hilera/vuelta, tejer de la manera siguiente: Tejer la 1ᵃ hilera del diagrama 1, continuar con la 1ª hilera del diagrama 2, después la 1ª hilera del diagrama 3, etc. RECUERDA: si estás tejiendo de ida y vuelta, el diagrama tendrá que ser tejido en el orden contrario por el lado revés – es decir: comenzar con el diagrama 3, después el diagrama 2 y, por último, el diagrama 1. También son tejidos en sentido contrario como se hace habitualmente.

En el patrón, esto puede estar escrito de la manera siguiente: “tejer A.1, A.2, A.3 un total de 1-1-2-3-4 veces”. Esto quiere decir que primero tejes A.1, después A.2 y, finalmente, repites A.3 un total de 1-1-2-3-4 veces (dependiendo de tu talla). Es SOLO el diagrama A.3 que es repetido, A.1 y A.2 se tejen 1 vez cada uno.

Cuando el número de puntos no corresponde a las repeticiones completas del diagrama:

A veces, el número de puntos no es divisible con las repeticiones completas del diagrama a tejer a lo ancho de la labor. Por ejemplo: A.1 cubre 12 puntos y debe ser repetido sobre 40 puntos. En este caso, vas a tejer 3 repeticiones completas de A.1 (= 36 puntos) y después vas a tejer los primeros 4 puntos del diagrama sobre los puntos restantes (ver la línea ROJA abajo). Usualmente este es el caso donde el diagrama es un patrón repetitivo y, por eso, independientemente de tejer repeticiones completas o no, el patrón será consistente.

Comentarios (678)

Country flag Mélodie escribió:

Bonjour, Je fais le modèle U-625. J'ai un décalage dans le motif M2 entre le début et la fin des rangs du pull. En effet ma dernière maille du rang 8 se retrouve à côté de la première maille du rang 9. Dois-je anticiper la démarcation et faire la dernière maille du rang 8 à la place de la dernière maille du rang 7 pour éviter le décalage dans le motif ? Merci d'avance pour votre réponse. Cordialement

18.12.2019 - 21:46

DROPS Design respondió:

Bonjour Mélodie, en fonction des jacquards, la technique des rayures en rond peut aider, mais parfois, un léger décalage est inévitable. Bon tricot!

19.12.2019 - 08:46

Country flag Rachel escribió:

On the pattern for socks DROPS 100-19 at the bottom of the diagram M.2 what does "36 m str 40/42" mean in English? And on the side 16 p/v? Please email me a response. Thanks for your help!

18.12.2019 - 03:33

DROPS Design respondió:

Dear Rachel, this means you are working M.2 over 36 stitches in size 40/42. Happy knitting!

18.12.2019 - 08:13

Country flag Jenny Timgren escribió:

Har ni några tips på enkla diagram att börja med? Har aldrig stickat efter diagram förut och skulle vilja göra en tunn sjal 🙂

17.12.2019 - 09:12

DROPS Design respondió:

Hei Jenny. Anbefaler deg å bruke vår søkmotor. Skriv: Sjal under "Vad letar du efter?" Hak av for "Stickat", velg Dam under Alla Kategorier, velg "Hålmönster (mönster/teknikk) og velg A under "All Yarn Groups". Da har du mange fine sjal du kan velge med diagramme, f.eks DROPS 201-20 og 158-5 (med små diagram). God Fornøyelse!

27.01.2020 - 07:33

Country flag Nasreen Syed escribió:

Sorry what do you mean or k1 row purl1 row because after the 2nd pattern my garter row is not starting from the right side i have to purl from the right side si the whole cycle is disturbing

15.12.2019 - 17:07

DROPS Design respondió:

Dear Mrs Syed, for any individual assistance please feel free to contact the store where you bought the yarn, even per mail or telephone, they will help you to read diagrams. Happy knitting!

16.12.2019 - 09:59

Country flag Nasreen Syed escribió:

In the pattern after the garter rows the 2 rows which is kfrom right snd purl from back shown in the diagram are 2 of them means that you k 1 row p 1 row then k 1 row and purl 1 row or just k 1 row and p1 row

13.12.2019 - 15:18

DROPS Design respondió:

Dear Mrs Syed, on first row inA.1 you have to knit all stitches = 1st symbol: knit from RS. on 2nd row in A.1 you will knit all stitches = 2nd symbol: knit from wrong side. Happy knitting!

16.12.2019 - 09:58

Country flag Nasreen Syed escribió:

Hi i am still working on odeta and having trouble to follow the pattern specially on the yarn over the 8 st are 2 knit 2 knit tog yarnover knit1 yarn over knit 1 slip 1 knit 1 slip.the slip st over the knit st Row 2 of the pattern 1 knit 2 ktog yarnover k1 k1 yarnover k1 slip1 k1 slip the slip st over the k st The ladt row of the pattern k2 yarnover k1 slip 1 k2 tog slip the slip st over the k st is that how it goes

05.12.2019 - 14:47

DROPS Design respondió:

Dear Mrs Syed, remember that diagram should be read from bottom up, ie row 2 in pattern-1 = A.1 = knit from WS. When you have K2 tog, YO all the row (= ex. A.3), just work K2 tog, YO over the stitches worked following that diagram. Should you need any further assistance reading diagrams, you are welcome to contact the store where you bought the yarn, even per mail or telephone. Happy knitting!

09.12.2019 - 10:30

Country flag Duquenoy Francine escribió:

Bonjour Merci pour ces explications claires et précises

03.12.2019 - 11:02

Country flag Nasreen Syed escribió:

I am trying to knit Odeta and i am not a new knitter but this pattern is confusing me when i am reading the pattern its directly starting with the diagram their is no ridge but the picture has ridge and the pattern says 3st then the diagram A1 8st and then it sayswork on 104st and then 13st and so how how does the diagram goes 8 1 8 please explain Regards

24.11.2019 - 16:44

DROPS Design respondió:

Dear Mrs Syed, when working A.1 on this pattern, the diagram includes the first 3 ridges (see the first 6 rows in diagram). You then work: 3 sts in garter st (= K every row), then repeat A.1 (= 8 sts) a total of 13 times over the next 104 sts, then work A.2 (= 1 stitch - so that pattern is symetrical on both sides) and finish with 3 sts in garter st. From WS work: 3 sts in garter st, A.2, repat A.1 reading diagram from the left towards the right, 3 sts in garter st. Happy knitting!

25.11.2019 - 13:07

Country flag Brenda escribió:

I just want to say how awesome all of the tutorial and lesson videos are, and I am SO grateful for this explanation on how to read a chart. Everything is so thorough and meticulous, I have no problem following along. This is one of my most favorite websites! Thank you so much for sharing!

24.11.2019 - 01:43

Country flag Ire'ne Tillberg escribió:

Jag stickar children 23-36 Storl 3/4 år. Kommit till benen, ska börja m flätan på sidan. Förstår inte diagrammet eller diagram förklaringen. Tack på förhand

15.11.2019 - 20:14

DROPS Design respondió:

Hei Ire`ne. Litt usikker på hva du ikke forstår. Du skal allerede ha strikket flettene før du begynner på bena. Fletten på bena fortsetter du med som før. Legg gjerne igjen et spørsmål under selve oppskriften og hva du har problemer med, så hjelper vi deg så fort vi kan. mvh DROPS design

18.11.2019 - 10:01

Country flag Madeleine escribió:

Vill bara säga att dessa instruktioner var mycket bra och hjälper mig mycket, stort tack!

15.11.2019 - 10:19

Country flag Karolyn Fredette escribió:

Why don't you just give us the directions, instead of these foolish confusing diagrams?

11.11.2019 - 21:19

DROPS Design respondió:

Dear Mrs Fredette, The DROPS patterns are knitted and crocheted by thousands and thousands of people  around the world. We understand however that in certain countries, with different knitting/crochet traditions than Scandinavia, our patterns might be written in a way that differs from what some are used to. But of course we want everyone to understand our patterns, so that’s why we have created an extensive library of tutorial videos as well as step by step lessons that explain how to follow the techniques we use and how to read the diagrams in our patterns. Give them a try!

12.11.2019 - 08:40

Country flag Romy Hutchinson escribió:

All three diagrams have a different number of lines I.e. M.3 has 18, M.2 has 8 & M.1 has 22.....I’m at line 8 which uses all 8 lines, but how do I work using different diagrams when the diagrams have different benumbed if lines? I hope that makes sense 😂

04.11.2019 - 21:59

DROPS Design respondió:

Dear Mrs Hutchinson, sometimes the repeats are not worked in height in the same number of rows, you have then to repeat the part of the repeat over the number of rows shown in the diagram - please ask your question on the pattern you are working on to get a more detailed answer. Happy knitting!

05.11.2019 - 10:56

Country flag Deborah Donnelly escribió:

I am doing drops design no ai-088. Don't understand the symbols in A.1 on row 41 and 43.Please help

30.10.2019 - 01:01

DROPS Design respondió:

Hi, please write your question under comments in the pattern, then we can answer asap. Thank you!

13.02.2020 - 12:31

Country flag Barbara Ross escribió:

HI I purchased pattern ME-042- Snuggly Bunny. Am i right in thinking the pattern is repeated along the whole row in graph pattern 1st Edge stitch in garter stitch . Also do i repeat the cables every 4 and 6 rows. Thank you . Barbara

29.10.2019 - 20:17

DROPS Design respondió:

Hello Barbara Ross! Yes you are right. Just follow the free Snuggly Bunny pattern here: https://www.garnstudio.com/pattern.php?id=4562&cid=19 Happy knitting!

05.04.2020 - 17:36

Country flag Britt Iréne Gotlin Blom escribió:

Jag har svårt att tyda diagrammet för modell 71-13 när det gäller början på ärmarna. Tacksam för hjälp med förklaring.

24.10.2019 - 23:20

DROPS Design respondió:

Hej. Om du lägger in det som en fråga på mönstret så ska vi försöka hjälpa dig. Mvh DROPS Design

25.10.2019 - 10:29

Country flag Rousset Fabienne escribió:

Bonjour Pouvez vous m'expliquer comment faire un décalage sur un diagramme. On me dit sur le modèle 188-3 de drops de décaler le début du tour de 2 mailles à gauche pour que le motif tombe juste. Merci d'avance

15.09.2019 - 16:16

DROPS Design respondió:

Bonjour Mme Rousset, vous trouverez la réponse ci-dessous pour la flèche 1 - pour la flèche 2, procédez de la même façon, mais glissez seulement 1 maille au début du tour; les 2 dernières mailles de chaque A.1 vont se tricoter avec la 1ère m du A.1 suivant. Bon tricot!

16.09.2019 - 13:26

Country flag Rousset Fabienne escribió:

Bonjour Sur le modèle de la robe 188-3 de drops on me dit" au tour avec la flèche 1 dans A1 , " décaler le début du tour de 2 mailles à gauche pour que le motif tombe juste" pouvez vous m'expliquer comment faire se décalage. Merci d'avance

15.09.2019 - 16:12

DROPS Design respondió:

Bonjour Mme Rousset, sur ce rang, glissez les 2 premières mailles du 1er A.1 du tour sur l'aiguille droite sans les tricoter, tricotez le 1er A.1 (= vous tricotez ensemble les 2 dernières mailles du 1er A.1 et les 2 premières mailles du A.1 suivant = glissez l'avant-dernière m de A.1, tricotez la dernière m de A.1 + les 2 premières m du A.1 suivant ensemble à l'endroit et passez la m glissée par-dessus les 3 mailles tricotées ensemble) ; le A.1 suivant commence après les 2 premières mailles, comme le 1er, continuez ainsi jusqu'à la fin du tour; le tour commence maintenant après la diminution du dernier A.1 du tour. Bon tricot!

16.09.2019 - 13:25

Country flag Deborah escribió:

Hi I am really new to knitting, I am unsure of what "knit from right side, purl from wrong side" means and vise versa. Does that mean I just knit stitch a whole row and then for "purl from right side, knit from wrong side" means that I then do purl stitches for a whole row? I am really confused help would be great!!

05.09.2019 - 14:48

DROPS Design respondió:

Dear Deborah, in the first diagram at the top of the lesson, you would have to work from RS as follows: the white squares will be worked K from RS and P from WS (= stocking stitch) and the black dots will be worked P from RS and K from WS . Each square in a diagram is matching a stitch. In 1st example at the top of lesson, work 1st row: K from RS (all stitches), P all sts on row 2, then on row 3 (= RS); work: K4, P1, K5, P1, K1 and on row 4 (=WS): K3, P4, K3, P3. and so on. Happy knitting!

06.09.2019 - 08:36

Country flag Marion escribió:

Bonjour, il est écrit "On lit un diagramme tricot dans le sens opposé de la lecture classique: de droite à gauche et de haut en bas." mais la flèche sur le schéma en dessous indique une lecture de bas en haut. Qu'est ce qui est correct?

05.09.2019 - 09:36

DROPS Design respondió:

Bonjour Marion, c'était une erreur, il faut effectivement lire les diagrammes de bas en haut et non de haut en bas (sauf mention contraire explicite dans le modèle), la correction a été faite, merci pour votre retour. Bon tricot!

05.09.2019 - 09:43

Deja un comentario o pregunta en esta lección

Tu dirección de email no será publicada. Los campos obligatorios están marcados con un *.