
Popular categories
Looking for a yarn?


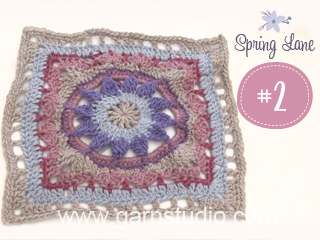
Clue #2 - Let's finish that first clue!
The second clue in the seasons Crochet-Along includes the 6th to 11th round in the square which we call A.1. We are using specific diagrams which are simply described in the text as well as pictures of how the work looks, stitch for stitch. If you are used to working from a diagram, you can find a complete diagram with symbols and text underneath all the pictures. If you would rather follow our tutorial videos you can find them at the bottom of the page.
Colours
In this step (A.1) you will use the following colour combination:
ROUND 6: 01 white
ROUND 7: 17 light lilac
ROUND 8: 15 heather
ROUND 9: 05 light wash
ROUNDS 10 + 11: 01 white
COLOUR TIPS:
Are you using a different colour combination than the one we are crocheting with?
Make a small note of which colour number replaces which before starting, by seeing the original materials here.
CROCHET INFO:
The information between two * is repeated every time they are written as follows *-* in the text.
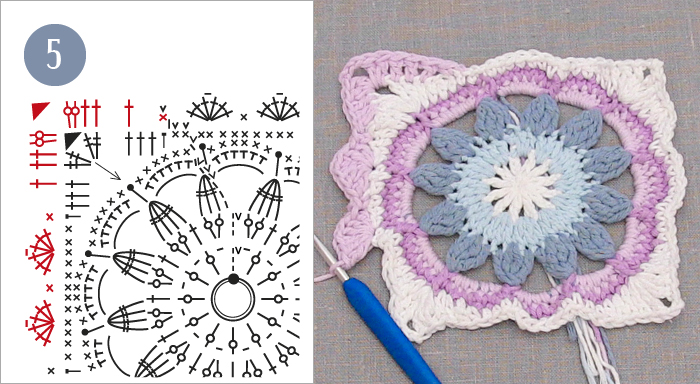
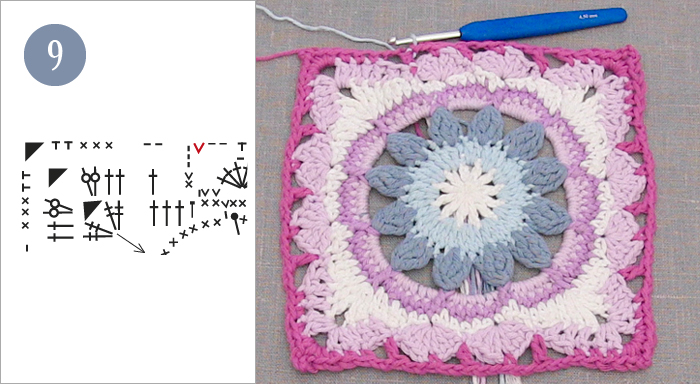
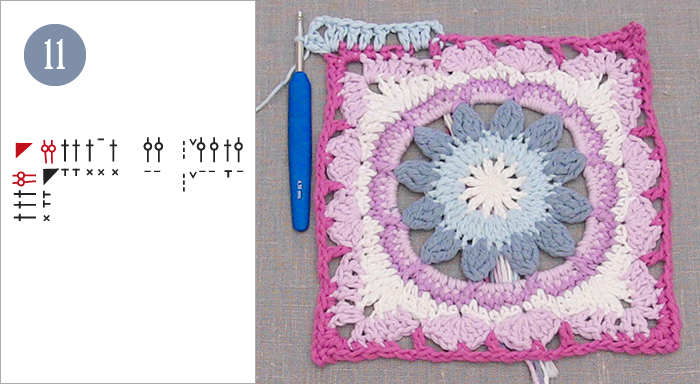
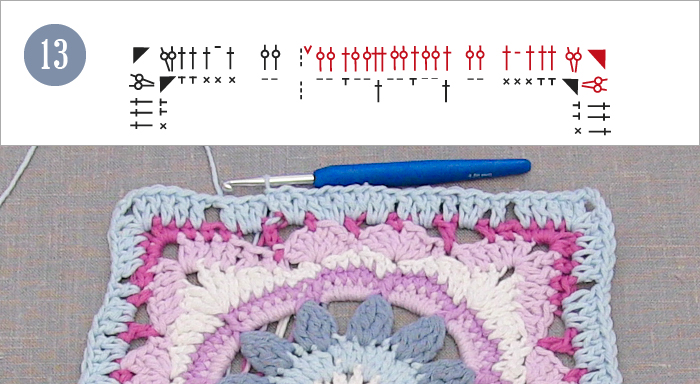
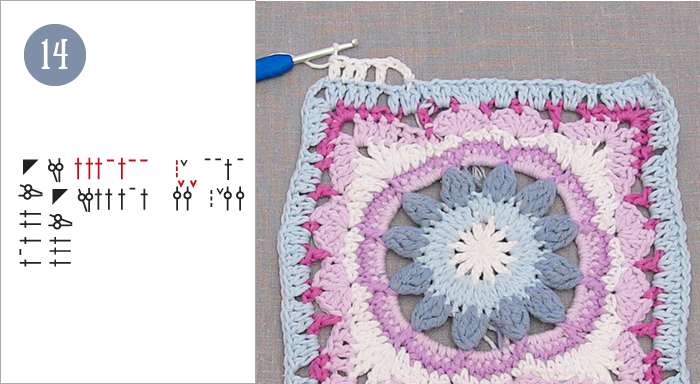
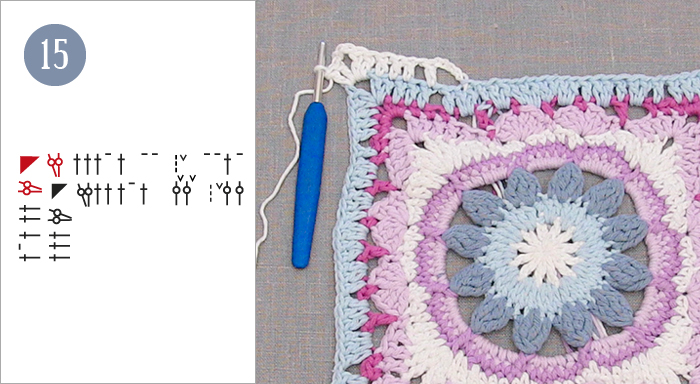
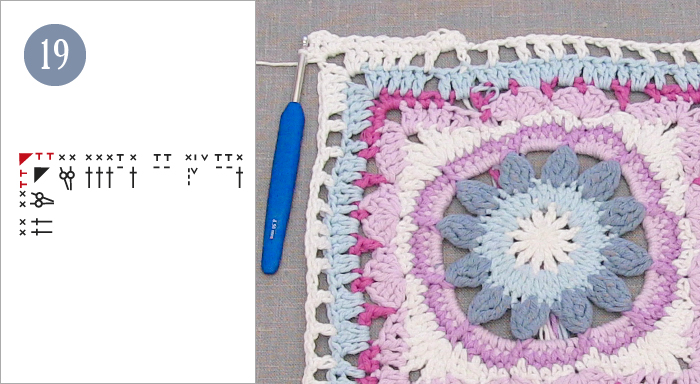
The red symbols in the diagrams are described in the text above the pictures.
Let's start!
Pick up the first circle we made in Clue #1.
ROUND 6:
Work 1 chain stitch.

Work * 1 double crochet in each of the next 2 stitches, 1 half treble crochet in the next stitch, 1 treble crochet in each of the next 3 stitches, 2 double treble crochets in the next stitch, 3 chain stitches (the corner), 2 double treble crochets in the same stitch, 1 treble crochet in each of the next 3 stitches, 1 half treble crochet in the next stitch, 1 double crochet in each of the next 10 stitches *, repeat *-* 4 times in total.

Finish the round with 1 slip stitch in the chain stitch at the beginning of the round, do not change colour.

ROUND 7:
Work 1 slip stitch in each of the next 2 double crochets, change to light lilac when working the last slip stitch, read COLOUR CHANGE TIP below, 1 chain stitch, cut the white strand.
COLOUR CHANGE TIP:
To get the neatest transition when changing colour, work the last stitch before the colour change with the new colour.

Work * 1 double crochet in the half treble crochet, skip 2 treble crochets, 1 treble crochet in each of the next 3 stitches, 2 treble crochets around the chain-space, 3 chain stitches (the corner), 2 treble crochets around the same chain-space, 1 treble crochet in each of the next 3 stitches, skip 2 stitches, 1 double crochet in the next stitch, skip 2 stitches, 3 treble crochets in the next stitch, 1 chain stitch, 3 treble crochets in the same stitch, skip 2 stitches, 1 double crochet in the next stitch. Skip 2 stitches, 3 treble crochets in the next stitch, 1 chain stitch, 3 treble crochets in the same stitch, skip 3 stitches *, repeat *-* 4 times in total, but on the last repeat also skip the two slip stitches and the chain stitch at the beginning of the round.
Finish the round with 1 slip stitch in the double crochet at the beginning of the round. Read COLOUR CHANGE TIP above, change to heather and cut the light lilac strand.

ROUND 8:
Work 3 chain stitches.

Work * 2 chain stitches, skip 2 stitches, 1 double crochet in each of the next 3 stitches, 2 double crochets around the chain-space, 3 chain stitches (the corner), 2 double crochets around the same chain-space, 1 double crochet in each of the next 3 stitches, 2 chain stitches, skip 2 stitches, ** 1 treble crochet in the next stitch, 2 chain stitches, skip 3 stitches, 1 double crochet around the chain stitch, 2 chain stitches, skip 3 stitches **, repeat **-** 1 more time, 1 treble crochet in the next stitch *. Repeat *-* 4 times in total, but finish with 1 slip stitch instead of 1 treble crochet in the last repeat.

Finish with 1 slip stitch in the 3rd chain stitch at the beginning of the round, read COLOUR CHANGE TIP above. Change to light wash and cut the heather strand.
ROUND 9:
Work 3 chain stitches, 2 treble crochets around the chain-space, 1 treble crochet in the next stitch, 1 chain stitch, skip 1 stitch, 1 treble crochet in each of the next 3 stitches.

CORNER: Work 2 treble crochets around the chain-space, 3 chain stitches, 2 treble crochets around the same chain-space.
Work * 1 treble crochet in each of the next 3 stitches, 1 chain stitch, skip 1 stitch, 1 treble crochet in the next stitch, ** 2 treble crochets around the chain-space, 1 treble crochet in the next stitch **, repeat **-** 2 more times. Work 1 treble crochet in the same stitch, repeat **-** 3 more times. Work 1 chain stitch, skip 1 stitch, 1 treble crochet in each of the next 3 stitches *. Work CORNER and *-* 3 times in total.

Work CORNER, see description above.
Work * 1 treble crochet in each of the next 3 stitches, 1 chain stitch, skip 1 stitch, 1 treble crochet in the next stitch, ** 2 treble crochets around the chain-space, 1 treble crochet in the next stitch **, repeat **-** two more time. Work 1 treble crochet in the same stitch, repeat **-** 1 more time. Work 2 treble crochets around the chain-space. Finish the round with 1 slip stitch in the 3rd chain stitch at the beginning of the round. Do not change colour.
ROUND 10:
Work 1 slip stitch in each of the next 2 stitches, at the same time as you change to white in the last stitch, read COLOUR CHANGE TIP above, 3 chain stitches, cut the light wash strand. Work 2 chain stitches, skip 2 stitches, 1 treble crochet in the next stitch, 1 chain stitch, skip 1 stitch, 1 treble crochet in each of the next 3 treble crochets.
CORNER:
Work 2 treble crochets around the chain-space, 3 chain stitches, 2 treble crochets around the same chain space.
Work * 1 treble crochet in each of the next 3 treble crochets, 1 chain stitch, skip 1 stitch, ** 1 treble crochet in the next stitch, 2 chain stitches, skip 2 stitches **, repeat **-** 2 more times. Work 1 treble crochet in the next stitch, 1 chain stitch, skip 1 stitch, 1 treble crochet in each of the next 2 treble crochets, 1 chain stitch, skip 1 stitch, work **-** 3 times, 1 treble crochet in the next stitch, 1 chain stitch, skip 1 stitch, 1 treble crochet in each of the next 3 stitches *.
Work CORNER, see description above and *-* 3 times in total, work CORNER.

Work 1 treble crochet in each of the next 3 treble crochets, 1 chain stitch, skip 1 stitch, * 1 treble crochet in the next stitch, 2 chain stitches, skip 2 stitches *, repeat *-* 2 more times. Work 1 treble crochet in the next stitch, 1 chain stitch, skip 1 stitch, 1 treble crochet in each of the next 2 treble crochets, 1 chain stitch, skip 1 stitch. Repeat *-* 2 times.
Finish with 1 slip stitch in the 3rd chain stitch at the beginning of the round, do not change colour.

ROUND 11:
Work 1 chain stitch, 1 double crochet in the 3rd chain stitch from the previous round, 2 double crochets around the chain-space, 1 double crochet in /around each of the next 7 stitches.
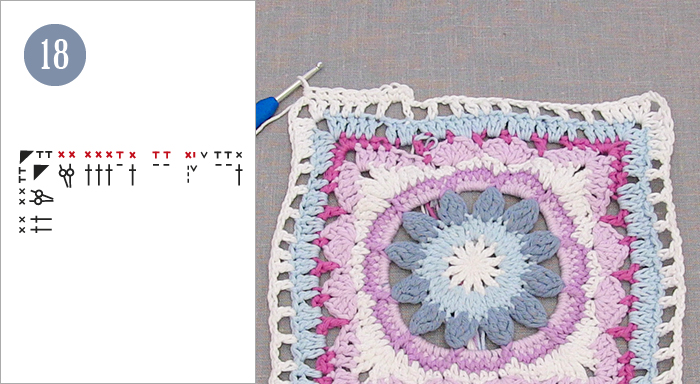
CORNER:
Work 2 double crochets around the chain-space, 3 chain stitches, 2 double crochets around the same chain-space.
Work * 1 double crochet in/around each of the next stitches and 2 double crochets around each chain-space *. Work CORNER, see description above and *-* the complete round = 160 double crochets and 12 chain stitches (4 chain-spaces).
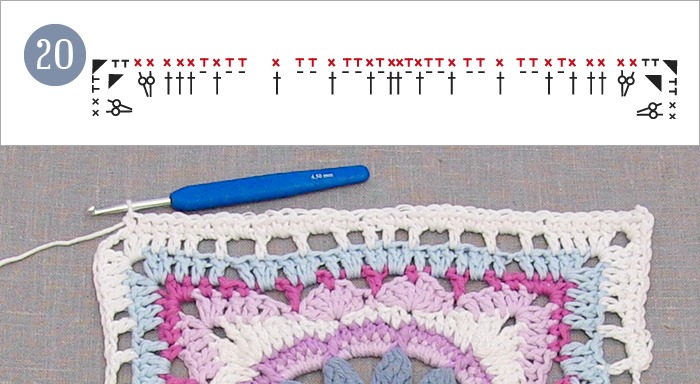
Finish with 1 slip stitch in the chain stitch at the beginning of the round. Cut and fasten all the strands.

Now you are only missing to work rounds 6-11 on your other square in this new colour combination:
ROUND 6: 01 white
ROUND 7: 17 light lilac
ROUND 8: 16 lilac
ROUND 9: 05 light wash
ROUNDS 10 + 11: 01 white
Finished!
This is how both colour combinations for diagram A.1 will look once you are done. The squares should be 25 x 25 cm.

Complete clue diagram
 |
= | chain stitch |
 |
= | slip stitch in/around stitch |
 |
= | double crochet in stitch |
 |
= | double crochet around chain stitch/chain-space |
 |
= | half treble crochet in stitch |
 |
= | treble crochet around chain-space |
 |
= | treble crochet in stitch |
 |
= | double treble crochet in stitch |
 |
= | 3 chain stitches |


With over 40 years in knitting and crochet design, DROPS Design offers one of the most extensive collections of free patterns on the internet - translated to 17 languages. As of today we count 314 catalogues and 11822 patterns translated into English (UK/cm).
We work hard to bring you the best knitting and crochet have to offer, inspiration and advice as well as great quality yarns at incredible prices! Would you like to use our patterns for other than personal use? You can read what you are allowed to do in the Copyright text at the bottom of all our patterns. Happy crafting!
Fick mejl om att ledtråd 3 var ute men går inte att öppna. Otålig😉
16.03.2017 - 13:39