How to make steek and cut a jacket and 6 different bands
Many find it scary to cut in knitwear, while others have no problems and are more than happy cutting without sewing with a sewing machine or crocheting an edge before cutting. Highly recommend that you read the text below to get a better understanding of the video.
In this DROPS video we use the yarn DROPS Nepal and show 3 different ways to sew / attach threads before cutting. We also show 6 different bands. We do not show how the bands are knitted in this video. The sample pieces in the video have 7 steek stitches (= cutting stitches) as we work with each other every color and the mid stitch is marked with a contrasting thread. You can also have more or less steek stitches (= cutting stitches). Often a jacket pattern will be explained how to knit back and forth, so these steek stitches are not explained in the pattern, but you have to add them yourself.
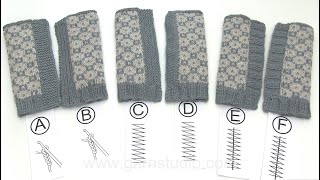
On sample piece A and B a row with double crochets are worked, while on sample piece C, D, E and F, a sewing machine is used before cutting. On sample piece A half of the 3rd and half of the 4th stitches are worked together, while half of the 4th and half of the 5th stitches are worked together on sample piece B. A sewing machine with zigzag stitch is used on piece C and D and a zigzag stitch + 1 straight stitch on piece E and F.
Overview of the different bands:
A) The cutting edge is worked using double crochets with a thinner thread than the garment itself (use a thinner thread and with the same content if possible, in this video we use DROPS Flora, colour no. 19 coral). The band is a long loose strip worked in garter stitches that is sewn to the garment, make sure the band is not being too long or too short in relation to the garment. The raw edge is sewn directly to the garment on the wrong side.
B) The cutting edge is worked using double crochets with a thinner thread than the garment itself (use a thinner thread and with the same content if possible, in this video we use DROPS Flora, colour no. 19 coral). The band is worked in one piece, half rib (knit 1, purl 1 with 1 edge stitch in garter stitch) and half stocking stitch. The band is sewn to the garment and the stocking stitch piece is laid over the raw edge and sewn from the wrong side.
C) The cutting edge is sewn using zigzag from a sewing machine, approx. 0,5-1,0 cm from where it is to be cut. For the band, stitches are picked up in the first stitch in the garment itself. Skip approx. every 4 stitches to avoid the band being too long in relation to the garment. The band is worked in garter stitch to the desired measurement and the raw edge is concealed with a decorative ribbon.
D) The cutting edge is sewn using zigzag from a sewing machine, approx. 0,5-1,0 cm from where it is to be cut. For the band, stitches are picked up in the first stitch in the garment itself. Skip approx. every 4 stitches to avoid the band being too long in relation to the garment. Work the band using stocking stitch to the desired measurement, then purl 1 row (folding edge) and then stockinette stitch. The last part with stocking stitches should be laid over the raw edge and sewn.
E) The cutting edge is sewn using straight seam over a zigzag seam (= 2 seams) from a sewing machine, approx. 0,5 - 1,0 cm from where it is to be cut. For the band, stitches are picked up in the first stitch in the garment itself. Skip approx. every 4 stitches to avoid the band being too long in relation to the garment. The band is worked in rib, knit 2, purl 2 to the desired measurement and the raw edge is concealed with a decorative ribbon.
F) The cutting edge is sewn using straight seam over a zigzag seam (= 2 seams) from a sewing machine, approx. 0,5 -1,0 cm from where it is to be cut. For the band, stitches are picked up in the first stitch in the garment itself. Skip approx. every 4 stitches to avoid the band being too long in relation to the garment. The band is worked in rib (knit 2, purl 2) to the desired measurement. At the wrong side, pick up the same amount of stitches in the same stitch as the band and work a piece (stocking stitch) to be laid over the raw edge and sewn.
We use the yarn DROPS Nepal in this video.