
Popular categories
Looking for a yarn?


|
||||||||||||||||
Lady Grey |
||||||||||||||||
 |
 |
|||||||||||||||
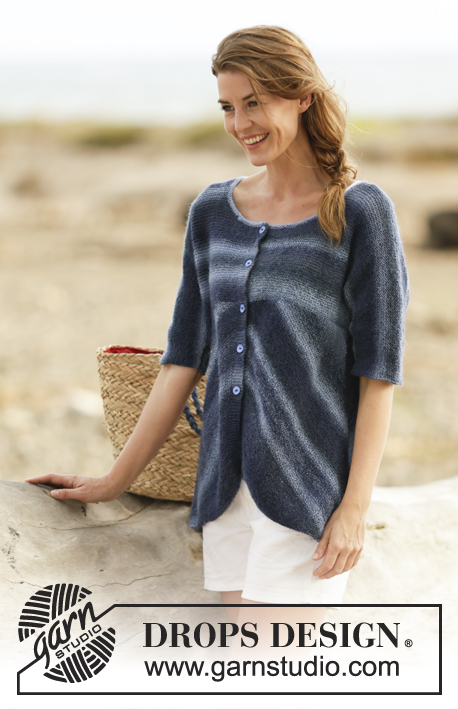
Knitted DROPS jacket in ”Fabel” with stripes, garter stitch and domino squares. Sizes S - XXXL.
DROPS 161-25 |
||||||||||||||||
|
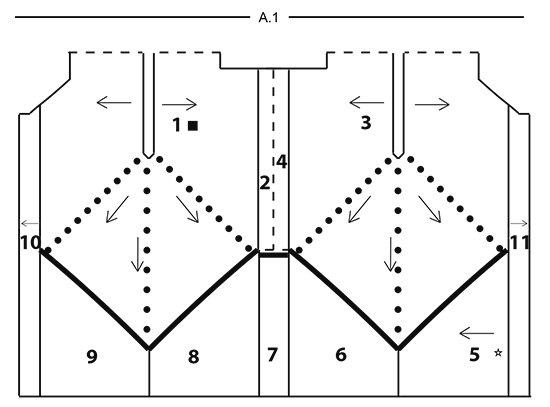
RIDGE/GARTER STITCH (worked back and forth): 1 ridge = knit 2 rows. STRIPES: Work stripes as follows (first row in each stripe = from right side): 1 RIDGE – see description above – with ocean view. 1 ridge with off white. DOMINO SQUARE: ROW 1 AND ALL OTHER ROWS FROM WRONG SIDE: Knit. ROW 2 (= right side): Knit to the stitch with the first marker, 1 yarn over, knit stitch with first marker, knit to stitch with 2nd marker, 1 yarn over, knit stitch with 2nd marker, 1 yarn over, knit to the stitch with the 3rd marker, knit stitch with 3rd marker, 1 yarn over, knit to end of row (= 4 stitches increased). The yarn overs are then knitted to allow holes. ROW 4: Knit and increase as in row 2. ROW 6: Knit to the stitch with the first marker, 1 yarn over, knit the stitch with the first marker, knit to 1 stitch before the stitch with the 2nd marker, 1 yarn over, knit 1, 1 yarn over, knit the stitch with the 2nd marker, 1 yarn over, knit 1, 1 yarn over, knit to the stitch with the 3rd marker, knit the stitch with the 3rd marker, 1 yarn over, knit to end of row (= 6 stitches increased). ROW 8: Knit and increase as for row 2. ROW 10: Knit and increase as for row 2. Repeat rows 1 to 10. BUTTONHOLE: 1 BUTTONHOLE = Knit 2 stitches together and make 1 yarn over. Make 4-4-4-5-5-5 buttonholes on the right band when the band (= part-11) measures 2-2-2-4-4-6 cm / ¾"-¾"-¾"-1½"-1½"-2¼". The first hole is worked 7-7-7-8-8-8 cm / 2¾"-2¾"-2¾"-3⅛"- 3⅛"- 3⅛" from the neckline, the others with approx. 8-8-8-9-9-9 cm / 3"-3"-3"-3½"-3½"-3½" between them. The 5th-5th-5th-6th-6th-6th buttonhole is worked when working the neckline, make it above the others. ---------------------------------------------------------- JACKET: The jacket is worked as follows (see A.1): Left part (= part-1 and part-2) is worked as one, right part (= part-3 and part-4) is worked as one, then an edge is worked around the whole jacket (= part-5 to part-9). The bands are worked to finish (= part-10 and part-11). The broken lines in A.1 show the seams on the jacket. Then the sleeves are worked separately and sewn onto the jacket. PART-1 (left front piece and back piece): Cast on 87-91-91-95-99-99 stitches with circular needle size 4 mm / US 6 and off white (= the armhole of the garment. The shoulder seam is sewn later). Work STRIPES – see description above. On row 1 (= right side) insert 3 markers in the piece as follows: Work 42-44-44-46-48-48 stitches, work the next stitch and insert the first marker in that stitch, work 1 stitch and insert the 2nd marker in that stitch (= the side of the jacket and the point of the domino), work 1 stitch and insert the 3rd marker in that stitch, work 42-44-44-46-48-48 stitches. The markers sit in the middle 3 stitches in the piece. The markers are to follow the piece as you work. Continue working DOMINO SQUARE – see description above (first row is worked with off white from wrong side). REMEMBER THE GAUGE! Work until the piece measures 13-15-17-20-23-27 cm / 5"-6"-6¾"-8"-9"-10½" measured at the shortest at the end/beginning of the row. The last row should be from wrong side. Bind off for the neck as follows: ROW 1 (= Right side): bind off the first 12-12-14-14-16-16 stitches for the neck on the front piece and work domino to the end of the row as before. ROW 2 (= wrong side): bind off the first 6 stitches for the neck on the back piece and work domino to the end of the row as before. ROW 3: Knit the first 2 stitches twisted together (= 1 stitch decreased for the neck on the front piece), work domino to the end of the row as before. ROW 4: Work domino. Repeat rows 3 and 4 until the piece measures 18-20-22-24-27-29 cm / 7"-8"-8¾"-9½"-10½"-11½" at the shortest – finish with 1 whole stripe with ocean view. Now divide the piece into 4 parts. Work with ocean view from the right side as follows: Knit to and including the stitch with the first marker, place these stitches on 1 thread (= stitches towards mid front – here the band will be worked = part-10), knit to and including the stitch with the 2nd marker, place these stitches on a 2nd thread (= diagonal line on the front piece from mid front to the side, these stitches will be worked together with an edge = part-9), knit to and including the stitch with the 3rd marker, place these stitches on a 3rd thread (= diagonal line on the back piece from the side up to mid back, these stitches will be worked together with an edge = part-8), change to off white and knit to end of the row (= stitches mid back, you will now continue working these stitches back and forth = part-2). There are now stitches on 3 different threads and the remaining stitches are on the needle. Now part-2 is worked back and forth over the stitches on the needle. PART-2 (left mid back): Continue to work stripes (row 1 = wrong side) until the piece measures 22-24-26-30-33-37 cm / 8¾"-9½"-10¼"-11¾"-13"-14½" measured from the cast-on edge and horizontally towards mid back. Finish with 1 whole stripe with ocean view. bind off loosely with ocean view (this is mid back and here part-2 will later be sewn together with part-4). Lay the piece to one side and work the right part of the jacket as follows: PART-3 (right front piece and back piece): Cast on and work as for part-1 until the piece measures 13-15-17-20-23-27 cm / 5"-6"-6¾"-8"-9"-10½"' at the shortest. The last row is from the wrong side. Now bind off for the neck as follows: ROW 1 (= right side): bind off the first 6 stitches for the neck on the back piece and work domino to end of the row as before. ROW 2 (= wrong side): bind off the first 12-12-14-14-16-16 stitches for the neck on the front piece and work domino to end of row as before. ROW 3: Work domino. ROW 4: Knit the first 2 stitches twisted together (= 1 stitch decreased for the neck on the front piece), work domino to end of row as before. Repeat rows 3 and 4 until the piece measures 18-20-22-24-27-29 cm / 7"-8"-8¾"-9½"-10½"-11½" at the shortest – make sure that length and stripes match part-1. Cut the strands. Now divide the piece into 4 parts. Work with off white from the right side as follows: Knit to and including the stitch with the first marker (= stitches mid back, you will continue to work back and forth over these stitches = part-4), change to ocean view, knit to and including the stitch with the 2nd marker, place these stitches on 1 thread (= diagonal line on the back piece from mid back to the side, these stitches will be worked together with an edge = part-6, the marker marks the side of the jacket), knit to and including the stitch with the 3rd marker, place these stitches on a 2nd thread (= diagonal line on the front piece from the side to mid front, these stitches will be worked together with an edge = part-5), knit to end of row and then place these stitches on a 3rd thread (= stitches towards mid front – here you will work a band = part-11). The stitches are now on 3 different threads and the remaining stitches are on the needle. PART-4 (right mid back): Continue working as for part-2. ASSEMBLY: Sew part-2 together with part-4 with ocean view – see the broken line in A.1, in the outermost loop of the outermost stitch. EDGE OF JACKET: The edge at the bottom is started mid front and is worked along the right front piece (part-5), right back piece (part-6) and continued along mid back (part-7), left back piece (part-8) and left front piece (part-9). Cast on 52-54-60-66-72-82 stitches with circular needle size 4 mm / US 6 and off white. PART-5 (edge on right front piece): The edge is worked together with the stitches between the 3rd and 2nd marker on part-3 (i.e. from mid front and down to the tip of the domino). Work as follows: ROW 1 (= right side): Knit 1, 1 yarn over, knit 2 twisted together, knit 2 twisted together and knit to end of row (= 1 stitch decreased). ROW 2 (= wrong side): Knit until there is 1 stitch left on the needle, place the first/next 2 stitches from the thread back on the needle, knit 3 stitches together. The edge is now worked together with the first/next 2 stitches from part-3. Change to ocean view. ROW 3: Work as for row 1. Work short rows over the edge as follows: ROW 4 (= wrong side): Knit until there are 8 stitches left on the needle, turn the piece. ROW 5 (= right side): Knit. ROW 6 (= wrong side): Knit until there are 2 stitches left on the needle, turn the piece. ROW 7 (= right side): Knit. ROW 8: Work as for row 2. Change to off white. Repeat rows 1-8 until all the stitches from mid front and down to the tip have been worked to the edge. PART-6 (edge on right back piece): The edge is worked to the stitches between the 2nd and first markers on part-3 (i.e. from the tip of the domino and up to mid back). Work as follows with off white: ROW 1 (= right side): Knit 1, 1 yarn over, knit to end of row (= 1 stitch increased). ROW 2 (= wrong side): Knit until there is 1 stitch left on the needle, place the first/next 2 stitches from the thread back on the needle and knit 3 stitches together. The edge is now worked together with the first/next 2 stitches from the right back piece. Change to ocean view. ROW 3: Work as for row 1. Work short rows over the edge as follows: ROW 4 (= wrong side): Knit until there are 8 stitches left on the needle, turn the piece. ROW 5 (= right side): Knit. ROW 6 (= wrong side): Knit until there are 2 stitches left on the needle, turn the piece. ROW 7 (= right side): Knit. ROW 8: Work as for row 2. Change to off white. Repeat rows 1-8 until all the stitches from the tip to mid back have been worked together with the edge. PART-7 (edge mid back): Place 1 marker in the piece. THE PIECE IS NOW MEASURED FROM HERE! Now work short rows back and forth over the stitches from the edge as follows (i.e. they are not worked together with stitches from part-1 or part-3): Continue with stripes as before, adjust color according to the stripes. Change to ocean view. ROW 1 (= right side): Knit. Knit short rows over the edge as follows: ROW 2 (= wrong side): Knit until there are 8 stitches left on the needle, turn the piece. ROW 3 (= right side): Knit. ROW 4 (= wrong side): Knit until there are 2 stitches left on the needle, turn the piece. ROW 5 (= right side): Knit. ROW 6: Knit. Change to off white. ROWS 7 AND 8: Knit. Repeat rows 1-8 until the piece measures 8-8-8-12-12-16 cm / 3"-3"-3"-4¾"-4¾"-6¼" at the shortest, adjust the measurement with part-2 and part-4, they will be sewn together later. PART-8 (edge on left back piece): The edge is worked together with the stitches between the 3rd and 2nd marker on part-1 (i.e. from mid back and down to the tip of the domino). Work as for part-5 until all the stitches from mid back and down to the tip of the domino have been worked together with the edge. PART-9 (edge on the left front piece): The edge is worked together with the stitches between the 2nd and first marker on part-1 (i.e. from the tip of the domino and up to mid front). Work as for part-6 until all the stitches from the tip to mid front have been worked together with the edge. PART-10 (rest of left front piece and left band): Place the stitches from the first thread on part-1 (= left front piece mid front) back on the needle (i.e. there are now stitches from the edge and stitches from the thread on the needle). Insert 1 marker in the piece. THE PIECE IS NOW MEASURED FROM HERE! Work band as follows in the different sizes (the jacket in the picture shows size XL): SIZES S-M-L: Work garter stitch with ocean view until the piece measures 4 cm / 1½". Loosely bind off. SIZES XL-XXL-XXXL: Continue with stipes and decrease for the neck (as for part-1) at the beginning of every row from the right side, by knitting the 2 first stitches twisted together. Repeat the decreases until the piece measures 2-2-4 cm / ¾"-¾"-1½". Work garter stitch with ocean view for 4 cm / 1½" (= band). Loosely bind off. PART-11 (the rest of the right front piece and right band): Insert 1 marker in the piece. THE PIECE IS NOW MEASURED FROM HERE! Work stripes as for part-3. Knit up 52-54-60-66-72-82 stitches along part-5 (= the edge on the right front piece) from the right side with ocean view, work the stitches from the thread mid front on part-3 (= right front piece mid front) back onto the needle. Knit 1 row from the wrong side – read BUTTONHOLE. Knit band as follows in the different sizes: SIZES S-M-L: Work as for part-10. SIZES XL-XXL-XXXL: Work as for part-10, but decrease for the neck at the start of each row from the wrong side. SLEEVE: The piece is worked back and forth in garter stitch and stripes. Cast on 54-54-56-56-58-58 stitches with circular needle size 4 mm / US 6 and ocean view (including 1 edge stitch in each side of the piece). When the piece measures 6-5-6-8-6-6 cm / 2½"-2"-2½"-3"-2½"-2½" increase 1 stitch with 1 yarn over inside the 1 edge stitch in each side of the piece. On the next row knit the yarn overs twisted. Increase in this way every 1½-1½-1½-1-1-1 cm / ½"-½"-½"-⅜"-⅜"-⅜" a total of 16-18-17-19-20-20 times = 86-90-90-94-98-98 stitches. Work until the piece measures 34-33-32-30-28-27 cm / 13½"-13"-12½"-11¾"-11"-10½" (shorter measurements in larger sizes due to wider shoulders), adjust so that the last stripe is with off white. Bind off. Work another sleeve. ASSEMBLY: See broken lines in A.1. Sew the shoulder seams. Sew the sleeve seams and sew the sleeves into the armholes. Sew part-7 together with part-2 and part-4 (= 8-8-8-12-12-16 cm / 3"-3"-3"-4¾"-4¾"-6¼" horizontal seam). NECKLINE: Pick up 160-180 stitches with circular needle size 4 mm / US 6 and ocean view. Work 3 ridges back and forth on the needle – remember BUTTONHOLE. Bind off. Sew the buttons onto the left band. |
||||||||||||||||
Diagram explanations |
||||||||||||||||
|
||||||||||||||||

|
||||||||||||||||
|
||||||||||||||||
|
Have you made this or any other of our designs? Tag your pictures in social media with #dropsdesign so we can see them! Do you need help with this pattern?You'll find tutorial videos, a Comments/Questions area and more by visiting the pattern on garnstudio.com. © 1982-2024 DROPS Design A/S. We reserve all rights. This document, including all its sub-sections, has copyrights. Read more about what you can do with our patterns at the bottom of each pattern on our site. |
||||||||||||||||


With over 40 years in knitting and crochet design, DROPS Design offers one of the most extensive collections of free patterns on the internet - translated to 17 languages. As of today we count 304 catalogs and 11422 patterns - 11417 of which are translated into English (US/in).
We work hard to bring you the best knitting and crochet have to offer, inspiration and advice as well as great quality yarns at incredible prices! Would you like to use our patterns for other than personal use? You can read what you are allowed to do in the Copyright text at the bottom of all our patterns. Happy crafting!
Comments / Questions (157)
Hej jeg er ved at strikke jakke drops model 161-25. jeg er igang med del 3,jeg har strikket det som der står ,men tage det op igen for jeg har jo ingen masker tilbage på pinden .hvis jeg skal strikke alle 8 p.hele vejen igennem eller er det kun første gang alle 8 p skal strikkes jeg kan godt se der står man gentage1.-8 men er ud sikker på hvordan det skal strikkes .håber i kan forklaremig det , eller opgiver jeg det, venlig hilsen Hanne
06.09.2015 - 15:00Bonsoir, C'est de nouveau Martine, si je me réfère aux explic. du domino on doit faire les rgs 4,8 et 10 comme le rg 2,ce qui fait qu'après les 10 rgs j'ai au total 22 augm, quelque chose m'échappe, ou il y a une erreur dans les explications du livre, car vous même me parlez d'augm qu'au 2ème et 6eme rg. Comment doit on tricoter les rgs 4,8 et 10? Merci beaucoup pour votre aide. Martine. Martine.
02.09.2015 - 19:26DROPS Design answered:
Bonjour Martine, c'est une erreur de lecture de ma part, vous avez tout à fait raison, en tricotant le domino, vous allez augmenter 4 m à chaque rang 2, 4, 8 et 10, et augmenter 6 m au rang 6, soit pour 1 série des rangs 1 à 10: 4x 4 augm + 1 x 6 augm = 30 m augmentées. Bon tricot!
03.09.2015 - 09:06Bonjour, Je vous avais pose une question le 30 mai et malgré votre explication je n'arrive toujours pas a realiser le DEVANT/DEMI DOS, pouvez vous m'apporter plus de précisions sur le nombre de jetés et a leur emplacement voir me faire un croquis en détails car mon tricot ne ressemble pas du tout à votre schéma, d'avance je vous remercie car je suis désespérée voulant vraiment faire cette veste. Martine.
01.09.2015 - 17:14DROPS Design answered:
Bonjour Martine, quand on tricote le domino, on a 4 jetés (= 4 augm) au rang 2 et 6 jetés (= 6 augm au rang 6). On répète les rangs 1 à 10 du domino (= 10 augm au total pour 10 rangs tricotés). Pour toute assistance individuelle, merci de bien vouloir contacter votre magasin DROPS ou le forum DROPS. Bon tricot!
02.09.2015 - 09:39Hej. Jeg er kommen til sammenstrikning del 3. Der skal slås op med natur, men når det skal strikkes sammen, er den 1. Stribe i det øverste forstykke havudsigt, skal striberne ikke passe sammen? Der står at den 1. Pind er retsiden, når man slår masker op er 1. Pind så ikke vrang siden? Jeg kunne ønske en video af, hvordan man strikker styrkerne sammen, og hvordan man gør med farveskiftene.
26.07.2015 - 23:41DROPS Design answered:
Hej Margit, du får en vinkel ved sammenstrikningen, så striberne behøver ikke passe sammen. Hvis du vil at de skal passe kan du bare strikke 2 pinde mere med den anden farve. Vi skriver dit ønske på ønskelisten. God fornøjelse!
28.07.2015 - 13:58Hej! Jag behöver få förklarat för mig hur jag gör när jag plockar upp maskorna från tråden på höger framstycke nederkant. Tack!
21.07.2015 - 16:34DROPS Design answered:
Hej Anna, det beskriver vi på varv 2 när du följer HÖGER FRAMST (nederkant)! Lycka till!
29.07.2015 - 12:52Hello, The photo of the Lady Grey jacket shows a striped band down each front between the domino square and the button border but this is not included in the instructions or the diagram. Do you have any additional instructions for these two sections? Thanks you for your help.
02.07.2015 - 16:15DROPS Design answered:
Dear Mrs Beardwell, your question has been forwarded to our Design team. Thank you very much in advance for your patience.
02.03.2016 - 09:18Bonjour, oui, j'ai bien compris mais ma question concerne le fait que dans les explications, la bordure (boutonage) touche les dominos. Hors, sur le modèle, il y a encore quelques rayures entre le domino et la bordure.
30.06.2015 - 08:31Bonjour, une fois que le bas est tricoté (c'est à dire jusqu'au domino) on nous demande de tricoter les bordures. Mais il manque la partie des explications entre le domino et la bordure. Combien de rangs doit-on tricoter sur les devants? Merci pour la réponse.
28.06.2015 - 11:08DROPS Design answered:
Bonjour Mme Siette, quand le haut de la veste est fait (2 demi-dos et chaque devant = parties 1 et 2 dans le schéma), on tricote la partie 3, à partir de la bordure devant droit jusqu'à la pointe du domino, puis de la pointe du bas du domino jusqu'au demi-dos droit et on termine par des rangs raccourcis (qui sont assemblés à la fin). On répète ensuite à partir du demi-dos gauche jusqu'au devant gauche. Bon tricot!
29.06.2015 - 11:03I don't know where I am going wrong. The bottom is not as long as the picture and seems at least 15cm too short. Very frustrating. Can anyone help
10.06.2015 - 19:32DROPS Design answered:
Dear Mrs Williams, for further individual pattern help, please contact the store where you bought the yarn. Having bought DROPS yarn, you are guaranteed to receive qualified help from a store specializing in the DROPS patterns. Happy knitting!
11.06.2015 - 09:55I have sewn the back tog and have cast on 54 stitches . Following pattern picking up Sts between 3rd and 2nd markers (ws facing down to tip of domino) after the cast on sts makes the decrese on the second row in the wrong place. Are the .instructions just for the stitches on the holder. If so do I knit the cast on stitches as normal? Is the stitch with the 2nd marker included in the stitches between 1st and 2nd markers or stitches between 2nd and 3rd markers. Please help. Thank you.
07.06.2015 - 12:17Judith Williams answered:
Re my question posted earlier I think I have worked it out now!
07.06.2015 - 16:54