
Popular categories
Looking for a yarn?


|
|
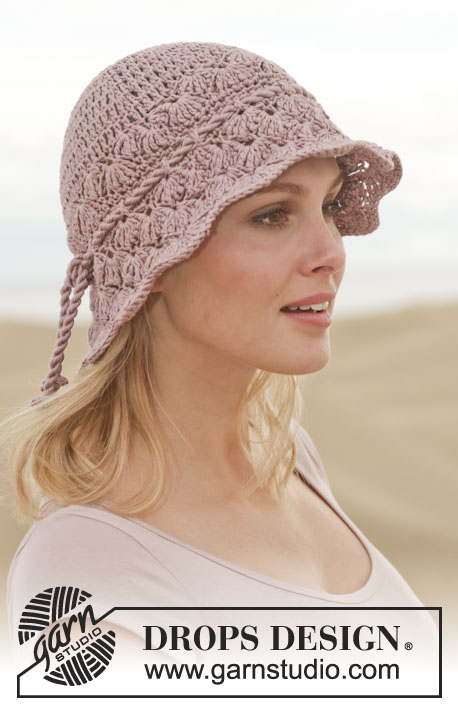
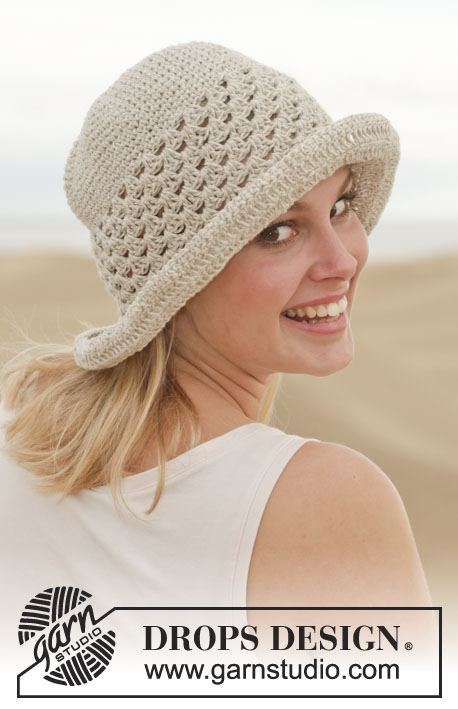
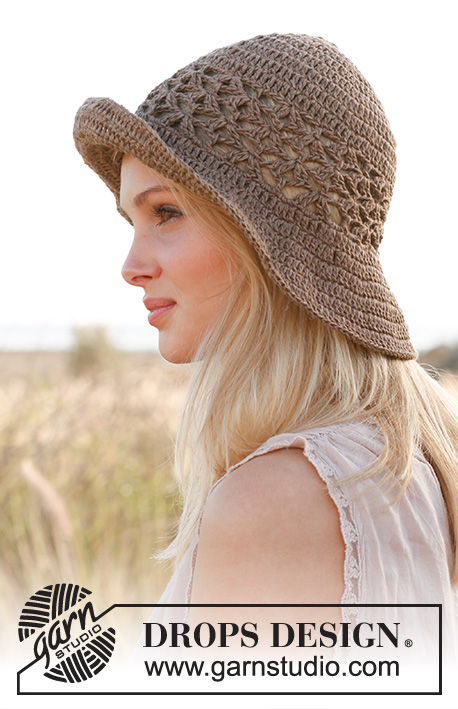
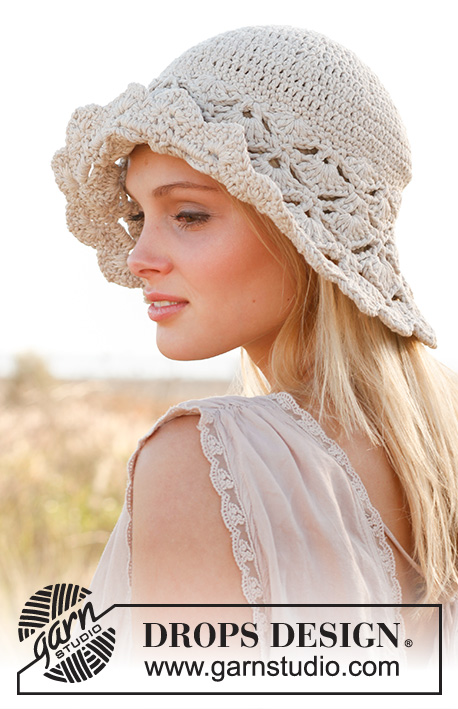
Summer Stripes |
|
 |
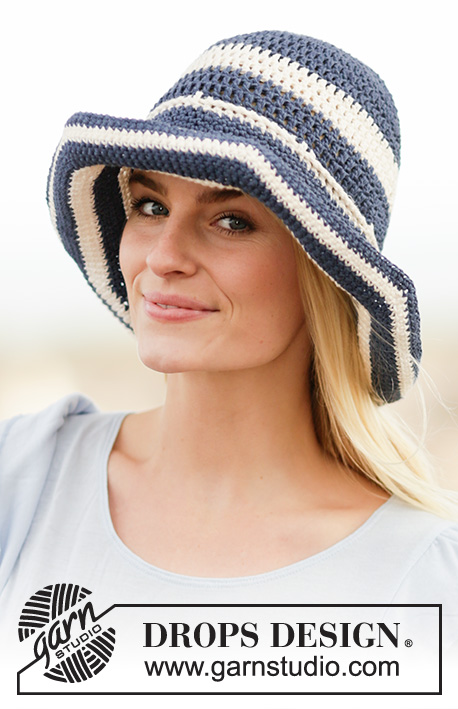 |
Crochet DROPS hat with stripes in "Bomull-Lin" or "Paris".
DROPS 162-31 |
|
|
CROCHET INFO: Replace first dc at beg of every dc round with 3 ch. Finish every round with 1 sl st in ch from beg of round. STRIPES-1: ROUND 1-3: Dark blue/dark wash ROUND 4-6: Off white ROUND 7-9: Dark blue/dark wash ROUND 10: Off white S/M is done, continue with 1 round dark blue/dark wash in L/XL. STRIPES-2: ROUND 1-4: Dark blue/dark wash ROUND 5-7: Off white ROUND 8-11: Dark blue/dark wash ROUND 12-14: Off white ROUND 15-18: Dark blue/dark wash ROUND 19-20: Off white ROUND 21-22: Dark blue/dark wash ---------------------------------------------------------- HAT: Crochet 5-5 ch on hook size 4.5 mm/US 7 with dark blue/dark wash and form a ring with 1 sl st. ROUND 1: Work 12-12 dc in ring – read CROCHET INFO. ROUND 2: Work 2 dc in every dc = 24-24 dc. ROUND 3: Work * 2 dc in next dc, 1 dc in the next dc*, repeat from *-* the entire round = 36-36 dc. ROUND 4: Work * 2 dc in first dc, 1 dc in each of the next 2 dc *, repeat from *-* the entire round = 48-48 dc. REMEMBER THE CROCHET GAUGE! ROUND 5: Work * 2 dc in first dc, 1 dc in each of the next 3 dc *, repeat from *-* the entire round = 60-60 dc. ROUND 6: Work * 2 dc in first dc, 1 dc in each of the next 4 dc *, repeat from *-* the entire round = 72-72 dc. S/M is now done, continue as follows in M/L: ROUND 7: Work * 2 dc in first dc, 1 dc in each of the next 5 dc *, repeat from *-* the entire round = 84 dc. BOTH SIZES: Continue with 1 dc in every dc, AT THE SAME TIME work STRIPES-1 - see explanation above. When stripes-1 has been done and piece measures approx. 17-18 cm / 6 3/4"-7", continue as follows: Now work a brim in sc and STRIPES-2 - see explanation above. ROUND 1: Work * 2 sc in first dc, 1 sc in each of the next 11-14 dc *, repeat from *-* the entire round = 78-90 sc. ROUND 2: Work * 2 sc in first sc, 1 sc in each of the next 12-15 sc *, repeat from *-* the entire round = 84-96 sc. ROUND 3: Work 1 sc in each sc = 84-96 sc. ROUND 4: Work * 2 sc in first sc, 1 sc in each of the next 13-16 sc *, repeat from *-* the entire round = 90-102 sc. ROUND 5: Work * 2 sc in first sc, 1 sc in each of the next 14-17 sc *, repeat from *-* the entire round = 96-108 sc. ROUND 6: Work 1 sc in every sc = 96-108 sc. ROUND 7: Work * 2 sc in first sc, 1 sc in each of the next 15-18 sc *, repeat from *-* the entire round = 102-114 sc. ROUND 8: Work * 2 sc in first sc, 1 sc in each of the next 16-19 sc *, repeat from *-* the entire round = 108-120 sc. ROUND 9: Work 1 sc in every sc = 108-120 sc. ROUND 10: Work * 2 sc in first sc, 1 sc in each of the next 17-20 sc *, repeat from *-* the entire round = 114-126 sc. ROUND 11: Work * 2 sc in first sc, 1 sc in each of the next 18-21 sc *, repeat from *-* the entire round = 120-132 sc. ROUND 12: Work 1 sc in every sc = 120-132 sc. ROUND 13: Work * 2 sc in first sc, 1 sc in each of the next 19-22 sc *, repeat from *-* the entire round = 126-138 sc. ROUND 14: Work * 2 sc in first sc, 1 sc in each of the next 20-23 sc *, repeat from *-* the entire round = 132-144 sc. ROUND 15: Work 1 sc in every sc = 132-144 sc. ROUND 16: Work * 2 sc in first sc, 1 sc in each of the next 21-24 sc *, repeat from *-* the entire round = 138-150 sc. ROUND 17: Work * 2 sc in first sc, 1 sc in each of the next 22-25 sc *, repeat from *-* the entire round = 144-156 sc. ROUND 18: Work 1 sc in every sc = 144-156 sc. ROUND 19: Work * 2 sc in first sc, 1 sc in each of the next 23-26 sc *, repeat from *-* the entire round = 150-162 sc. ROUND 20: Work * 2 sc in first sc, 1 sc in each of the next 24-27 sc *, repeat from *-* the entire round = 156-168 sc. ROUND 21: Work 1 sc in every sc = 156-168 sc. ROUND 22: Work * 2 sc in first sc, 1 sc in each of the next 25-28 sc *, repeat from *-* the entire round = 162-174 sc. Brim measures approx. 12 cm / 4¾''. TWINED STRING: Cut 2 lengths of 3 metres/3.2 yds each with off white. Twine the strands tog until they resist, fold the string double so that it twines again. Make a knot at each end. Thread the string in last stripe before brim. Thread the string under a dc for approx. every 10 dc on this round. Tie a double knot or a bow. |
|
|
Have you made this or any other of our designs? Tag your pictures in social media with #dropsdesign so we can see them! Do you need help with this pattern?You'll find tutorial videos, a Comments/Questions area and more by visiting the pattern on garnstudio.com. © 1982-2024 DROPS Design A/S. We reserve all rights. This document, including all its sub-sections, has copyrights. Read more about what you can do with our patterns at the bottom of each pattern on our site. |
|


With over 40 years in knitting and crochet design, DROPS Design offers one of the most extensive collections of free patterns on the internet - translated to 17 languages. As of today we count 304 catalogs and 11422 patterns - 11417 of which are translated into English (US/in).
We work hard to bring you the best knitting and crochet have to offer, inspiration and advice as well as great quality yarns at incredible prices! Would you like to use our patterns for other than personal use? You can read what you are allowed to do in the Copyright text at the bottom of all our patterns. Happy crafting!
Comments / Questions (22)
Er staat dat ik van de lichte kleur drie bollen Paris nodig heb. Ik heb echter maar anderhalve bol gebruikt en ja de stekenverhouding klopte.
04.06.2016 - 19:53Er zit een fout in het patroon. Bij de rand staat bij de grote maat dat je in het eerste stokje twee vasten moet haken en dan een vaste in 14 stokjes. Dat moet 13 zijn. Je moet namelijk zes keer meerderen. 84 stokjes gedeeld door 6 is 14. Dus in 1 stokje 2 vasten en dan in 13 1 vaste. In elk van de volgende toeren moet het steeds 1 vaste minder zijn dan er staat.
04.06.2016 - 19:52Ik ben een beginner. Ik begrijp het verschil tussen Toer 3 en Toer 4 niet. Toer 3 geeft aan 2 stk in de volgende stk en Toer 4 geeft aan 2 stk in de eerste stk. Wat is het verschil tussen de eerste en de volgende steek?
13.05.2016 - 13:04DROPS Design answered:
Hoi Jonna. In toer 3 haak je 2 stk in volgend stk, 1 stk in volgend stk (= 1 stk) en in toer 4 haak je 2 stk in eerste stk, 1 stk in elke van de volgende 2 stk
17.05.2016 - 12:10Hei, Fin solhatt, men er det mulig å hekle bremmen litt større ?
05.07.2015 - 12:44DROPS Design answered:
Du kan forsøge, det er bare at fortsætte med bremmen på samme måde. Men det er muligt at den ikke kommer til at holde og vil falde lidt ned. Men prøv gerne!
08.07.2015 - 15:12Jeg har fået lavet den fineste hat, men mit problem er at skyggen ikke vil folde rundt. Den hænger bare ned i øjnene. Jeg kan godt folde den der op men efter få minutter klasker den sammen igen. Hvad er fejlen og kan jeg gøre noget for at den vil sidde ordenligt? Ser frem til at høre fra jeg☺️
14.06.2015 - 21:14DROPS Design answered:
Hej Marie, kan det være hæklet en anelse for løst, jo blødere den er jo mere vil den falde ned. Du kan prøve at hækle lidt mere fast prøv evt en hæklenål mindre. God fornøjelse!
07.08.2015 - 11:14It's finished! I really like the fact that because the brim is in dc, it stays in position and isn't too floppy. Just hope my sister likes her birthday present! I love your patterns - and your yarn, I used Bromull-Linen. Thank you.
15.05.2015 - 08:54I'm working on S/M size and have got to row10. Do I repeat Stripes 1 until the piece measures 17cm? It measures 12cm at the moment. My tension seems to be ok. It says, 'When stripes-1 has been done and piece measures approx 17-18 cm, continue as follows:'. Help please. Thanks 8-)
09.05.2015 - 18:59Jocelyn answered:
Hello again. I've just realised what I have done wrong! I started Stripes 1 from the beginning, instead of from the end of the increasing. Whoops - silly me! 8-).
09.05.2015 - 19:18Jag får inte till hatten, hu virkar jag själva kullen, om jag virkar efter mönstret blir hatten till en docka. jag har garnet drops paris o virknål 4 mm. Hur får jag hatten som på bilden? hade tänkt att jag ska använda den på lördag , men det får jag nog lägga ner. Tackar på förhand för hjälp Med vänlig hälsning Helena
23.04.2015 - 13:34DROPS Design answered:
Hej Helena, Virka ett prov först och se om du få 16 st på 10 cm, då skall du få till det. Lycka till!
13.05.2015 - 14:23Yulia Olsen wrote:
There is a mistake, or I am completely out of the pattern: for the size M/L, in the brim, it is not next 14, 15 or so on dc, but 1 less per row, like 13, 14, 15... Also Round 1, after the first 2dc there are 13 dc, not tr.... I am really annoyed. But the hat looks nice in the picture. Besides, the crochet I use is nr 3.5. Maybe I use it too loosely. But for the gauge it is the 16 tr per little more than 9 rows...
19.03.2015 - 16:24DROPS Design answered:
Dear Mrs Olsen, for the brim you will inc 6 sts per round, ie work 2 sts in same st, then 1 st in next 14 sts, then 15 sts on next round, then 16 sts .. on next round - brim is worked with dc (UK-English)/sc (US-English). Happy crocheting!
20.03.2015 - 09:59Maritim inspireret sommerhat, da jeg sejler er dette lige rigtige model for mig. Vi skal beskytte os for for meget sol, den skal jeg lave. Flot flot hat....
05.02.2015 - 18:10