
Suositut kategoriat
Etsitkö tiettyä lankaa?


Kommentit / Kysymykset (117)
![]() Catherine kirjoitti:
Catherine kirjoitti:
I have knitted the sleeves 2 at a time using magic loop method. Having got to 56cm, I think I will need to finish the sleeves one at a time knitting back and forth casting off at the beginning of each row right side and wrong side. Just checking I’ve got this right. Thank yoi.
05.01.2025 - 01:16DROPS Design vastasi:
Dear Catherine, yes, since you cast off stitches and work back and forth you need to work each sleeve separately. Happy knitting!
05.01.2025 - 20:32
![]() Charlotte Häggkvist kirjoitti:
Charlotte Häggkvist kirjoitti:
Hej! Det står att man ska ”Sticka upp de mittersta m från tråden igen från rätsidan bakom höger krage”, ska jag tolka det som att det i mitt fall gäller alla 26 m på tråden?
30.12.2024 - 20:25DROPS Design vastasi:
Hei Charlotte. Om du strikker den minste str, så ja, 26 masker. (Husk å la tråden sitte i arb) . mvh DROPS Design
07.01.2025 - 08:22
![]() Jenn, kirjoitti:
Jenn, kirjoitti:
Hallo, ich stricken gerade am Ärmel, also in Runden auf dem Nadelspiel. Ich soll jetzt vor und nach dem Maschenmarkierer jeweils eine Masche zunehmen, aber das stört und verschiebt das Muster in der darauffolgenden Runde. Wie kann ich das Problem lösen?
26.12.2024 - 01:35DROPS Design vastasi:
Liebe Jenn, das Perlmuster wird über eine gerade Maschenanzahl gestrickt, man soll jeweils 2 Maschen zunehmen, stricken Sie die letze Masche der Runde 2 Mal und die erste Masche der Runde 2 Mal, dann stricken Sie das Muster wie zuvor, es wird automatisch passen. Viel Spaß beim Stricken!
02.01.2025 - 11:28
![]() Catherine Frew kirjoitti:
Catherine Frew kirjoitti:
So on this pattern DROPS 135 1 Limestone when I split for the back and front and work back and forth, I should knit 1 edge st each side in garter st (K on all rows) of the back and front?
30.10.2024 - 19:29DROPS Design vastasi:
Dear Mrs Frew, you can work 1 edge stitch in garter stitch on each side on both front/back pieces when working them back and forth separately - after all stitches for armholes have been cast off. Happy knitting!
31.10.2024 - 09:15
![]() Catherine Frew kirjoitti:
Catherine Frew kirjoitti:
Does double moss stitch follow the same instructions when knitting back and forth for the front and back, as it does when knitting in the round?
30.10.2024 - 14:58DROPS Design vastasi:
Dear Mrs Frew, this video should help you to understand how to work double moss stitch in height in rows/back and forth on needle. Happy knitting!
30.10.2024 - 16:26
![]() Nicky Swan kirjoitti:
Nicky Swan kirjoitti:
Can someone please help me. I am struggling to understand knitting up the collar. Says to pick stitches from holder for right Collar, when I go to do the left collar where do I get stitches for that please? Thankyou in advance
30.03.2024 - 22:10DROPS Design vastasi:
Dear Nicky, You should pick up those stitches in the same stitches that were on the stitch holder, but BEHIND the stitches you piced up for the left collar. Please look at the picture, you can see that the swo half of the collar are behind each other. I hope this helps. Happy Knitting!
31.03.2024 - 21:03
![]() Julie kirjoitti:
Julie kirjoitti:
Når man skal felle av på ermet står det: Det fortsettes å felles til ermtopp i hver side på hver 2.p slik: 2 m 2 ganger og deretter 1 m 4 (strikker M). Skal man felle av på hver side eller kun 2 m på starten av hver andre pinne?
08.11.2023 - 06:46DROPS Design vastasi:
Hei Julie. Du feller av på hver side, slik at sidenen blir like. mvh DROPS Design
13.11.2023 - 11:34
![]() Jenni kirjoitti:
Jenni kirjoitti:
Hallo! Ich bin total verwirrt mit den Angaben. Ich habe exakt nach Angaben gestrickt und meine Maschenprobe, glatt rechts gestrickt, passte auch. Solange ich den Bund gestrickt habe passte das mit den 53 cm. Jetzt habe ich die 74 Maschen abgenommen und das Perlmuster begonnen und jetzt „explodiert“ mir die Breite auf 65cm. Reguliert dich das wieder? Oder habe ich etwas falsch gemacht? Danke schonmal für eure Mühen!
16.01.2023 - 08:28DROPS Design vastasi:
Liebe Jenni, welche Größe stricken Sie? unten bei dem Bündchen sind es 38-42-46-51-57-63 cm dann, nach den 2 Zunahmen an beiden Seiten und vor Armlöcher sollen Sie 40-44-48-53-59-65 cm haben. Viel Spaß beim stricken!
16.01.2023 - 10:40
![]() Bärbel kirjoitti:
Bärbel kirjoitti:
Eine Frage zu den Ärmeln: irgendwann sollen für die Armkugeln zu Beginn der Reihe Maschen abgekettet werden. Tatsächlich nur am Anfang der Reihe, oder beidseitig?
26.12.2022 - 16:34DROPS Design vastasi:
Liebe Bärbel, die Maschen für die Armkugel werden am Anfang jeder Reihe (= Hin- sowie Rücktreihe) abgekettet,dh so wird es abgekettet: 2 Maschen am Anfang der nächsten 4-4-6-6-10-10 Reihen (= 2-2-3-3-5-5 Mal beidseitig) und 1 Masche am Anfang der nächsten 6-8-8-10-10-12 Reihen (= 3-4-4-5-5-6 Mal beidseitig). Viel Spaß beim stricken!
02.01.2023 - 09:21
![]() Katherine kirjoitti:
Katherine kirjoitti:
Hola de nuevo, para hacer la vuelta corta los puntos externos serían los 20 puntos finales del lado derecho o izquierdo? Cuando la labor está del LD. Saludos
13.10.2022 - 10:06DROPS Design vastasi:
Hola Katherine, los 20 pts son desde el centro del delantero hacia el borde de costura. Si trabajas por el lado derecho, los 20 pts son los del inicio de la vuelta/ fila.
17.10.2022 - 00:17
|
|
Limestone#limestonesweater |
|
 |
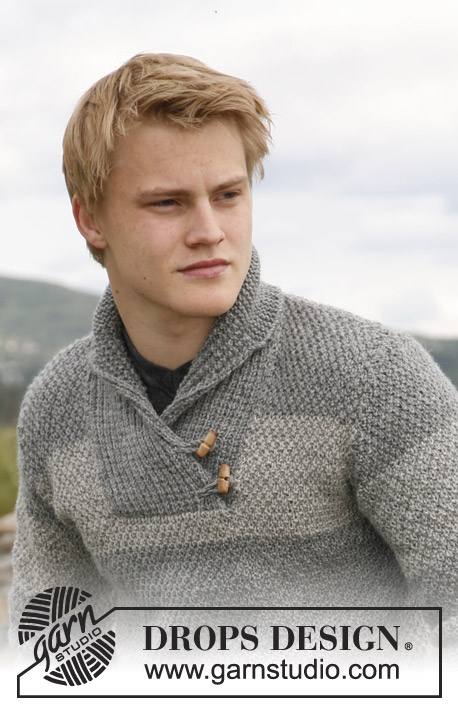 |
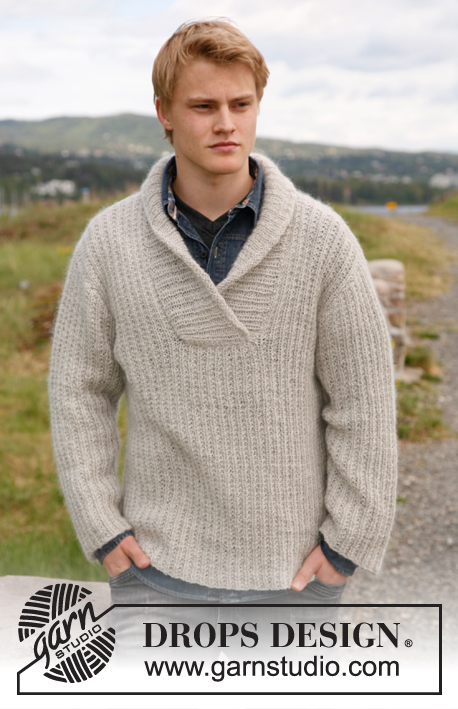
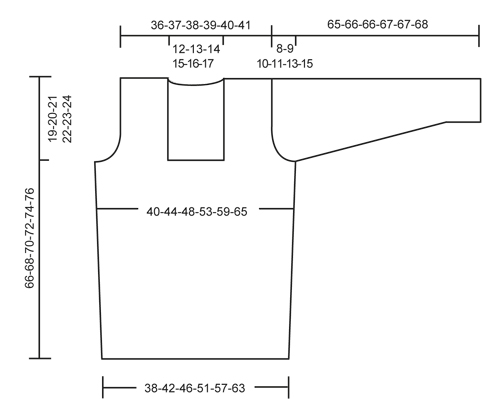
Miehen neulottu pusero DROPS Karisma- tai DROPS Merino Extra Fine -langasta. Työssä on huivikaulus. Koot S-XXXL.
DROPS 135-1 |
|
|
KAHDEN KERROKSEN HELMINEULE: 1.krs: *1 o, 1 n*, toista *-*. 2.krs: Neulo oikeat s:t oikein ja nurjat s:t nurin. 3.krs: *1 n, 1 o*, toista *-*. 4.krs: Neulo nurjat s:t nurin ja oikeat s:t oikein. Toista krs:ia 1.- 4. RAIDOITUS: Neulo vuorotellen 11-11-11½-12-12-12½ cm keskiharmaalla ja vaaleaharmaalla langalla. HUOM: Ensimmäinen raidan mitat otetaan luomisreunasta. Viimeinen raita neulotaan keskiharmaalla langalla lopulliseen mittaan asti. LISÄYSVINKKI: Lisää 1 s tekemällä 1 langankierto puikolle. Seuraavalla krs:lla langankierto neulotaan kiertäen (eli neulo langankierto takakautta), jottei muodostuisi reikää. MALLINEULE: 1. krs (= oikea puoli): Neulo oikeaa. 2. krs (= nurja puoli): *1 o, 1 n*, toista *-*. Toista krs:t 1.-2. AINAOIKEINNEULE tasona: Neulo kaikki kerrokset oikein. -------------------------------------------------------- ETU- JA TAKAKAPPALE: Neulotaan suljettuna neuleena pyöröpuikolla. Luo 213-234-255-288-318-351 s pyöröpuikolle nro 3,5 vaaleanharmaalla langalla. Neulo joustinneuletta seuraavasti: *1 o, 2 n*, toista *-*. Kun työn pituus on 4 cm, neulo 1 krs oikein ja kavenna SAMALLA tasavälein 53-58-63-72-78-87 s (kavenna neulomalla n. joka 3. ja joka 4. s oikein yhteen) = 160-176-192-216-240-264 s. Vaihda sitten pyöröpuikkoon nro 4 ja jatka neulomalla KAHDEN KERROKSEN HELMINEULETTA ja RAIDOITUSTA (ks. selitys yllä) suljettuna neuleena. TARKISTA NEULETIHEYS! Kun työn pituus on 15-15-16-16-17-17 cm, kiinnitä 1 merkkilanka krs:n alkuun ja 1 merkkilanka 80-88-96-108-120-132 s:n jälkeen (sivut). Lisää seuraavalla krs:lla kummankin merkkilangan molemmin puolin 1 s (lue LISÄYSVINKKI yllä). Työhön lisättiin 4 s. HUOM: Lisätyillä silmukoilla neulotaan kahden kerroksen helmineuletta. Toista tällaiset lisäykset vielä kerran, kun työn pituus on 30-30-32-32-34-34 cm = 168-184-200-224-248-272 s. Kun työn pituus on 47-48-49-50-51-52 cm, jaa työ merkkilankojen kohdalta ja neulo osat erikseen. TAKAKAPPALE: = 84-92-100-112-124-136 s (1. krs = oikea puoli). Jatka raidoitusta ja kahden kerroksen helmineuletta ja päätä SAMALLA kummastakin reunasta kädenteitä varten joka 2. krs: 1 x 3 s, 0-1-2-4-6-8 x 2 s ja 1-2-3-4-5-6 x 1 s = 76-78-80-82-84-86 s. Kun työn pituus on 64-66-68-70-72-74 cm, päätä keskimmäiset 24-26-28-30-32-34 s pääntietä varten ja neulo molemmat puolet erikseen. Kavenna seuraavalla krs:lla pääntien reunassa 1 s (kavenna neulomalla reunimmaiset 2 s yhteen) = 25 s jäljellä olalla kaikissa koissa. Päätä loput s:t löyhästi, kun työn pituus on 66-68-70-72-74-76 cm. Neulo pääntien toinen puoli vastaavasti. ETUKAPPALE: = 84-92-100-112-124-136 s. Jatka raidoitusta ja kahden kerroksen helmineuletta. Päätä sivusta kädentietä varten kuten takana (1. krs = oikea puoli) ja siirrä samalla keskimmäiset 26-28-30-32-34-36 s apulangalle pääntietä varten. Neulo molemmat puolet erikseen. Kun kaikki tarvittavat s:t on päätetty kädentietä varten, olalla on jäljellä 25 s. Jatka raidoitusta ja helmineuletta kuten aiemmin. Kun työn pituus on 66-68-70-72-74-76 cm, päätä loput s:t löyhästi. Neulo pääntien toinen puoli vastaavasti. HIHA: Neulotaan suljettuna neuleena sukkapuikoilla. Luo 63-66-69-72-75-78 s sukkapuikoille nro 3,5 vaaleanharmaalla langalla. Neulo joustinneuletta seuraavasti: *1 o, 2 n*, toista *-*. Kun työn pituus on 4 cm, neulo 1 krs oikein ja kavenna SAMALLA tasavälein 15-16-17-18-19-20 s (kavenna neulomalla n. joka 3. ja joka 4. s oikein yhteen) = 48-50-52-54-56-58 s. Vaihda sukkapuikkoihin nro 4 ja kiinnitä 1 merkkilanka krs:n alkuun. Jatka neulomalla KAHDEN KERROKSEN HELMINEULETTA ja RAIDOITUSTA suljettuna neuleena. Kun työn pituus on 8-8-7-7-7-6 cm, lisää merkkilangan molemmin puolin 1 s. Toista tällaiset lisäykset 5-4½-3½-3-2½-2½ cm välein yht. 10-11-13-15-17-18 kertaa = 68-72-78-84-90-94 s. Kun työn pituus on 57-57-56-56-54-53 cm (suurimmissa koissa on lyhyemmät mitat, koska niissä on korkeammat hihanpyöriöt ja leveämmät olat), päätä merkkilangan molemmin puolin 3 s (eli päätä keskeltä hihan alta 6 s). Jatka neulomista tasona ja päätä samalla kummastakin reunasta hihanpyöriötä varten joka 2. krs: 2-2-3-3-5-5 x 2 s ja sitten 3-4-4-5-5-6 x 1 s. Päätä vielä kummastakin reunasta 2 s, kunnes työn pituus on 64-65-65-66-66-67 cm. Päätä lopuksi kummastakin reunasta 1 x 3 s. Päätä loput s:t löyhästi. Työn pituus on n. 65-66-66-67-67-68 cm. VIIMEISTELY: Ompele olkasaumat. Kiinnitä hihat paikoilleen. OIKEA KAULUSKAPPALE: Neulotaan tasona pyöröpuikolla nro 4 ja keskiharmaalla langalla näin: Ota työn nurjalta puolelta keskiedun apulangalta 26-28-30-32-34-36 s takaisin työhön (jätä vasemman kauluskappaleen s:t apulangalle odottamaan). Neulo sitten MALLINEULETTA (ks. selitys yllä, 1. krs = oikea puoli). Kun kauluksen korkeus on 19-20-21-22-23-24 cm ja olet viimeksi neulonut mallineuleen 2. krs:n, kiinnitä 1 merkkilanka oikean puolen krs:n loppuun. Jatka neulomalla AINAOIKEAA (ks. selitys yllä) ja neulo SAMALLA lyhennettyjä kerroksia (1. krs = oikea puoli) näin: *Neulo 2 krs kaikilla silmukoilla, neulo 2 krs vain etureunan reunimmaisilla 20 s:lla*, toista *-* kunnes työn korkeus lyhyimmän reunan merkkilangasta mitattuna on 8-9-9-10-10-11 cm. Päätä s:t. VASEN KAULUSKAPPALE: Ota apulangalla odottavat s:t takaisin työhön työn oikealta puolelta, oikean kauluskappaleen takaa (vasen kappale jää oikean kappaleen alle). Neulo oikean kauluskappaleen peilikuvaksi. VIIMEISTELY: Kiinnitä oikea kauluskappale oikeaan etukappaleeseen ja kiinnitä vasen kauluskappale vasempaan etukappaleeseen. Ompele kaulus yhteen keskeltä takaa ja kiinnitä kaulus takakappaleen pääntien reunaan. NAPITUSSILMU: Tee 1 napitussilmu seuraavasti: Kierrä 2 kpl n. 40 cm:n pituista vaaleanharmaata lankaa yhteen ja taita langat kaksinkerroin. Tee toinen napitussilmu samoin. Kiinnitä silmut n. 4 ja 11 cm:n päähän oikean kauluskappaleen alareunasta (n. 1 cm:n päähän etureunasta). Pujota langat kauluksen läpi ja päättele langanpäät työn takaosaan. Kiinnitä napit vasempaan kauluskappaleeseen, n. 2 ja 4 cm vasemman etukappaleen sauman sisäpuolelle. |
|
|
|
Oletko tehnyt tämän mallin?Tägää tällöin kuviasi #dropspattern #limestonesweater tai lähetä kuvat #dropsfan galleriaan. Tarvitsetko apua tämän ohjeen kanssa?Löydät 17 ohjevideota, kommentteja/kysymyksiä ja muuta osoitteessa www.garnstudio.com © 1982-2025 DROPS Design A/S. Pidätämme kaikki oikeudet. Tämä tiedosto ja kaikki sen alatiedostot on suojattu tekijänoikeuslailla. Lue lisää siitä, mitä voit tehdä ohjeillamme, verkkosivujemme jokaisen ohjeen alaosasta. |
|


DROPS Design on toiminut neule- ja virkkausalalla yli 40 vuotta ja meillä on yksi kaikkein laajin valikoima ilmaisia ohjeita verkossa - käännettynä 17 kielelle. Tänään meiltä löytyy 314 lehteä ja 11821 ohjetta - joista 11218 ohjetta on käännetty suomeksi.
Työskentelemme ahkerasti, jotta voisimme antaa teille kaikkein parhaimpia neule- ja virkkausohjeita, inspiraatiota ja neuvoja sekä korkealaatuisia lankoja todella edulliseen hintaan! Haluaisitko käyttää ohjeitamme muuhun kuin henkilökohtaiseen käyttöön? Voit lukea säännöistä ohjeiden Tekijänoikeus -tekstissä, joka löytyy kaikkien ohjeidemme alapuolelta. Hauskoja hetkiä käsitöiden parissa!
Lisää kommentti ohjeeseen DROPS 135-1
Haluamme mielellämme kuulla mielipiteesi tästä ohjeesta!
Mikäli haluat esittää kysymyksen, valitse oikea kategoria alla olevasta valikosta - tällä tavoin saat vastauksen nopeammin. Pakolliset kentät on merkitty tähdellä *.