
Catégories populaires
Vous cherchez un fil?


Commentaires / Questions (73)
![]() SandraB a écrit:
SandraB a écrit:
Hallo! Ik wil graag dit patroon maken. Heb nog niet zovaak kleren gehaakt. Daarom begrijp ik de tweede tekening met de maten niet zo goed. Hoe moet ik die zien?
01.07.2017 - 08:37DROPS Design a répondu:
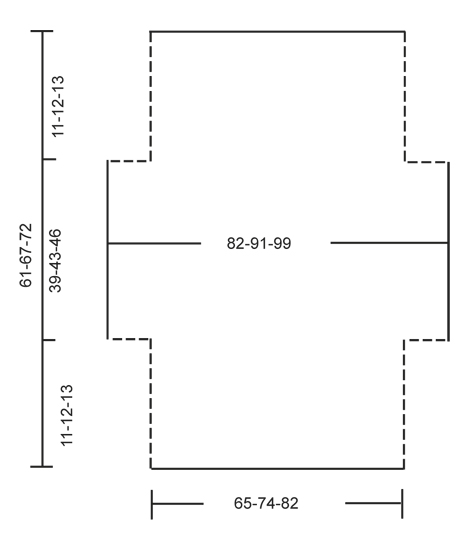
Hoi Sandra, In de tweede tekening zie je het werk wanneer je klaar bent met haken, maar nog niet in elkaar genaaid hebt. Het kledingstuk wordt op de horizontale lijn dubbel gevouwen en op op de stippellijnen aan elkaar gehaakt.
01.07.2017 - 12:01
![]() Elizabeth Baker a écrit:
Elizabeth Baker a écrit:
I have finished my 21 1/2 inches and pattern says to not work 12 stitches on either side how then do I start my next row
21.05.2017 - 19:07DROPS Design a répondu:
Dear Mrs Baker, work next row until 12 sts remain, turn and work next row until 12 sts remain, turn and work next row. You will have now 12 sts unworked on each side. Happy crocheting!
22.05.2017 - 09:54
![]() Elizabeth Baker a écrit:
Elizabeth Baker a écrit:
I have finished my 21 1/2 inches and pattern says to not work 12 stitches on either side, how do I start next row?
20.05.2017 - 19:02
![]() Elizabeth Baker a écrit:
Elizabeth Baker a écrit:
After I have finished row 8 to continue do I start with A1 or A2 to repeat
01.05.2017 - 16:43DROPS Design a répondu:
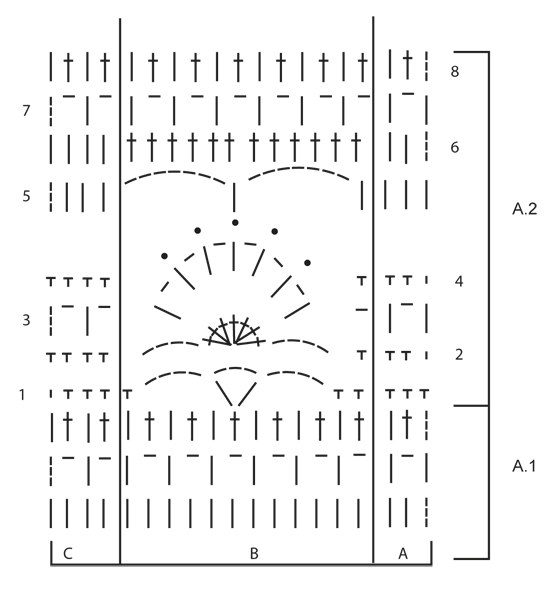
Dear Mrs Baker, after you have worked A.2 1 time in height, repeat A.2 from row 1. Happy croccheting!
02.05.2017 - 11:48
![]() Elizabeth Baker a écrit:
Elizabeth Baker a écrit:
After I have finished row 8 do I start with row A1 or A2
01.05.2017 - 16:20DROPS Design a répondu:
Dear Elizabeth, after row 8, you should continue and repeat pattern A.2. I hope this helps. Happy crocheting!
06.05.2017 - 11:06
![]() GB a écrit:
GB a écrit:
Hi, in the pattern directions it says the picot has a DC in the first of the chain 3s, but the video shows a sc instead. Could you clarify please? Thanks!
15.04.2017 - 17:14DROPS Design a répondu:
Dear GB, you should work 1 dc in 1st of the 3 ch as explained in the pattern and not 1 sc as worked in the video, thanks for noticing. Happy crocheting!
19.04.2017 - 15:24
![]() Mary Ancira a écrit:
Mary Ancira a écrit:
The letter sizes, (example- S, M, L,) are not showing what size the bust is like it normally does. Should I assume the sizes are the same on all the patterns?
03.04.2017 - 10:24DROPS Design a répondu:
Dear Mrs Ancira, you will find at the bottom of the pattern a measurement chart with measurements for each size in cm, taken flat from side to side. Compare these to a similar garment you have and like the shape to find out the matching size. Read more about sizing and convert into inches here. Happy crocheting!
03.04.2017 - 11:25
![]() Stephanie a écrit:
Stephanie a écrit:
Bonjour je ne comprends pas l'augmentation, au rang 6 avec l'ajout de maille en l'air que l'on crochete apres avec une bride un ml une bride et ensuite crochete le reste comment ? c'est la que je saisis pas , parce que logiquement on serait sur le rang 7 mais ensuite encore au rang 7 ,pouvez vous m'expliquer merci
14.02.2017 - 00:10DROPS Design a répondu:
Bonjour Stéphanie, la 1ère augmentation sur le côté se fait à la fin du rang 5 (= le rang suivant sera le rang 6), on crochète 14 ml à la fin de ce rang, on tourne, on crochète 11B, puis le rang 6 de A.2 et on crochète 15 ml à la fin du rang 6, on tourne, on crochète 1B, 1 ml sur les nouvelles ml et on continue le rang 7 comme A.2. Puis on continue A.2 sur toutes les mailles. Bon crochet!
14.02.2017 - 09:32
![]() Jasmine a écrit:
Jasmine a écrit:
Dear Jasmine, "on row 1 in A.1 work 1 dc in each st," So since I have 92 stitches in A.1 I need to do 92 DC stitches all the way across?
21.01.2017 - 03:45DROPS Design a répondu:
Dear Jasmine, you should have 92 dc on first row, then work: A.1A (= 4 sts), repeat A.1B a total of 7 times (= 7 x 12 sts), and finish with A.1C (= 4 sts), ie: 3 + (x12=84) + 4= 91 sts. Happy crocheting!
23.01.2017 - 09:29Leonore a écrit:
This pattern doesnt make any sence. Row one is clear to work. From there on i dont understand anything! Please write out the pattern. I dont work with diagrams or whatever this confusuon is called. Please help!
17.12.2016 - 18:45DROPS Design a répondu:
Dear Leonore, there is only diagram to this pattern, start reading diagram from the bottom corner on the right side and read towards the left from RS and from left to right from WS. Each symbol represents 1 st/group of sts. work A.1A (= 3 sts), then repeat A.1B (= 12 sts) and finish with A.1C (= 4 sts). You are welcome to contact your DROPS store for any further individual assistance. Happy crocheting!
19.12.2016 - 09:17
|
||||||||||||||||
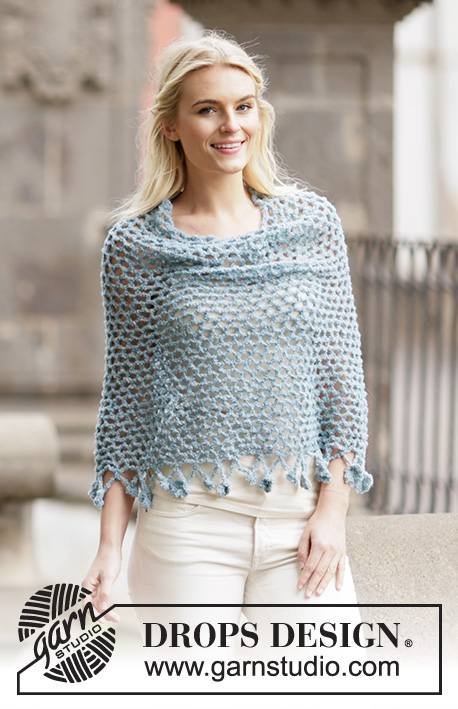
Blue Wonder#bluewondershoulderpiece |
||||||||||||||||
 |
 |
|||||||||||||||
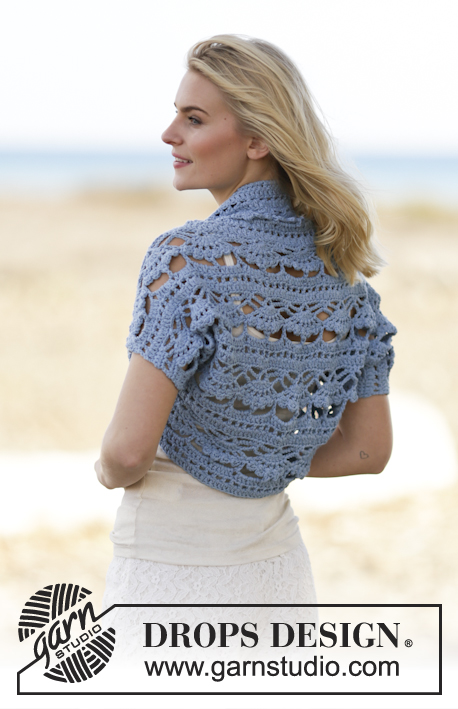
Chauffe-épaules DROPS au crochet, en "Paris". Du S au XXXL
DROPS 162-34 |
||||||||||||||||
|
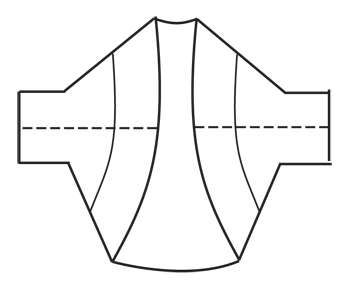
POINT FANTAISIE: Voir diagrammes A.1 et A.2. CHAUFFE-ÉPAULES: Monter une chaînette de 110-125-139 ml avec le crochet 5 en Paris. RANG 1: Tourner et crocheter 1 B dans la 4e ml à partir du crochet (= 2 B), 1 B dans chacune des 4-1-3 ml suivantes, *sauter 1 ml, 1 B dans chacune des 5 ml suivantes*, répéter de *-* = 91-103-115 B. RANG 2: Crocheter ensuite en suivant le diagramme A.1 ainsi: A.1 A, 7-8-9 fois A.1 B au total, terminer par A.1C. Quand A.1 a été crocheté 1 fois en hauteur, suivre et répéter A.2 en hauteur. EN MÊME TEMPS, quand l'ouvrage mesure environ 11-12-13 cm (ajuster pour que le rang suivant soit le rang 6 de A.2), crocheter 14 ml à la fin du rang (= rang 5). Tourner et crocheter 1 B dans la 4e ml à partir du crochet, 1 B dans chacune des 10 nouvelles ml suivantes. Continuer avec le rang 6 de A.2, et, à la fin du rang, crocheter 15 ml. Tourner et crocheter 1 B dans la 6e ml à partir du crochet, *1 ml, sauter 1 ml, 1 B dans la ml suivante*, répéter de *-* au-dessus des 9 nouvelles ml suivantes, terminer par 1 ml. Crocheter le reste du rang en suivant A.2. Au rang suivant, crocheter comme avant jusqu'aux nouvelles mailles à la fin du rang, crocheter 1 B dans chaque arceau et 1 B dans chaque B. On a augmenté 12 B de chaque côté = 115-127-139 B. Continuer ensuite au rang 8 ainsi: A.2 A, 9-10-11 fois A.2 B au total, terminer par A.2 C. À environ 50-55-59 cm de hauteur totale (ajuster pour que le rang suivant soit le rang 7), ne pas crocheter au-dessus des 12 B de chaque côté = 91-103-115 B. Continuer ainsi: A.2 A, 7-8-9 fois A.2 B au total, terminer par A.2 C. Continuer jusqu'à ce que l'ouvrage mesure environ 61-67-72 cm – ajuster après un motif complet de A.2. Arrêter. ASSEMBLAGE: Faire la couture des côtés et sous les manches à 1 m lis des bords. |
||||||||||||||||
Légende diagramme(s) |
||||||||||||||||
|
||||||||||||||||
 |
||||||||||||||||
 |
||||||||||||||||
 |
||||||||||||||||
Vous avez terminé ce modèle?Alors taguez vos photos avec #dropspattern #bluewondershoulderpiece ou bien présentez-les dans la galerie #dropsfan Vous avez besoin d'aide pour ce modèle ?Vous trouverez 7 tutoriels vidéo, une rubrique commentaires/questions et plus encore en vous rendant sur la page du modèle sur garnstudio.com © 1982-2026 DROPS Design A/S. Tous droits réservés. Ce document, y compris ces sous-sections, est protégé par les droits d'auteur (copyright). Apprenez-en davantage sur ce que vous pouvez faire avec nos modèles en bas de chacune des pages de notre site. |
||||||||||||||||


Avec plus de 40 ans dans la conception de modèles tricot et crochet, DROPS Design offre l'une des plus vastes collections de modèles gratuits sur internet - traduits dans 17 langues. À ce jour, on compte 324 catalogues et 12290 modèles en français.
Nous nous efforçons de vous apporter le meilleur de ce que le tricot et le crochet peuvent vous offrir, inspiration et conseils mais également des fils de haute qualité à des prix incroyables! Vous souhaiteriez utiliser nos modèles autrement que pour un usage personnel? Vous pouvez lire ce que vous êtes autorisés à faire dans le Copyright en bas de page de chacun de nos modèles. Bon tricot!
Poster un commentaire sur le modèle DROPS 162-34
Nous aimerions connaître votre avis sur ce modèle !
Si vous souhaitez poser une question, merci de bien vouloir vérifier que vous avez choisi la bonne catégorie dans le formulaire ci-dessous afin d'accélérer la réponse. Les champs obligatoires sont indiqués par une *.