
Suositut kategoriat
Etsitkö tiettyä lankaa?


Kommentit / Kysymykset (75)
![]() Ana kirjoitti:
Ana kirjoitti:
I've just finished knitting the 10cm on the mid back, but I fear I may have done it wrong, as now there's a 10 cm height difference between one side of the work and the other, which doesn't make sense as we're not casting off just yet. Should I have been knitting all the stitches and not just the 28+62?
22.10.2022 - 15:28DROPS Design vastasi:
Boa tarde, Now divide the piece mid back to work back and forth from mid back (this is done so that the seam is mid back). Work in garter stitch back and forth until piece measures 10 cm from the 28 stitches cast on mid front. Deve dividir as 152 malhas em 2 partes que tricota separadamente. até ter 10 cm medidos a partir da carreira em que montou a28 malhas, Bons tricôs!
23.10.2022 - 17:21
![]() Ana kirjoitti:
Ana kirjoitti:
I've just finished knitting the first 24cm and I'm already confused, what do you mean "cast on 1 stitch 2 times and 2 stitches 5 times"? I need a better explanation, please!
09.10.2022 - 16:36DROPS Design vastasi:
Dear Ana, cast on 1 stitch at the end of each row from each side. Cast on 1 stitch at the end of the first row from the RS and WS. Repeat this once more on the next row from the RS and WS. Then, cast on 2 stitches at the end of each row from each side, but repeat this 5 times (so you increase 2 stitches at the end of the next 5 rows from the RS and 5 rows from the WS). Happy knitting!
09.10.2022 - 19:48
![]() Anna kirjoitti:
Anna kirjoitti:
Dzień dobry, czy jest dostępny szkic/schemat do tego projektu?
09.10.2022 - 11:54DROPS Design vastasi:
Witaj Aniu, niestety nie. Napisz jeśli masz jakiś problem. Pozdrawiamy!
10.10.2022 - 10:09
![]() Jutta kirjoitti:
Jutta kirjoitti:
Hallo, wir haben mit der Anleitung angefangen, befinden uns aber grade in einer Sackgasse und kommen auch mit vereinten Denkkräften nicht weiter...Nach dem einseitige Anschlagen der 28 Maschen und dem Teilen an der hinteren Mitte können wir uns so langsam nicht mehr vorstellen wie es weiter geht und wie daraus die Kapuze entstehen soll. Hat jemand vielleicht eine Zeichnung? Was genau ist die hintere / vordere Mitte? Wie wird alles zusammengenäht? Ich hoffe jemand kann helfen
06.08.2022 - 15:54DROPS Design vastasi:
Liebe Jutta, die Arbeit wird zuerst in Reihen von der vorderen Mitte gestrickt, dann wenn die neuen Maschen für die Öffnung für Gesicht angeschlagen wurden, soll die Arbeit von der hinteren Mitte gestrickt werden (so gibt es keine Naht an der vorderen Mitte). Am Ende nähen Sie die Kapuze oben zusammen und die unteren Reihen in der hinteren Mitte (ab den neuen Maschen bis zur Abketterand). Viel Spaß beim stricken!
08.08.2022 - 08:07
![]() Tiko kirjoitti:
Tiko kirjoitti:
First time I got confused with your pattern 😊1. the whole piece is in gaeter stitch except for the 158 stitches around face? 2. Is the piece worked inthe round at any stage? 3. Is it possible to send or add to the pattern a drawing fo what the finished piece looks like prior to been assambled? Thanks for the answerrs 💚
13.03.2022 - 19:12DROPS Design vastasi:
Dear Tiko, 1. correct, only the ribbing edge around face is worked in rib, the whole work is then worked in garter stitch. 2. Piece is only worked in rows, but first from mid front (until opening for face is done), then from mid back (after you have increased/cast on the stitches for under face). 3. we have no chart for this sorry. Happy knitting!
14.03.2022 - 12:06
![]() Ana kirjoitti:
Ana kirjoitti:
Could I do the whole pattern in rib instead of garter stitch? How could I adapt from one to the other? Thank you so much!
24.02.2022 - 19:10DROPS Design vastasi:
Dear Ana, your tension would be then different and your would have to re-calculate the whole pattern. You might find another pattern among these ones. Happy knitting!
25.02.2022 - 08:59
![]() Ayra kirjoitti:
Ayra kirjoitti:
Plz explain when you pick up 158 stitches around face opening do you have to pick up all of the stitches or you have to pick up 3 and skip one. Thanks
13.02.2022 - 20:44DROPS Design vastasi:
Hi Ayra, you have to distribute new stitches evenly to have 158 stitches around face opening in total. Happy knitting!
14.02.2022 - 08:18
![]() Ayra kirjoitti:
Ayra kirjoitti:
Plz explain for mid back seam after working on 28 new cast on stitches and 62 stitches when you turn your work do you have to do the purl stitch from that side and also you have to work on 28 stitches.again so the mid back seam is done. Now you have to do garter stitch for all of the stitches. Thanks
04.02.2022 - 01:51DROPS Design vastasi:
Dear Ayra, when you cut the yarn after the hood part, you start again piece from mid back (= approx. middle of previous rows), and will then cast on new stitches for face opening, ending rows on mid back. The seam on mid back will start here and will be sewn to the bottom edge; the 28 sts are cast on on mid front, there won't be any seam here. Hope it will help. Happy knitting!
04.02.2022 - 09:16
![]() Ayra kirjoitti:
Ayra kirjoitti:
Plz explain how you sew the hood in the end? Thanks
03.02.2022 - 02:10DROPS Design vastasi:
Dear Ayra, fold the cast on edge double and sew cast on sts together; and then sew on mid back from the beginning of row worked from mid back (after face opening) towards the cast off edge. Happy knitting!
03.02.2022 - 08:47
![]() Marta kirjoitti:
Marta kirjoitti:
One follow up if I may. If there is a seam mid-back, where is the face opening. I'm really confused as you can tell.
02.02.2022 - 14:18DROPS Design vastasi:
Dear Marta, you first work the hood, back and forth from mid front, then cut the yarn and start on mid back to work now from the mid back, increasing stitches on mid front and working the 2nd half of sts to mid back. The seam will be on mid back from this part. Hope it will help. Happy knitting!
02.02.2022 - 14:29
|
|
Lawless#lawlesshood |
|
 |
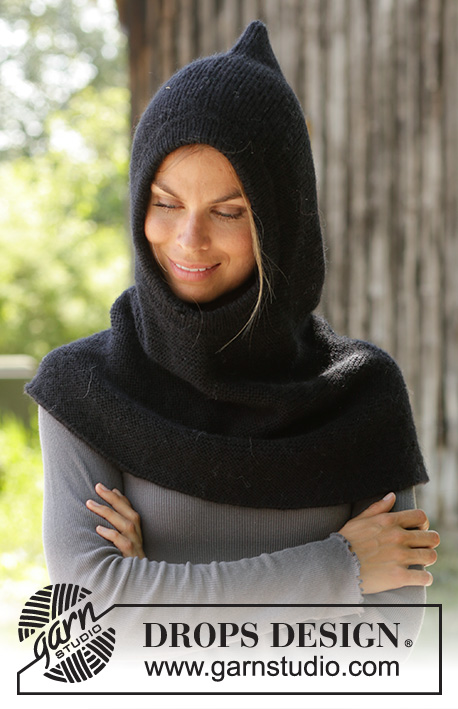 |
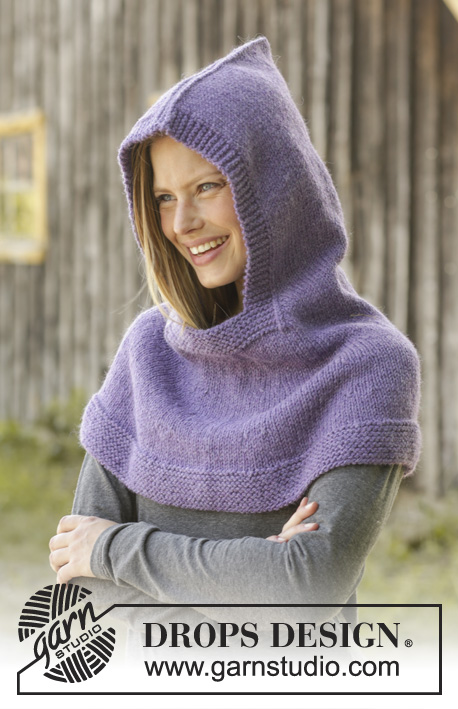
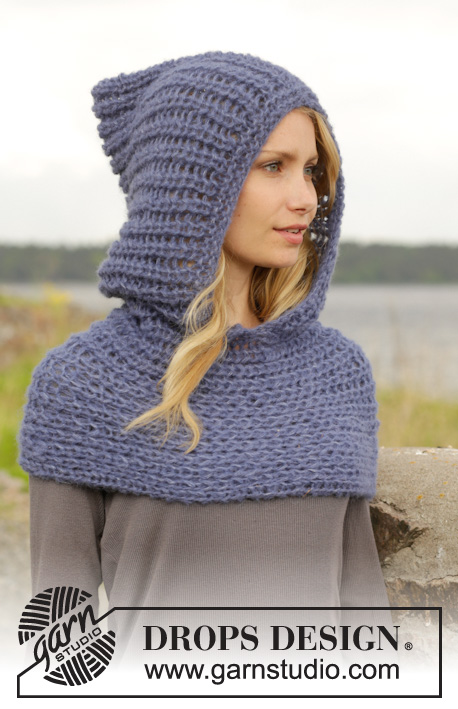
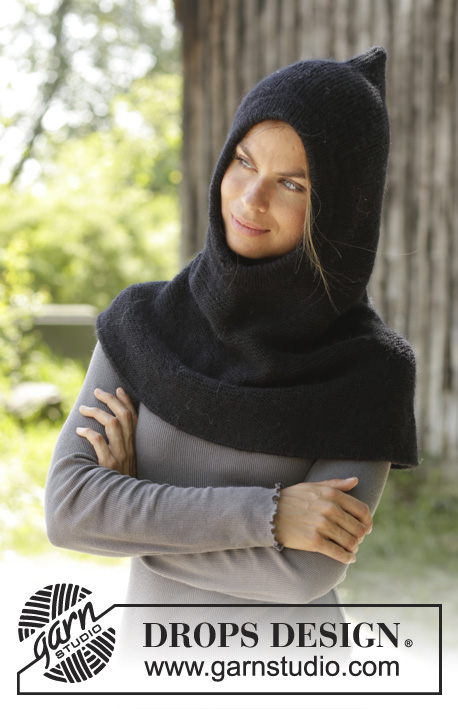
Ylhäältä alas neulottu huppuhuivi DROPS Merino Extra Fine- tai DROPS Karisma-langasta. Työssä on ainaoikein -neuletta. Koot S-XXXL.
DROPS 192-2 |
|
|
OHJE: ------------------------------------------------------- AINAOIKEINNEULE tasona: Neulo kaikki kerrokset oikein. LISÄYSVINKKI: Neulo kunnes merkkilankaa edeltää 1 silmukka, 1 langankierto, neulo 2 silmukkaa oikein (merkkilanka on näiden silmukoiden keskellä), 1 langankierto. Seuraavalla kerroksella langankierto neulotaan kiertäen, jottei muodostuisi reikää. ------------------------------------------------------- ALOITA TYÖ TÄSTÄ: ------------------------------------------------------- HUPPUHUIVI: LYHYT YLEISKATSAUS TYÖSTÄ: Työ neulotaan tasona pyöröpuikolla, ylhäältä alas. Lopuksi työ ommellaan yhteen keskeltä takaa ja hupun kärjestä. HUPPUHUIVI: Luo 100 silmukkaa pyöröpuikolle nro 3 Merino Extra Fine- tai Karisma-langalla. Neulo tasona AINAOIKEAA (lue selitys yllä). TARKISTA NEULETIHEYS! Kun työn korkeus on 24 cm, luo jokaisen kerroksen loppuun kumpaankin reunaan (keskelle eteen, kasvoaukon reunaan) silmukat näin: Luo 1 silmukka 2 kertaa ja 2 silmukkaa 5 kertaa (= kumpaankin reunaan luotiin 12 silmukkaa) = 124 silmukkaa. Luo seuraavan kerroksen loppuun (keskelle eteen, kasvoaukon alareunaan) 28 silmukkaa = 152 silmukkaa. Neulo oikeaa hupun takaosan keskelle asti, eli neulo keskiedun luotujen 28 silmukan jälkeen 62 silmukkaa oikein. Jaa sitten työ ja jatka neulomista tasona keskeltä takaa alkaen (tällä tavoin sauma tulee keskelle taakse). Neulo tasona ainaoikeaa, kunnes työn korkeus keskelle eteen luoduista 28 silmukasta mitattuna on 10 cm. Kiinnitä nyt 8 merkkilankaa työhön seuraavasti: Aloita keskeltä takaa ja kiinnitä ensimmäinen merkkilanka 10 silmukan jälkeen, kiinnitä sitten seuraavat 7 merkkilankaa aina 19 silmukan välein, viimeisen merkkilangan jälkeen kerroksella on jäljellä 9 silmukkaa. Jatka ainaoikein -neuletta. Lisää seuraavalla oikean puolen kerroksella jokaisen merkkilangan molemmin puolin 1 silmukka (lue LISÄYSVINKKI). Toista tällaiset lisäykset n. 3 cm välein yhteensä 6-7-8 kertaa = 248-264-280 silmukkaa. Jatka neulomista, kunnes työn korkeus on yhteensä 58-60-62 cm. Päätä silmukat 2-kertaisella langalla. VIIMEISTELY: Ompele huppuhuivi yhteen keskeltä takaa ja hupun kärjen luomisreunan kohdalta (ompele uloimmista silmukanreunoista). KASVOAUKON REUNUS: Poimi työn oikealta puolelta kasvoaukon reunoista 158 silmukkaa lyhyelle pyöröpuikolle nro 2,5. Neulo 1 kerros nurin, 1 kerros oikein, 1 kerros nurin, 1 kerros oikein. Neulo sitten 6 cm joustinneuletta (1 silmukka oikein / 1 silmukka nurin). Päätä silmukat joustinneuletta neuloen. Taita ja kiinnitä reunus kaksinkerroin työn nurjalle puolelle. |
|
Oletko tehnyt tämän mallin?Tägää tällöin kuviasi #dropspattern #lawlesshood tai lähetä kuvat #dropsfan galleriaan. Tarvitsetko apua tämän ohjeen kanssa?Löydät 17 ohjevideota, kommentteja/kysymyksiä ja muuta osoitteessa www.garnstudio.com © 1982-2026 DROPS Design A/S. Pidätämme kaikki oikeudet. Tämä tiedosto ja kaikki sen alatiedostot on suojattu tekijänoikeuslailla. Lue lisää siitä, mitä voit tehdä ohjeillamme, verkkosivujemme jokaisen ohjeen alaosasta. |
|


DROPS Design on toiminut neule- ja virkkausalalla yli 40 vuotta ja meillä on yksi kaikkein laajin valikoima ilmaisia ohjeita verkossa - käännettynä 17 kielelle. Tänään meiltä löytyy 324 lehteä ja 12290 ohjetta - joista 11706 ohjetta on käännetty suomeksi.
Työskentelemme ahkerasti, jotta voisimme antaa teille kaikkein parhaimpia neule- ja virkkausohjeita, inspiraatiota ja neuvoja sekä korkealaatuisia lankoja todella edulliseen hintaan! Haluaisitko käyttää ohjeitamme muuhun kuin henkilökohtaiseen käyttöön? Voit lukea säännöistä ohjeiden Tekijänoikeus -tekstissä, joka löytyy kaikkien ohjeidemme alapuolelta. Hauskoja hetkiä käsitöiden parissa!
Lisää kommentti ohjeeseen DROPS 192-2
Haluamme mielellämme kuulla mielipiteesi tästä ohjeesta!
Mikäli haluat esittää kysymyksen, valitse oikea kategoria alla olevasta valikosta - tällä tavoin saat vastauksen nopeammin. Pakolliset kentät on merkitty tähdellä *.