
Suositut kategoriat
Etsitkö tiettyä lankaa?


Kommentit / Kysymykset (54)
![]() Ada kirjoitti:
Ada kirjoitti:
Goedemiddag, ben de poncho in maat M/L aan het maken. Nu bij de 3e herhaling t/m toer 7 en ben 67 cm hoog (dus bijna bij de 71 cm). Zag dat je in ieder geval bij een toer met stokjes moet stoppen. 2 vragen: 1. Ik neem aan dat dit ook halverwege het patroon kan? 2. Maakt het nog uit of dit dan toer 12 of 13 is? Alvast bedankt voor de reactie. Groet, Ada
21.03.2020 - 14:41DROPS Design vastasi:
Dag Ada,
Ja hoor, dit kan halverwege het patroon en toer 12 of 13 maakt ook niet uit want het zijn beide toeren met stokjes.
22.03.2020 - 16:53
![]() Cathie kirjoitti:
Cathie kirjoitti:
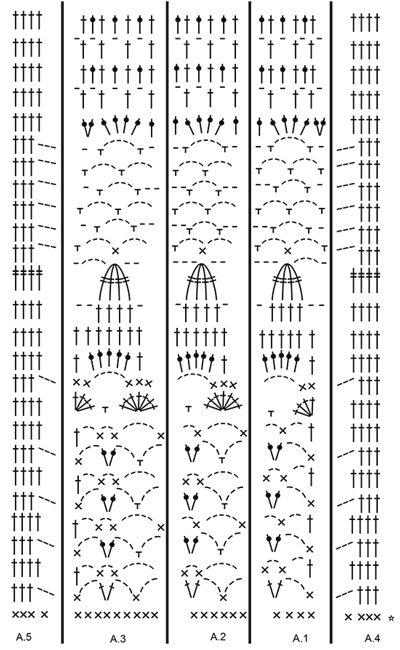
I have been crocheting for 50 years. I do not know how to read a diagram. I only use written instructions. However, I have no clue what you are talking about after the 2nd row. What is A.4 over the next 4 stitches, etc? What is the A. ? Help please. I am so lost!
08.03.2020 - 03:40DROPS Design vastasi:
Dear Cathie, it is well worth the time and effort to figure out how to read pattern diagrams, because they not only tell you what to do at the very next step, but also show you how the stitches AND the rows relate to each other. In this case pattern A.4 shows you the trebles stitches at the right of the diagram. HERE you can find a lesson on how to read crochet diagrams, and do not forget, that you can always ask for help (in person or over teh phone) for help in the store where you bought your DROPS yarn from. Happy Crafting!
08.03.2020 - 22:56
![]() Imelda Parra Suarez kirjoitti:
Imelda Parra Suarez kirjoitti:
Quisiera elaborar el poncho con patron de calados en Paris pero no entiendo las abreviasiones que colocan me gustaría algo más claro o una fotografia donde se observe claramente las puntadas. Muchas gracias por su atención quedo atenta.
14.11.2019 - 21:03DROPS Design vastasi:
Hola Imelda. No disponemos de más fotos que las que están publicadas de este modelo. Tienes bajo el patrón varios vídeos explicativos y el diccionario de abreviaturas está en este link https://www.garnstudio.com/dictionary.php?lang=es
17.11.2019 - 19:34
![]() Phoebe Musa kirjoitti:
Phoebe Musa kirjoitti:
Kindly give us the pattern in writing, diagrams are kind of confusing
15.10.2019 - 10:15DROPS Design vastasi:
Dear Mrs Musa, when there are only diagrams in a pattern, such as this one for example, you will find help with crochet diagrams here. Happy crocheting!
15.10.2019 - 10:25
![]() Birgitta kirjoitti:
Birgitta kirjoitti:
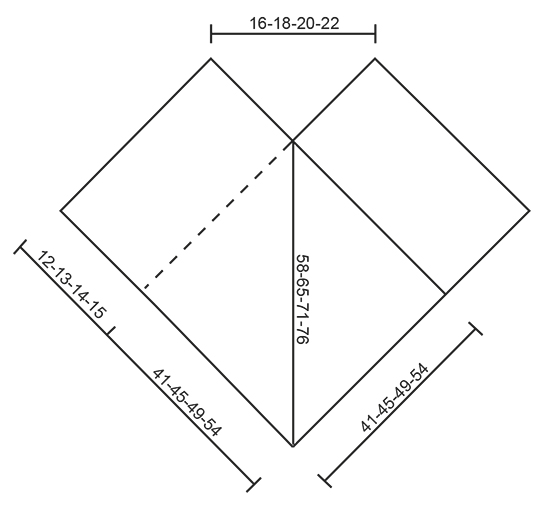
Hej. Jag skulle vilja veta bredden på "halsduken". Mvh Birgitta
26.08.2019 - 11:08DROPS Design vastasi:
Hej. Du hittar alla mått i de olika storlekarna på måttskissen längst ner på mönstret. Lycka till!
27.08.2019 - 08:15
![]() SAROJ kirjoitti:
SAROJ kirjoitti:
Hi there Is there any way I can get this pattern fully written out, I get extremely confused reading a diagram. Please assist.
23.07.2019 - 11:20DROPS Design vastasi:
Dear Mrs Saroj, there are only diagrams to this pattern but you will find here how to read crochet diagrams, should you need any further assistance reading diagrams, feel free to contact your DROPS store even per mail or telephone. Happy crocheting!
06.08.2019 - 09:45
![]() Carrie kirjoitti:
Carrie kirjoitti:
Hello again! I’m just about to finish the first part of the diagram. When starting the diagram again, to get the length, do I start with the rows of single crochets at the very bottom, or do I start with the second row of 3 dc, chain 3 on top of the top most row of dc? Thank you! I think I’m going to like diagrams much better than the US way of writing every line out! :)
14.06.2019 - 02:57DROPS Design vastasi:
Dear Carrie, when repeating the diagrams in height, start from 2nd row in diagram, ie skip the single crochets row from the very bottom. Happy crocheting!
14.06.2019 - 07:27
![]() Carrie kirjoitti:
Carrie kirjoitti:
I have gotten up to the 4th row above the row of single crochets and have torn it out 3 times. Where does the 4th DC in stitch go? The first of the chain 3 below? I am assuming that this row goes from A4-A5. I can’t tell where single crochets go between A1 and A2. Do they go into each of the DC around chain below? The diagram looks like one DC in the first DC around and the second in the first of chain 3. That just doesn’t seem right. Thank you, Carrie
11.06.2019 - 02:20DROPS Design vastasi:
Dear Carrie, on row 3 (5, 7..) in A.4/A.5 the 4th dc (in A.4) and the first dc (in A.5) will be worked in the first chain (A.4)/last chain (= next to the dc) in A.5. So that there are either 3 or 4 dc in A.4/A.5. Happy crocheting!
11.06.2019 - 12:32
![]() Hedi kirjoitti:
Hedi kirjoitti:
Ich möchte wissen wie ich dieses teil zusammen nähe
02.05.2019 - 21:49DROPS Design vastasi:
Liebe Hedi, dieses Video zeigt wie man einen gestrickten Poncho zusammennäht - beim gehäkelten wird es die gleiche Technik. Viel Spaß beim häkeln!
03.05.2019 - 09:00
![]() Gemma kirjoitti:
Gemma kirjoitti:
Leuk patroon. Om de juiste hoogte, 84 cm voor maat XXL, te krijgen, veronderstel ik dat ik na de gegeven toeren ik weer ergens aan het begin van de tekening werder moet haken. Klopt dat? Bij welke toer moet ik dan weer verder haken? Alvast bedankt voor jullie antwoord.
20.04.2019 - 21:50DROPS Design vastasi:
Dag Gemma,
Je kan inderdaad, nadat je A.x 1 keer in de hoogte hebt gebreid, gewoon weer opnieuw beginnen onderaan, dus bij de eerste toer na de toer met het sterretje.
21.04.2019 - 16:51
|
|||||||||||||||||||||||||||||||
Sky Love#skyloveponcho |
|||||||||||||||||||||||||||||||
 |
 |
||||||||||||||||||||||||||||||
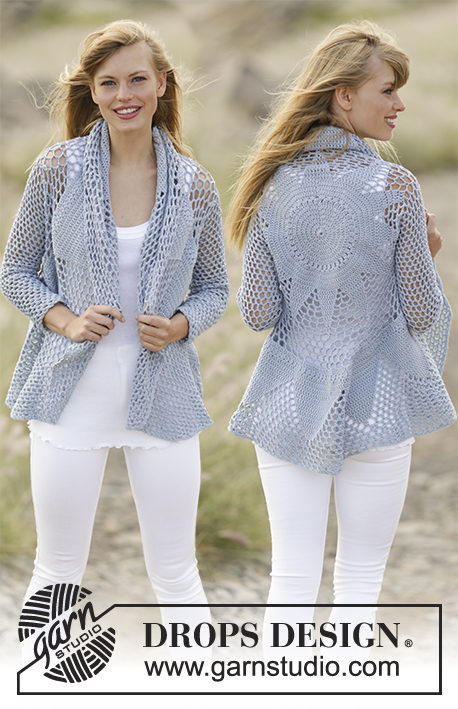
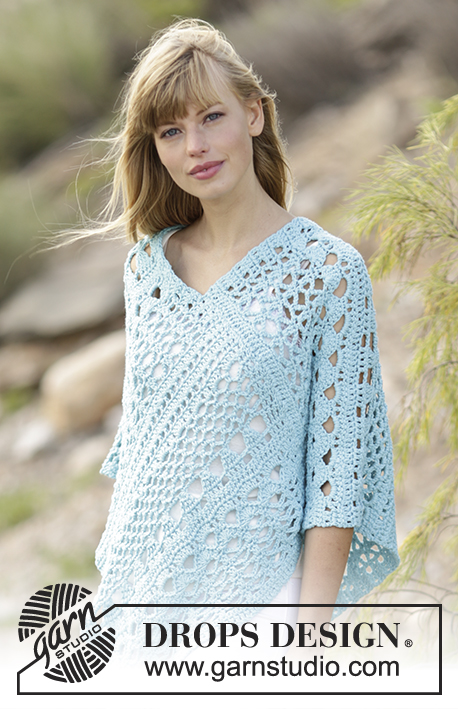
Virkattu DROPS pitsiponcho ”Paris”-langasta. Koot S-XXXL.
DROPS 168-13 |
|||||||||||||||||||||||||||||||
|
VIRKKAUSINFO: Jokaisen ks-kerroksen aluksi virkataan 1 kjs (= ensimmäinen ks). Jokaisen p-kerroksen aluksi virkataan 3 kjs (= ensimmäinen p). Jokaisen kp-kerroksen aluksi virkataan 4 kjs (= ensimmäinen kp). MALLIVIRKKAUS: Katso piirrokset A.1-A.5. ---------------------------------------------------------- PONCHO: Virkataan 2 kappaleena ja ommellaan yhteen. Virkkaa 77-85-93-101 kjs koukulla nro 5 ja Paris-langalla. Virkkaa 1 p 4. kjs:aan koukusta laskien (= 2 p), 1 p seuraavaan kjs:aan, *jätä 1 kjs väliin, 1 p jokaiseen 3 seuraavaan kjs:aan*, toista *-* koko krs:n pituudelta = 57-63-69-75 p. Virkkaa 1 ks jokaiseen p:seen (= nurja puoli, LUE VIRKKAUSINFO) = 57-63-69-75 ks. Virkkaa sitten seuraavasti: Virkkaa ensimmäisten 4 ks:n kohdalla piirroksen A.4 mallivirkkausta, virkkaa seuraavien 4 ks:n kohdalla piirroksen A.1 mallivirkkausta, virkkaa seuraavien 36-42-48-54 ks:n kohdalla piirroksen A.2 mallivirkkausta (= 6-7-8-9 mallikertaa krs:lla), virkkaa seuraavien 9 ks:n kohdalla piirroksen A.3 mallivirkkausta, virkkaa lopuksi viimeisten 4 ks:n kohdalla piirroksen A.5 mallivirkkausta. Jatka mallivirkkausta tähän tapaan. TARKISTA VIRKKUUTIHEYS! Jatka virkkaamista, kunnes työn pituus on 65-71-77-84 cm ja olet viimeksi virkannut piirroksen p-kerroksen. Katkaise lanka ja päättele langanpäät. Virkkaa toinen osa samoin. VIIMEISTELY: Aseta 1. osan päätösreuna 2. osan oikean pitkittäissivun viereen, alareunasta alkaen ja 41-45-49-54 cm:n matkalta ylöspäin. Älä venytä työtä liikaa. Ompele osat yhteen pienin siistein pistoin. Kiinnitä sitten 2. osan päätösreuna 1. osan oikeaan sivuun samalla tavalla. |
|||||||||||||||||||||||||||||||
Ruutupiirroksen selitykset |
|||||||||||||||||||||||||||||||
|
|||||||||||||||||||||||||||||||
 |
|||||||||||||||||||||||||||||||
 |
|||||||||||||||||||||||||||||||
Oletko tehnyt tämän mallin?Tägää tällöin kuviasi #dropspattern #skyloveponcho tai lähetä kuvat #dropsfan galleriaan. Tarvitsetko apua tämän ohjeen kanssa?Löydät 8 ohjevideota, kommentteja/kysymyksiä ja muuta osoitteessa www.garnstudio.com © 1982-2026 DROPS Design A/S. Pidätämme kaikki oikeudet. Tämä tiedosto ja kaikki sen alatiedostot on suojattu tekijänoikeuslailla. Lue lisää siitä, mitä voit tehdä ohjeillamme, verkkosivujemme jokaisen ohjeen alaosasta. |
|||||||||||||||||||||||||||||||


DROPS Design on toiminut neule- ja virkkausalalla yli 40 vuotta ja meillä on yksi kaikkein laajin valikoima ilmaisia ohjeita verkossa - käännettynä 17 kielelle. Tänään meiltä löytyy 324 lehteä ja 12290 ohjetta - joista 11709 ohjetta on käännetty suomeksi.
Työskentelemme ahkerasti, jotta voisimme antaa teille kaikkein parhaimpia neule- ja virkkausohjeita, inspiraatiota ja neuvoja sekä korkealaatuisia lankoja todella edulliseen hintaan! Haluaisitko käyttää ohjeitamme muuhun kuin henkilökohtaiseen käyttöön? Voit lukea säännöistä ohjeiden Tekijänoikeus -tekstissä, joka löytyy kaikkien ohjeidemme alapuolelta. Hauskoja hetkiä käsitöiden parissa!
Lisää kommentti ohjeeseen DROPS 168-13
Haluamme mielellämme kuulla mielipiteesi tästä ohjeesta!
Mikäli haluat esittää kysymyksen, valitse oikea kategoria alla olevasta valikosta - tällä tavoin saat vastauksen nopeammin. Pakolliset kentät on merkitty tähdellä *.