
Suositut kategoriat
Etsitkö tiettyä lankaa?


Kommentit / Kysymykset (35)
![]() Mie Iversen kirjoitti:
Mie Iversen kirjoitti:
Jeg forstår ikke hvorfor der i de første 4 cm er de 3 vr og det ikke bare er 2r/2vr? Hvor er de tre vr placeret ift. M1?
01.12.2014 - 20:44DROPS Design vastasi:
Hej Mie, Det er bar for at få maskeantallet til at passe. M.1 starter lige over de 3 vr når arb måler 4 cm. God fornøjelse!
02.12.2014 - 10:29Norris kirjoitti:
Bonjour Je suis à faire le patron de mitaine je veux savoir que veux dire une maille envers sur l'endroit, le dedans de la main n'ai pas tricoté en jersey j'attends votre réponse
01.10.2014 - 20:22DROPS Design vastasi:
Bonjour Mme Norris, les mitaines se tricotent en rond en jersey end pour la torsade (= mailles à tricoter à l'endroit) et en jersey env entre les torsades et paume de la main (= mailles à tricoter à l'envers). Bon tricot!
02.10.2014 - 09:07Renée kirjoitti:
I am unsure about the YO increases for the thumb on the left hand. I know how to do the YOs that is fine. But on the round following the YOs, I am not sure if I need to knit into the back of the loop in the same way on both these YOs as the 2nd YO is done before a knit stitch & the 1st YO is before a purl stitch. Do I knit into the back of these 2 YOs in the same way.
16.06.2014 - 14:39DROPS Design vastasi:
Dear Renée, you should work all YOs (ie the increase sts) into back of loop in order to avoid holes, ie on next row P YOs into back of loop. Happy knitting!
16.06.2014 - 15:07Renée kirjoitti:
Thanks, I figured it out anyway and completed the wrist warmers yesterday. I am very pleased with the end result. They are really lovely.
03.06.2014 - 14:00Renée kirjoitti:
When slipping the 11 thumb sts for the Right hand wrist warmer, you need to slip the first 11 sts from the beginning of the round. You do not need to take the knit st from the end of the previous round as the YO increases were done before & after the 2nd stitch. Is this correct?
31.05.2014 - 16:08DROPS Design vastasi:
Dear Renée, when all inc for thumb gusset are done, slip on a st holder all thumb sts + 1 st before all inc sts + 1 st after all inc sts (for left wrist warmer, you will put aside the 1st st on round). Happy knitting!
03.06.2014 - 09:28Renée kirjoitti:
I forgot to ask in my last post, when you slip the thumb stitches, you need to slip 1 st from either side of the 9 sts, giving 11 sts in total. But slipping this 11th stitch from the beginning of the round onto the stitch holder - does this not throw the pattern off, as M.1 starts with 2 knit stitches & you have just slipped one of them off for the thumb opening. How do you compensate for this? I know you cast on 3 new ones at the end of the round. Can you please clarify.
20.05.2014 - 15:41DROPS Design vastasi:
Dear Renée, follow the pattern as before, ie the first 2 sts casted on over thumb will be P (as the other sts on upper hand) and the 3rd st will be K as before (as the first st from beg of round). Happy knitting
20.05.2014 - 15:48Renée kirjoitti:
I'm about to slip the thumb stitches & need clarification, as I have never done a thumb hole before. I purl until I have just 10sts left in the Rnd. I slip these 10sts from the working needle to a stitch holder. And then slip 1 st from the left hand needle (beg of Rnd) to stitch holder = 11sts. Then cast on 3 sts onto the needle I have just slipped the 10sts from (the working needle) using the backward loop cast on. Would this be correct?
20.05.2014 - 14:26DROPS Design vastasi:
Dear Renée, this looks correct. Happy knitting!
20.05.2014 - 15:41Renée kirjoitti:
Of course. Thank you for clarifying.
20.05.2014 - 12:30Renée kirjoitti:
For thumb increase, pattern states: Inc 1 st on both sides of last st on round i.e. you need to increase 2 sts on every 4th round a total of 4 times. This should give 8 sts, but the pattern states 9 sts and 53 sts in total. What am I missing?
19.05.2014 - 17:24DROPS Design vastasi:
Dear Renée, the last st of round counts in the thumb sts, so that you get that st + 4 inc each side = 9 sts for thumb gusset. Happy knitting!
20.05.2014 - 08:53Renée kirjoitti:
I am having a lot of problems with the 2nd YO. I cannot manage to do a YO when there are no stitches left on the needle. In the video, I see that the YOs are done when there are 2 sts left on the needle i.e. YO, K, YO, K. For this pattern would it be possible for me to do the YOs with 2 sts left on the needle, so I would do the following: YO, P; YO, P? Or would this not work for this pattern?
19.05.2014 - 17:17DROPS Design vastasi:
Dear Renée, to this pattern you will work the inc as follows, YO, work last st of round, YO, and work a new round. Happy knitting!
20.05.2014 - 08:52
|
|||||||||||||||||||
DROPS 108-36 |
|||||||||||||||||||
|
|
|||||||||||||||||||
DROPS palmikolliset ranteenlämmittimet ”Karisma”-langasta. Nämä voidaan neuloa myös ”Merino”-langasta.
DROPS 108-36 |
|||||||||||||||||||
|
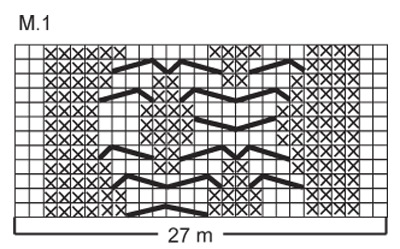
Mallineule: Katso ruutupiirros M.1. Piirros näyttää mallineuletta oikealta puolelta katsottuna. Vasen ranteenlämmitin: Neulotaan suljettuna neuleena sukkapuikoilla. Luo sukkapuikoille nro 3,5 Karisma-langalla 45-49 s. Neulo 1 krs oikein. Jatka neulomalla näin: 0-2 o, 3 n ja jäljellä olevilla 42-44 s:lla 2 o/2 n -joustinta. Kun työn pituus on 4 cm, vaihda sukkapuikkoihin nro 4 ja jatka neulomalla näin: 0-2 n, M.1 (= 27 s), 18-20 n. Tarkista neuletiheys! Kun työn pituus on 15 cm, aloita peukalokiilan lisäykset, eli lisää kerroksen toiseksi viimeisen silmukan molemmin puolin 1 s. Lisää tekemällä 1 langankierto puikolle, seuraavalla krs:lla langankierto neulotaan kiertäen nurin, jottei muodostuisi reikää. Tee lisäykset 4 krs välein yht. 4-5 kertaa = 9-11 s peukaloa varten ja yht. 53-59 s. Kun työn pituus on 20-21 cm, siirrä peukalon s:t + 1 s näiden silmukoiden molemmin puolin (= 11-13 s) apulangalle. Luo apulangan silmukoiden tilalle 3 s = 45-49 s. Jatka mallineuletta kunnes työn pituus on 23-24 cm. Jatka nyt neulomalla joustinta sukkapuikoilla nro 3,5 seuraavasti: 0-2 o, 3 n ja jäljellä olevilla 42-44 s:lla 2 o/2 n -joustinta. Päätä s:t joustinta neuloen kun työn pituus on 27-28 cm. Peukalo: Ota apulangan 11-13 s sukkapuikoille nro 3,5 ja poimi peukalokiilan takareunasta 3 s = 14-16 s. Neulo 1 krs oikein ja kavenna samalla tasavälein 2-0 s = 12-16 s. Neulo 2 o/2 n -joustinta kunnes peukalon pituus on 4 cm. Päätä s:t joustinta neuloen. Oikea ranteenlämmitin: Neulo vasemman ranteenlämmittimen peilikuvaksi, eli neulo mallineuletta seuraavasti: 18-20 n, M.1 (= 27 s), 0-2 n. Tee nyt lisäykset peukalokiilaa varten kerroksen toisen silmukan molemmin puolin. |
|||||||||||||||||||
Ruutupiirroksen selitykset |
|||||||||||||||||||
|
|||||||||||||||||||
 |
|||||||||||||||||||
Oletko tehnyt tämän mallin?Tägää tällöin kuviasi #dropspattern tai lähetä kuvat #dropsfan galleriaan. Tarvitsetko apua tämän ohjeen kanssa?Löydät 14 ohjevideota, kommentteja/kysymyksiä ja muuta osoitteessa www.garnstudio.com © 1982-2026 DROPS Design A/S. Pidätämme kaikki oikeudet. Tämä tiedosto ja kaikki sen alatiedostot on suojattu tekijänoikeuslailla. Lue lisää siitä, mitä voit tehdä ohjeillamme, verkkosivujemme jokaisen ohjeen alaosasta. |
|||||||||||||||||||


DROPS Design on toiminut neule- ja virkkausalalla yli 40 vuotta ja meillä on yksi kaikkein laajin valikoima ilmaisia ohjeita verkossa - käännettynä 17 kielelle. Tänään meiltä löytyy 325 lehteä ja 12298 ohjetta - joista 11747 ohjetta on käännetty suomeksi.
Työskentelemme ahkerasti, jotta voisimme antaa teille kaikkein parhaimpia neule- ja virkkausohjeita, inspiraatiota ja neuvoja sekä korkealaatuisia lankoja todella edulliseen hintaan! Haluaisitko käyttää ohjeitamme muuhun kuin henkilökohtaiseen käyttöön? Voit lukea säännöistä ohjeiden Tekijänoikeus -tekstissä, joka löytyy kaikkien ohjeidemme alapuolelta. Hauskoja hetkiä käsitöiden parissa!
Lisää kommentti ohjeeseen DROPS 108-36
Haluamme mielellämme kuulla mielipiteesi tästä ohjeesta!
Mikäli haluat esittää kysymyksen, valitse oikea kategoria alla olevasta valikosta - tällä tavoin saat vastauksen nopeammin. Pakolliset kentät on merkitty tähdellä *.