
Suositut kategoriat
Etsitkö tiettyä lankaa?


Kommentit / Kysymykset (238)
![]() Andrea kirjoitti:
Andrea kirjoitti:
Hallo, eine Frage: Wenn ich mit den verkürzten Reihen fertig bin, muss ich dann direkt wieder über alle 124M (Gr.xxl) stricken, oder nach dem selben Schema wie beim verkürzen die Reihen wieder verlängern? LG
23.02.2026 - 16:37DROPS Design vastasi:
Liebe Andrea, Sie beginnen erneut mit den verkürzten Reihen (die ersten 2 Runden stricken Sie über alle Maschen) , um den Kreis weiter zu erweitern. Viel Spaß beim Stricken!
24.02.2026 - 09:02
![]() Lotta kirjoitti:
Lotta kirjoitti:
Äh glöm min fråga, repar upp & använder ett för mig mer begripligt mönster.
27.11.2025 - 17:23
![]() Lotta kirjoitti:
Lotta kirjoitti:
Hej igen! Storlek XL/XXL totalt antal maskor 124 st och märktråden sitter på maska 73. Just nu är stickningen bananformad, maska 73 sitter närmare innercirkeln och fattar att det är från den jag ska mäta. Men hur ska jag mäta, mot vad? Ska fortsätta med att minska med 8 maskor för första gången. Vi hörs!
25.11.2025 - 16:04DROPS Design vastasi:
Hei Lotta. Da har vi "glemt" ditt spørsmål og ønsker deg lykke til på ditt neste prosjekt :) mvh DROPS Design
01.12.2025 - 11:27
![]() Lotta kirjoitti:
Lotta kirjoitti:
Begriper inte hur jag ska mäta från märktråden för ärmhål!? Skickar gärna en bild men det går ju inte i detta formulär. Kontakta gärna mig via e-post. Tack på förhand!
24.11.2025 - 18:29DROPS Design vastasi:
Hej Lotta, skriv hvilken størrelse du strikker. Skriv hvor mange masker og cm du har og skriv den sætning du ikke forstår, så skal vi prøve at hjælpe dig her :)
25.11.2025 - 13:58
![]() Lisa kirjoitti:
Lisa kirjoitti:
Hi, Just trying to clarify; on the second row, do I leave 2 stitches on needle and turn, work 14 stitches then turn and work 16 stitches? Then repeat row 1 and do I leave 4 stitches unworked or just 2 again?
11.11.2025 - 19:16
![]() Lisa kirjoitti:
Lisa kirjoitti:
Pattern instructions far too difficult. I love the jacket and I love a challenge but this? What happened to row 1 all the way through to last row with specific instructions such as ask or dec or s1k1. Etc? I give up😞
27.07.2025 - 20:09
![]() Lisa kirjoitti:
Lisa kirjoitti:
So, am I leaving the the uncorked stitches on the needle or just not knitting them?
27.07.2025 - 19:38DROPS Design vastasi:
Dear Lisa, work the first 2 rows over all 112 stitches. In the 3rd row work only over the first 16 sts of the row. Now, start working the next row over all stitches but turn when you have worked 110 stitches. Work the next row back over all stitches, but turn when you have worked 108; so you work 2 less stitches on each side. Repeat rows 3 and 4 exactly as before. Continue working 2 less stitches on each side on the "long" rows 9 more times, then 4 less stitches 9 times and 8 less stitches 5 times. The stitches are simply left unworked until we "start at the beginning" the short rows technique. Happy knitting!
27.07.2025 - 20:36
![]() Lisa kirjoitti:
Lisa kirjoitti:
Where do I start the pattern? At the top of page or where it says circle? Also, what does it mean under the short row section to start again from beginning over all stitches? How many sections is this piece? I’m reading cast on 112 sts. Twice and under short row section start over from beginning? So, cast on another 112sts?
27.07.2025 - 19:06DROPS Design vastasi:
Dear Lisa, yes, the written instructions start at "Circle"; all of the instructions above are tips for when you are crochetting. In the short rows you work by turning the piece (but not decreasing) in order to get the correct circle shape. After reaching the remaining 18-16-20-20 outermost sts of circle, you will now work over all stitches again (not the pattern from the beginning); they were not decreased, just left behind. You work a single circle: you cast on 112 stitches, over which you will work the chart and short rows. Then you work the armholes, and continue working the other half-circle on the other side. Then you work the sleeves. Happy knitting!
27.07.2025 - 19:25
![]() Lisa kirjoitti:
Lisa kirjoitti:
Is there a row by row instruction for this pattern (ie, row 1, row 2 etc)? I find this really confusing
27.07.2025 - 15:44DROPS Design vastasi:
Dear Lisa, this is the only version of the pattern available, with both charts and written instructions. If you have any doubts as you read and work the pattern you can write us a comment here and we will try to answer all of your questions as clearly as possible. Happy knitting!
27.07.2025 - 18:59
![]() Patricia Alexandra Caruso Reis kirjoitti:
Patricia Alexandra Caruso Reis kirjoitti:
Caros, os diagramas M1 já não estão nítidos. Existe alguma nova versão desses diagramas que possam ser melhor vistos? Está tudo opaco, talvez pelo tempo. Grata
07.06.2024 - 03:36DROPS Design vastasi:
Bom dia, Vamos comunicar à equipa de web design. Obrigado!
07.06.2024 - 09:17
|
||||||||||||||||
Blue Moon |
||||||||||||||||
 |
 |
|||||||||||||||
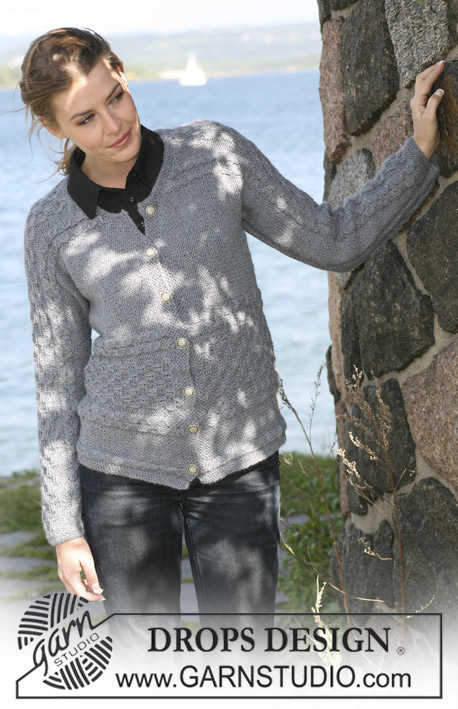
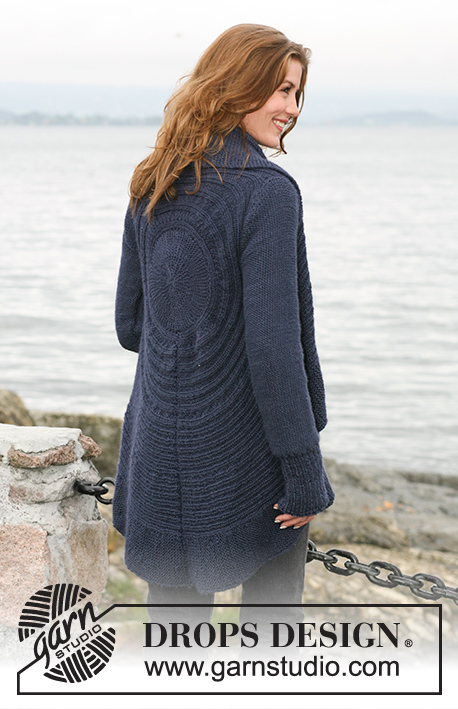
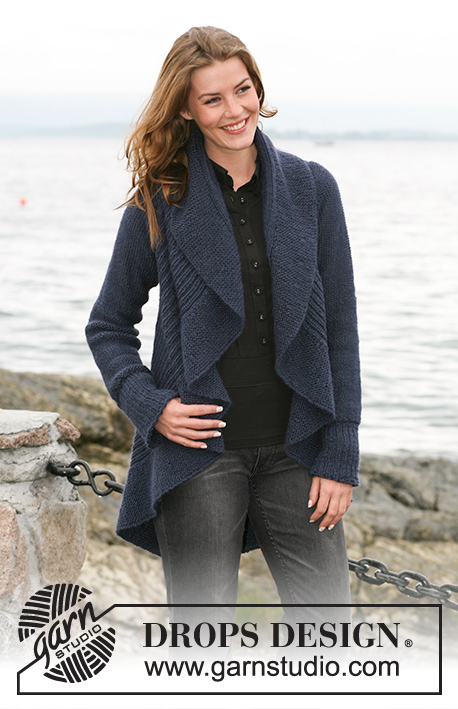
Kohoneuleinen DROPS ympyräjakku ”Silke-Alpaca”-langasta. Koot S-XXXL.
DROPS 102-6 |
||||||||||||||||
|
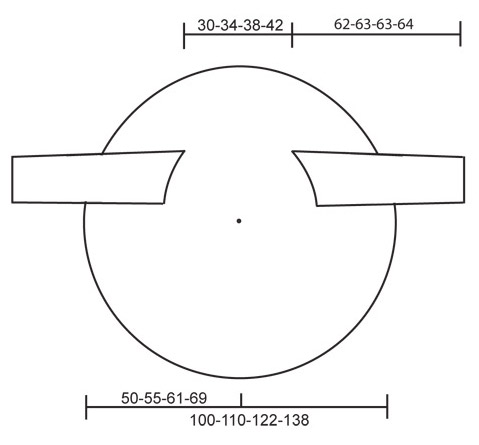
Mallineule: Katso ruutupiirros M.1. Piirros näyttää mallineuletta oikealta puolelta katsottuna. Huom! Eri ruutupiirros jokaiselle koolle. Lyhennetyt kerrokset: Neulo lyhennettyjä kerroksia, jotta työstä tulisi ympyränmuotoinen. Lyhennetyt kerrokset neulotaan näin: 1. krs/ 2. krs: Neulo 102-112-124-140 s, käännä työ ja neulo takaisin. 3. krs/ 4. krs: Neulo edestakaisin krs:n ensimmäisillä 18-16-20-20 s:lla (nämä s:t = ympyrän ulkoreuna) - lue Neulomisvinkki 1 alla. Toista 1.-4. krs:ia, neulo kuitenkin aina 2 s vähemmän ennen kuin käännät työtä neuloessasi 1./ 2. krs:ia. Toista tämä yht. 10-10-12-12 kertaa. Neulo sitten aina 4 s vähemmän ennen kuin käännät työtä yht. 6-9-8-12 kertaa ja neulo sitten aina 8 s vähemmän ennen kuin käännät työtä yht. 5-5-6-6 kertaa. Tämän jälkeen jäljellä on ympyrän ulkoreunassa olevat 18-16-20-20 s. Neulo sitten taas kaikilla s:illa -lue Neulomisvinkki 2 alla. Neulomisvinkki 1: Nosta aina 1. s kun olet kääntänyt työn, kiristä lankaa ja jatka neulomista. Tällä tavoin kääntymiskohtiin ei muodostu reikiä. Tämä ei koske sisimpänä ympyrässä olevia 20-20-24-24 s:ita, neulo kaikilla s:illa kuten tavallisesti kääntyessäsi näiden s:iden kohdalla. Neulomisvinkki 2: Krs:illa, joilla neulotaan kaikilla s:illa, ympyrän sisimmillä 20-20-24-24 s:lla neulotaan nurjaa (oikealta puolelta katsottuna). Jatka sitten M.1:n mukaan kuten aiemmin. Mittausvinkki: Kaikki ympyrän mitat otetaan työn maatessa litteänä. Älä mittaa suoraan työn poikki! Mitat otetaan pitkin 63.-69.-73.-81. s:n kaarta. Ympyrä: Työ neulotaan edestakaisin pyöröpuikolla, jotta kaikille s:ille olisi tilaa. Luo pyöröpuikolle nro 4,5 Silke-Alpaca-langalla 102-112-124-140 s. Kiinnitä merkkilanka 63-69-73-81 s:n jälkeen, kaikki mitat otetaan tästä merkkilangasta. Neulo M.1:n mukaan (kts. halutun koon ruutupiirrosta) oikeasta reunasta lähtien kohti vasenta reunaa (ts. ympyrän ulkoreunasta lähtien kohti sen sisäosaa) - 1. krs = oikea puoli. Neulo samalla myös Lyhennettyjä kerroksia - kts. selitys yllä - jotta työstä tulisi ympyränmuotoinen. Kun työn korkeus merkkilangasta mitattuna - lue Mittausvinkki - on 37-40-49-57 cm, tee kädentiet. Kädentie: Siirrä uloimmat 63-69-73-81 s:t apupuikolle nro 4,5 (pyöröpuikolle, jotta kaikille s:ille olisi tilaa). Päätä sitten seuraavat 2 s:t (= kädentie). Kiinnitä merkkilanka 2:n päätetyn s:n väliin. Jätä jäljellä olevat s:t puikolle. Neulo nyt molemmat osat (s:t ennen kädentietä ja s:t kädentien jälkeen) erikseen, osat neulotaan kuitenkin samanaikaisesti kahdella eri puikolla ja kahdella eri lankakerällä. Tällä tavoin lyhennetyistä kerroksista tulevat samanlaiset kädentien molemmin puolin. Jatka mallineuletta ja lyhennettyjä kerroksia kuten aiemmin. Kun kädentien korkeus on 18-21-23-25 cm, luo 2 uutta s kädentien yläpuolelle (ts. kahden osan väliin). Siirrä sitten kaikki s:t takaisin samalle pyöröpuikolle = 102-112-124-140 s. Kiinnitä merkkilanka 63-69-73-81 s:n jälkeen. Kaikki mitat otetaan nyt tästä. Jatka nyt kaikilla s:illa lyhennettyjä kerroksia ja M.1:n mukaan kunnes työn korkeus on n. 15-17-19-21 cm, työ on nyt ½-ympyrän muotoinen. Jatka neulomista kunnes työn korkeus merkkilangasta mitattuna - lue Mittausvinkki - on n. 30-34-38-42 cm. Tee nyt toinen kädentie samalla tavalla. Kun olet siirtänyt kaikki s:t takaisin puikolle, kiinnitä merkkilanka 63-69-73-81 s:n jälkeen. Kaikki mitat otetaan nyt tästä. Jatka M.1:n mukaan ja lyhennettyjä kerroksia kunnes työn korkeus merkkilangasta mitattuna on n. 37-40-49-57 cm (sopeuta lyhennettyjen kerrosten kokonaisen mallikerran jälkeen). Päätä s:t löyhästi. Hihat: Työ neulotaan edestakaisin pyöröpuikolla. Luo pyöröpuikolle nro 4,5 Silke-Alpaca-langalla 56-59-65-68 s (sis. 1 reuna-s kummassakin reunassa). Neulo 1 krs nurin nurjalta puolelta. Jatka sitten neulomalla 2 o/ 1 n -joustinta 1:llä reuna-s:lla kummassakin reunassa. Kun joustimen korkeus on 13-13-14-14 cm, neulo 1 krs oikein nurjalta puolelta ja kavenna samalla tasavälein 10-11-13-14 s = 46-48-52-54 s. Jatka sitten neulomalla sileää nurjaa neuletta lopulliseen mittaan asti. Kun työn korkeus on 16 cm, lisää kummassakin reunassa 1 s yht. 5-9-11-13 x 9-4½-3½-3 cm:n välein = 56-66-74-80 s. Kun työn korkeus on 56 cm, päätä kummassakin reunassa hihanpyöriötä varten joka 2. krs 1-2-2-2 x 4 s. Päätä vielä kummassakin reunassa 2 s kunnes työn korkeus on n. 61-62-62-63 cm. Päätä lopuksi kummassakin reunassa 1 x 4 s. Työn korkeus on n. 62-63-63-64 cm. Päätä jäljellä olevat s:t. Viimeistely: Ompele ympyrä yhteen reunat vastakkain pitkin luomis- ja päätösreunaa. Ompele hihojen alahihasaumat. Kiinnitä hihat paikoilleen ja huolehdi siitä, että alahihasauma tulee alimpana kädentiessä olevaa merkkilankaa vasten ja, että hihanpyöriön keskikohta tulee ylimpänä kädentiessä olevaa merkkilankaa vasten. |
||||||||||||||||
Ruutupiirroksen selitykset |
||||||||||||||||
|
||||||||||||||||
 |
||||||||||||||||
 |
||||||||||||||||
Oletko tehnyt tämän mallin?Tägää tällöin kuviasi #dropspattern tai lähetä kuvat #dropsfan galleriaan. Tarvitsetko apua tämän ohjeen kanssa?Löydät 15 ohjevideota, kommentteja/kysymyksiä ja muuta osoitteessa www.garnstudio.com © 1982-2026 DROPS Design A/S. Pidätämme kaikki oikeudet. Tämä tiedosto ja kaikki sen alatiedostot on suojattu tekijänoikeuslailla. Lue lisää siitä, mitä voit tehdä ohjeillamme, verkkosivujemme jokaisen ohjeen alaosasta. |
||||||||||||||||


DROPS Design on toiminut neule- ja virkkausalalla yli 40 vuotta ja meillä on yksi kaikkein laajin valikoima ilmaisia ohjeita verkossa - käännettynä 17 kielelle. Tänään meiltä löytyy 324 lehteä ja 12290 ohjetta - joista 11712 ohjetta on käännetty suomeksi.
Työskentelemme ahkerasti, jotta voisimme antaa teille kaikkein parhaimpia neule- ja virkkausohjeita, inspiraatiota ja neuvoja sekä korkealaatuisia lankoja todella edulliseen hintaan! Haluaisitko käyttää ohjeitamme muuhun kuin henkilökohtaiseen käyttöön? Voit lukea säännöistä ohjeiden Tekijänoikeus -tekstissä, joka löytyy kaikkien ohjeidemme alapuolelta. Hauskoja hetkiä käsitöiden parissa!
Lisää kommentti ohjeeseen DROPS 102-6
Haluamme mielellämme kuulla mielipiteesi tästä ohjeesta!
Mikäli haluat esittää kysymyksen, valitse oikea kategoria alla olevasta valikosta - tällä tavoin saat vastauksen nopeammin. Pakolliset kentät on merkitty tähdellä *.