
Suositut kategoriat
Etsitkö tiettyä lankaa?


Kommentit / Kysymykset (62)
Lusi kirjoitti:
Continue to crochet around the edge of the leg in Puddel as follows. 1st round: 1 sc in each sc around all of the leg (incl the slit at the centre front). Finish with a sl st in the first sc. 2nd round: *3 ch, 1 sc in the following sc*, repeat from *-*, and finish with a sl st in the first ch from beg of round. Cut the thread. can you explain this i dont quite understand
19.03.2014 - 12:13DROPS Design vastasi:
Dear Lusi, with Puddel, you will work first 1 round sc all around of the leg (=1 sc in each sc around), then on 2nd round work a ch-loop edge: *ch 3, 1 sc in next sc*, repeat from *-* around. Happy crocheting!
19.03.2014 - 13:47Luci kirjoitti:
What does it mean to crochet back until 1sc left?
19.03.2014 - 11:48DROPS Design vastasi:
Dear Lucy, work 1 row sc leaving 1 sc unworked at the end of row. Happy crocheting!
19.03.2014 - 11:55Luci kirjoitti:
What does it mean to crochet back until 1sc left?
19.03.2014 - 11:46
![]() Lucia Green kirjoitti:
Lucia Green kirjoitti:
When I join at the back of the heel I end up with a weird little point at the bottom. It's not rounded like the slipper in the picture appears. I've gone over and over the pattern and don't see that I'm missing a step. It seems like to have a pretty rounded heel I'm going to have to alter the pattern. Did I miss something?
31.10.2013 - 13:32DROPS Design vastasi:
Dear Mrs Green, a little point may appear when crocheting heel together, but when wearing them, it shouldn't be that visible. Happy crocheting!
31.10.2013 - 15:49
![]() Soraya Va A Compartir 300 Monedas! kirjoitti:
Soraya Va A Compartir 300 Monedas! kirjoitti:
Este patron tiene una forma elegante y la figura del pie se ve bonita quiero probar haber como queda!
05.08.2013 - 22:55
![]() Maria kirjoitti:
Maria kirjoitti:
Hallo, wenn in Runde 2 steht: "5 fM häkeln", heißt das dann 1 LM + 4 fM oder 1 LM + 5 fM? Wie wird das generell in Ihren Anleitungen gehandhabt? Vielen Dank im Voraus
17.01.2013 - 12:05DROPS Design vastasi:
Liebe Maria, in der Häkelinfo finden Sie die Information dazu: „Die erste fM jeder R. wird mit 1 Lm ersetzt“, es wird also nicht in jeder Runde nochmals speziell erwähnt. Viel Spaß beim Häkeln!
17.01.2013 - 13:16Guadalupe Suárez kirjoitti:
Según puedo entender falta la vuelta 9 ya que si continuamos tejiendo con 20 puntos quedará un cono pequeño que no da aumento al pie en la parte del empeine...corríganme si estoy mal, gracias
15.12.2012 - 19:28
![]() DROPS Design kirjoitti:
DROPS Design kirjoitti:
Til hele tøffelen måler ca 22-25-28 cm.
19.01.2012 - 09:18
![]() Lovise kirjoitti:
Lovise kirjoitti:
Hvor mange masker skal jeg hekle frem og tilbake på hælen?
19.01.2012 - 00:03Shaima kirjoitti:
I couldn't make the end of this sock .. i mean this final row that have mini sagged threads .. could anyone help me ??
21.12.2011 - 22:18
|
|
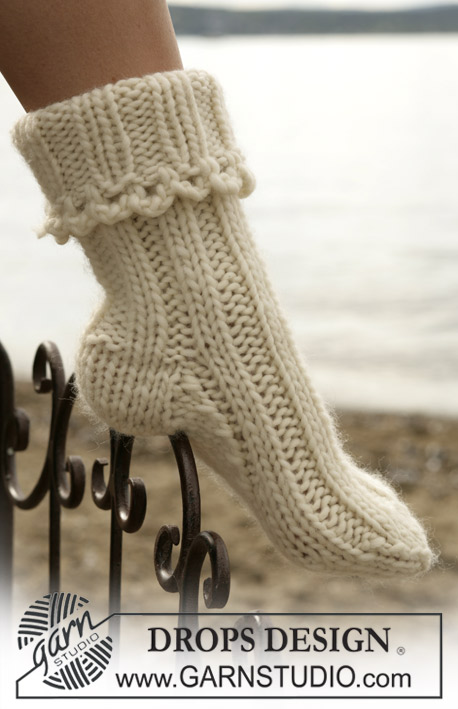
Pom Pom Adore Slippers |
|
|
|
|
Virkatut tohvelit
DROPS 98-7 |
|
|
Virkkausinfo: Ensimmäisen krs:n alussa olevaan ks:n sijaan neulotaan 1:llä kjs. Jokainen krs päätetään 1:llä ps krs:n aluss olevaan kjs, (edellisen krs:n alussa olevaan kjs:aan kun virkataan edes takaisin). Jalka: Aloita virkkaaminen edestä varpaasta, virkkaa Snow-langalla ja koukulla nro 8 näin: 1. krs: Virkkaa 3 kjs ja sulje ne renkaaksi 1:llä ps:lla 1. kjs:aan ensimmäisessä kjs. 2. krs: Virkkaa 5-5-6 ks renkaaseen - Lue Virkkausinfo yltä! 3. krs: 2 ks jokaiseen ks = 10-10-12 ks. 4. krs: * 1 ps ensimmäiseen ks, 2 ks seuraavaan ks *, toista *-* ympäri krs:n = 15-15-18 ks. 5. - 7. krs: Virkkaa 1 ks jokaiseen ks. 8. krs: * 1 ks ensimmäiseen ks, 1 ks toiseen ks ja 2 ks kolmanteen ks *, toista *-* ympäri krs:n = 20-20-24 ks. Jatka virkkaamalla 1 ks jokaiseen ks kunnes työ on n. 11-13-14 cm. Kantapää: Nyt työ jaetaan kahtia ja virkataan edestakaisin alkaen keskeltä jalan kärjestä - muista virkkausinfo. Kun koko tohveli on n. 22-25-28 cm se laitetaan litteäksi ja virkataan yhteen keskeltä takaa yhdellä krs:lla ks:oita läpi molemmat kerrokset. Katkaise lanka ja kiinnitä huolellisesti. Varsi: Virkkaa 1 krs ks:oita ympäri tohvelin aukkoa (aloita keskeltä edestä). Jatka nyt ympäri virkaten 1 ks jokaiseen ks kunnes varsi on 11 cm, virkkaa sitten edes takaisin keskeltä edestä näin: 1. krs: käännä työ ja virkkaa takaisin kunnes jäljellä on 1 ks (johon ei enää virkata). 2. krs: käännä työ ja virkkaa takaisin yli s:t edelliseltä krs:lta kunnes jäljellä on 1 ks (johon ei enää virkata) = 2 s keskellä edessä. 3. krs: käännä työ ja virkkaa takaisin yli s:t edelliseltä krs:lta. Katkaise lanka. Jatka nyt virkkaamalla reunan ympäri vartta Puddel-langalla ja koukulla nro 8 näin: 1. krs: 1 ks jokaiseen ks ympäri koko reunaa (ts. myös alas halkioon keskellä edessä). Päätä ps:lla ensimmäiseen ks. 2. krs: * 3 kjs, 1 ks seuraavaan s *, toista *-*, päätä virkkaamalla 1 ps ensimmäiseen kjs krs:n alussa. Katkaise lanka. Viimeistely: Tee Puddel-langasta pallo jonka halkaisija n. 5 cm. Kiinnitä lankapallo keskelle eteen tohveliin varren ja jalan väliin. |
|
Oletko tehnyt tämän mallin?Tägää tällöin kuviasi #dropspattern tai lähetä kuvat #dropsfan galleriaan. Tarvitsetko apua tämän ohjeen kanssa?Löydät 9 ohjevideota, kommentteja/kysymyksiä ja muuta osoitteessa www.garnstudio.com © 1982-2026 DROPS Design A/S. Pidätämme kaikki oikeudet. Tämä tiedosto ja kaikki sen alatiedostot on suojattu tekijänoikeuslailla. Lue lisää siitä, mitä voit tehdä ohjeillamme, verkkosivujemme jokaisen ohjeen alaosasta. |


DROPS Design on toiminut neule- ja virkkausalalla yli 40 vuotta ja meillä on yksi kaikkein laajin valikoima ilmaisia ohjeita verkossa - käännettynä 17 kielelle. Tänään meiltä löytyy 324 lehteä ja 12290 ohjetta - joista 11695 ohjetta on käännetty suomeksi.
Työskentelemme ahkerasti, jotta voisimme antaa teille kaikkein parhaimpia neule- ja virkkausohjeita, inspiraatiota ja neuvoja sekä korkealaatuisia lankoja todella edulliseen hintaan! Haluaisitko käyttää ohjeitamme muuhun kuin henkilökohtaiseen käyttöön? Voit lukea säännöistä ohjeiden Tekijänoikeus -tekstissä, joka löytyy kaikkien ohjeidemme alapuolelta. Hauskoja hetkiä käsitöiden parissa!
Lisää kommentti ohjeeseen DROPS 98-7
Haluamme mielellämme kuulla mielipiteesi tästä ohjeesta!
Mikäli haluat esittää kysymyksen, valitse oikea kategoria alla olevasta valikosta - tällä tavoin saat vastauksen nopeammin. Pakolliset kentät on merkitty tähdellä *.