
Categorías populares
¿Buscas un hilo?


Cómo aumentar puntos a la vez que se crea un pequeño agujero

Esta es la manera de aumentar un punto, levantando el hilo entre 2 puntos de la hilera anterior. Aparecerá un pequeño agujero por abajo del nuevo punto:
Figura 1: Tejer hasta donde deseas hacer tu aumento y crear el nuevo punto.
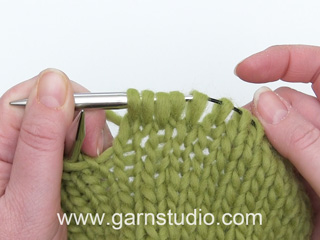
Figura 2: Pasar la punta de tu aguja izquierda del frente para atrás y levantar el hilo entre el punto en la aguja izquierda y el punto en la aguja derecha.
Figura 3: Tienes, ahora, un nuevo punto en tu aguja izquierda.
Figura 4: Insertar tu aguja derecha en el nuevo punto como si lo fueses a tejer de derecho y extraer el hilo a través del bucle.
Figura 5: Has tejido un nuevo punto que está, ahora, en tu aguja derecha y puedes deslizarlo para la aguja izquierda.
Figura 6: Continuar y tejer el punto siguiente en tu aguja izquierda.
Figura 7: Tejer algunas hileras y podrás ver que aparece un pequeño agujero donde hiciste el aumento.
Esta manera de aumentar es un buen método para dar forma a tus prendas de punto en una línea recta o en diagonal. El agujero no será grande, mas marcará tus aumentos.Ver este video para más ayuda


Con más de 40 años en el diseño de modelos de punto y de ganchillo, DROPS Design ofrece una de las más vastas colecciones de patrones gratuitos en el internet - traducidos en 17 idiomas. Al día de hoy, contamos con 314 catálogos y 11822 patrones - de los cuales 11158 están traducidos en español.
Nosotros trabajamos con mucho esmero para brindarte lo mejor que las labores de punto y ganchillo tienen para ofrecer,inspiración y consejos, así como hilos de magnífica calidad a precios increíbles! Te gustaría usar nuestros patrones para otro fin además del uso personal? Puedes leer acerca de lo que estás permitida a hacer en el texto de Copyright en la parte de abajo de todos nuestros patrones. Felices labores!
De plaatjes en de tekst komen niet overeen. Plaatje 2 laat zien hoe een steek gemaakt wordt door de naald van achter naar voor te steken, terwijl de tekst het omgekeerde zegt. Ook wordt niet vermeld of er voor of achter in de lus gebreid moet worden en of dit een naar links of naar rechts vallende meerdering is.
19.03.2016 - 14:42