DROPS Super Sale · AHORRA el 30% en 5 acogedores hilos de lana

Cómo leer los diagramas de ganchillo

Un diagrama de ganchillo consiste de símbolos, 1 símbolo = 1 punto – la definición del símbolo explica qué tipo de punto es/cómo se trabaja. El diagrama muestra todos los puntos vistos por el lado derecho (a menos que se especifique de otra manera).

Un típico diagrama de ganchillo se ve así:
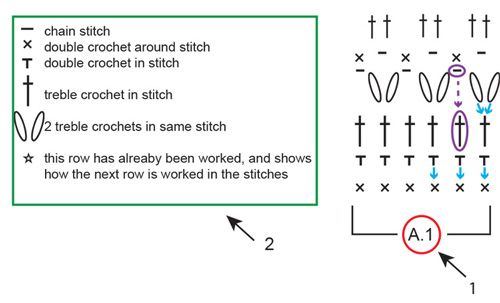
1: 1. A.1 es el nombre del diagrama y se refiere al diagrama entero - dentro de los corchetes. Todo lo que está dentro de los corchetes es 1 repetición del diagrama.
2: 2. Esta es la definición del símbolo, que explica cómo trabajar cada símbolo.
Flechas azules: El símbolo es trabajado en o alrededor del punto directamente abajo en el diagrama. A veces, se trabajan varios puntos en/alrededor del mismo punto.
Óvalos y flechas púrpura: No todos los puntos son trabajados, por ejemplo: a veces se trabaja un punto de cadena y el punto abajo es saltado.

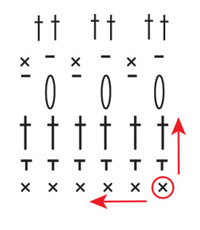
Un diagrama de ganchillo se lee de forma contraria a como leerías normalmente: de derecha a izquierda, de abajo para arriba. Es decir: comienzas en el símbolo de la esquina inferior derecha, y trabajas en dirección al lado izquierdo y hacia arriba (ver las flechas en ROJO en el diagrama abajo).

Si debes trabajar varias repeticiones de un diagrama (es decir: si debe ser repetido varias veces en la hilera/vuelta), trabajar hasta el fin de la hilera y comenzar nuevamente por el primer símbolo de la hilera.
De ida y vuelta:

Cuando se trabaja de ida y vuelta, se trabaja una hilera por el lado derecho de la labor y una hilera por el lado revés de la labor. Cuando se trabaja por el lado revés, el diagrama deberá ser leído en sentido contrario: de izquierda a derecha (ver la flecha roja por el lado derecho y la flecha azul por el lado revés abajo).

La hilera comienza generalmente con un determinado número de puntos de cadena – el número es equivalente a la altura del punto siguiente, y están incluidos para asegurar que estás comenzando por la parte de arriba del punto siguiente (ver los círculos verdes abajo). Si los puntos de cadena están incluidos en el diagrama (como en este ejemplo) todos los puntos son trabajados exactamente como aparecen. A veces el patrón incluye INFORMACIÓN PARA REALIZAR EL TRABAJO en la parte de arriba de las instrucciones, la cual te indica cuántos puntos debes trabajar al principio de cada hilera, y si estos puntos de cadena sustituyen el primer punto de la hilera (o si son adicionales). Si los puntos de cadena NO están incluidos en el diagrama: seguir las instrucciones dadas en INFORMACIÓN PARA REALIZAR EL TRABAJO.

En redondo:

Cuando se trabaja en redondo, todas las vueltas son trabajadas por el lado derecho: de derecha a izquierda (ver las flechas rojas abajo). De qué manera la vuelta comienza y termina es algo frecuentemente mostrado en un diagrama (ver A.2 abajo – cuadrado verde). De la misma manera como cuando se trabaja de ida y vuelta, la vuelta comienza con un determinado número de puntos de cadena, equivalente a la altura del punto siguiente. Al final de la vuelta, generalmente unes el principio y el fin de la vuelta con un punto bajísimo en el último de los puntos de cadena del principio (ver cuadrado azul abajo). Es decir: los puntos de cadena en A.2 = el principio de la vuelta, mientras que el punto bajísimo en A.2 = el fin de la vuelta.

Si tienes que trabajar varias repeticiones del diagrama (A.1) (es decir, es repetido varias veces en la vuelta) trabajas hasta el último punto y, después, comienzas nuevamente en el primer punto en la misma hilera de A.1. NOTA: en este ejemplo, SOLO se repite A.1, A.2 muestra cómo se trabaja el principio y el fin de toda la vuelta.

Varios diagramas diferentes trabajados consecutivamente en la hilera/vuelta:

Si estás trabajando varios diagramas diferentes uno después del otro en la misma hilera/vuelta, trabajar de la manera siguiente: Trabajar la 1ᵃ hilera del diagrama 1, continuar con la 1ª hilera del diagrama 2, después la 1ª hilera del diagrama 3, etc. RECUERDA: si estás trabajando de ida y vuelta, los diagramas tendrán que ser trabajados en sentido contrario por el lado revés – es decir: comenzar con el diagrama 3, después el diagrama 2 y, por último, el diagrama 1. Son también trabajados en sentido contrario, como habitualmente.

Diagramas circulares:

Cuando se trabaja en un círculo, es decir que comienzas en el centro y trabajas en dirección hacia afuera, esto generalmente es mostrado en un diagrama circular. El diagrama puede mostrar el círculo entero – en este caso cada símbolo es trabajado exactamente como aparece, o el diagrama puede mostrar una parte del círculo, que después es repetido un determinado número de veces para formar un círculo entero.

Círculo entero:

En un diagrama de círculo entero, comienzas por el símbolo en el centro del círculo: generalmente un pequeño círculo representando un determinado número de puntos de cadena, fijado con un punto bajísimo (ver el círculo rojo abajo). De la misma forma a cuando se trabaja en redondo, la vuelta comienza con un determinado número de puntos de cadena (equivalente a la altura del símbolo siguiente) y termina con un punto bajísimo en el último de estos puntos de cadena – es decir: equivalente a A.2 en nuestro ejemplo anterior (ver cuadrado azul) – NOTA: cuando los puntos de cadena son mostrados en el diagrama, ellos NO sustituyen ninguno de los otros símbolos, y cada símbolo es trabajado exactamente como aparece. Si los puntos de cadena SUSTITUYEN cualquier punto, esto habrá sido retirado del diagrama.

Se trabaja en el sentido contrario a las agujas del reloj: de derecha a izquierda, 1 símbolo después del otro (ver la flecha roja abajo). Los puntos de la primera vuelta generalmente son trabajados ALREDEDOR del anillo de puntos de cadena, lo que significa que colocas la aguja de ganchillo A TRAVÉS del centro del anillo de puntos de cadena, coges el hilo y lo pasas nuevamente a través del anillo (trabajando el punto como se hace habitualmente) – No trabajas el punto EN ninguno de los puntos de cadena, más bien ALREDEDOR del anillo de puntos de cadena. Al final de la vuelta, unir el principio y el fin con un punto bajísimo y comenzar la segunda vuelta del diagrama: la segunda vuelta más próxima al centro (ver la flecha verde).

Fracción de un círculo:

Si el diagrama representa solamente una fracción (parte) de un círculo, esto es porque esa fracción es repetida un determinado número de veces en redondo para formar un círculo entero. Comienzas por el símbolo de la parte de abajo (ver el círculo rojo) y trabajas de la misma manera como para un CÍRCULO ENTERO, pero A.2 será repetido un determinado número de veces en redondo. De la misma manera como cuando se trabaja en redondo, generalmente hay un diagrama separado que ilustra cómo comienza y termina la vuelta (ver A.1, cuadrado azul abajo). Comienzas por la hilera del diagrama más próxima al anillo de puntos de cadena, en la parte de abajo del diagrama, trabajas el(los) punto(s) de cadena de A.1, después trabajas el(los) símbolo(s) de A.2 (en la primera vuelta es solo 1 símbolo) y repites el(los) símbolo(s) de A.2 el número de veces indicado en el patrón.

Al final de la vuelta, unes la vuelta con el punto bajísimo de A.1. Cuando la primera vuelta esté hecha, continuar con la vuelta siguiente: la segunda vuelta más próxima al anillo de puntos de cadena (ver la flecha verde abajo).

Diagramas cuadrados / jacquards:

Algunos diagramas de ganchillo son mostrados en un diagrama de cuadrados, en el que 1 cuadrado = 1 punto. El tipo de punto a trabajar generalmente será explicado en las instrucciones del patrón, mientras que el propósito del diagrama es mostrar con qué colores se debe trabajar los puntos (ver el círculo rojo abajo = definición de los símbolos).

Trabajas como está explicado arriba, dependiendo de si trabajas DE IDA Y VUELTA, EN REDONDO o un DIAGRAMA CIRCULAR.

Comentarios (161)

Country flag Emelie escribió:

Svar till svaret 19/10: Det är strecken mellan diagrammen. Inte symbolerna i beskrivningen. Om du tittar på beskrivningen till Autumn ballad har strecken som skiljer diagrammen åt vändningar åt olika håll längst ner. Antingen avslutas strecket åt höger eller vänster. Det är de jag undrar varför de går åt olika håll?

19.10.2026 - 09:09

DROPS Design respondió:

Hej Emelie, vi tror også at stregerne kun er for at vise overgangene i diagrammet. Skriv dit spørgsmål ind i selve opskriften, så kan vi se på det :)

20.10.2026 - 11:46

Country flag Emelie escribió:

Hej! Virkar Autumn ballad. De vertikala strecken mellan diagrammen, varför har de streck åt olika håll längst ner? Tack för svar!

17.10.2026 - 21:46

DROPS Design respondió:

Hei Emelie. Usikker på hva du mener med vertikala streker. Hvilken streker og i hvilken diagram? Er det de lange vertikala strekene som bare skiller diagrammene? Tenker du på selve diagramikoner som vender ulike veier? Om det er det, så må du lese forklaringen til ikonene over diagrammene. Da forholder du deg til forklaringen til ikonen, spiller ingen rolle om ikonet vender til venstre eller til høyre i selve diagrammet. mvh DROPS Design

19.10.2026 - 07:22

Country flag Anita escribió:

Hi, I am working on the Slate Rose seat pad. On round 7 there are sc 3c sc 3c sc 3c then what appears to be a floating sc. Can you please explain how to make this without an 'anchor' ? Or perhaps direct me to a video. I can't seem to find anything similar on your videos. Thanks . Anita

02.10.2026 - 20:16

DROPS Design respondió:

Dear Anita, the sc is not floating, it's worked in the middle chain space of the previous round, just as all other sc in that round. But we don't represent it as close to the chain space to make the chain spaces on each side of the sc wider and better represent what is worked over the chain space and all subsequent stitches here. So you work the sc in the chain space below. Happy crochetting!

04.10.2026 - 18:28

Country flag Brenda escribió:

I'm left handed. How do I adjust reading the chart? Do I read it just opposite of the right handed instructions making sure that the right and wrong side match the chart going the opposite direction?

14.09.2026 - 21:22

DROPS Design respondió:

Dear Brenda, you just have to follow the diagrams as they are supposed to be worked, so from the right side read diagram from the right towards the left (same when working in the round) and when working from the wrong side read diagram from the left towards the right. Your yarn store might have even more tips for you, don't hesitate to contact them even per mail or telephone. Happy crocheting!

17.09.2026 - 17:55

Country flag Lene Bøndergaard escribió:

Jeg vil gerne hækle garden cobbles shawl - men hvordan kommer jeg igang? Jeg har ikke hæklet efter diagram før, og jeg kan ikke finde ud af hvordan jeg starter - kan I hjælpe mig igang? Jeg har set alle videoerne til opskriften - og kan ikke se hvad jeg skal gøre, når jeg skal starte midt på.

31.08.2026 - 16:50

DROPS Design respondió:

Hei Lena. Jo, du starter med sirkelen i diagrammet som er tegnet helt nederst, midt på. Hekle 5 luftmasker og 1 kjedemaske i første luftmaske, du har nå en sirkel. Hekle i denne sirkelen. 1. rad: 4 luftmaske (= samme "høyde" som en dobbeltstav) , så 3 luftmaske, så 2 staver om sirkelen, 3 luftmasker og deretter 2 staver om samme sirkel, 3 luftmasker igjen og så avsluttes raden med 1 dobbeltstav. Vri arbeidet, og start på 2. rad / 4 luftmasker og hekle videre som diagrammet viser. Se gjerne videoene til DROPS 222-07, der ser du hvordan det hekles etter diagram (ikke samme som 242-4), men tankegangen. mvh DROPS Design

07.09.2026 - 07:23

Country flag Gisella Giar escribió:

Hello, I’m trying to cut and glow the chart pictures in a logical way to help me visualize. I know the R side is worked R to left and wrong side is worked L to R but if I glue them down next to ea. Other does it go A1a, A2, A3, A4, A1b? Or A1a, A4, A3,A4, A2 Could you also explain the order with the remaining charts for small size for the front? Thanks!

13.08.2026 - 00:20

DROPS Design respondió:

Dear Mrs Giar, make sure to tell us which pattern you are working on - or just ask your question on the pattern you are working on so that we can check and help you. Thanks for your comprehension.

14.08.2026 - 07:45

Country flag Seanette Kuykendall escribió:

Working on 241-23 sizes small and and at the shoulder. The pattern says work from right side A1A, work 1 repeat of A.1B, A.1C turn & work back=19 stitches. I am not getting 19 stitches on shoulder. What am I doing wrong?

10.07.2026 - 00:11

Country flag Michele escribió:

Bonjour,Je suis gauchère et j'ai un diagramme crochet d'une droitière. Comment je lis le diagramme.merci pour votre réponse

01.07.2026 - 14:43

DROPS Design respondió:

Bonjour Michèle, notez que les rangs sur l'endroit se lisent en général (sauf mention contraire dans les explications) toujours de droite à gauche et ceux sur l'envers de gauche à droite; cela devrait pouvoir vous aider à faire vos ajustements. Bon crochet!

02.07.2026 - 15:39

Country flag Elizabeth escribió:

In the Bonnie Blue 250-9 pattern how to interpret the symbol of a treble with a dot on it? My swatch working 3 trebles in to ch space from row below increases the work by 1.5 and the stitch count did not match on the row following, is this a cluster or a shell? Please explain symbols.

25.05.2026 - 23:24

DROPS Design respondió:

Dear Elizabeth, the third symbol, with the dot, means" 1 treble crochet in the chain space below". So it's not exactly in the stitch. The shape below should be like a small fan or shell. Happy knitting!

25.05.2026 - 23:53

Country flag Kristin escribió:

Evening Breath crochet shawl. When round no. 6 has been crocheted, you´ll need to repeat rounds 5 and 6, until the desired length is reached. You need to crochet an increase in these two rounds, but there is no description of where and how to crochet the increase. Can you help? Many thanks and best regards.

26.03.2026 - 13:38

DROPS Design respondió:

Dear Kristin, the increases are made automatically when working these 2 rows, ie at the beg + at the end of the row and in the middle of the row too, so just work diagram as you did before, you will just have automatically more sts between beg/middle of piece and middle of piece/end of row due to the increases. Happy crocheting!

27.03.2026 - 08:04

Country flag Kristin escribió:

Evening Breath heklað sjal með sólfjaðramynstri. Þegar umferð nr 6 hefur verið heklað á að endurtaka umferð 5 og 6 mar til ákveðinni hengd er náð. Það þarf að heklað útaukningu í þessum tveimur umferðum en það vantar lýsingu á því hvar og hvernig á að heklað útaukningu. Getið þið hjálpað? Kærar þakkir og kveðjur.

20.03.2026 - 19:03

DROPS Design respondió:

Blessuð Kristín. Þar sem þú hefur heklað fyrstu 6 umferðirnar, hefur þú þegar aukið út í hvorri hlið. Þú heldur áfram á sama hátt. Það er að segja, þú endurtekur umferð 5 og 6, en í hvert skipti eru fleiri loftlykkjubogar á milli kantsins og miðjunnar. Gangi þér vel.

03.04.2026 - 20:47

Country flag Eva escribió:

Jag har nyss köpt garn och ett av era tröjmönster. Det är inte helt pedagogiska mönster men jag vill ändå få till det. Ni har fina mönster. Min fråga, vad betyder detta i mönstret: 1 st i var och en av de nästa 5-5-0-0-1-1 lm. Vad betyder siffrorna 5-5-0-0-1 -1?

29.12.2025 - 21:49

DROPS Design respondió:

Hei Eva. En oppskrift blir gjerne skrevet i mange størrelser og da henviser de tallene til den str. du strikker. Om et plagg har disse str. XS - S - M - L - XL - XXL, vil tallene 5-5-0-0-1-1 fortelle deg at det første tallet (5) "tilhører" str XS, andre tallet (5) "tilhører" str. S, tredje tallet (0) "tilhører" str. M osv. Det samme systemet gjelder garnmengden som er oppgitt i begynnelsen av en oppskrift og målskissen (om oppskriften har det) som du ser nederst på oppskriften. mvh DROPS Design

05.01.2026 - 08:30

Country flag Hilde escribió:

Bestaat de uitleg van de steken ook in het Nederlands? Dank u

12.09.2025 - 08:49

Country flag Adelina escribió:

Buongiorno, in un giornale ho visto uno schema con tre maglie alte chiuse insieme, ma invece di essere verticali sono orizzontali. Come si eseguono per favore? Grazie

25.07.2025 - 18:02

DROPS Design respondió:

Buonasera Adelina, a quale modello DROPS sta facendo riferimento? Buon lavoro!

28.07.2025 - 21:01

Country flag Jan Puddey escribió:

I have bought Bomull-Linen to make the ivory twist bag and having difficulty in interpreting one of the symbols in the pattern. It is the dash with a dot on the line. I understand the description but why it is at 90 degrees to the rest of the symbols. Nowhere in the videos or lessons can I find help to explain what I have to do.It seems very important because it determines the correct number of stitches. Thank you . Jan

18.05.2025 - 09:59

DROPS Design respondió:

Dear Jan, are you referring to the symbol: 1 treble crochet around chain-space (or 1 double crochet around chain-space, if you are reading the US version)? Our charts are semi-3D, in the sense that we don't just draw the symbols but try to place and orient them as how it would look like when crochetting in the round; that's why the charts has a fan shape and the orientation of some stitches may vary to accomodate to its position. You don't need to work it differently due to its position, just take into account which stitch from the previous row it's worked on. Happy crochetting!

18.05.2025 - 12:33

Country flag Sophie escribió:

I am working the California dream pattern. A.1a diagram for example has 5 rows. Working the front piece. When the pattern starts working through the diagrams, we have 71 double crochets for the medium size. Then it says work next row as follow, begin from right side– work, one crochet in each of the one double crochet, A.1 a over the next 10 double crochet repeat A.1b over the next 30 double crochets. A.1c for the next 9 dc and 1dc in each of last 1 dc. Thats 51 stitches?! What am I missing

29.04.2025 - 01:33

DROPS Design respondió:

Dear Sophie, note that you should work simultaneously the pattern and the increases, ie on the very first increase row, start working diagrams as explained over the 51 sts and increase at the same time on each side. Happy crocheting!

29.04.2025 - 09:30

Country flag Jannie Jensen escribió:

1 lige stangmaske og 1 skrå stangmaske i diagram. Hvad menes med det

12.04.2025 - 11:12

DROPS Design respondió:

Hei Jannie. Hvilket diagram gjelder det? Om det er f.eks en sirkel som hekles vil stavmaskene "bøye" seg for at det skal bli en sirkel. Ikonet vil ha samme forklaring selv om de står litt ulikt. mvh DROPS Design

22.04.2025 - 09:17

Country flag Jacinthe escribió:

Merci pour votre réponse. Voici pour être plus précise, pour le Patron 173-37. Que veut dire 6 fois en largeur? Merci

18.02.2025 - 16:58

DROPS Design respondió:

Bonjour Jacinthe, lorsqu'il est indiqué que vous devez crocheter 6 fois A.1 au-dessus des 12 premières brides (par ex.), cela signifie que vous allez crocheter les 12 mailles suivantes en répétant 6 fois les 2 mailles de A.1 . Bon crochet!

19.02.2025 - 08:14

Country flag Jacinthe Delisle escribió:

Que veut dire 6 fois en largeur dans un patron au crochet?

13.02.2025 - 16:33

DROPS Design respondió:

Bonjour Mme Delisle, il faut probablement répéter 6 fois tout le rang/tout le tour les indications précédente, mais pour une réponse plus précise, n'hésitez pas à poser la question sous le modèle concerné, nous pourrons ainsi vérifier et confirmer la réponse. Merci pour votre compréhension. Bon crochet!

14.02.2025 - 09:32

Country flag Ida Weiss escribió:

Hello, I am working on the following: DROPS 200-32 - beach paradise poncho DROPS design: Pattern z-851. I cannot follow the diagram instructions at all. Is is possible to have the instructions written out row by row as they are at the beginning of the pattern? Thank you, Ida Weiss

30.10.2024 - 17:35

DROPS Design respondió:

Dear Mrs Weiss, this pattern has only diagrams and written pattern explaining how to work them, so just look at the description of each symbol and work the diagrams as explained in the written pattern, diagrams are read from the right towards the left on every round. Happy crocheting!

31.10.2024 - 09:56

Deja un comentario o pregunta en esta lección

Tu dirección de email no será publicada. Los campos obligatorios están marcados con un *.