DROPS Super Sale - ¡AHORRA el 30% en 4 maravillosos hilos de lana!

Cómo leer los diagramas de punto

Un diagrama de punto consiste de cuadrados. 1 cuadrado = 1 punto – la definición del símbolo proporciona información acerca de cómo tejer el punto. El diagrama muestra todos los puntos vistos por el lado derecho (a menos que se especifique de otra manera).

Un diagrama se ve así:
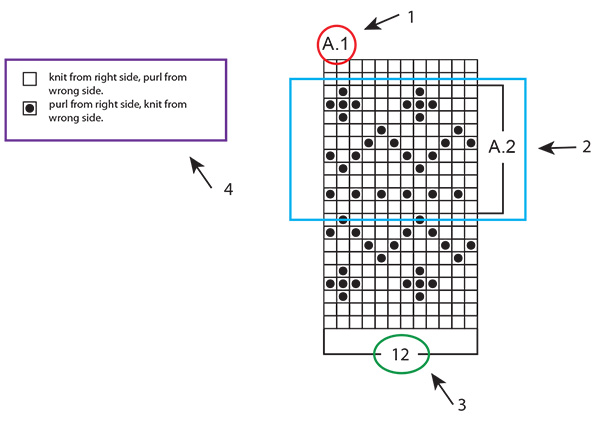
  1. A.1 es el nombre del diagrama, y se refiere al diagrama entero.
  2. A.2 es solo la parte del diagrama que está dentro de los cuadrados separados por líneas más oscuras.
  3. Este número se refiere al número de puntos en la 1ᵃ hilera del diagrama.
  4. Esta es la definición de los símbolos: explica cómo tejer cada punto, o en qué color (en patrones multicolores).

Un diagrama se lee completamente en sentido contrario a cómo leemos normalmente: de derecha a izquierda, de abajo para arriba. Es decir, se comienza con el símbolo en la esquina inferior derecha, y se va tejiendo hacia la izquierda y en dirección hacia arriba (ver lo señalado en ROJO en el diagrama abajo). Si tienes que comenzar en un cuadrado diferente/con un punto diferente, esto será especificado – por ejemplo: las diferentes tallas pueden comenzar en diferentes lugares en el mismo diagrama (ver el rectángulo azul abajo).

Si tienes que tejer varias repeticiones de un diagrama (es decir: tejer el mismo diagrama varias veces a lo ancho) vas a tejer hasta el fin de la hilera del diagrama, y comenzarás nuevamente con el primer punto para la repetición siguiente.

De ida y vuelta:

Cuando se teje de ida y vuelta, se teje una hilera por el lado derecho de la labor y una hilera por el lado revés de la labor. Como los diagramas muestran todos los puntos vistos por el lado derecho, tendrás que tejer en el sentido contrario cuando se teje por el lado revés (ver las flechas AZULES en el diagrama abajo): lees la hilera de izquierda a derecha, los puntos derechos se tejen de revés, y los puntos reveses se tejen de derecho, etc (esto frecuentemente va a estar especificado en la definición de los símbolos: “derecho por el lado derecho, revés por el lado revés”).

En redondo:

Cuando se teje en redondo, todas las vueltas son tejidas por el lado derecho, y el diagrama es leído completamente de derecha a izquierda. Cuando se comienza una nueva vuelta, simplemente comenzar tejiendo el primer símbolo de la hilera siguiente del diagrama.

Varios diagramas diferentes tejidos consecutivamente en la hilera/vuelta:

Si estás tejiendo varios diagramas diferentes, uno después del otro en la misma hilera/vuelta, tejer de la manera siguiente: Tejer la 1ᵃ hilera del diagrama 1, continuar con la 1ª hilera del diagrama 2, después la 1ª hilera del diagrama 3, etc. RECUERDA: si estás tejiendo de ida y vuelta, el diagrama tendrá que ser tejido en el orden contrario por el lado revés – es decir: comenzar con el diagrama 3, después el diagrama 2 y, por último, el diagrama 1. También son tejidos en sentido contrario como se hace habitualmente.

En el patrón, esto puede estar escrito de la manera siguiente: “tejer A.1, A.2, A.3 un total de 1-1-2-3-4 veces”. Esto quiere decir que primero tejes A.1, después A.2 y, finalmente, repites A.3 un total de 1-1-2-3-4 veces (dependiendo de tu talla). Es SOLO el diagrama A.3 que es repetido, A.1 y A.2 se tejen 1 vez cada uno.

Cuando el número de puntos no corresponde a las repeticiones completas del diagrama:

A veces, el número de puntos no es divisible con las repeticiones completas del diagrama a tejer a lo ancho de la labor. Por ejemplo: A.1 cubre 12 puntos y debe ser repetido sobre 40 puntos. En este caso, vas a tejer 3 repeticiones completas de A.1 (= 36 puntos) y después vas a tejer los primeros 4 puntos del diagrama sobre los puntos restantes (ver la línea ROJA abajo). Usualmente este es el caso donde el diagrama es un patrón repetitivo y, por eso, independientemente de tejer repeticiones completas o no, el patrón será consistente.

Comentarios (703)

Country flag Inger Elisabeth Frank escribió:

Hej ! Jag stickar just nu en bar tröja som heter Igor. Är lite frågande and mönsterrapporterna. De slutar på olika rader och om jag går ner och börjar från början tycker jag inte att de passar . Jag skulle önska att ni skrivit så att mönstrerdelarna slutar på samma rad, då hade jag inte behövt undra om jag gör rätt. Kan inte heller hitta någon beskrivning eller förklaring någonstans på mönstret, Behöver få det förklarat för mig! Hälsningar Inger Frank

13.12.2024 - 11:03

DROPS Design respondió:

Hei Inger. Når et plagg har ulik fletter, slik som Igor genseren har, kan ikke diagrammet slutte på samme rad (evnt så må man lage diagrammene fra start til slutt i alle de forskjellige størrelsene, noe vi ikke kan bruke plass til). Så her må man følge med selv. Tips : bruk maskemarkører, både mellom hvert diagram (A, B, C, D og E) og hver gang et diagram er strikket 1 gang i høyden. mvh DROPS Design

16.12.2024 - 07:32

Country flag Michelle Bretherton escribió:

Hi..I am knitting "Wicker Island " Pattern Da-035. Where does one start the pattern for the charts? On the 1st stitch of the beginning of the round, or where the marker is? I have knitted my neck and yoke and now need to start A1. Thank you

11.12.2024 - 21:05

DROPS Design respondió:

Dear Michelle, you start working A.1 at the yoke: "When piece measures 3-4-4-4-4-5 cm from marker". Start working A.1, from the first row of the chart, and repeat this row the whole round (so you work A.1 over all the stitches in the round). Continue working A.1 upwards until piece measures 5-6-6-6-6-7 cm from marker. Happy knitting!

15.12.2024 - 12:56

Country flag Chantal Mothet escribió:

De les explications du modèle 'Rambling man' veste homme en Lima, les exp des rgs raccourcis ns dit 'tric 1rg raccourci à chaque rang 3 de chacun des RAPPORTS du pt fantaisie' ?? A quel moment faut il tricoter le rg raccourci , a chaque 3e rg de la grille ou juste au premier 3e rg de la grille ? C'est a dire une seule fois au début de chaque diagramme.

05.12.2024 - 13:20

DROPS Design respondió:

Bonjour Mme Mothet, 1 rapport correspond à 1 diagramme; autrement dit, vous tricotez les rangs raccourcis à chaque fois que vous tricotez le 3ème rang du diagramme. Bon tricot!

06.12.2024 - 08:23

Country flag Margaret Scerri escribió:

Hi there I am knitting Beach Baby 10-7 and I want to know what does M1and continue M2 as I am getting g confused and then when I reach my desired length do I start do decrease then or do I decrease as am knitting can you help me please thank you in advance.

09.11.2024 - 00:29

Country flag Christine Russell escribió:

Hello there. I am knitting pattern Infinite Sweetness no. 255-24 in Small. I have just knitted the increases on arrow 3 leaving me with 288 stitches. I do not understand the next line on the pattern where it says to increase as shown in the diagram to achieve an extra 48 stitches by arrow 4. I see the extra 2 squares in the row after arrow 3 but don’t understand what it means. Thank you in advance.

05.11.2024 - 18:12

DROPS Design respondió:

Dear Mrs Russel, after 3rd arrow you get enough stitches to work the 6 sts of each A.1 a total of 48 times, then on the 3rd row with small cables you will increase 1 stitch in each p-section at the beg of each A.1 (see 4th symbol diagram text); so that there are now 7 sts in each A.1 x 48 repeats = 336 sts. On the round with 4th arrow, increase now 24 sts evenly = 360 sts. Happy knitting!

06.11.2024 - 09:24

Country flag Irini Papageorgiou Veiler escribió:

White Sands / 183-15 Rude 1. Pind 1 til 4 har 52 masker. Pind 5 strikkes efter mønster fra højre mod venstre. A.1a / A.1b / A.1c / A.1d / A.1c / A.1b / A.1a (inkl. 2 ret i hver side). Jeg har nu 70 masker og strikker retur iflg.mønsteret 2 linje. Pind 6: A.1e / A.1f / A.1g / A.1h / A.1g / A.1f / A.1e (inkl. 2 ret i hver side) HVORDAN skal min returpind (vrang) strikkes????

04.11.2024 - 21:25

DROPS Design respondió:

Hei Irini. Husk du må strikke diagram A.1a+A.1b+A.1c+A.1d 1 gang i høyden (2 pinner) før du starter med diagram A.1e+A.1f+A.1g+A.1h. Først strikkes 4 pinner retstrik. Så strikkes 5. pinne (fra retten, diagrammene leses fra høyre mot venstre) slik: 2 masker retstrik, A.1a + A.1b + A.1c + A.1d + A.1c + A.1b + A.1a + og 2 masker retstrik (52 masker + 18 kast). 6. pinne (fra vrangen, diagrammene leses fra venstre mot høyre) strikkes slik: 2 masker retstrik + A.1a + A.1b + A.1c + A.1d + A.1c + A.1b + A.1a + og 2 masker retstrik (70 masker). Du har nå strikket diagram A.1a+A.1b+A.1c+A.1d 1 gang i høyden og du skal nå starte på diagram A.1e+A.1f+A.1g+A.1h. mvh DROPS Design

11.11.2024 - 07:33

Country flag Susan escribió:

HI, I am making pattern Drops 203-15 (mermaid wrap). will you please explain what the instruction Repeat diagram A1 vertically 8 times in total(=24 stitches decreased in repetition).\r\nWhat does it mean by vertically\r\nThank Yo

03.11.2024 - 17:38

DROPS Design respondió:

Dear Susan, 1 repeat vertically = work all rows of the chart. So if A.1 has 8 rows, each time you work these 8 rows = 1 repeat vertically. So for 8 repeats you need to work 8*8 = 64 rows with the A.1 pattern. Happy knitting!

03.11.2024 - 20:40

Country flag Patricia escribió:

Ich habe gerade ein Verständnisproblem.... Muster A1 stricke ich zunächst 27x (Größe XXL) und dann mache ich erst die Zunahme von 64 Maschen. Sehe ich das so richtig? Modell Christmas Time Cardigan

19.10.2024 - 14:58

DROPS Design respondió:

Liebe Patricia, konnte die Antwort an Ihrer Frage bei der Anleitung helfen? Sonnst sagen Sie uns gerne bescheid, damit wird noch weiterhelfen können. Viel Spaß beim Stricken!

21.10.2024 - 09:59

Country flag MG escribió:

Can you please explain this pattern desing? I am knitting a baby blanket using baby merino wool and 3mm circular needles. Work next row as follows from right side: 5 stitches in garter stitch, A.1 (= 4 stitches), work A.2 over the next 144 stitches (= 18 repetitions of 8 stitches), A.3 (= 5 stitches) and finish with 5 stitches in garter stitch. Thanks so much.

17.10.2024 - 02:11

DROPS Design respondió:

Dear MG, could you please tell us which pattern you are working on (pattern name and/or pattern number); but as you are writing you should work from RS: 5 sts in garter stitch, then work the 4 sts as shown in diagram A.1, then repeat the 8 sts A.2 over the next 144 sts (a total of 18 times), then work the 5 sts in A.3 and finish with 5 sts in garter stitch. From wrong side read the diagrams from the left towards the right: A.3, repeat A.2 and finish with A.1 (between the 5 sts in garter stitch). Happy knitting!

17.10.2024 - 10:05

Country flag Cherton escribió:

Bonjour voilà J’ai 79 mailles et le graphique et de 106 mailles comment faire ? Merci pour votre réponse

15.10.2024 - 20:34

DROPS Design respondió:

Bonjour Mme Cherton, pouvez-vous nous indiquer quel modèle/quelle taille vous tricotez? Nous pourrons ainsi mieux vous répondre. Merci d'avance pour votre compréhension.

16.10.2024 - 09:14

Country flag Karen escribió:

Hej, jeg er igang med at strikke Sun Wreath og jeg har brug for lidt hjælp. Jeg er nået til at skulle starte mønsteret og jeg kan se, at den første om gang er i hvede, men i opskriften siger den at jeg skal strikke med gul samt lave udtagninger. Det er mit første mønster strik. Mange tak på forhånd.

15.10.2024 - 14:14

DROPS Design respondió:

Hei Karen. Du legger opp med gult og strikker 4-5 cm, disse 4-5 cm blir på innsiden av halskanten (genseren har dobbelt halskant) og viser kun litt fra retten (en omgang vrang = brettekanten). Nå byttes det til hvete og det strikkes med hvete fargen helt til MØNSTER A.1 starter (1. omgang av A.1 strikkes med hvete). mvh DROPS Design

21.10.2024 - 07:59

Country flag Bonnie Cherny escribió:

I’m making Snow Drift and am confused about the chart and the directions they follow for the neck edge . When it says A1 or A2 I realize I am to do cables but are there 6 knitted stitches before the cable and 12 after? It doesn’t seem to line up with the written directions when it says to purl 1 knit 2 after the A1.

13.10.2024 - 00:33

DROPS Design respondió:

Dear Bonnie, excluding the rounds with the actual cables (rounds 3 and 7 of the charts) you will knit over all stitches when the chart is mentioned. You won't have 6 straight knitted stitches, because you will alternate between working one type of rib ( knit 1, purl 1) or the second type (purl 1, knit 2). So in the first 2 rounds of the neck edge with the charts you will knit over all 4 stitches when the charts are mentioned. On the third round, you will actually work the cable. Happy knitting!

13.10.2024 - 19:57

Country flag Conniei escribió:

Hello. I am working on the Drops Design Running Circles Cardigan size 9-10. It is a beautiful pattern but I don't understand what the charts are telling me to do. Is there anywhere I can find the written instructions please. I have never knitted off of charts before. Thank you in advance.

07.10.2024 - 21:30

DROPS Design respondió:

Dear Conniei, there are only diagrams to this pattern; read the lesson above and check symbols and their description, then read diagrams from the right towards the left from right side (see how to work the symbols "from the right side" under diagram key) and from the left towards the right from the wrong side (see how to work the symbols "from the wrong side" under diagram key). Hope it can help. Happy knitting!

08.10.2024 - 07:52

Country flag Anne escribió:

Is there a video to show how the pattern in Lazy Sunday afternoon jumper is worked? I am struggling to understand the instructions. Thanks

01.10.2024 - 14:01

DROPS Design respondió:

Dear Anne, there is no specific video to this pattern but feel free to ask your question using the form at the bottom of the written pattern/diagrams so that we can try to help you. Happy knitting!

01.10.2024 - 16:37

Country flag Susanne escribió:

Hej Är nybörjare på mönsterstickning och förstår inte hur jag ska sticka när det är inte är några rutor i diagrammet. Så här ser det ut: Färg A (=en ruta) Färg B (= en ruta) ingen ruta, ingen ruta, Färg A (= en ruta) Färg B. ( = en ruta) Vad ska jag sticka där det är tomma rutor? Svårt att förklara i ord men hoppas ni förstår. Stickar Anne Wentzel Super Selene Vänligen Susanne

27.09.2024 - 11:10

DROPS Design respondió:

Hei Susanne. Om du oppgir hvilken DROPS oppskrift du strikker etter, så skal vi hjelpe deg så godt vi kan med å forklare. Er det andre oppskrifter / designere, må du nesten kontakte de som har skrevet den. Vi har dessverre ikke mulighet til å svare på andre sine design og vite at vi gir et riktig svar. mvh DROPS Design

30.09.2024 - 07:05

Country flag Barbara escribió:

On pattern Billowing Rose #188-22 - I am new to diagrams - I seem to understand them but I don't understand the written instructions on A1 - is the instruction for just one row? Or do I do 6 rows i.e. R1 K, R2 K, R3 K2tog 4x, yo (6x) K2tog 4x, R4 K, R5 K, R6K? When I do just one row with the 2 edge stitches my count is 17 st short -- 132 vs 149. I have tried everything. If you could help me here, I am sure I could get on with the rest of this lovely bolero. Thank you for any help.

21.09.2024 - 05:15

DROPS Design respondió:

Dear Barbara, the first row of each chart for the yoke is as follows: A.1 (= 1 yarn over, knit 2 together, 1 yarn over), A.2 (= knit 1, 1 yarn over, slip 1 stitch knitwise, knit 1, pass slipped stitch over stitch worked, knit 1, knit 2 together, 1 yarn over) A.3 (= knit 1, 1 yarn over, slip 1 stitch knitwise, knit 1, pass slipped stitch over stitch worked, 1 yarn over). Work these charts as stated in the pattern, repeating the charts as many times as necessary for your size. On the next round, continue with the next round of the charts (in this case, you knit all stitches, since that is what you have in all charts). Happy knitting!

22.09.2024 - 23:19

Country flag June escribió:

Hei. Jeg strikker en genser hvor str M begynner mitt i diagrammet, strikker jeg da fra M’en og ut til venste for så å starte helt i starten av diagrammet? Eller skal man kun strikke fra M’en og til enden og starte ved M’en igjen ? På forhånd takk Mvh June

20.09.2024 - 22:55

DROPS Design respondió:

Hei June. Mest sannsynnlig er det slik du først skriver (fra M’en og ut til venste for så å starte helt i starten av diagrammet). Men siden det ikke er oppgitt hvilken oppskrift det gjelder, får jeg ikke dobbeltsjekke med hva / og om det står noe spesielt i den oppskriften. mvh DROPS Design

23.09.2024 - 08:54

Country flag Tim escribió:

I am working the Lucky Wish pattern and have reached the 114 stitches stage of the yoke, but can\'t figure out the next stage to reach 304 stitches. Apologies if I am not understanding something obvious.

12.09.2024 - 11:12

Country flag Tim escribió:

I am working the Lucky Wish pattern and have reached the 114 stitches stage of the yoke, but can\'t figure out the next stage to reach 304 stitches. Apologies if I am not understanding something obvious.

12.09.2024 - 11:12

DROPS Design respondió:

Dear Tim, you will work following the diagram A.1 a total of 19 times (6 stitches in each A.1 x 19 repeats in the round = 114 sts); increase in each A.1 just as shown in diagram so that you get 16 sts in each A.1 when diagram is done, so that you have 16 stitches in each A.1 x 19 repeats in the round = 304 stitches. Happy knitting!

13.09.2024 - 09:41

Country flag Anna Melnick escribió:

Hi, I am working the Snow Baby pattern and have just started the jacket. For some reason I’m not figuring out the M.1 pattern. I keep increasing with every yo row. On the 4th row it says to knit 2 together 3x -yo 6 times- knit 2 together 3x. By the next row I have added a ton of stitches…. What am I missing? Don’t the two actions cancel each other out? Can you help me on this? Thank you!!

24.08.2024 - 06:19

DROPS Design respondió:

Dear Anna, in the first row of M.1, since you work the charts from the bottom up, you have 6 decreases and 6 yarn overs/increases, so they should be cancelling each other out. The number of stitches remains the same, as you can see on the next rows, rows 2 to 4, working upwards. Check as you work M.1 each time in the row to see if you have worked all necessary decreases and increases each time. Happy knitting!

26.08.2024 - 00:02

Deja un comentario o pregunta en esta lección

Tu dirección de email no será publicada. Los campos obligatorios están marcados con un *.