DROPS Children 49 · ¡Muchos nuevos modelos para niños!

Cómo leer los diagramas de punto

Un diagrama de punto consiste de cuadrados. 1 cuadrado = 1 punto – la definición del símbolo proporciona información acerca de cómo tejer el punto. El diagrama muestra todos los puntos vistos por el lado derecho (a menos que se especifique de otra manera).

Un diagrama se ve así:
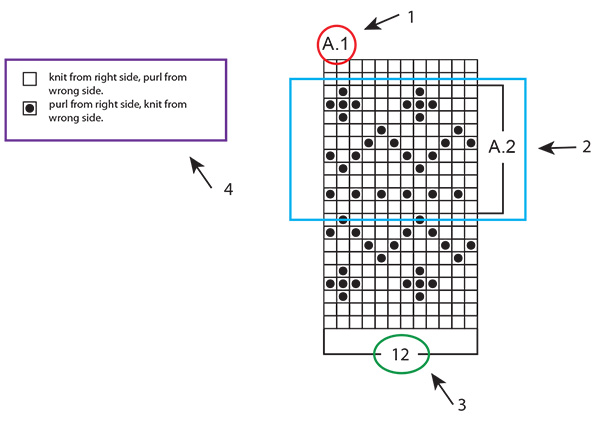
  1. A.1 es el nombre del diagrama, y se refiere al diagrama entero.
  2. A.2 es solo la parte del diagrama que está dentro de los cuadrados separados por líneas más oscuras.
  3. Este número se refiere al número de puntos en la 1ᵃ hilera del diagrama.
  4. Esta es la definición de los símbolos: explica cómo tejer cada punto, o en qué color (en patrones multicolores).

Un diagrama se lee completamente en sentido contrario a cómo leemos normalmente: de derecha a izquierda, de abajo para arriba. Es decir, se comienza con el símbolo en la esquina inferior derecha, y se va tejiendo hacia la izquierda y en dirección hacia arriba (ver lo señalado en ROJO en el diagrama abajo). Si tienes que comenzar en un cuadrado diferente/con un punto diferente, esto será especificado – por ejemplo: las diferentes tallas pueden comenzar en diferentes lugares en el mismo diagrama (ver el rectángulo azul abajo).

Si tienes que tejer varias repeticiones de un diagrama (es decir: tejer el mismo diagrama varias veces a lo ancho) vas a tejer hasta el fin de la hilera del diagrama, y comenzarás nuevamente con el primer punto para la repetición siguiente.

De ida y vuelta:

Cuando se teje de ida y vuelta, se teje una hilera por el lado derecho de la labor y una hilera por el lado revés de la labor. Como los diagramas muestran todos los puntos vistos por el lado derecho, tendrás que tejer en el sentido contrario cuando se teje por el lado revés (ver las flechas AZULES en el diagrama abajo): lees la hilera de izquierda a derecha, los puntos derechos se tejen de revés, y los puntos reveses se tejen de derecho, etc (esto frecuentemente va a estar especificado en la definición de los símbolos: “derecho por el lado derecho, revés por el lado revés”).

En redondo:

Cuando se teje en redondo, todas las vueltas son tejidas por el lado derecho, y el diagrama es leído completamente de derecha a izquierda. Cuando se comienza una nueva vuelta, simplemente comenzar tejiendo el primer símbolo de la hilera siguiente del diagrama.

Varios diagramas diferentes tejidos consecutivamente en la hilera/vuelta:

Si estás tejiendo varios diagramas diferentes, uno después del otro en la misma hilera/vuelta, tejer de la manera siguiente: Tejer la 1ᵃ hilera del diagrama 1, continuar con la 1ª hilera del diagrama 2, después la 1ª hilera del diagrama 3, etc. RECUERDA: si estás tejiendo de ida y vuelta, el diagrama tendrá que ser tejido en el orden contrario por el lado revés – es decir: comenzar con el diagrama 3, después el diagrama 2 y, por último, el diagrama 1. También son tejidos en sentido contrario como se hace habitualmente.

En el patrón, esto puede estar escrito de la manera siguiente: “tejer A.1, A.2, A.3 un total de 1-1-2-3-4 veces”. Esto quiere decir que primero tejes A.1, después A.2 y, finalmente, repites A.3 un total de 1-1-2-3-4 veces (dependiendo de tu talla). Es SOLO el diagrama A.3 que es repetido, A.1 y A.2 se tejen 1 vez cada uno.

Cuando el número de puntos no corresponde a las repeticiones completas del diagrama:

A veces, el número de puntos no es divisible con las repeticiones completas del diagrama a tejer a lo ancho de la labor. Por ejemplo: A.1 cubre 12 puntos y debe ser repetido sobre 40 puntos. En este caso, vas a tejer 3 repeticiones completas de A.1 (= 36 puntos) y después vas a tejer los primeros 4 puntos del diagrama sobre los puntos restantes (ver la línea ROJA abajo). Usualmente este es el caso donde el diagrama es un patrón repetitivo y, por eso, independientemente de tejer repeticiones completas o no, el patrón será consistente.

Comentarios (678)

Country flag Caroline Bussieres escribió:

Bonjour ! Je suis rendue à faire le diagramme A1. Je tricote en rond, j'ai 80 mailles. . Je ne comprend pas la portion du 3 fois en hauteur.

21.09.2021 - 13:55

DROPS Design respondió:

Bonjour Mme Bussieres, peut-être pourriez-vous poser votre question sur le modèle concerné? Ce serait ainsi plus facile de pouvoir regarder les explications pour vous répondre, merci pour votre compréhension.

22.09.2021 - 08:01

Country flag Wendy escribió:

I will be making the Kaia top in the 11/12or 13/14. What do you mean bend the circular needle double? Also there are two M1 diagrams. One says 12 across and 13 rows up the other is 16 across and 18 up. Which one is used? Can this be knit fully in the round from bottom up and then split at the decrease and neck edge? I’m finding reading the pattern very confusing.

16.09.2021 - 22:31

DROPS Design respondió:

Dear Wendy, you bend the circular needle to cast on the stitches on both tips, just as shown in this video with 2 needles; for the tunic use the diagram M.1 worked over 16 sts (the one over 12 sts applies to hat). You work body from bottom up in the round to the armholes, then divide pieces and work back and front pieces together, splitting front pieces in 2 sides. Happy knitting!

17.09.2021 - 07:45

Country flag Lene Berg escribió:

I opskrift Baby 19-10 - kørepose, er der 3 diagrammer. I 2 og 3 er der i toppen af diagrammet i midt, hvor det ser ud til, at der skal strikkes to pinde (og kun der). Skal garnet brydes og disse pinde strikkes alene?

16.09.2021 - 07:51

DROPS Design respondió:

Hei Lene. Når du har strikket 4 pinner av M.2 og M.3, så gjentar du diagrammene i høyden, MEN over de "midterste" flettene (12 masker) strikker du 2 rader til med glattstrikk før du gjentar diagrammene i høyden. Altså de midterste flettene har 5 rader med glattstrikk mellom hver flette, mens flettene i sidene har 3 rader med glattstrikk mellom hver flette. mvh DROPS design

20.09.2021 - 08:44

Country flag Elizabeth escribió:

Jeg strikker babypledd Princess Chantilly 18-30. Diagrammet M1 går over 13 masker. På rad 1, der det er 6 kast på pinnen. Skal det første kastet komme direkte etter de 2 rettmaskene i rapporten?

15.09.2021 - 17:37

DROPS Design respondió:

Hei Elizabeth. På 5. rad i M.1 der det er 6 kast, strikkes det 2 masker sammen slik: ta 1 maske løst av ponnen, 1 rett, løft den løse masken over, så gjøres 1. kast, osv. mvh DROPS design

20.09.2021 - 07:35

Country flag LINDA escribió:

Drop design 217-33 Please explain the sequence for the pattern I cant figure out how to get the pattern started. Have the collar now need the yoke pattern. Have knit your patterns before and had no problem. Really like the ones have kint . All were pull overs. Thanks for your help

11.09.2021 - 01:56

DROPS Design respondió:

Dear Linda, on yoke you will now work (A.1, A.2) all the row, starting and ending with 5 sts in garter stitch for front band sts. A.1 will be worked over the same 3 sts in height all the way, and the number of sts in A.2 will increase as shown in the diagram (first row is worked over 3 sts with 1 increase and depending on the size you will increase 6 to 7 sts in each A.2). Happy knitting!

13.09.2021 - 09:48

Country flag Dorothy Ann Aarholt escribió:

Jeg skal strikke Pink Petals Hat but can't work out how to follow diagram A1. I have 7 stitches. Where do I start? I can't find a starting point with 7 stitches. Oops, gikk over til engelsk. Språkforvirret, Hilsen Dorothy

09.09.2021 - 19:47

DROPS Design respondió:

Hei Dorothy. Se svar på ditt forrige spørsmål :) mvh DROPS design

13.09.2021 - 07:39

Country flag Dorothy Ann Aarholt escribió:

Jeg skal strikke Pink Petals Hat but can't work out how to follow A1. I have 7 stitches. Where do I start? I can't find a starting point with 7 stitches. Oops, gikk over til engelsk. Språkforvirret, Hilsen Dorothy

09.09.2021 - 19:30

DROPS Design respondió:

Hei Dorothy. Du strikker frem og tilbake. Legg opp 7 masker, snu. Strikk 1. pinne fra vrangen og etter diagram A.1 = 7 masker vrang, snu og strikk 2. pinne fra retten og 2. rad etter diagram A.1 (7 kast + 7 rett = 14 masker). Snu og strikk 3. pinne etter diagram A.1 (maskene strikkes rett og kastene strikkes kastet vridd rett). mvh DROPS design

13.09.2021 - 07:38

Country flag Hilary Ball escribió:

I am trying to knit the Egyptian Feathers jacket pattern drops 201-29 but don’t understand the diagrams. I can’t find the A.1A or A.2A patterns to start the neck. Help I’m completely stuck Hilary

04.09.2021 - 19:57

DROPS Design respondió:

Dear Hilary, you can find the A.1A and A.2A patterns in the measurement guide/ sketch (the last picture) just below the left sleeve. The other diagrams are in multiples because they vary depending on their size, but those are equal for all sizes.

05.09.2021 - 16:14

Country flag Elma escribió:

Als je in de rondte breit komt bij de overgang van averecht naar recht, de laatste averechtse steek naast de eerste rechte steek te liggen.\r\nDaardoor loopt de averechtse ribbel niet mooi in elkaar over. Is hier een trucje voor zodat de ribbel wel naast elkaar komt te liggen bij de overgang naar recht.\r\nAlvast bedankt.

02.09.2021 - 10:34

Country flag Yvonne Bogues escribió:

Hi, I'm knitting Drops Seasons in the Sand. What does 'cast on 60 sts (inkl 1 edge st in each side). Does it mean edge st is included in the 60 or do I have to add an extra edge st on each side? I have never come across this notation before. Many thanks

30.08.2021 - 17:35

DROPS Design respondió:

Dear Yvonne, you need to cast on 60 sts in total; the edge st are always included in the amount of sts to cast on initially in our patterns. Happy knitting!

30.08.2021 - 18:34

Country flag Pat Calder escribió:

I am knitting Drops 60-13 and cannot work out where I supposed to find the pattern. I have done the first 5 rows and am completely lost after that. Never used these patterns before. Many thanks.

28.08.2021 - 18:36

DROPS Design respondió:

Dear Mrs Calder, you will now work pattern on the half stitches of the round (= to the marker on the side), then start again to the 2nd half of piece, ie work starting from the arrow (= in S + M with 2nd sitch on diagram, in size L with 6th stitch), to the left, then repeat diagram from the first to the last stitch until you have worked the half of the stitches (= to the marker), then start again the same way over the 2nd half of stitches ie to the end of the round. Happy knitting!

30.08.2021 - 09:39

Country flag Elisabeth Solhaug escribió:

221-3 når jeg starter på A1 (21m) så stemmer mønster med antall masker. På omg 3 blir det feil, for mange masker. Lurer på omg 2 som starter med 2 masker før 2 vrang. Hvorfor tegnes flere masker på omg 2? Mønstret er utvidet med 2m i hver side.... hvordan skal jeg tenke:)

27.08.2021 - 16:20

DROPS Design respondió:

Hei Elisabeth. På 1. omg økes det med 4 masker hver gang A.1 strikkes (den sorte prikken i diagrammet). 4 prikker = 4 økte masker, derfor er det tegnet inn flere masker i 2.rad. Sette 1 maskemarkør / merketråd før A.1 og 1 maskemarkør / merketråd etter A.1, da får du en bedre oversikt. mvh DROPS design

30.08.2021 - 09:35

Country flag Trine Breivik escribió:

Skjønner ikke hvordan jeg skal få 179 masker etter mønstret. Dårlig forklart kast og øking eller er det jeg som er treg i hue 🤣🤣🤣

20.08.2021 - 12:57

DROPS Design respondió:

Hej Trine. Om du ställer din fråga på oppskriften istället så hjälper vi dig där. Mvh DROPS Design

20.08.2021 - 13:29

Country flag Maria Sigurd escribió:

Hej Jag stickar tröja 135-5 och har börjat på oket. När man stickar diagram på rundsticka står det att alla varv stickas höger till vänster. Enligt diagrammet är då sista maskan vit. Om jag går tillbaka till höger för att börja varv 2 blir ju första maskan också vit. Eftersom arbetet går ihop ser det ju då ut som om jag har två vita maskor på rad det ser inte rätt ut. Jag har rätt antal maskor på stickan.

17.08.2021 - 15:31

DROPS Design respondió:

Hei Maria. Det vil nok bli en ujevnhet mellom start og slutt på hver omgang når man strikker mønster. Ta en titt på denne videoen og se om dersom du bruker denne teknikken om du får noe jevnere /penere overganger: Hur man stickar ränder runt utan hack mvh DROPS design

18.08.2021 - 06:54

Country flag Lina Bergeron escribió:

Dans le modèle Drops 107-8, la grile M1, il y a des cases sans légende, vide, je fais quoi avec ces mailles?

11.08.2021 - 22:13

DROPS Design respondió:

Bonjour Mme Bergeron, la réponse à votre question posée sur ce modèle a-t'elle pu vous aider? Si tel n'est pas le cas, n'hésitez pas à nous le dire. Merci d'avance. Bon tricot!

12.08.2021 - 09:01

Country flag Janey Nottage-Tacey escribió:

I am working on Little Red Nose Jacket and am confused by the first row in the pattern. Is it really an increase, then six knits than another increase? Size 12 mos. It says that row one is a repeat of 6 stitches, but looks like an increase at the beginning and then another on after 6 stitches, one knit than another increase. Help please.

05.08.2021 - 00:19

DROPS Design respondió:

Dear Mrs Nottage-Tacey, on first row in A.1 size 12/18 months, work like this: *yarn over, knit 5, yarn over, knit 1*, and repeat from *-* = 6 sts are becoming 8 sts. Happy knitting!

05.08.2021 - 09:52

Country flag Suzy Durston escribió:

Hi , I'm stuck on my pattern Branching Out 216/14. I've never come across this in the neck I 'work A1 over the 6 stitches, and A2 over the next 2_stitches ' for the entire length of the diagram. A2 becomes 6 then more sts long, so how do I knit it ? Thank you in advance .

30.07.2021 - 18:19

DROPS Design respondió:

Dear Mrs Durston, when starting diagrams under yoke, work the first row each diagram: *A.1 over 6 sts (= repeat 3 times the 2 sts in A.1), then work A.2 (= work the first row in A.2 over the next 2 sts)* and repeat from *-* - on next row, work diagram reading from the left towards the right: *A.2, then repeat A.1 3 times *. On 5 th row, increase in A.2 as shown in the diagram (continue working A.1 as before wihtout increasing). And continue like as shown in diagram A.2 and continue increasing as shown in A.2. Happy knitting!

02.08.2021 - 08:32

Country flag Eve Rowell escribió:

I am working Sunrise Glow Drops 170/14. The chart begins with 208 sts, a 12 stitch pattern but shows additional YO's such that by the final row of the A-1 section, it has gone from a 12 stitch repeat to a 23 stitch repeat. Pattern reads:"When A.1 has been worked 1 time vertically, there are 207 sts on needle. Piece measures approx. 19 cm / 7½". K 1 round and inc 1-0-1-0-1-0 sts evenly = 208-sts." How can a 23 stitch pattern repeated 9 times yield a total 207 stitches?

18.07.2021 - 18:35

DROPS Design respondió:

Dear Mrs Rowell, before working A.1 you have 108 sts on the needle and repeat 9 times the 12 stitches in A.1 (= 9x12= 108); then you increase in A.1 as shown in the diagram, and there will be 23 sts when diagram is done (= 9 x 23 = 207 sts). Hope this will help, happy knitting!

19.07.2021 - 09:47

Country flag Michelle Lamontagne escribió:

Good day, I just started a Twin River sweater by Drops design # 174-14. I am afraid do not understand this segment of the pattern; \r\n\"Now work pattern A.1 as follows: Work the last 2 sts in A.1, then repeat A.1 the entire round until 1 st remains on round, work the first st in A.1.\"\r\nCould you please clarify for me? The way I read it I would simply continue in the same pattern through the rounds???? Thank you.M.L.

14.07.2021 - 17:11

DROPS Design respondió:

Dear Mrs Lamontagne, you are working that way to get the pattern symmetrical on each side: work the last 2 sts in A.1 (= P1, K1), then repeat A.1 (= P2, K1) over the number of sts stated, and now work the first stitch in A.1 (= P1) - now pattern looks the same at the beg and at the end of the section in pattern. Happy knitting!

15.07.2021 - 10:00

Country flag Gill Mineur escribió:

Hej, Första gången jag stickar enligt mönster och vill fråga så jag förstår :) . är varje rad ett varv? alltså om man stickar enligt diagram så börjar man om och stickar enligt diagram igen tills varvet är färdigt? Mvh Gill

12.07.2021 - 09:18

DROPS Design respondió:

Hej Gill. Ja det stämmer, varje rad är ett varv. Mvh DROPS Design

13.07.2021 - 12:16

Deja un comentario o pregunta en esta lección

Tu dirección de email no será publicada. Los campos obligatorios están marcados con un *.