
Popular categories
Looking for a yarn?


|
||||||||||
Peach blossom |
||||||||||
 |
 |
|||||||||
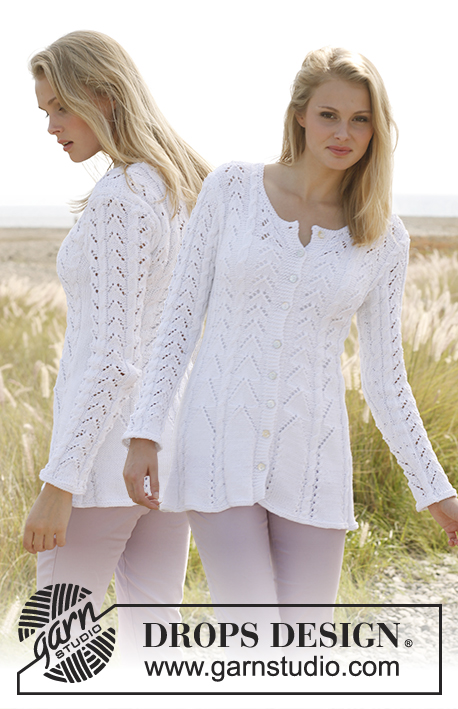
Crochet DROPS jacket with lace pattern and flounce at the bottom in ”Safran”. Size S - XXXL
DROPS 147-38 |
||||||||||
|
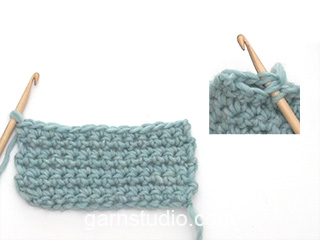
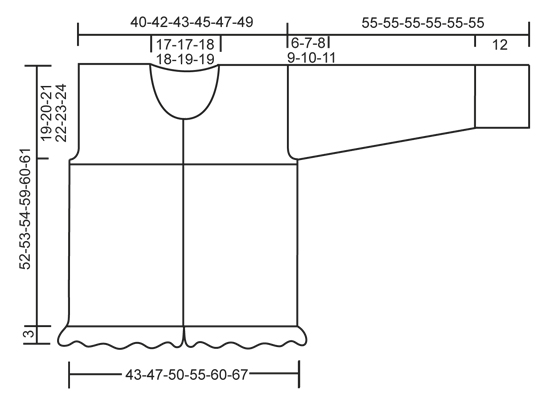
CROCHET INFO: Replace first dc on every row with 3 ch. PATTERN: See diagram A.1. DECREASE TIP: Dec at beg of row as follows: Work sl sts over no of dc to be dec. Dec at end of row as follows: When no of dc to be dec remains, turn. -------------------------------------------------------- JACKET: Worked bottom up, back and forth from mid front. READ CROCHET INFO! Work 246-265-284-313-342-380 ch on hook size 3 mm / C with Safran. Continue with 1 sc in 2nd ch from hook, then 1 sc in each of the next 4-5-6-5-4-6 ch, * skip ch 1, 1 sc in each of the next 5 ch *, repeat from *-* the entire row = 205-221-237-261-285-317 sc. Continue diagram A.1 as follows: ch 3 up from first sc, 1 dc in next sc, diagram a over the first 9 sc, diagram b until 10 sc remain, diagram c over the first 8 sc, then 1 dc in each of the last 2 sc (= 25-27-29-32-35-39 repetitions on row). Repeat the 4 rows in A.1 upwards until piece measures approx. 32-32-32-36-36-36 cm / 12½"-12½"-12½"-14¼"-14¼"-14¼"" – finish after 4th row in diagram. REMEMBER THE CROCHET GAUGE! On next row work dc as shown in 5th row in diagram, i.e. as follows: 1 dc in each of the first 4 dc, * 2 dc in ch-space, 2 dc in next ch-space, 1 dc in each of the next 4 dc *, repeat from *-*, finish with 2 dc in each of the last 2 ch-spaces and 1 dc in each of the last 4 dc = 204-220-236-260-284-316 dc. Then finish front and back piece separately. FIRST FRONT PIECE: Work dc back and forth over the first 50-53-57-62-68-75 dc on row. At the same time dec towards the armhole on every row: 2 dc 0-0-1-2-3-5 times and 1 dc 1-2-2-3-5-6 times – SEE DECREASE TIP = 49-51-53-55-57-59 dc remain. When piece measures 42-43-44-47-48-49 cm / 16½"-17"-17¼"-18½"-19"-19¼", beg neck dec as follows: Dec 13-13-14-14-15-15 dc 1 time, 3 dc 1 time, 2 dc 2 times and 1 dc 3 times = 26-28-29-31-32-34 dc remain on row. Cut the yarn when piece measures approx. 52-53-54-59-60-61 cm / 20½"-21"-21¼"-23¼"-23½"-24". OTHER FRONT PIECE: Work as first front piece but reversed. BACK PIECE: Work dc back and forth over the middle 94-100-108-118-130-144 dc (do not work over the 5-7-7-9-9-11 sts in each side = armhole). AT THE SAME TIME dec towards armhole in each side as on front piece = 92-96-100-104-108-112 dc. When piece measures 50-51-52-57-58-59 cm / 19¾"-20"-20½"-22½"-22¾"-23¼", work 1 row only over the outermost 28-30-31-33-34-36 dc in one side for shoulder, then work 1 more row while at the same time dec 2 dc towards the neck, work the rest of row = 26-28-29-31-32-34 dc on shoulder, cut the yarn. Piece measures approx. 52-53-54-59-60-61 cm / 20½"-21"-21¼"-23¼"-23½"-24". Work the same way on the other shoulder. FLOUNCE AT THE BOTTOM OF BODY: Work in the sc row at the bottom of body as follows - beg from WS: ROW 1: 1 sc in first sc, * ch 3, skip 1 sc, 1 sc in next sc *, repeat from *-* the entire row. ROW 2: Turn with ch 5, 1 sc in first ch-space, * ch 4, 1 sc in next ch-space *, repeat from *-* the entire row. ROW 3: Turn with ch 6, 1 sc in first ch-space, * ch 6, 1 sc in next ch-space *, repeat from *-* the entire row. ROW 4: Work as follows in every ch-space: 2 sc + 1 picot (= ch 3, 1 sc in first ch) + 2 sc. Fasten off. SLEEVE: Worked back and forth and sewn tog at the end. Ch 68-68-78-78-78-87 on hook size 3 mm / C with Safran. Turn and work 1 sc in 2nd ch from hook, then work 1 sc in each of the next 6-6-4-4-4-7 ch, * skip ch 1, 1 sc in each of the next 5 ch *, repeat from *-* the entire row = 57-57-65-65-65-73 sc. Continue to work diagram A.1 as follows: Diagram a over the first 9 sc, diagram b until 8 sc remain, then diagram c (= 7-7-8-8-8-9 repetitions on row). Continue like this until the 4 rows in diagram A.1 have been worked a total of 3 times vertically. Piece measures approx. 12 cm / 4¾". On next row work dc as shown in 5th row in diagram, i.e. as follows: 1 dc in each of the first 2 dc, * 2 dc in ch-space, 2 dc in next ch-space, 1 dc in each of the next 4 dc *, repeat from *-*, finish with 2 dc in each of the last 2 ch-spaces and 1 dc in each of the last 2 dc = 56-56-64-64-64-72 dc. Continue with 1 dc in every dc – AT THE SAME TIME when piece measures 16 cm / 6¼", inc 1 dc in each side by working 2 dc in next to last dc in each side. Repeat inc 9-12-11-13-16-15 more times: SIZE S: Every 4th row, SIZE M + L: Every 3rd row, SIZE XL: Alternately every other and 3rd row, SIZE XXL + XXXL: Every other row = 76-82-88-92-98-104 dc. When piece measures 49-48-47-46-45-44 cm / 19¼"-19"-18½"-18"-17¾"-17¼" (shorter measurements in the larger sizes because of longer sleeve cap and broader shoulder width), dec for sleeve cap on every row in each side as follows: 3 dc 1 time, 2 dc 5-6-8-9-10-11 times and 3 dc 1 time. Piece now measures approx. 55 cm / 21½" for all sizes, cut the yarn. EDGE AT THE BOTTOM OF SLEEVE: Work in the sc row at the bottom of sleeve as follows - beg from WS: ROW 1: 1 sc in first sc, * ch 5, skip 2 sc, 1 sc in next sc *, repeat from *-* the entire row - NOTE: For the no of sts to add up skip only 1 sc the last time in sizes S and M. In sizes L and XL skip 3 sc the last time. Turn piece. ROW 2: Work as follows in every ch-space: 2 sc + 1 picot (= ch 3, 1 sc in first ch) + 2 sc. Fasten off. ASSEMBLY: Sew shoulder seams and sleeve seams edge to edge to avoid a chunky seam and sew sleeves in body. Work up along right band, around the neck and down along left band as follows: 1 sc in first st, * ch 3, skip approx. 1 cm / ½", 1 sc in next st *, repeat from *-*. Sew buttons on left band – top button should be approx. 1 cm / ½" from the top, then evenly spaced downwards. Button in ch-spaces on right band. |
||||||||||
Diagram explanations |
||||||||||
|
||||||||||
|
||||||||||

|
||||||||||
|
Have you made this or any other of our designs? Tag your pictures in social media with #dropsdesign so we can see them! Do you need help with this pattern?You'll find tutorial videos, a Comments/Questions area and more by visiting the pattern on garnstudio.com. © 1982-2024 DROPS Design A/S. We reserve all rights. This document, including all its sub-sections, has copyrights. Read more about what you can do with our patterns at the bottom of each pattern on our site. |
||||||||||


With over 40 years in knitting and crochet design, DROPS Design offers one of the most extensive collections of free patterns on the internet - translated to 17 languages. As of today we count 304 catalogs and 11422 patterns - 11417 of which are translated into English (US/in).
We work hard to bring you the best knitting and crochet have to offer, inspiration and advice as well as great quality yarns at incredible prices! Would you like to use our patterns for other than personal use? You can read what you are allowed to do in the Copyright text at the bottom of all our patterns. Happy crafting!
Comments / Questions (44)
Ik ben boos.Jullie hebben een grote fout gemakt in de patroonbeschrijving.Ik kwam erachter toen ik het achterpand al af had.Jullie zeggen dat het inzijn geheel 51 cm moet zijn.Ik vond dit al raar want het handelt zich om een bovenstuk wat op borsthoogte einigt/begint. Zie ik in de tekening dat dit 21 cm moet zijn!!! Wat nu???Al het werk voor niets!!!!Ik ben zeer kwaad. Misschien kunnen jullie op zijn minst mij vertellen wat het moet zijn. Gegroet
02.02.2015 - 19:49DROPS Design answered:
Beste Karin. Wij hebben het patroon nagekeken en wij kunnen geen fout vinden. In het patroon staat op welke hoogte u moet opdelen voor de armsgaten (ongeveer 32-32-32-36-36-36 cm; daarna nog 1 toer haken zoals beschreven) en vervolgens de totale hoogte wanneer u klaar bent (52-53-54-59-60-61 cm). Daarna haakt u de ruche langs de onderkant (3 cm). Dat komt overeen met de afmetingen aangegeven op de maattekening.
03.02.2015 - 13:37Zie nu dat ik mijn vraag bij de opmerkingen heb gezet. Dus hierbij alsnog mijn vraag. Ik ben heel enthousiast aan dit vestje begonnen, maar ik snap begin en einde v.d. toer niet. In A.1 moet je in de 3e toer i.p.v. 3 st. er 4 haken door in het 3e st. 2 st. te haken. Dus zowel in de 3e als 4e toer 2 st. in het 3e st. van de vorige toer = 4 st. Moet je dan voor de volgende 2 toeren terug naar 3 st.? Dan krijg je toch een ongelijk begin en einde? Zouden jullie me dat willen uitleggen? Bedankt!
28.07.2014 - 16:10DROPS Design answered:
Het patroon verspringt na steeds twee toeren, vandaar deze extra steken. U kunt het patroon zo haken als het er staat en dan komt het werk uit.
29.07.2014 - 09:40Ben heel enthousiast begonnen, maar ik snap de overgang niet van begin en einde. In A.1 moet je in 3e toer i.p.v. 3 st. er 4 haken door in het 3e st. 2 st. te haken? Dus zowel in 3e als 4e toer 2 st. in het 3e st. van de vorige toer = 4 st. Moet je dan voor de volgende 2 toeren terug naar 3 st.? Dan krijg je toch een ongelijk begin en einde of een gaatje? Zouden jullie me dat willen uitleggen? Bedankt!
27.07.2014 - 13:53Bonjour, J'ai commencé à faire le point fantaisie A1 (donc 25 rapports) mais il me semble un peu large. Est-ce normal ? On part d'une base de 205 m mais actuellement, j'en ai beaucoup plus? Merci pour votre aide.
24.02.2014 - 19:38DROPS Design answered:
Bonjour Floriane, pensez à bien vérifier votre échantillon/tension, vous devez avoir 23 B x 12 rangs = 10 x 10 cm et 1 rapport de A.1b = environ 3.5 cm de large et 4 rangs de A.1 = 4 cm. Bon crochet !
25.02.2014 - 09:00Bedankt voor uw reactie. Het spijt me dat ik het nog niet helemaal begrijp. Dat heb ik gelezen in het patroon, maar ik vraag me af of je in de ene toer 2 stokjes moet minderen en dan in de volgende 1 stokje. Anders is het toch in elke toer drie stokjes minderen? Is het dan niet zo dat bij maat M elke tweede toer geminderd moet worden?
22.11.2013 - 21:52DROPS Design answered:
Hoi Ditta. Je mindert aan de zijkant voor het armsgat in elke toer. Dus eerst minder je 0 stk (dus eigenlijk niet minderen), dan 2 keer 1 stk - dus eerst 1 stk in de ene toer, en dan 1 stk in de volgende toer. Zie ook tip voor het minderen.
26.11.2013 - 16:34Hoe doe je dat minderen dan bij de grote maten? Ben benieuwd hoe het dan zit.
19.11.2013 - 23:23DROPS Design answered:
Hoi Ditta. De minderingen voor de overige (en grotere maten) staan in het patroon: Minder TEGELIJKERTIJD aan de zijkant voor armsgat elke toer: 0-0-1-2-3-5 keer 2 stk en 1-2-2-3-5-6 keer 1 stk – ZIE TIP VOOR HET MINDEREN = 49-51-53-55-57-59 stk over.
20.11.2013 - 10:55Dag, Dit vest ben ik in maat m aan het haken. Bij het EERSTE VOORPAND staat dat je 0 keer 2 stokjes moet haken en 2 keer 1 stokje. Betekent dit dus dat ik de eerste toer 53 stokjes haak, 2e toer 52 stokjes en de 3e toer 51 stokjes? En daarna alles recht totdat aan de andere kant middenvoor bij de hals geminderd moet worden. Alvast bedankt voor uw reactie!
18.11.2013 - 22:06DROPS Design answered:
Hoi Ditta. Ja. Dat klopt.
19.11.2013 - 14:25Johanne wrote:
Bonjour, dans l'explication il est écrit pour le point de fantaisie 3ml et 1B dans la ms suivante, sur le diagramme il est démontré 1 B au début du rang. Dites-moi ce qui est la bonne parce qu'en faisant une bride dans la maille suivante on obtient 2 B au début du rang. Merci beaucoup j'aime vraiment votre site !
10.07.2013 - 17:40DROPS Design answered:
Bonjour Johanne, on crochète A.1 ainsi : 3 ml (1ère bride), 1 B dans la ms suiv, puis diagramme A1a au-dessus des 9 m suivantes, diag. A1b jusqu'à ce qu'il reste 10 ms, diag.A1c au-dessus des 8 ms suiv, puis vous terminez par 1 B dans chacune des 2 dernières ms. Le diag A.1 est ainsi entouré par 2 B de chaque côté (3 ml + 1 B au début du rang). Bon crochet !
10.07.2013 - 18:24Johanne wrote:
Bonjour, le point fantaisie au début on inscrit 3 ml et une B dans la prochaine ms mais ce n'est pas ce qui est démontré sur le diagrameme A1. étape a=9 . dites moi ce qui est la bonne façon.
10.07.2013 - 17:30DROPS Design answered:
Tout à fait Johanne, vous crochetez d'abord: 3 ml, 1 B puis a1 = 1 B, 2ml, sautez 3 ms, 2B,1ml,2B, 2ml,sautez 3B, 1B dans la ms suiv. Ainsi, A.1 est encadré par 2 B de chaque côté : 3 ml, 1B en début de rang et 2 B en fin de rang, et au milieu, on crochète A.1a, puis on répète A.1b et on termine par A.1c. Bon crochet!
11.07.2013 - 09:39Dans ce modèle, il est question de "8 rapports" que signifie cela ? Merci.
24.03.2013 - 17:24DROPS Design answered:
Bonjour Madame Duval, 1 rapport = 1 motif du diagramme à répéter, soit sur 8 m pour A.1b. Bon crochet !
25.03.2013 - 13:52