
Suositut kategoriat
Etsitkö tiettyä lankaa?


Kommentit / Kysymykset (28)
![]() Georgia kirjoitti:
Georgia kirjoitti:
Coming back to this pattern now which is very difficult. The pattern does not tell you what needles to change to when reducing/shaping. I have discovered there are several different ways but none of them are outlined here on this website.
07.10.2022 - 17:01DROPS Design vastasi:
Dear Georgia, we only change to double-pointed needles when it's too difficult to work the stitches in a circular needle because you have too few stitches in the needle. From them, you can continue with the double pointed needles up till the end. So it may depend on each person; you can directly change to double-pointed needles as soon as you start decreasing/ shaping for the top of the hat. Happy knitting!
09.10.2022 - 19:18
![]() Georgia kirjoitti:
Georgia kirjoitti:
Should the 'knit 2 together' and decrease knit be also 'twist knit'? What about the slip knitting h when decreasing? Dies it mean normal knitting or trust knit? Whi h would actually be purlwise .
03.05.2022 - 08:18DROPS Design vastasi:
Dear Georgia, you can replace the K2 tog with slip 1 twisted, slip 1 twisted and K2 together, and the slip 1 as if to K., K1, psso, with slip 1 twisted, knit 1 and psso; Happy knitting!
03.05.2022 - 10:30
![]() Georgia kirjoitti:
Georgia kirjoitti:
Turning the work: when watching the suggested videos for this, the second video gies the best finish HOWEVER, because the video is using knit only it is important to make sure that your working yarn is in the right place. I have worked out that you need to follow the video instruction making sure that where the yarn is you need to do the opposite so that the yarn is in the right position (at the back) for when you have turned and are ready to do the first stitch will be a knit.
12.04.2022 - 12:30
![]() Georgia kirjoitti:
Georgia kirjoitti:
Another question: how do you 'turn the work'? I have watched the videos but both methods don't explain how to turn when doing ribbing.
11.04.2022 - 20:23DROPS Design vastasi:
Dear Georgia, when you fold the lower part of the hat, the wrong side will be facing outwards. So, to be sure that the rib looks the same both in the upper part on the right side and the lower part on the wrong side, you turn, so that you work on the wrong side and then knit where you would purl and purl where you would knit. Then, if you fold the lower part of the hat, the rib should look opposite to what you have worked and the same as in the upper part of the hat. Happy knitting!
11.04.2022 - 22:56
![]() Georgia kirjoitti:
Georgia kirjoitti:
Hello, I am a beginner and don't understand what this means: A.1 (= 26 stitches) over all stitches (= 5 times in width). When A.1 has been worked 1 time in height there are 10 stitches left.
08.04.2022 - 21:42DROPS Design vastasi:
Dear Georgia, you repeat A.1 (which consists of 26 stitches) in the round. So, to work it until the end of the round, you need to repeat it 5 times (work round 1 of A.1 once, then start again the round 1 of A.1 the 2nd time...). A.1 includes decreases. In the last round of A.1, you only work 2 stitches in each repeat (so, if you had 5 repeats, you will have 10 stitches left in total). Since you are working the last round of A.1, that's what's called working A.1 1 time in height (you have worked all of the rounds of A.1). Happy knitting!
09.04.2022 - 18:44
![]() Andreas kirjoitti:
Andreas kirjoitti:
Jag förstår inte hur jag ska vända arbetet?! När jag stickar baklänges blir det ett hål när jag kommer tillbaka till markören. Säg att jag stickar rät/ avig när jag vänder arbetet, kommer första maskan jag ska sticka i vara avig?
29.01.2022 - 11:14
![]() Laila kirjoitti:
Laila kirjoitti:
Etter å ha strikket oppbrettskanten, skal en ikke strikke videre med rett/vrang, og ikke vridd rett/vrang?
28.12.2021 - 08:34DROPS Design vastasi:
Hei Laila. Når oppbrettskanten er ferdig, vendes luen slik at luen strikkes rundt i motsatt retning av brettekanten. Og det skal strikkes videre med vrangbord (= 1 vridd rett / 1 vrang). mvh DROPS Design
04.01.2022 - 13:55
![]() Ulrike K kirjoitti:
Ulrike K kirjoitti:
Die Mütze ist zur Lieblingsmütze des Vaters geworden, der täglich Mütze trägt. Grund dafür ist sicher das Garn, es ist so leicht und hält so schön warm. Da werde ich bald noch eine stricken. Vielen Dank für die Anleitung.
28.12.2021 - 07:26
![]() Claude kirjoitti:
Claude kirjoitti:
Bonjour, que voulez vous dire par :Continuer maintenant le bonnet en tournant l'ouvrage sur l'endroit et tricoter en rond, dans le sens opposé, en côtes. Pourriez vous intégrer un tutoriel pour que l’on puisse visualiser
03.09.2021 - 23:15DROPS Design vastasi:
Bonjour Claude, la partie que vous avez tricoté au début doit se retrouver maintenant sur l'envers et vous continuez à tricoter sur l'endroit (qui était l'envers auparavant) pour que l'endroit du revers soit à l'endroit quand on le retourne (mais il sera sur l'envers jusqu'à la fin du bonnet). En espérant que ces explications complémentaires puissent vous aider; votre demande a été transmise à notre équipe; Bon tricot!
06.09.2021 - 07:17
![]() Alva kirjoitti:
Alva kirjoitti:
Hej! Läses A1 diagrammet från höger till vänster eller tvärtom?
28.05.2021 - 10:36DROPS Design vastasi:
Hej Alva, Ja du starter i nederste højre hjørne og strikker hver maske ifølge diagrammet, så starter du forfra igen omgangen rundt :)
28.05.2021 - 13:37
|
||||||||||||||||
Care for Nature#carefornaturehat |
||||||||||||||||
 |
 |
|||||||||||||||
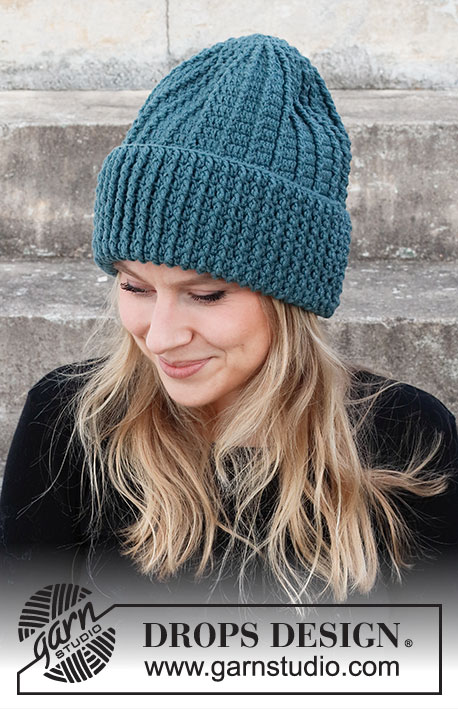
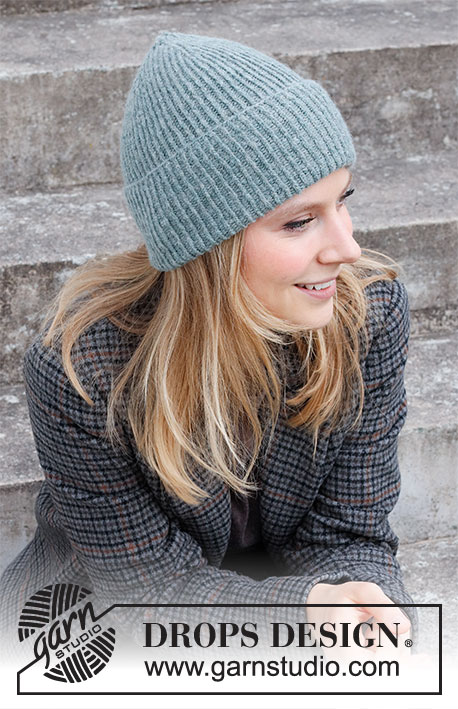
Neulottu myssy / hipsterimyssy DROPS Sky-langasta. Työssä on joustinneuletta. Koot: Yksi koko.
DROPS 214-33 |
||||||||||||||||
|
OHJE: ------------------------------------------------------- MALLINEULE: Katso ruutupiirros A.1. ------------------------------------------------------- ALOITA TYÖ TÄSTÄ: ------------------------------------------------------- MYSSY: LYHYT YLEISKATSAUS TYÖSTÄ: Työ neulotaan suljettuna neuleena pyöröpuikolla, alhaalta ylös. Taitereuna neulotaan työn nurjalta puolelta, tämän jälkeen työn oikea puoli käännetään ulospäin. Vaihda työhön sukkapuikot, kun pyöröpuikko käy liian pitkäksi. MYSSY: Neulo aluksi myssyn taitereuna työn nurjalta puolelta näin: Luo 130 silmukkaa pyöröpuikolle nro 3 Sky-langalla. Neulo 1 kerros oikein. Neulo sitten 12 cm joustinneuletta (= 1 silmukka kiertäen oikein / 1 silmukka nurin). Taitereuna neulotaan työn nurjalta puolelta, jotta kiertäen oikein neulotut silmukat jäisivät työn oikealle puolelle, kun taitereuna käännetään ylös. Käännä nyt myssyn oikea puoli ulospäin ja jatka neulomista työn oikealta puolelta, eli neulo nyt vastakkaiseen suuntaan. Jatka joustinneuletta (= 1 silmukka kiertäen oikein / 1 silmukka nurin). TARKISTA NEULETIHEYS! Kun myssyn korkeus on 27 cm (sisällyttäen taitereunan n. 12 cm, työhön neulotaan vielä n. 8 cm), neulo kaikilla silmukoilla mallineuletta piirroksen A.1 (= 26 silmukkaa) mukaisesti (= 5 mallikertaa kerroksella, eli neulo kiertäen oikein neulotut silmukat kiertäen oikein ja neulo nurjat silmukat nurin). Kun olet neulonut piirroksen A.1 loppuun, työssä on jäljellä 10 silmukkaa. Katkaise lanka ja vedä lanka jäljellä olevien silmukoiden läpi, kiristä lanka ja päättele langanpäät hyvin. Myssyn korkeus luomisreunasta mitattuna on n. 35 cm. Taita alimmat 12 cm ylös työn päälle. |
||||||||||||||||
Ruutupiirroksen selitykset |
||||||||||||||||
|
||||||||||||||||
 |
||||||||||||||||
Oletko tehnyt tämän mallin?Tägää tällöin kuviasi #dropspattern #carefornaturehat tai lähetä kuvat #dropsfan galleriaan. Tarvitsetko apua tämän ohjeen kanssa?Löydät 13 ohjevideota, kommentteja/kysymyksiä ja muuta osoitteessa www.garnstudio.com © 1982-2026 DROPS Design A/S. Pidätämme kaikki oikeudet. Tämä tiedosto ja kaikki sen alatiedostot on suojattu tekijänoikeuslailla. Lue lisää siitä, mitä voit tehdä ohjeillamme, verkkosivujemme jokaisen ohjeen alaosasta. |
||||||||||||||||


DROPS Design on toiminut neule- ja virkkausalalla yli 40 vuotta ja meillä on yksi kaikkein laajin valikoima ilmaisia ohjeita verkossa - käännettynä 17 kielelle. Tänään meiltä löytyy 324 lehteä ja 12290 ohjetta - joista 11709 ohjetta on käännetty suomeksi.
Työskentelemme ahkerasti, jotta voisimme antaa teille kaikkein parhaimpia neule- ja virkkausohjeita, inspiraatiota ja neuvoja sekä korkealaatuisia lankoja todella edulliseen hintaan! Haluaisitko käyttää ohjeitamme muuhun kuin henkilökohtaiseen käyttöön? Voit lukea säännöistä ohjeiden Tekijänoikeus -tekstissä, joka löytyy kaikkien ohjeidemme alapuolelta. Hauskoja hetkiä käsitöiden parissa!
Lisää kommentti ohjeeseen DROPS 214-33
Haluamme mielellämme kuulla mielipiteesi tästä ohjeesta!
Mikäli haluat esittää kysymyksen, valitse oikea kategoria alla olevasta valikosta - tällä tavoin saat vastauksen nopeammin. Pakolliset kentät on merkitty tähdellä *.