
Suositut kategoriat
Etsitkö tiettyä lankaa?


Kommentit / Kysymykset (27)
![]() María Gonzalez kirjoitti:
María Gonzalez kirjoitti:
"Comenzar en el 4º punto bajo y trabajar a partir de la 3ª vuelta de los diagramas de la manera siguiente: Trabajar A.2a en el punto bajo..." me quedé aauí porque no se como identificar ese 4to punto bajo, desde donde se empieza a contar? con el video me fue muy bien y entiendo basicamente el gráfico pero esto no lo entendí, gracias por su ayuda
25.10.2020 - 20:45DROPS Design vastasi:
Hola Maria! Debes contar el 4º punto bajo antes de la esquina (hay 3 arcos de cadenas antes de la esquina) y comenzar aqui. Buen trabajo!
19.11.2020 - 09:16
![]() Sharon Beck kirjoitti:
Sharon Beck kirjoitti:
I have written out the instructions for this pattern. Would you be willing to publish them on your website? I see that several people have requested them.
05.06.2020 - 00:40DROPS Design vastasi:
Dear Mrs Beck, thanks for your feedback, there are already 2 videos to this pattern so that it is very easy to follow them. Happy crocheting!
05.06.2020 - 12:01
![]() Deborah Baxter kirjoitti:
Deborah Baxter kirjoitti:
Is there a written pattern somewhere? I don’t understand diagrams. It’s a beautiful blanket and I would love to crochet this but unfortunately diagrams aren’t my thing. I think there’s probably a lot of people who don’t understand diagrams.
28.06.2019 - 18:10DROPS Design vastasi:
Dear Deborah, unfortunately we cannot accomondate every wish about pattern writing. Our patterns are available in many languages, and we found the best way to give the pattern to everyone in chart forms. Charts do have their advantages, you can see not only a row (and what comes right after a stitch), but you can also see the relations of stitches to each other, and how rows should follow one another. It is not that difficult to memorize the explanation of the stitches (after a few repeats the mind remembers almost automatically). If you are still stuck, remember, you can always ask for help in person in the store where you bought your DROPS yarn from. Happy Crafting!
28.06.2019 - 21:25
![]() Sarah kirjoitti:
Sarah kirjoitti:
Het derde symbool werd verkeerd vertaald vanuit het Engels: " 1 double crochet around chain stitch space/between 2 trebles". Dit werd vertaald naar halve vaste, maar moet een vaste zijn rond de lossenlus. Ook in het filmpje is te zien dat de persoon een vaste haakt....
30.04.2019 - 14:09
![]() Olga Jaén Pareja kirjoitti:
Olga Jaén Pareja kirjoitti:
Ustedes dicen que la lana que hay que utilizar es una del grupo C, pero luego indican utilizar una aguja del 3,5mm. ¿Es correcto esto?
30.03.2019 - 12:55DROPS Design vastasi:
Hola Olga. Lo importante es la tensión del tejido, en este caso 18 puntos altos x 10.5 filas = 10 cm x 10 cm. El tamaño de la aguja es orientativo.
02.04.2019 - 14:56
![]() Diane kirjoitti:
Diane kirjoitti:
I've been crocheting for several decades, and I have no issues reading standard charts, but the instructions here are about as incomprehensible as they come and very confusing. As far as I can tell, round 1 ring is 4 chains, but then what? What stitches and how many in the ring?? If I can't even get it started, then I may just have to find another pattern, this is a Christmas project, I don't have a lot of time to waste deciphering this :-/ Thanks
08.10.2017 - 22:26DROPS Design vastasi:
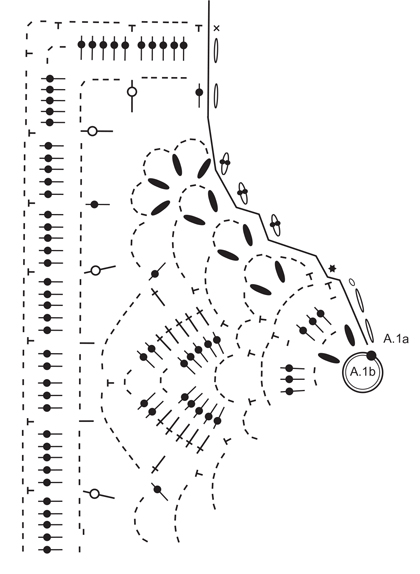
Dear Diane, after the initial circle made from 4 chain stitch, and closed with a slip stitch, you do 3 treble (UK)/ double (US) (this is ahown in A.1a). [*Then two treble (UK) / double (US) crocheted together, 2 chain stitch.* Repeat *-* one more time (this is A.1b)]. Then repeat [-] 4 times, then close the round with a lip stitch. And so on. A.1 only shows the stitches that are used in order to raise the row to the next level. A1.b is repeated 4 times in the round. I hope this helps. Happy Crocheting!
08.10.2017 - 23:09
![]() Kathleen kirjoitti:
Kathleen kirjoitti:
The diagrams are fine as far as they go, however they don't go nearly far enough. In fact, after following the first snippet of diagram shown, it's nearly impossible to figure out where you are. Those who are having problems with the diagrams (and I've followed diagrams for years), it's not you, it's the creator of the diagram.
26.03.2017 - 17:00DROPS Design vastasi:
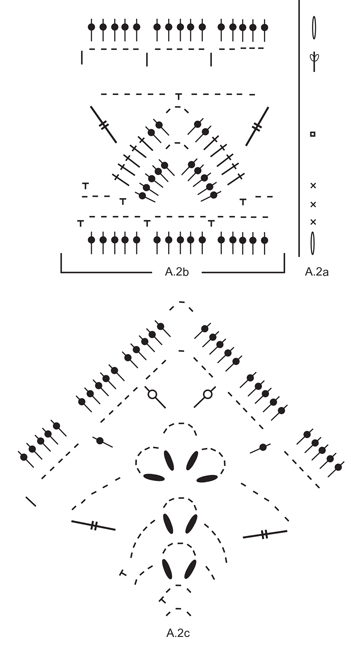
Dear kathleen, in A.1 you just repeat 4 times A.1b in the round, in A.2a-A.2c work A.2b along the sides and A.2c in the corner, A.2a is only showing how to start/finish the round. Happy crocheting!
27.03.2017 - 10:17
![]() Michelle Achee kirjoitti:
Michelle Achee kirjoitti:
Is there a written pattern for this? I bought the wool thinking it would have a regular written pattern, but all I see is a diagram which I cannot understand. Very frustrated.
22.02.2017 - 20:32DROPS Design vastasi:
Dear Mrs Achee, there is only diagram to this pattern, each symbol is matching a st/group of sts and is explaining under diagram text. For any further personnal assistance you are welcome to contact the DROPS store where you bought your yarn, they would be able to assist you, even per mail or telephone. Happy crocheting!
23.02.2017 - 09:51
![]() Naty Gagnon kirjoitti:
Naty Gagnon kirjoitti:
Merci, pas nécessairement en vidéo mais comme le tutoriel de drops children 24-6, tour par tour par écrit pas en diagramme. Merci.
30.01.2017 - 19:54
![]() Naty Gagnon kirjoitti:
Naty Gagnon kirjoitti:
Bonjour, je viens de commencer ce modèle et j'ai un peu de difficulté avec les diagrammes, auriez-vous les explications tour après tour comme pour le patron DROPS children 24-6 (Lovely Lily) que j'ai réussi avec succès. En passant votre site est merveilleux.
30.01.2017 - 03:46DROPS Design vastasi:
Bonjour Mme Gagnon, votre demande a bien été enregistrée, en attendant la vidéo, vous pouvez suivre le diagramme en vérifiant bien la légende de chaque symbole: A.1a = début/fin de chaque tour, A.1b = à répéter pour former le carré. Bon crochet!
30.01.2017 - 12:08
|
|||||||||||||||||||||||||||||||||||||||||||||||||
Orient Dream#orientdreamblanket |
|||||||||||||||||||||||||||||||||||||||||||||||||
 |
 |
||||||||||||||||||||||||||||||||||||||||||||||||
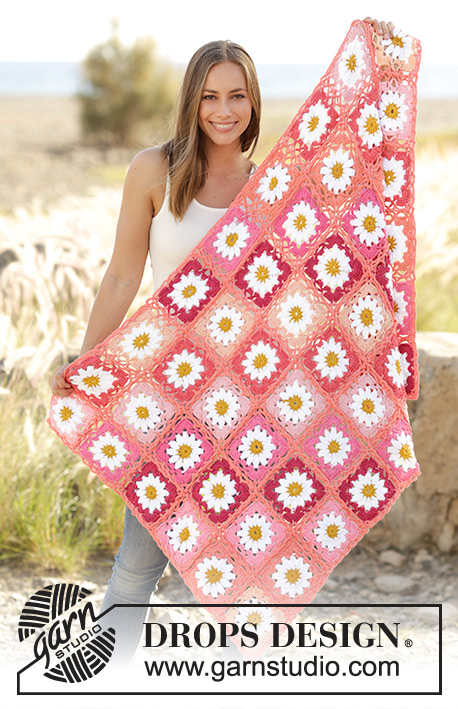
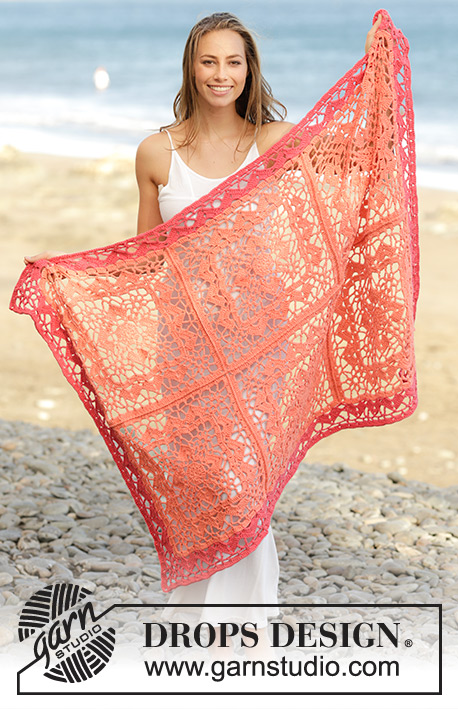
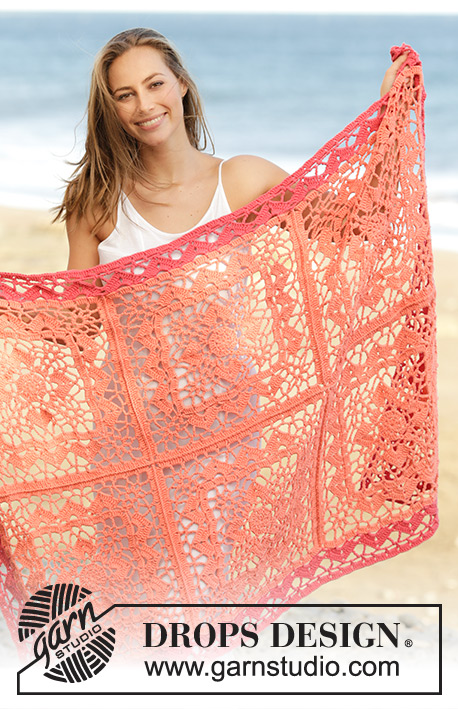
Virkattu pitsipeitto DROPS Paris-langasta.
DROPS 175-10 |
|||||||||||||||||||||||||||||||||||||||||||||||||
|
MALLIVIRKKAUS: Katso piirrokset A.1 ja A.2. ---------------------------------------------------------- PEITTO: Virkkaa 6 ruutua ja virkkaa sitten ruudut yhteen. Virkkaa lopuksi reunus peiton ympäri. VIRKATTU RUUTU: Virkkaa koukulla nro 3,5 ja aprikoosin värisellä langalla mallivirkkausta piirroksen A.1b mukaisesti (yht. 4 mallikertaa kerroksella, piirros A.1a näyttää miten kerros alkaa ja loppuu) ja virkkaa vielä mallivirkkausta piirroksen A.1b mukaisesti. TARKISTA VIRKKUUTIHEYS! Kun olet virkannut piirrokset A.1a ja A.1b loppuun, ruudun mitat ovat n. 24 x 24 cm. Katkaise lanka. Aloita 4. kiinteästä silmukasta ennen ruudun kulmaa ja virkkaa piirrosten 3.kerrokselta alkaen näin: Virkkaa kiinteään silmukkaan piirroksen A.2a mallivirkkausta (piirros A.2a näyttää miten kerros alkaa ja loppuu), virkkaa ensimmäisten 3 ketjusilmukkakaaren kohdalla piirroksen A.2b mallivirkkausta, *virkkaa piirroksen A.2c mallivirkkausta (= kulma), virkkaa seuraavien 9 ketjusilmukkakaaren kohdalla piirroksen A.2b mallivirkkausta (= 3 mallikertaa)*, toista *-* vielä 2 kertaa, virkkaa kulmaan piirroksen A.2c mallivirkkausta ja virkkaa jäljellä olevien 6 ketjusilmukkakaaren kohdalla piirroksen A.2b mallivirkkausta (= 2 mallikertaa). Kun olet virkannut piirrokset A.2a-A.2c loppuun, katkaise lanka ja päättele langanpäät. Ruudun mitat ovat n. 39 x 39 cm. Virkkaa vielä 5 ruutua tähän tapaan = yht. 6 ruutua. VIIMEISTELY: Viimeistele nyt ruudut virkkaamalla ne yhteen molempien kerrosten läpi aprikoosin värisellä langalla näin: Aseta 2 ruutua nurjat puolet vastakkain, kiinnitä lanka virkkaamalla 1 kiinteä silmukka kulman ketjusilmukkakaareen, *virkkaa 1 kiinteä silmukka (molempien kerrosten läpi) seuraavaan pylvääseen, 2 ketjusilmukkaa, jätä 1 pylväs väliin*, toista *-* kunnes olet yhdistänyt koko sivun, virkkaa 1 kiinteä silmukka ketjusilmukkakaareen. Toista muissa ruuduissa siten, että saat kaksi kolmen ruudun kaitaletta. Virkkaa sitten kaitaleet yhteen siten, että saat 2 x 3 ruudun kokoisen neliön. Katso mittapiirros. REUNUS: Virkkaa reunus työn ympäri korallin värisellä langalla. Virkkaa aluksi 1 kiinteä silmukka kulman ketjusilmukkakaareen ja virkkaa sitten piirrosten 2.kerrokselta alkaen näin: HUOM: Virkkaa piirroksen 2.kerroksella 1 kiinteä silmukka 2 ruudun rajakohtaan (eli kohtaan, jossa ruudut virkattiin yhteen), eikä 1 kiinteä silmukka jokaisen ruudun kulman ketjusilmukkakaareen. Ruutujen jokaiseen sivuun tulee tällöin 15 ketjusilmukkakaarta. Virkkaa piirroksen A.2a mallivirkkausta (näyttää miten kerros alkaa ja loppuu), *virkkaa piirroksen A.2b mallivirkkausta, kunnes olet peiton seuraavan kulman kohdalla, virkkaa piirroksen A.2c mallivirkkausta (= kulma)*, toista *-* vielä 3 kertaa. Jatka mallivirkkausta tähän tapaan. Kun olet virkannut piirrokset A.2a-A.2c loppuun, katkaise lanka ja päättele langanpäät. |
|||||||||||||||||||||||||||||||||||||||||||||||||
Ruutupiirroksen selitykset |
|||||||||||||||||||||||||||||||||||||||||||||||||
|
|||||||||||||||||||||||||||||||||||||||||||||||||
 |
|||||||||||||||||||||||||||||||||||||||||||||||||
 |
|||||||||||||||||||||||||||||||||||||||||||||||||
 |
|||||||||||||||||||||||||||||||||||||||||||||||||
Oletko tehnyt tämän mallin?Tägää tällöin kuviasi #dropspattern #orientdreamblanket tai lähetä kuvat #dropsfan galleriaan. Tarvitsetko apua tämän ohjeen kanssa?Löydät 12 ohjevideota, kommentteja/kysymyksiä ja muuta osoitteessa www.garnstudio.com © 1982-2026 DROPS Design A/S. Pidätämme kaikki oikeudet. Tämä tiedosto ja kaikki sen alatiedostot on suojattu tekijänoikeuslailla. Lue lisää siitä, mitä voit tehdä ohjeillamme, verkkosivujemme jokaisen ohjeen alaosasta. |
|||||||||||||||||||||||||||||||||||||||||||||||||


DROPS Design on toiminut neule- ja virkkausalalla yli 40 vuotta ja meillä on yksi kaikkein laajin valikoima ilmaisia ohjeita verkossa - käännettynä 17 kielelle. Tänään meiltä löytyy 324 lehteä ja 12239 ohjetta - joista 11636 ohjetta on käännetty suomeksi.
Työskentelemme ahkerasti, jotta voisimme antaa teille kaikkein parhaimpia neule- ja virkkausohjeita, inspiraatiota ja neuvoja sekä korkealaatuisia lankoja todella edulliseen hintaan! Haluaisitko käyttää ohjeitamme muuhun kuin henkilökohtaiseen käyttöön? Voit lukea säännöistä ohjeiden Tekijänoikeus -tekstissä, joka löytyy kaikkien ohjeidemme alapuolelta. Hauskoja hetkiä käsitöiden parissa!
Lisää kommentti ohjeeseen DROPS 175-10
Haluamme mielellämme kuulla mielipiteesi tästä ohjeesta!
Mikäli haluat esittää kysymyksen, valitse oikea kategoria alla olevasta valikosta - tällä tavoin saat vastauksen nopeammin. Pakolliset kentät on merkitty tähdellä *.