
Suositut kategoriat
Etsitkö tiettyä lankaa?


Kommentit / Kysymykset (17)
![]() Monica Panera kirjoitti:
Monica Panera kirjoitti:
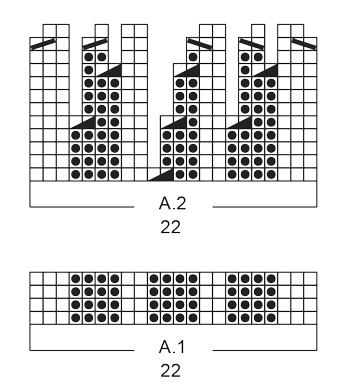
Buongiorno, ho difficoltà a capire lo schema A2 della fascia per capelli che sto facendo Warm Lavender modello:ee-536 Quando nello schema non vi sono quadratini che spiegano il punto da fare ma c'è il vuoto cosa significa? Che il punto è da passare sull'altro ferro senza lavorarlo? Aspetto una vostra gentile risposta.Grazie
12.12.2018 - 16:49DROPS Design vastasi:
Buongiorno Monica. Trova un vuoto perchè al ferro precedente è stata diminuita una maglia. Quando incontra il vuoto, deve lavorare la maglia come indicato nel quadratino successivo. Quindi per es., alla riga 6 del diagramma A2 (riga lavorata sul rovescio, quindi si legge da sinistra verso destra), lavora: 3 m rovescio, 3 m diritto, 2 maglie rovescio e così via. Buon lavoro!
12.12.2018 - 17:02
![]() Alva kirjoitti:
Alva kirjoitti:
Hur många masker ska man lägga upp om man har 4mm stickor och garn till stickorna?
23.02.2018 - 21:35DROPS Design vastasi:
Hei Alva. Oppskriften er skrevet til pinne 7 og Eskimo ... et garn som er tykkere og koster ca 15 kr for 50 gr ... kanske du skulle bytte garn - da blir den myk og fin og du kan bruke oppskriften :) Go Fornøyelse.
24.02.2018 - 09:34
![]() Sandra kirjoitti:
Sandra kirjoitti:
What is meant by: K YO twisted on next row & P YO twisted on next row?
25.11.2017 - 22:47DROPS Design vastasi:
Hi Sandra, To avoid a hole after increasing by making a yarn over (YO) you need to work them twisted. Either this will be knitted twisted or purled twisted depending on the pattern. To work twisted you need to insert the needle in the back loop of the stitch, rather than the front. I hope this helps. Happy knitting!
26.11.2017 - 06:49
![]() Sandra kirjoitti:
Sandra kirjoitti:
Part 2: I am so confused! YouTube person says that when you are reading charts in the round, everything is always read from Right to Left. So what is the right way?
23.11.2017 - 01:03DROPS Design vastasi:
Dear Sandra, that's right, diagrams will be read here from the right towards the left every round (= you are working here in the round, ie from RS) starting on the bottom corner on the right side. Read more here. Happy knitting!
23.11.2017 - 08:35
![]() Sandra kirjoitti:
Sandra kirjoitti:
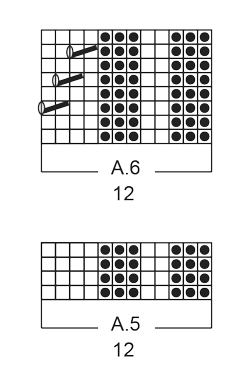
Part 1: A friend of mine read chart A.6 as this: "I'm looking at that exact pattern and this particular chart A6 is just k2tog, yo, k, k. The cable is worked in chart A3. In laments terms this would read: R1: p4, k3, p2, k3 R2: p3, k2, p3, k2tog, yo, k2 R3: p4, k3, p2, k3 R4: p3, k2, p3, k1, k2tog, yo, k1 R5: p4, k3, p2, k3 R6: p3, k2, p3, k2, k2tog, yo R7: p4, k3, p2, k3 R8: p3, k2, p3, k4" Is this correct?
23.11.2017 - 01:02DROPS Design vastasi:
Dear Sandra, start reading diag. from the bottom corner on the right side towards the left on every round (from RS), so that on row 3 in A.3 work the cable (previous and next rows are K from RS) and work row 3 in A.6 as follows: P3, K2, P3, K2, K2 tog, YO. When diagrams are done in height, repeat from row 1. Happy knitting!
23.11.2017 - 08:33
![]() Sandra kirjoitti:
Sandra kirjoitti:
Hi again...sorry for bugging you. In chart A6 of the neck warmer pattern - 1 slant from Right to Left over 2 squares then a yarn over is a cable (right?). How does this work? Slip 2 sts onto a cable needle (to the front or back yarn over then yarn over then knit from the cable?
22.11.2017 - 01:33DROPS Design vastasi:
Dear Sandra, the symbol used in A.6 with a slant line is 3rd symbol under diagram text, ie Knit 2 stitches together (and then make a YO (= 5th symbol) to compensate this dec). Happy knitting!
22.11.2017 - 09:10
![]() Sandra Delamont kirjoitti:
Sandra Delamont kirjoitti:
I have just finished the headband successfully after numerous attempts. I am very new to knitting and reading charts in patterns - so this is my first. When I look at the picture the neck warmer I see cable patterns. However, when I read the chart and words there is no mention of slipping stitches onto cable needles. What am I missing in the chart/directions? Can you please help me? Thanks. Sandra
11.11.2017 - 20:19DROPS Design vastasi:
Hi Sandra, The diagram A6 has the cables - just 2 this time (the sloping lines over 2 squares) and A6 is worked after you have worked A5 for 4 cm. You work A6 until the neck warmer measures 20-22 cm and then A5 for another 4 cm. I hope this helps and happy knitting!
12.11.2017 - 06:33
|
|||||||||||||||||||||||||
Warm Lavender |
|||||||||||||||||||||||||
|
|
|||||||||||||||||||||||||
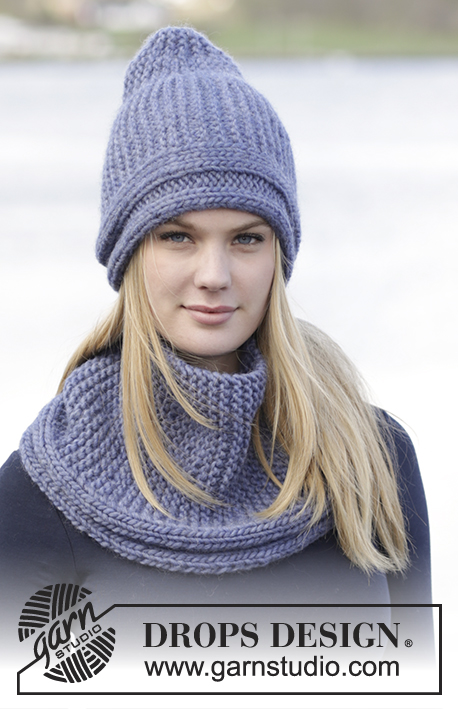
Settiin kuuluu: Joustinneuleiset DROPS otsanauha ja kauluri ”Snow”-langasta.
DROPS Extra 0-1234 |
|||||||||||||||||||||||||
|
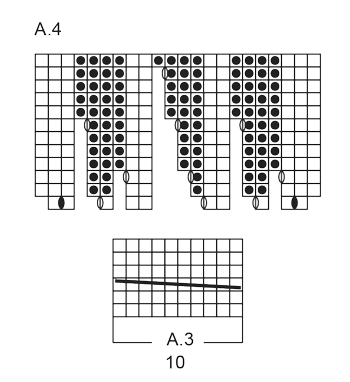
AINAOIKEINNEULE tasona: Neulo kaikki kerrokset oikein. MALLINEULE: Katso ruutupiirrokset A.1-A.6. Piirrokset näyttävät mallineuletta oikealta puolelta katsottuna. ---------------------------------------------------------- OTSANAUHA: Neulotaan tasona. Luo 22 s puikoille nro 7 Snow-langalla. Neulo 2 krs AINAOIKEAA (kts. selitys yllä). Neulo sitten mallineuletta piirroksen A.1 mukaisesti (= 22 s). TARKISTA NEULETIHEYS! Toista piirroksen A.1 mallikertaa, kunnes työn pituus on 14-15-16 cm ja olet viimeksi neulonut nurjan puolen krs:n. Neulo nyt piirroksen A.1 mallineuleen silmukoilla mallineuletta piirroksen A.2 mukaisesti. Kun olet neulonut piirroksen A.2 loppuun, työssä on 10 s. Jatka neulomalla mallineuletta piirroksen A.3 mukaisesti. Kun olet neulonut piirroksen A.3 loppuun, neulo piirroksen A.3 mallineuleen silmukoilla mallineuletta piirroksen A.4 mukaisesti. Langankierroilla neulotaan kiertäen mallineuletta. Kun olet neulonut piirroksen A.4 loppuun, työssä on 22 s. Neulo mallineuletta piirroksen A.1 mukaisesti, kunnes työn pituus on 48-50-52 cm. Neulo 2 krs ainaoikeaa. Päätä s:t. Ompele luomis- ja päätösreuna yhteen. ---------------------------------------------------------- KAULURI: Neulotaan suljettuna neuleena pyöröpuikolla. Luo 72-84 s pyöröpuikolle nro 8 Snow-langalla. Toista piirroksen A.5 mallikertaa (= 12 s) yht. 6-7 kertaa krs:lla. Kun työn korkeus on 4 cm, neulo piirroksen A.5 mallineuleen silmukoilla mallineuletta piirroksen A.6 mukaisesti. TARKISTA NEULETIHEYS! Kun työn korkeus on 20-22 cm ja olet neulonut kokonaisen piirroksen A.6 mallikerran loppuun, neulo piirroksen A.6 mallineuleen silmukoilla mallineuletta piirroksen A.5 mukaisesti. Päätä loput s:t kerralla, kun työn korkeus on 24-26 cm. |
|||||||||||||||||||||||||
Ruutupiirroksen selitykset |
|||||||||||||||||||||||||
|
|||||||||||||||||||||||||
 |
|||||||||||||||||||||||||
 |
|||||||||||||||||||||||||
 |
|||||||||||||||||||||||||
Oletko tehnyt tämän mallin?Tägää tällöin kuviasi #dropspattern tai lähetä kuvat #dropsfan galleriaan. Tarvitsetko apua tämän ohjeen kanssa?Löydät 19 ohjevideota, kommentteja/kysymyksiä ja muuta osoitteessa www.garnstudio.com © 1982-2026 DROPS Design A/S. Pidätämme kaikki oikeudet. Tämä tiedosto ja kaikki sen alatiedostot on suojattu tekijänoikeuslailla. Lue lisää siitä, mitä voit tehdä ohjeillamme, verkkosivujemme jokaisen ohjeen alaosasta. |
|||||||||||||||||||||||||


DROPS Design on toiminut neule- ja virkkausalalla yli 40 vuotta ja meillä on yksi kaikkein laajin valikoima ilmaisia ohjeita verkossa - käännettynä 17 kielelle. Tänään meiltä löytyy 324 lehteä ja 12290 ohjetta - joista 11712 ohjetta on käännetty suomeksi.
Työskentelemme ahkerasti, jotta voisimme antaa teille kaikkein parhaimpia neule- ja virkkausohjeita, inspiraatiota ja neuvoja sekä korkealaatuisia lankoja todella edulliseen hintaan! Haluaisitko käyttää ohjeitamme muuhun kuin henkilökohtaiseen käyttöön? Voit lukea säännöistä ohjeiden Tekijänoikeus -tekstissä, joka löytyy kaikkien ohjeidemme alapuolelta. Hauskoja hetkiä käsitöiden parissa!
Lisää kommentti ohjeeseen DROPS Extra 0-1234
Haluamme mielellämme kuulla mielipiteesi tästä ohjeesta!
Mikäli haluat esittää kysymyksen, valitse oikea kategoria alla olevasta valikosta - tällä tavoin saat vastauksen nopeammin. Pakolliset kentät on merkitty tähdellä *.