
Suositut kategoriat
Etsitkö tiettyä lankaa?


Kommentit / Kysymykset (16)
![]() Sharon kirjoitti:
Sharon kirjoitti:
Any suggestion on how I could make this a bit wider? This was a funn project. Instruction was easy to follow. S
06.12.2021 - 16:33DROPS Design vastasi:
Hi Sharon, If you cast on more stitches then the head band will be wider. Just make sure the number of stitches is divisible by 3 + 2. Happy knitting!
07.12.2021 - 07:03
![]() Stephanie Bedard kirjoitti:
Stephanie Bedard kirjoitti:
Hi there, I am stuck at the middle part! Here’s the part of the pattern I’m having issues with: ROW 5: K 1 edge st, * 1 YO, K 2 in next st *, repeat from *-* 4 times in total and finish with K 1 edge st = 14 sts on needle I had 6 sts on my needle as mentioned after decreasing on row 1 as expected, but when increasing at row 5, I am left with only 11 sts and not 14. Is there any troubleshooting possible here ? Thank you!!
03.12.2021 - 18:29DROPS Design vastasi:
Dear Stephanie, you have 2 edge stitches on each side + 4 YO + 2x4=8 sts. So in total you have 14 stitches. You k2 in each of the 4 sts between the edge stitches, so you increase one stitch in each stitch. Happy knitting!
05.12.2021 - 17:27
![]() Sharon kirjoitti:
Sharon kirjoitti:
What is the correct size needles to make the headband. A size 10,75 give a head band hard like a board. This cannot be the correct needles. Is the size give in the pattern correct.
26.11.2021 - 18:29DROPS Design vastasi:
Dear Sharon, everyone knits with a different gauge, Pleade make a swatch and use the needles with which you can achieve the knitting tension goven in the pattern. Happy Stitching!
28.11.2021 - 00:26
![]() Sharon kirjoitti:
Sharon kirjoitti:
Hi, looking to start the headband an am confused on how to join the back invisible using kitichner stitch. The first time I made this 3 needle bind off was the solution but it was not invisible and an unhappy with the results. The one am working on now is a Christmas gift so it has to be prefect. So my question again is how do I kitichner the back to make it invisible? Thanks for your response.
26.11.2021 - 09:33DROPS Design vastasi:
Dear Sharon, this video shows how to sew together patterns such as rib in this pattern and should help you to finish your piece. Happy finishing!
26.11.2021 - 15:46
![]() Pru kirjoitti:
Pru kirjoitti:
Hello- on knitting the headband as per the instructions...i get a 'seed stitch' pattern...ive ripped out and started 5 times now...am i reading this wrong? please help me...thank you!!
07.12.2019 - 22:19DROPS Design vastasi:
Dear Pru, check your number of stitches (you should have 14) and remember to work with 1 edge stitch in garter stitch in each side.On row 1, work: K1 (edge st), then (K1, P1, K1) until 1 stitch remain, K the last st. On row 2, work: K1 (edge st), then repeat: (P1, K1, P1) until last st remain, K last st. Repeat rows 1 and 2. Happy knitting!
09.12.2019 - 08:54
![]() Tanja Kroczek kirjoitti:
Tanja Kroczek kirjoitti:
Hallo Zusammen! Ich stricke gerade das Stirnband. Nach dem 1. Absatz "Wie folgt weiterstricken" steht unter dem 1. Punkt: 6 Maschen übrig, was passiert damit?
02.02.2019 - 12:16DROPS Design vastasi:
Liebe Frau Kroczek, bei der 1. Hin-Reihe hier nehmen Sie Maschen ab (= 2 M so abheben als würden sie re zusgestr, 1 M re, die 2 abgehobenen M überziehen), am Ende dieser Reihe sind es nur noch 6 Maschen auf der Nadel. Viel Spaß beim stricken!
04.02.2019 - 11:06
![]() Nagymama kirjoitti:
Nagymama kirjoitti:
Pedig automatával könnyebb és mindenekelőtt pontosabb lenne a fordítás! Egyszer kell jól beprogramozni, és onnantól kezdve nem hibázik. Nem úgy, mint... na mindegy, szóval a leírás még mindig nem jó, mert van ám 6. meg 7. sora is. Hogy a helyesírásról meg az elírásokról ne is beszéljünk. :(
01.10.2018 - 09:39
![]() Nagymama kirjoitti:
Nagymama kirjoitti:
Már megint rossz a magyar leírás. Nem ez az első eset. Tessenek már végiggondolni, hogy ha a fejpántnál ezt a két sort váltogatjuk, akkor abból milyen minta lesz!
30.09.2018 - 09:34DROPS Design vastasi:
Kedves Nagymama! Köszönjük, hogy felhívta a figyelmünket a hibára, ami így javításra is került. A fordításokat nem automata készíti, így sajnos, a legnagyobb odafigyelés mellett is előfordulhatnak hibák. Célunk, hogy minél pontosabb minták legyenek a weboldalon, ezért mindig köszönettel vesszük, ha jelzést kapunk egy-egy javítani valóról. Sikeres kézimunkázást!
30.09.2018 - 14:52
![]() Gail Thorpe kirjoitti:
Gail Thorpe kirjoitti:
Thank you for your help on pattern #164-27. The tutorial is very helpful. I have another question. I knit the piece in Polaris yarn. Should I block it before I sew it together? The yarn is so plush and heavy that it seems daunting to plunge it under water. Will it be okay to do so? Please give me some detailed instructions. Thank you.
16.06.2017 - 01:11DROPS Design vastasi:
Dear Mrs Thorpe, some knitters block every piece, some others don't. Feel free to contact your DROPS store even per mail or telephone they will have some more individual tipps for you. Happy knitting!
16.06.2017 - 09:12
![]() Anne kirjoitti:
Anne kirjoitti:
Que veux dire, pour le rang 2 du tour de cou: i m lis à l'end. Que veux dire lis???je n'ai jamais pu trouver l'explication! Merci
01.03.2017 - 19:52DROPS Design vastasi:
Chere Anne, 1 maille lis est la premiere maille du rang. Parfois elle est tricotee autrement que les autres mailles pour que le bord du tricot soit esthetique et facile a assemler a la fin. Bon tricot!
01.03.2017 - 20:27
|
|
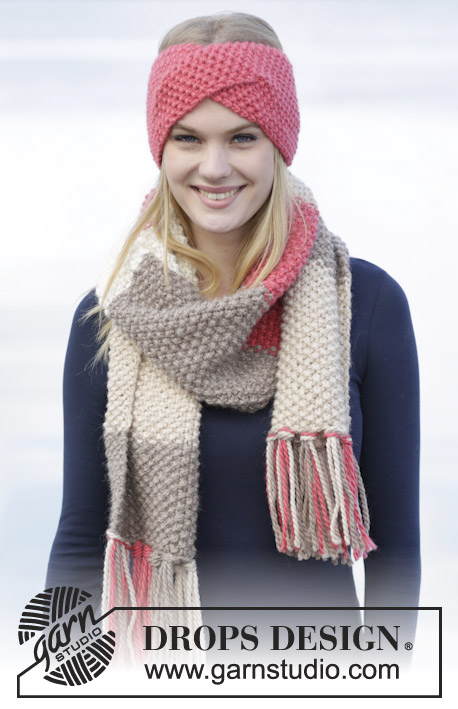
What A Sight!#whatasightset |
|
|
|
|
Settiin kuuluu: Joustinneuleiset DROPS otsanauha ja kauluri ”Polaris”-langasta.
DROPS 164-27 |
|
|
OTSANAUHA: Luo 14 s puikoille nro 7 Polaris-langalla ja neulo seuraavasti: 1. krs (= nurja puoli): 1 reunas oikein, *1 o, 1 n, 1 o*, toista *-* yht. 4 kertaa ja neulo lopuksi 1 reunas oikein. 2. krs (= oikea puoli): 1 reunas oikein, *1 n, 1 o, 1 n*, toista *-* yht. 4 kertaa ja neulo lopuksi 1 reunas oikein. Toista krs:t 1.- 2., kunnes työn pituus on n. 23 cm ja olet viimeksi neulonut nurjan puolen krs:n. TARKISTA NEULETIHEYS! Jatka neulomalla seuraavasti: 1. krs (= oikea puoli): 1 reunas oikein, *nosta 2 s neulomatta kuten neuloisit ne oikein yhteen, 1 o, vedä nostetut s:t neulotun yli*, toista *-* yht. 4 kertaa ja neulo lopuksi 1 reunas oikein = 6 s jäljellä työssä. 2. krs (= nurja puoli): Neulo oikeaa. 3. krs: Neulo oikeaa. 4. krs: Neulo oikeaa. 5. krs: 1 reunas oikein, *1 langankierto, neulo seuraavaan s:aan 2 oikeaa s*, toista *-* yht. 4 kertaa ja neulo lopuksi 1 reunas oikein = 14 s työssä. 6. krs: 1 reunas oikein, *1 o, 1 n, 1 o*, toista *-* yht. 4 kertaa ja neulo lopuksi 1 reunas oikein. HUOM: Langankierrot neulotaan kiertäen, jottei muodostuisi reikää. 7. krs: 1 reunas oikein, *1 n, 1 o, 1 n*, toista *-* yht. 4 kertaa ja neulo lopuksi 1 reunas oikein. Toista krs:t 6. ja 7., kunnes työn pituus on n. 48 cm (tai kunnes työ on halutun pituinen). Päätä s:t joustinneuletta neuloen. Ompele otsanauha yhteen keskeltä takaa uloimmista silmukanreunoista, jotta saumasta tulisi huomaamaton. ---------------------------------------------------------- KAULURI: AINAOIKEINNEULE tasona: Neulo kaikki kerrokset oikein. LANGANVAIHTOVINKKI: Kun vaihdat uuteen Polaris-kerään, jaa edellisen kerän langan viimeiset 15 cm kahteen osaan ja katkaise toinen osa. Tee samoin uuden kerän langalla. Aseta ensimmäiset ja viimeiset 15 cm päällekkäin (lanka on nyt normaalipaksuinen) ja jatka neulomista. Tällä tavoin liitoskohdasta tulee huomaamaton. ---------------------------------------------------------- KAULURI: Neulotaan tasona ja ommellaan lopuksi yhteen. Luo 18-21 s puikoille nro 10 Polaris-langalla. Neulo 4 krs AINAOIKEAA (kts. selitys yllä). Jatka neulomalla joustinneuletta seuraavasti: 1. krs (= oikea puoli): Neulo 2 o, *2 n, 1 o*, toista *-* kunnes jäljellä on 1 s ja neulo lopuksi 1 o. 2. krs (= nurja puoli): 1 reunas oikein, *1 n, 2 o*, toista *-* kunnes jäljellä on 2 s ja neulo lopuksi 1 n ja 1 reunas oikein. Toista krs:t 1.- 2. TARKISTA NEULETIHEYS ja LUE LANGANVAIHTOVINKKI! Kun työn pituus on 23-26 cm, kiinnitä 1 merkki krs:n ensimmäiseen s:aan (oikealta puolelta katsottuna). Neulo kunnes työn pituus on 86-88 cm. Neulo sitten vielä 4 krs ainaoikeaa. Päätä s:t oikein silmukoin työn oikealta puolelta. VIIMEISTELY: Taita kauluri siten, että päätösreuna on luomisreunan ja merkin välissä. Ompele yhteen reunat vastakkain (ompele 1 pisto jokaiseen s:aan). |
|
Oletko tehnyt tämän mallin?Tägää tällöin kuviasi #dropspattern #whatasightset tai lähetä kuvat #dropsfan galleriaan. Tarvitsetko apua tämän ohjeen kanssa?Löydät 19 ohjevideota, kommentteja/kysymyksiä ja muuta osoitteessa www.garnstudio.com © 1982-2026 DROPS Design A/S. Pidätämme kaikki oikeudet. Tämä tiedosto ja kaikki sen alatiedostot on suojattu tekijänoikeuslailla. Lue lisää siitä, mitä voit tehdä ohjeillamme, verkkosivujemme jokaisen ohjeen alaosasta. |


DROPS Design on toiminut neule- ja virkkausalalla yli 40 vuotta ja meillä on yksi kaikkein laajin valikoima ilmaisia ohjeita verkossa - käännettynä 17 kielelle. Tänään meiltä löytyy 324 lehteä ja 12290 ohjetta - joista 11709 ohjetta on käännetty suomeksi.
Työskentelemme ahkerasti, jotta voisimme antaa teille kaikkein parhaimpia neule- ja virkkausohjeita, inspiraatiota ja neuvoja sekä korkealaatuisia lankoja todella edulliseen hintaan! Haluaisitko käyttää ohjeitamme muuhun kuin henkilökohtaiseen käyttöön? Voit lukea säännöistä ohjeiden Tekijänoikeus -tekstissä, joka löytyy kaikkien ohjeidemme alapuolelta. Hauskoja hetkiä käsitöiden parissa!
Lisää kommentti ohjeeseen DROPS 164-27
Haluamme mielellämme kuulla mielipiteesi tästä ohjeesta!
Mikäli haluat esittää kysymyksen, valitse oikea kategoria alla olevasta valikosta - tällä tavoin saat vastauksen nopeammin. Pakolliset kentät on merkitty tähdellä *.