
Suositut kategoriat
Etsitkö tiettyä lankaa?

















Kommentit / Kysymykset (164)
 Christina kirjoitti:
As soon as I posted my last comment/ question the answer appeared below my original question. It definitely wasnt there before cos I looked carefully. Anyway thank you.
28.09.2026 - 22:06
Christina kirjoitti:
Please could someone answer my question from the 23/9 as it doesnt say which size hook to use for the loops. Is it a 3mm or a 5mm. Really this pattern is not at all clear.
28.09.2026 - 22:03DROPS Design vastasi:
Hi Christina, We have answered your question and you should have been notified via e mail. If you look at the comments and answers at the bottom of the page, you will see our answer - you work the loops with a 5 mm hook. Regards, Drops Team.
29.09.2026 - 06:12
Christina kirjoitti:
I'm about to crochet the loops but it doesnt say what size hook to use. Is it the 3mm or 5mm hook. I take it that I use a 5mm for the ties in chain stitch as I did for the ties at the neck/shoulder.
23.09.2026 - 22:45DROPS Design vastasi:
Hi Christina, Yes, the loops are worked using crochet hook size 5 mm. Regards, Drops Team.
24.09.2026 - 07:29
Christina kirjoitti:
Ok, thanks. I just did slip stitches at the beginning of M2 to get to M3 and also slip stitches at each beginning row of M3 to decrease and for each new shorter row.Your previous reply on 10/9 said to turn when I have done M3. But then when should I do M4? I went straight from M3 to crochet halfway across M4 to the central point and then turned and went crocheted back across M4 and M3. I couldnt see any other way to do it.
23.09.2026 - 22:41
Christina kirjoitti:
Ok, I'll work dble crochet AGAIN along the top of M2 to get to the start of M3 but this will be row 6 of M2. Why doesnt it show this on the graph? But then you say to turn after M3. Dont I have to work M4 after M3 to get to the halfway point. None of this makes any sense to me!
13.09.2026 - 01:17DROPS Design vastasi:
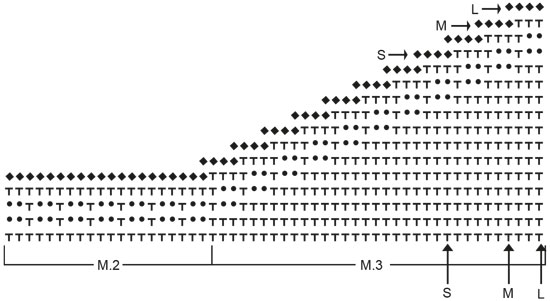
Dear Christina, we don't show it in the chart because you can simply cut the thread and rejoin it in M.3. Otherwise, you could also work slip stitches, to avoid cutting the thread but still stitches small enough that it won't look as if M.2 has a 6th row. The M.3 after this first M.2 is worked as before; however, there is an M.3 which is worked before M.2, at the end of the row, previously. For this M.3, instead of working slip stitches, you simply turn the piece and leave unworked the stitches in the final M.2 (as opposed to the initial M.2, which was explained above). Happy crochetting!
14.09.2026 - 00:06
Christina kirjoitti:
Thanks for your reply but I still dont understand. Im at ghe end of row5 so if I work a double crochet in each M2 stitch now, then I will have two rows of double crochet instead of one as shown on the pattern. It clearly says in the instructions that M2 has only 5 rows. How do I get to the start of M3 without doing another M2 row? There's nothing to say in the instructions.
09.09.2026 - 22:18DROPS Design vastasi:
Dear Christina, at the beginning of the row you work M.2 = 1 dc in each st to the beg of M.3, then when you have done M.3, just turn leaving the last stitches M.2 unworked at the end of the row and continue with M.3 as shown in the diagram. Happy crocheting!
10.09.2026 - 09:45
Christina kirjoitti:
I dont want to break and rejoin the yarn as that's a bit messy but the pattern doesn't show to do any slip stitches to make my way from the end of M2 to the beginning of row 6 of M3.
08.09.2026 - 01:18
Christina kirjoitti:
I dont want to break and rejoin the yarn as that's a bit messy but the pattern doesn't show to do any slip stitches to make my way from the end of M2 to the beginning of row 6 of M3.
07.09.2026 - 22:52
Christina kirjoitti:
Sorry didnt mean to send it twice. I thought it hadnt been sent
07.09.2026 - 22:49
Christina kirjoitti:
I'm at the end of row 5 of M2. How to I get to the beginning of row 6 of M3 and M4? Do I have to break off the yarn and retie each time or can I slip stitch until I get to the start of M3? Also what do I do when I reach the middle of M4? Do I turn and work back and forth over that half and then crochet the other half separately.
07.09.2026 - 22:44DROPS Design vastasi:
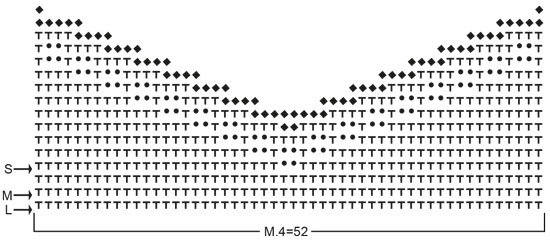
Dear Christina, work 1 double crochet (UK crochet terminology - see 2nd symbol under diagram text) in each stitch in M.2 to M.3 - when you reach the middle of M.4 you will finish each part separately, without breaking yarn just work one side to the end then join yarn again to finish the 2nd side. Happy crocheting!
08.09.2026 - 09:24
|
|||||||||||||
Sidney |
|||||||||||||
 |
 |
||||||||||||
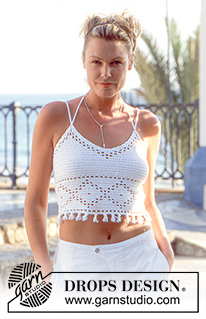
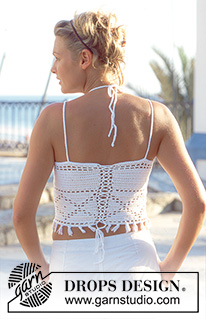
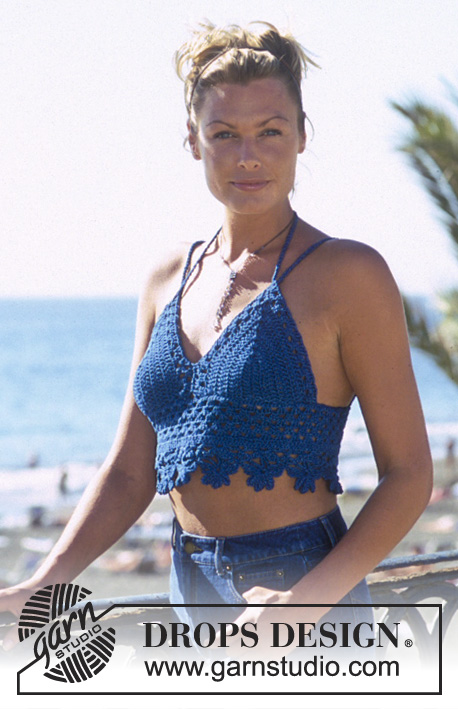
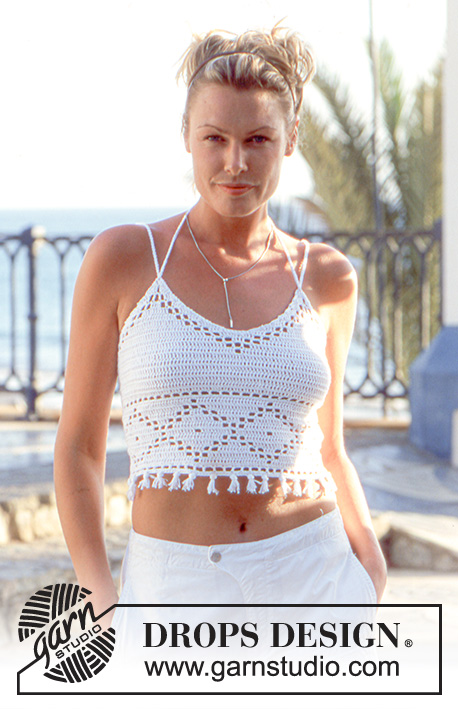
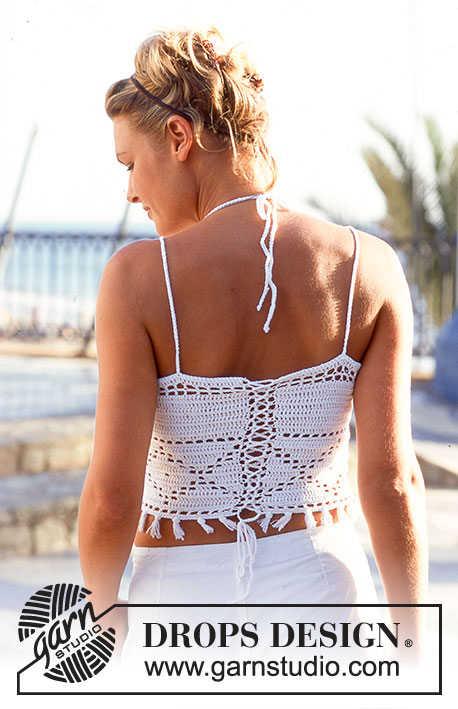
VIRKATTU TOPPI
DROPS 69-1 |
|||||||||||||
|
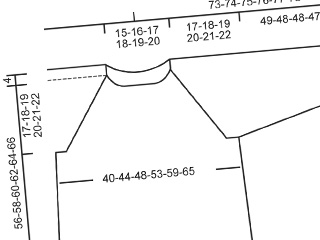
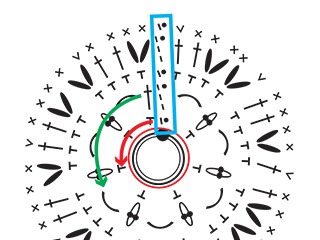
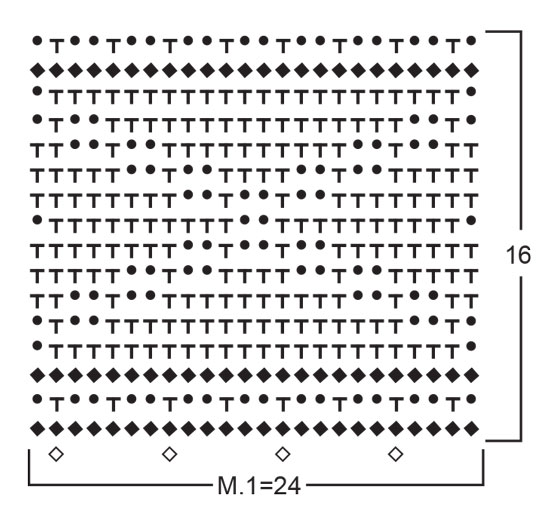
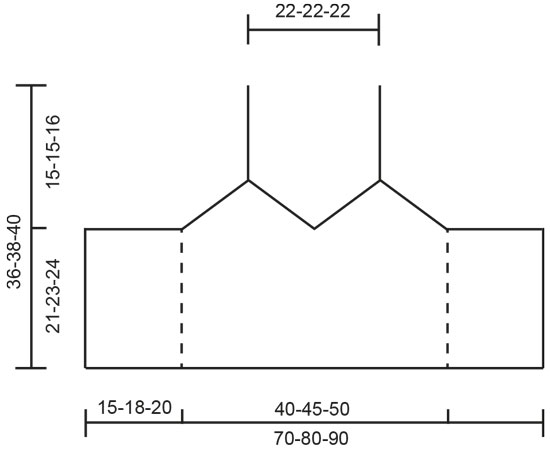
Mallivirkkaus: Virkkaa piirrosten mukaan. Piirrokset 1 ja 2 sisältävät yhden mallikerran. Piirroksista 3 ja 4 käy ilmi miten kavennukset eri ko’oissa virkataan. Huom! Krs:n alussa on 2 kjs =1. p tai 1 kjs = 1. ks. Kun kavennat krs:n alussa, virkkaa piilo-s kavennettavien soiden yli. Tiheys: 24 p ja 12 krs mallivirkkausta koukulla nro 3 = 10x10 cm. Toppi: Virkkaa koukulla nro 3 aloitusketjuun 169-193-217 kjs (sis. 1 kjs kääntymistä varten). Jatka piirroksen M.1 mukaan, ja sen jälkeen ainoastaan p:ita. Samanaikaisesti 1. p-krs:lla lisää kooissa S ja M tasavälein 4 s ja kavenna koossa L 2 s = 172-196-214 s. Virkattuasi yhteensä 22-24-25 krs (sis. M.1), työn pituus on n. 18-20-21 cm, jatka näin: Virkkaa piirroksen 2 mukaan 36-42-48 5:lla, aloita piirroksen alareunasta vasemmasta kulmasta, jatka M.3:n mukaan seuraavilla 24-30-33 s:lla taas vasemmalta oikealle piirroksessa, sitten 52 s piirroksen M.4 mukaan (aloita kyseisen koon nuolesta), seur. 24-30-33 s piirroksen M.3 mukaan, mutta nyt oikeasta reunasta kyseisen koon nuolen kohdalta ja loput 36-42-48 s piirroksen 2 mukaan oikealta vasemmalle. Jatka näin piirroksien mukaan. Virkattuasi 5 krs on piirros 2 valmis, mutta jatka piirrokset 3 ja 4 loppuun. Viimeistely: Olkainnauhat: Virkkaa kaksinkertaisella langalla ja koukulla nro 5. Aloita toisen takakpl:n yläreunasta 9 cm keskitakareunasta ja virkkaa n. 90 cm pitkä kjs-ketju. Pujota nauha etukpl:n vastaavaan kärkeen. Virkkaa toinen nauha samoin. Topin pituutta voi säädellä niskaan solmittavilla nauhoilla. Virkaa kumpaankin takareunaan silmuja: Aloita yläkulmasta, virkkaa *1 ks, 3 kjs, jätä 1 cm väliin*, toista*–*. Virkkaa n.150 cm pitkä kjs-nauha. Pujota nauha silmuihin ylhäältä alas. Hapsut: 1 hapsu = 4 lankaa kukin 8 cm pitkä. Taita langat kaksinkerroin ja kiinnitä alareunan aloituskrs:een piirroksen 1 mukaan. Yhteensä 28-32-36 hapsua. |
|||||||||||||
Ruutupiirroksen selitykset |
|||||||||||||
|
|||||||||||||
 |
|||||||||||||
 |
|||||||||||||
 |
|||||||||||||
 |
|||||||||||||
Oletko tehnyt tämän mallin?Tägää tällöin kuviasi #dropspattern tai lähetä kuvat #dropsfan galleriaan. Tarvitsetko apua tämän ohjeen kanssa?Löydät 8 ohjevideota, kommentteja/kysymyksiä ja muuta osoitteessa www.garnstudio.com © 1982-2026 DROPS Design A/S. Pidätämme kaikki oikeudet. Tämä tiedosto ja kaikki sen alatiedostot on suojattu tekijänoikeuslailla. Lue lisää siitä, mitä voit tehdä ohjeillamme, verkkosivujemme jokaisen ohjeen alaosasta. |
|||||||||||||

DROPS Design on toiminut neule- ja virkkausalalla yli 40 vuotta ja meillä on yksi kaikkein laajin valikoima ilmaisia ohjeita verkossa - käännettynä 17 kielelle. Tänään meiltä löytyy 333 lehteä ja 12537 ohjetta - joista 12023 ohjetta on käännetty suomeksi.
Työskentelemme ahkerasti, jotta voisimme antaa teille kaikkein parhaimpia neule- ja virkkausohjeita, inspiraatiota ja neuvoja sekä korkealaatuisia lankoja todella edulliseen hintaan! Haluaisitko käyttää ohjeitamme muuhun kuin henkilökohtaiseen käyttöön? Voit lukea säännöistä ohjeiden Tekijänoikeus -tekstissä, joka löytyy kaikkien ohjeidemme alapuolelta. Hauskoja hetkiä käsitöiden parissa!
Lisää kommentti ohjeeseen DROPS 69-1
Haluamme mielellämme kuulla mielipiteesi tästä ohjeesta!
Mikäli haluat esittää kysymyksen, valitse oikea kategoria alla olevasta valikosta - tällä tavoin saat vastauksen nopeammin. Pakolliset kentät on merkitty tähdellä *.