
Suositut kategoriat
Etsitkö tiettyä lankaa?


Kommentit / Kysymykset (30)
![]() Andrea kirjoitti:
Andrea kirjoitti:
Hallo, ich würde den Bolero gern für ein Fest stricken, brauche dazu aber ein rein weißes Garn. Welches würdet ihr vorschlagen? Danke Andrea
03.01.2018 - 06:07DROPS Design vastasi:
Liebe Andrea, für persönnliche Hilfe um eine Farbe bzw Garn zu finden, nehmen Sie bitte Kontakt mit Ihrem DROPS Laden auf. Viel Spaß beim stricken!
03.01.2018 - 14:11
![]() Pamela kirjoitti:
Pamela kirjoitti:
Bonjour, Il me reste de la laine 2 pelote de laine air penssez vous que je puisse faire ce modèle?? Car la laine recommandé c'est kid silk
09.02.2017 - 12:42DROPS Design vastasi:
Bonjour Pamela, 1 fil du groupe C (Air par ex) peut remplacer 2 fils du groupe A (comme Kid-Silk ici) - calculez ici la quantité nécessaire. Bon tricot!
09.02.2017 - 13:17
![]() Marian kirjoitti:
Marian kirjoitti:
Thank you for answering my last question. I am crocheting row 2 of the trim so I am almost finished ! My question is about: *5ch, 1 sc in next ch-loop*. Does this mean 1 sc in the very next ch next to the last one.....or first ch in next "section " ? Thank you
16.07.2015 - 02:48DROPS Design vastasi:
Dear Marian, you work 1 sc around the next ch-loop (insert crochet under ch-loop to crochet the sc), then crochet 5 ch, and repeat 1 sc around next ch-loop, 5 ch... Happy crocheting!
27.07.2015 - 14:03Marian kirjoitti:
Question about the increases on the back of this pattern. I understand that I increase at the end of the row. So when it says 1 time do I actually do it twice.....at the end of row and then at the end of the next row ? Thank you.
23.06.2015 - 20:12DROPS Design vastasi:
Dear Marian, you inc 1 time at the end of every row but on each side (back piece), so that when you inc 1 st 1 time at the end of every row, you will inc 1 st on both sides = a total of 2 sts inc on row. Happy knitting!
24.06.2015 - 08:54
![]() Tigermama kirjoitti:
Tigermama kirjoitti:
Hallo ich habe jetzt das vorderteil gemacht werden die Ärmel nur an einer seite abgenommen oder in hin und Rückreihe ? und wie nehme ich das nun mit dem bogen ab das verstehe nicht können sie mir das erklären Lg
14.04.2015 - 13:20DROPS Design vastasi:
Die Abnahmen für den Ärmel machen Sie an beiden Seiten, also immer am Anfang jeder R, d.h. am Anfang der Hin-R und am Anfang der Rück-R. "1x" heißt dabei, dass Sie das 1x in der Hin-R und 1x in der Rück-R machen, also an beiden Seiten 1x. Die Rundung arbeiten Sie nur an der Vorderseite, also nur an einer Seite. Sie nehmen am Rand des Vorderteils 1 M ab (also nicht abketten, wie es dort steht, das wird gleich geändert, sondern durch zusammenstricken neben der äußersten Masche), in jeder 4. R, danach in jeder 2. R und dann in jeder R wie beschrieben.
17.04.2015 - 10:37
![]() Tigermama kirjoitti:
Tigermama kirjoitti:
Halllo ich bin dabei den tollen bolero zu machen, aber ich stecke gerade bei der Zunahme fest. wie ist das gemeint 1. 1mal 2.m 2 mal ich habe die größe 7-8 jahre nur ich komme nicht auf die 130 maschen muss ich das nur auf der vorseite zunehmen oder auch die Rückseite bitte helfen sie mir Lg
30.03.2015 - 10:17DROPS Design vastasi:
Die Zunahmen arbeiten Sie am Ende JEDER R, d.h. an der einen Seite immer am Ende der Rück-R und an der anderen Seite immer am Ende der Hin-R. Zuerst an beiden Seiten jeweils 1 x 1 M (= 2 M insgesamt), dann an beiden Seiten 2 x je 2 M (= 8 M insgesamt), dann an beiden Seiten 2 x je 4 M (= 16 M insgesamt), dann an beiden Seiten 2 x je 6 M = (24 M insgesamt), zuletzt beidseitig 1 x je 10 M (= 20 M insgesamt). Damit haben Sie 2 M + 8 M + 16 M + 24 M + 20 M = 70 M zugenommen. Die Zunahmen arbeiten Sie, indem Sie neue M anschlagen, wie das funktioniert, ist im Video "Seitlich neue M anschlagen" erklärt, im Kopf neben dem Foto.
31.03.2015 - 10:36Wedding Knitter kirjoitti:
Dear Drops, I have 7 of these to knit and I am just finishing the first one and I too decreased 1st "mid-front" but that is wrong? Also, I had to severely edit the decreasing at the front or this part would have been much longer than the back. Please could you help with my next 6 garments by giving Row by row instructions, as with a large stitch it's crucial at each stage. Also, I too found inc for sleeves ambiguous.
31.01.2015 - 12:07DROPS Design vastasi:
Dear Wedding knitter, remember to check and keep your gauge to be sure the front piece will match in length back piece. You first cast on each side of back piece new sts for sleeve then you will cast off/ dec these sts on front piece mirrored. For any individual assistance, please contact your DROPS store. Happy knitting!
02.02.2015 - 09:25
![]() Julie Hehir kirjoitti:
Julie Hehir kirjoitti:
Can you explain the following in more detail: "Dec 1 st towards mid front inside 1 st by k2 tog"? I think it means to decrease in the middle of the row nearer to the seam end of the front piece, but I am not sure where exactly you are placing the decrease stitch in order to shape the front panels of the sweater,
09.10.2014 - 23:40DROPS Design vastasi:
FRONT PIECE 1: ... When piece measures 22-23-25-26 cm dec 1 st towards mid front to shape the front piece – SEE DECREASING TIP ... It means you knit first stitch from front edge, then dec 2 sts and knit rest of the row.
09.10.2014 - 23:45
![]() Astrid Hofmann kirjoitti:
Astrid Hofmann kirjoitti:
Meine Tochter (11 Jahre) hat die Anleitung mit passender Wolle zum Geburtstag geschenkt bekommen. Jetzt sind wir uns nicht ganz sicher, wie das mit den 2 Fäden anschlagen gemeint ist. Sollen wir 2 Knäuel parallel laufen lassen und immer als eine Masche abstricken?
09.02.2014 - 12:31DROPS Design vastasi:
Liebe Astrid, der ganze Bolero wird mit doppeltem Faden, also mit 2 Knäuel, gestrickt.
10.02.2014 - 09:34
![]() Pommes kirjoitti:
Pommes kirjoitti:
Habe das Jäckchen zum Kommunionkleid gestrickt. Sieht sehr schön aus und ging schnell stricken.
02.02.2014 - 09:34
|
|
Ravel Kids#ravelkidsbolero |
|
|
|
|
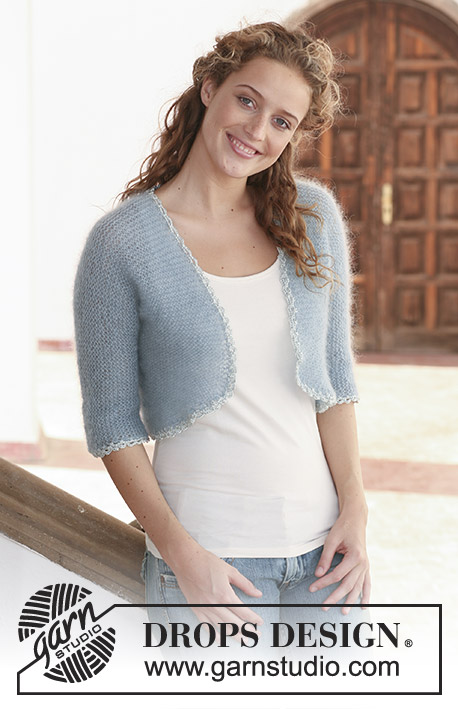
Ainaoikeinneulottu DROPS bolero kaksinkertaisesta ”Kid-Silk” -langasta. Koot 7-14 vuotta.
DROPS 113-9 |
|
|
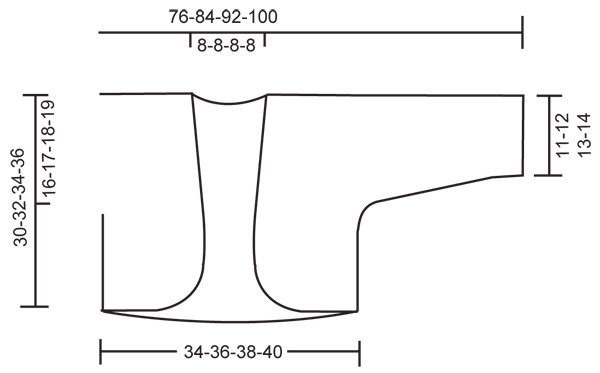
KAVENNUSVINKKI: Kavenna uloimman silmukan sisäpuolella neulomalla toiseksi ja kolmanneksi uloin s oikein yhteen. ---------------------------------------------------------- BOLERO: Neulotaan yhtenä kappaleena. Aloita takakappaleen alareunasta, luo silmukoita hihoja varten, päätä pääntietä varten, päätä sitten hihojen silmukat ja neulo etukappaleet. Työ neulotaan tasona pyöröpuikolla, jotta kaikille silmukoille olisi tilaa. TAKAKAPPALE: Luo pyöröpuikolle nro 5 kaksinkertaisella Kid-Silk -langalla 60-64-66-70 s (sis. 1 reunas kummassakin reunassa). Neulo ainaoikeaa lopulliseen mittaan asti. TARKISTA NEULETIHEYS! Kun työn pituus on 14-15-16-17 cm, luo kumpaankin reunaan silmukoita hihoja varten joka 2. krs (eli jokaisen krs:n loppuun) seuraavasti: 1-1-1-1 x 1 s, 2-2-1-1 x 2 s, 2-2-2-1 x 4 s, 2-1-2-2 x 6 s, 0-1-1-2 x 8 s ja 1 x 10-12-14-15 s = yht. 130-142-156-170 s. Jatka neulomista kunnes työn pituus on 29-31-33-35 cm. Päätä sitten keskimmäiset 14 s pääntietä varten = 58-64-71-78 s jäljellä kummallakin olalla/kummassakin hihassa. Siirrä toisen puolen s:t apulangalle. 1. ETUKAPPALE: = 58-64-71-78 s. Neulo 1 cm ja kiinnitä sitten 1 merkkilanka työhön = olan keskikohta. KAIKKI MITAT OTETAAN JATKOSSA TÄSTÄ! Kun työn pituus on 11-12-13-14 cm, päätä hihojen silmukat. Eli päätä löyhästi hihan alareunasta alkaen joka 2. krs (eli jokaisen krs:n alusta) seuraavasti: 1 x 10-12-14-15 s, 0-1-1-2 x 8 s, 2-1-2-2 x 6 s, 2-2-2-1 x 4 s, 2-2-1-1 x 2 s ja 1-1-1-1 x 1 s = 23-25-26-28 s jäljellä. Kun työn pituus on 22-23-25-26 cm, kavenna kaarevaa etureunaa varten (KS. KAVENNUSVINKKI) 4 krs välein 3-4-4-4 x 1 s, sitten 2 krs välein 4-4-4-6 x 1 s ja vielä jokaisella krs:lla 8-8-8-8 x 1 s = 8-9-10-10 s jäljellä työssä. Päätä loput s:t. 2. ETUKAPPALE: Ota apulangalla odottavat s:t työhön ja neulo ensimmäisen etukappaleen peilikuvaksi. VIIMEISTELY: Taita bolero kahtia olan merkkilangan kohdalta. Ompele sivu- ja hihasaumat yhden reunasilmukan päästä. VIRKATTU REUNUS: Virkkaa boleron aukon reunoihin Cotton Viscose -langalla seuraavasti: 1. KRS: *1 ks, 3 kjs, jätä n. 1 cm väliin*, toista *-* ja virkkaa lopuksi 1 ps kerroksen ensimmäiseen ks:aan. 2. KRS: 2 kjs, 1 ks edellisen krs:n ensimmäiseen kjs-kaareen, *5 kjs, 1 ks seuraavaan kjs-kaareen*, toista *-*, virkkaa lopuksi 5 kjs ja 1 ps kerroksen ensimmäiseen ks:aan. Virkkaa samanlainen reunus kummankin hihan alareunaan. |
|
 |
|
Oletko tehnyt tämän mallin?Tägää tällöin kuviasi #dropspattern #ravelkidsbolero tai lähetä kuvat #dropsfan galleriaan. Tarvitsetko apua tämän ohjeen kanssa?Löydät 13 ohjevideota, kommentteja/kysymyksiä ja muuta osoitteessa www.garnstudio.com © 1982-2026 DROPS Design A/S. Pidätämme kaikki oikeudet. Tämä tiedosto ja kaikki sen alatiedostot on suojattu tekijänoikeuslailla. Lue lisää siitä, mitä voit tehdä ohjeillamme, verkkosivujemme jokaisen ohjeen alaosasta. |


DROPS Design on toiminut neule- ja virkkausalalla yli 40 vuotta ja meillä on yksi kaikkein laajin valikoima ilmaisia ohjeita verkossa - käännettynä 17 kielelle. Tänään meiltä löytyy 324 lehteä ja 12290 ohjetta - joista 11706 ohjetta on käännetty suomeksi.
Työskentelemme ahkerasti, jotta voisimme antaa teille kaikkein parhaimpia neule- ja virkkausohjeita, inspiraatiota ja neuvoja sekä korkealaatuisia lankoja todella edulliseen hintaan! Haluaisitko käyttää ohjeitamme muuhun kuin henkilökohtaiseen käyttöön? Voit lukea säännöistä ohjeiden Tekijänoikeus -tekstissä, joka löytyy kaikkien ohjeidemme alapuolelta. Hauskoja hetkiä käsitöiden parissa!
Lisää kommentti ohjeeseen DROPS 113-9
Haluamme mielellämme kuulla mielipiteesi tästä ohjeesta!
Mikäli haluat esittää kysymyksen, valitse oikea kategoria alla olevasta valikosta - tällä tavoin saat vastauksen nopeammin. Pakolliset kentät on merkitty tähdellä *.